A tilt-and-turn sash is much more convenient than a rotary sash due to the ability to be fixed in ventilation and micro-ventilation modes. The presence of the mechanism allows you not to purchase additional accessories - clamps and opening limiters.
If you have windows with pivoting sashes that you want to turn and tilt, you don’t have to replace the entire window unit. You can expand the functionality of a double-glazed window, which does not provide for ventilation by tilting, by installing special fittings.
It is better to trust the repair and reinstallation of window mechanisms to professionals - specialized companies. Specialists will select components that are compatible with the size of the sash, compatible with the profile, and will install all components with high quality. Independent intervention in the structure can lead to damage to the sash. Eliminating the consequences of unqualified repairs will be expensive.
How to replace fittings with tilt-and-turn ones
The work is carried out on site and takes a minimum of time. Installers remove the opening sash and attach the missing parts for tilting. The tilt-and-turn mechanism consists of several elements located around the perimeter of the window sash and ensuring uniform load distribution when the window is opened. A complete set usually includes:
- scissors;
- tilt-and-turn and strike plates;
- blockers;
- switches;
- constipation;
- handle.
You should choose accessories for a plastic window with the utmost care; it is better to prefer products from reliable manufacturers. Window components from famous brands are durable and ensure trouble-free opening and fixation of the sash in the desired position.
Negative sides
In addition to a large number of advantages, English windows have some negative qualities that cannot be ignored:
- When installing a double-glazed window, the elegance characteristic of this type of glazing will be partially lost, which can be solved by using external jointing of the sashes with decorative overlays (shpros).
- The shutters weigh a lot, especially large double-glazed windows, and the design of English windows involves lifting them manually when opening, which will require some effort, despite part of the weight being compensated by a lifting mechanism.
- The sealing rubbers must be replaced annually, otherwise the tightness of the connection between the sashes and the frame will be lost.
- An English window can only be opened half way, which means that in emergency cases it will be quite difficult for a large person to leave the room.
- Compared to their swing counterparts, English windows are significantly more expensive.
Fittings replacement service from OknaStar
Our company is engaged not only in glazing and the sale of double-glazed windows, but also in the repair and maintenance of PVC windows. We will quickly and efficiently carry out the work of replacing fittings on plastic double-glazed windows and will provide a guarantee for the work performed. Advantages of contacting us:
- constant availability of replacement fittings;
- short deadlines for completing work;
- affordable prices.
We use only high-quality fittings and reliable mechanisms. Repairs are carried out by experienced installers.
The cost of replacement depends on the type of window unit. Our specialist will help you calculate the price. Contact us through the form on the website or by phone, the manager will answer all your questions about repair services and agree on a convenient time for a technician to come out. Our installers travel to any district of Moscow and the Moscow region.
Residents of Moscow and the Moscow region order repair and replacement services for window fittings of plastic, wooden or aluminum windows at affordable prices - from 300 rubles per service .
Window fittings are used to control the window system, so any malfunctions in its operation are perceived critically. Our technicians are ready to professionally eliminate breakdowns in the shortest possible time.
There is only a little left - we insert the glass
Making wooden windows with your own hands
The most important thing in this process is the accurate selection of glass sizes. Thanks to this, cold bridges are not created, and the glass adheres well to the wooden window frame. Deviations of 1 mm can already have negative consequences - but we don’t need that.
You need to cut the glass with a diamond glass cutter, and fine-grained sandpaper is suitable for polishing the edge. The cutting technique is very simple. It is enough to stock up on a ruler that will be longer than the glass and guide it along it with a glass cutter. Before coating the edges with sealant, you need to attach the glass for fitting. If everything is successful, then sealant is applied to the grooves, after which the glass is finally inserted into the frame. After this, we use a glazing bead - it should hook both the frame and the glass, and then fix it with thin nails. If the ties are wider, then fix them with self-tapping screws - choose thin fasteners.
At this point, making wooden windows with your own hands is completely completed and only one thing remains: placing wooden windows in prepared boxes. I didn’t need this action, but if you still decide to install, then:
- We insert the structure into the block and fix it in the grooves
- We fix the frame using self-tapping screws - the elements should pass through it directly into the wall
- All cracks are blown in using foam and wait for it to dry completely.
- In the future, you can design the slopes with your own hands in the most convenient way for you. But for wooden structures everyone is accustomed to using plaster, since plastic slopes will not look harmonious
Problems that can be solved by repairing or replacing window fittings
- The doors are difficult to open . Perhaps you can limit yourself to lubricating and cleaning parts of the structure. Or maybe they are already in need of repair or even replacement;
- The sash sags or has even fallen out . It is possible to determine exactly what led to this only after diagnosis, but there is a high probability that the loops or adjacent nodes will have to be changed;
- Obvious failure of structural elements . Has a handle or part of the window mechanism broken and you can see it? Replacement of course!
- Blowing windows . It may be enough to adjust the window or replace the seal. Or maybe the mechanism is already so worn out that radical measures are required;
- Expansion of functionality . A child lock for windows, a comb, or replacing the sash from a fixed or pivoting one to a tilt and turn one? Why not!
At the very beginning of work on the site, I published a small material - a guide on adjusting plastic windows. Despite the short and insufficiently informative post, in my opinion, it is still in demand. Many years have passed since then, and it seems that the time has come to expand the information “in depth.” So what can you do yourself, and what is better left to the master?
Content:
What is window adjustment Preliminary diagnostics Adjustment of windows by width and height using a key Adjustment of slot ventilators Strike plates and their correct installation Adjustment of windows by clamping Adjustment of sashes by geometry, or “crossbar” Adjustment of windows - profitable Summary
What is window adjustment?
As a rule, people think about adjusting plastic windows when they close or open poorly, touch and stick, blow out from different sides, etc. That is, when the window is not yet broken, but is already acting up and has difficulty performing its functions. Many people believe that window adjustment is a simple “tightening” of the trunnions and hinges of the fittings, which need to be “tightened” almost every year. And it’s not surprising, because sooner or later your plastic window sags again and starts to blow. Think about it: PVC structures have been installed in Russia for three decades now. Everything was calculated, even by the Germans, down to the smallest detail, and tested in practice. However, the same problems with windows are observed year after year. Why is this happening? How to adjust the window “once and for all”, and is it possible? The answer is yes, it’s possible if you know what to do. Window adjustment is a process whose ultimate goal is not just eliminating basic faults and bringing it into working condition. The window must again (or for the first time) become the way the manufacturer intended and designed it. This is, in fact, a whole set of measures in which, contrary to popular belief, screws and hinges are assigned a modest, auxiliary role.
In all the years of my work (more than 15 years), I remember only a couple of cases when it was more expedient to replace windows rather than repair them. Adjusting windows, even those that have served for many years, and “returning them to service” is much more profitable than replacing them. After all, in addition to the obvious costs of purchasing new double-glazed windows, you have to go through the entire “debacle” of installation work again, and, often, renovate the apartment. The material will go “from simple to complex.” You can easily do the simplest adjustment of the window fittings yourself (twist it a little, so to speak), but, for example, I strongly recommend entrusting disassembling the sash and correcting its “geometry” (that is, shape) to an experienced specialist.
Diagnostics of the sash position of a plastic window
To determine the algorithm for future window adjustment, it is advisable to make simple diagnostics. You need to take a regular pencil and mark the position of the corners and the middle part of the sash, as shown in the photo.
Then open the window and measure how many millimeters the sash “overlaps” the frame. The average amount of the so-called “overlap” should normally be approximately 8 mm.
For correctly assembled and installed windows, the overlap on all sides is almost the same. If a window does not close well, after diagnostics it will be immediately clear whether it is sagging too much. By comparing the marks in several places, you will get an idea of how much the sash is skewed relative to the frame. If there is a slight (1-2 mm) deviation from the norm, it is enough to adjust the window by tightening or loosening the screws on the fittings. If the difference in height between the corners is more than 2-3 mm, the sash geometry may need to be corrected (this is done from the inside; here, adjusting the window with a key will not help).
If the “overlap” is too large, the sash will constantly touch the frame, and if it is too small, it will blow from the window.
Adjusting the window sash position using a key
If the window does not close well, touching the frame from below, above or from the side, the easiest option is to adjust it with a key, using screws specially designed for this. As a rule, these keys are not some special “window” keys - one suitable for our purposes can almost always be found at the nearest auto parts store. Most often you need a regular 4 mm “furniture” hexagon, but there are other options, for example, stars. The problem can only arise when adjusting windows with non-standard keys, but this rarely happens. For example, a branded key for the lower hinges of Aubi 300 fittings, due to its discontinuation, can be difficult to find on sale (however, most experienced craftsmen have it).
Window adjustment when sagging and touching the lower corner under the handle
When closing a window that has sagged downward, it usually has to be “pushed” into the frame. To raise it, you can use two screws - a height adjustment screw in the bottom hinge, and a width adjustment screw in the top hinge. We screw these screws in clockwise, and the angle under the handle rises (the features of adjusting the lower hinge of the Aubi 300 fittings can be found here).
In some fitting systems, for example Winkhaus, the top hinge can be tightened by turning the screw counterclockwise. On Roto swing doors, the width adjustment screw is located on the opposite side of the hinge, along the same axis.
In the Aubi 300 system, instead of a screw, there is a shaped washer for several fixed positions.
If the sash knocks on the top striker on the frame when closing
To eliminate the knocking, screw in the screw for adjusting the upper hinge width, and the sash moves away from the strike plate.
When touching the side of the window (in the center) , the width adjustment screws of both the upper and lower hinges are used. At the same time, the sash moves towards the hinges.
If the contact occurs above the sash , you can try to slightly unscrew the height adjustment screw in the lower hinge (the sash will drop lower). Problems with slot ventilators are discussed in the next section.
When opening a window, does something click between the hinges? Try to lift the sash up a little using the same screw for raising the height of the lower hinge. In addition, it may be necessary to rearrange the corresponding striker (see below).
That, in fact, is all you need to know to adjust a window that slightly touches the frame.
If the window is sagging a lot, and simple adjustment does not help (for example, when you try to lift the sash, the top immediately begins to touch), you need to correct its “geometry”. I will tell you about the features of window sash at the end of the article.
Adjustment of slot ventilators and their counters
The fittings on the swing-out doors may include a 45-degree slot ventilation system. For all its advantages, it requires fairly precise adjustment of the window, often causing jamming, noise and knocking in the mechanism. Diagnosing this malfunction sometimes causes difficulties, since the ventilator is usually located in the upper part of the sash and is not visible during operation.
To adjust the window, it is better to stand on a window sill or stepladder and look from above the sash. When turning the handle strictly horizontally or vertically , the pin of the fittings should be at the same distance (2-3 mm) from the central protrusion of the bar, without touching it. Correct position of the strike plate relative to the fittings (using MACO as an example):
Displacement of the plank or sash causes rubbing and knocking.
To adjust the position of the strip, the holes for the screws are usually made oval. You should completely unscrew them, remove the bar and install it correctly. If the cause of the jamming is the sideways movement of the window sash (determined by the overlap), use the corresponding screw in the upper hinge. Plastic windows with ROTO NT fittings may require sash height adjustment.
Due to the design features of the slot ventilator, the locking pin of the fittings works “closely” to the strip and often touches it. You should adjust the sash using the key, lowering it down a little, and if this does not work, adjust it according to the geometry.
Before rearranging the strikers on a plastic window, you need to make sure that the sash is not skewed relative to the frame.
Pressure counters and adjustment of their position
The clamping of the plastic window sash is provided by strikers on the frame. They are the hooks for the locking pins of the mechanism and must be installed correctly.
Checking the position of the strikers
Have you determined whether the sash is level, or even adjusted it to overlap, but it is still blowing from the window? This often happens when the strikers are incorrectly positioned on the frame. Even in the most modern window factories, there is a “human factor”, not to mention the fact that the assembly of sashes and frames usually takes place in different areas. In general, the distance from the strike plate to the locking pin of a plastic window should be 3-5 mm (with the window open, the handle is strictly horizontal).
If the gap is significantly larger, the sash may simply not be pressed all the way, and if there is practically no gap, knocking and clicking can be heard when opening and closing the window.
Errors especially often occur when installing strips on swing-out sashes on the hinge side (they are not visible if the sashes are not fully open).
There are also frequent cases of intentional rearrangement of strikers by installers after unsuccessful attempts to adjust the window. When you remove such a strip, you will see a second hole from the screw.
If the sash is level and does not sag (the overlap at the top and bottom is the same), the planks should be installed in the desired position and the screws should be screwed into new places. However, you should be aware that such discrepancies may also indicate serious deformation of the sash. In the case of a strong diagonal distortion, first of all you should adjust the window according to its geometry - then most likely there will be no need to rearrange the slats.
If the distance between the locking pin and the strike plate is too large, the fittings do not work - therefore there is blowing from under the seal, and attempts to adjust the window to the clamp do not bring results.
Adjusting windows for pressure
To begin with, you need to answer yourself the question - why, in fact, adjust the clamps? To eliminate the blowing - most likely, you will say. There are many such recommendations on the Internet, and, in part, they have a right to exist. But only under two conditions that do not always occur simultaneously: - your window sashes are not deformed; - windows (or their seals) are more than 10 years old. Then adjusting the window to the pressure will help delay the replacement of “tired” tires for some time. If there is a deflection of the plastic profile of more than 2-3 mm, most likely, such an adjustment will not help, and closing the window will become much worse. In practice, on the contrary, I often have to loosen the clamps (return them to the factory position), since after adjusting the windows according to their geometry, the tightness is usually completely restored - the window stops blowing. That is why the “winter-summer” adjustment is not discussed in this article. After all, under maximum load, and even in winter, the seal does not last long, and the fittings behind it, due to constant torsion back and forth and increased wear, will require replacement ahead of schedule. I consider absolutely unnecessary any regular manipulations with fully functional plastic windows, except for mandatory annual lubrication . As they say, don’t interfere with the mechanism working properly :). And I answer clients’ questions about their service life like this: it will last for our lifetime!
A simple adjustment of the windows to the pressure is done as follows.
If you want to increase the pressing density of the sash, the eccentric (usually this is the locking pin) must be installed with a point (or its wide side) to the sealing rubber .
If, on the contrary, you need to loosen the pressure and make the handle move easier, turn the point (or the wide part of the eccentric) away from the rubber .
With the “old” Roto Centro fittings (the one in which the eccentric is located in the striker), to adjust for increased pressure, you should turn that part of the strip towards the rubber, on the side of which the locking pin is located.
The pins of the Winkhaus AutoPilot fittings are adjusted without a key, simply by hand, by pulling and turning in the desired direction.
Adjustment of the sash pressure in the lower hinge (not available for all windows). There are options for both an asterisk and a regular screwdriver.
It is also possible to adjust the pressure in the top loop.
However, the latter adjustment is used extremely rarely, since the degree of pressure practically does not affect the blowing through the upper loops (in most cases, in the upper loop, air constantly passes through small gaps, this is a normal situation).
And remember, the rubber window seal is not designed for constant operation in “winter” mode. Being strongly “flattened”, it will quickly lose its elasticity and finally stop retaining heat.
Adjusting windows according to geometry (“crosslinking” sashes)
What happens to a plastic window sash over time? To put it simply, the main influence on it is exerted by two forces - the force of gravity and the force of, so to speak, “friction” (it occurs when the window is closed).
The first turns the rectangle of the plastic profile into a parallelogram, causing the corner under the handle to sag and problems with opening and closing. This also causes air to blow through the top of wide windows, and the pressure in the area of the handle deteriorates. The second causes a significant deflection of the “hinged” vertical part of the sash, due to the lateral pressure of the rubber on the plastic when closing the window. The notorious blowing between the hinges begins, which has become almost a “calling card” of low-quality plastic windows. Sometimes the deflection is so great that, combined with installation defects, the fittings on the hinge side simply do not engage. The window, in fact, does not close completely, and often you can even hear the street. Therefore, the usual adjustment of the window trunnions with a key in this case is pointless, and replacing the seal does not help for long, or does not help at all. The problem with skew and deflection of profiles also has internal reasons. The fact is that the rectangular shape required for normal operation is given to the window by a double-glazed window. Yes, yes, everything is supported by glass and special adjustment plates. This is how plates under a double-glazed window should be installed according to GOST 30674-99.
Why is this so? Let's look at a simple example, using a children's construction set as a model of our window sash.
If you assemble a rectangle from planks, under the influence of gravity, at the slightest loosening of the screws, it will tend to turn into a parallelogram (provided that one side is rigidly fixed).
A plastic window sash without a double-glazed window behaves the same way - the profiles are reinforced with metal, but there is no reinforcement in the corners. If we install another bar diagonally, then our “sash” will no longer sag, right? A block of 2-3 glued glasses, or a double-glazed window, is one of the load-bearing elements in the design of a plastic window, and must expand (or “wedge”) the sash in a strictly defined way. For this purpose, there are special support (leveling) and adjustment plates (or pads). The linings, indicated in the GOST diagram in black, give the sash the necessary rigidity, holding it diagonally. In cases where they are located differently, are incorrectly selected in thickness, or are missing (and are not visible from the outside), there can be no talk of any successful window adjustment with a key . Moreover, despite GOST, in practice it is often necessary to install additional side plates (in the center of the vertical sides) to prevent deflection, especially on high sashes.
The adjustment plates have a thickness of 1 to 6 mm, different colors corresponding to their thickness, and must be installed with the flat part against the glass unit. Available in different widths, in the photo - 32 mm plates.
Attention! The following outlines the general principles of adjusting plastic windows “according to geometry”. I categorically do not recommend doing this to “home craftsmen”! To correct the shape of the sash, it is necessary to remove and reinstall the glazing beads, and sometimes the glass unit. The re-linking should be done by a window repair specialist, or at least an installer with relevant experience and special tools. Without practice, you can dent and scratch the plastic, as well as seriously cut your hands on the sharp edges of the glass (or even break the glass unit). I am not responsible for the consequences of disassembling and repairing windows myself. This section is purely informational in nature and will help you understand what an experienced, knowledgeable master should do.
When the sash sag
Often, when disassembling such sashes, it is discovered that one or several adjustment plates are missing at all, or they are not in the right place, or their thickness is incorrectly selected.
To correctly adjust the window height, it is enough to achieve the same “overlap” at the top and bottom by rearranging and adding adjustment plates of suitable thickness. Sometimes it is enough to simply move the existing plates as close to the corners as possible to eliminate sagging of the sash.
Before adjustment:
After adjustment:
An attentive reader may notice that according to GOST, the linings are installed at some distance from the inner corner of the sash, but in my photos they are right in the corner. The fact is that in reality, the rigidity of modern metal-plastic window profiles is usually, alas, significantly lower than it should have been according to the calculations of German engineers. Therefore, I install the plates in this way to reduce the deformation of the sash (which occurs mainly at the bottom, due to the weight of the glass unit).
When touching the middle of the lower part of a wide sash
If a wide sash rubs a lot from below, in the center (often against the striker bar), and does not close well, you should, again, move the lower adjustment plate to the very corner, until it stops. The load on the profile is reduced and grazing stops in most cases.
Please note that when adjusting the windows according to geometry, the hinges do not need to be “twisted” at all - they remain in the optimal, middle position.
When blowing
When blowing from the side (usually the window blows between the hinges), it is often necessary to install additional adjustment plates in the center of the sash.
Thus, the sash is leveled, the fittings engage, the seal is pressed against the frame, and the blowing stops. If the window blows from the side of the handle, the actions are similar. The width of the “overlap”, again, is checked with a pencil (should be approximately 8 mm).
You probably already realized that the main thing in adjusting the window geometry is to ensure uniform overlap of the sash along the entire perimeter of the frame . Without this, there will be neither a normal fit of the rubber seal nor correct operation of the fittings. No matter how you twist the screws, it is usually impossible to achieve such a result with them alone.
Using a crossbar can also correct some mistakes made during the installation of plastic windows. For example, if the frame was “stretched” during installation, the craftsman can slightly pull the sash in the same direction. In this relatively simple way, it is often possible to ensure good pressure on the seal and eliminate blowing without redoing the installation (no need to break and rebuild the side slopes again). Visually, a slight “barrel” bend of the sash will be invisible.
If even after all the manipulations, alignment of the geometry and adjustment of the window, it still blows from it - then, and only then, the seal should be changed.
Window adjustments, done correctly, will save not only your health, but also your money.
At the time of writing this article, the author was repairing windows in a new building. The satisfied housewife said that she will now reduce the temperature of the radiators in the apartment to a minimum, and the monthly heating bill will immediately decrease. It turned out that earlier, when it was blowing strongly from the windows, she was forced to pay for heating the street - heat meters were already installed in the house. Over time, such metering devices will appear in all apartments, so the cost of calling a specialist, sooner or later, will pay off many times over. The service life of the seals and fittings of plastic windows, adjusted according to geometry (and therefore operating without unnecessary loads), also increases significantly.
Summary
Simple window adjustment with a key is within the capabilities of almost anyone. But this should only be done in case of minor faults. If your windows close very poorly, or there is a lot of wind coming out of them, it is better to contact an experienced specialist who will correctly adjust them according to their geometry just once. And you can, as they say, continue to sleep peacefully!
Features of modern window fittings
Modern windows are more than just a frame with a handle and hinges. They are a whole complex of mechanisms that interact with each other to ensure the functioning of the window sash: its rotary or folding opening and closing. Moreover, this is true regardless of the profile material used, be it wooden Euro-windows with double-glazed windows, PVC or aluminum window structures.
Components of window fittings:
- Constipation (main)
- Angular gear
- "Scissors"
- Constipation (moderate)
- Top loop
- Bottom loop
In addition to the internal mechanism, there are a number of additional elements with the help of which direct human interaction with the window sash occurs:
- window handle;
- strike plate;
- comb.
Where is the best place to install
The thermal insulation performance of English-type windows is somewhat lower than energy-saving casement windows, which somewhat limits their scope of application. The most convenient and elegant option, with single glass frames, will be relevant anywhere in the country house, summer kitchen and other buildings that are not heated in winter.
If you plan to glaze a residential building or apartment, you should pay attention to structures with an insulated profile and double-glazed windows that are suitable for the weather in winter. However, in regions with extremely cold climates, it is better to refrain from using English windows, even the most energy-efficient ones. After all, their homeland is Britain, and there it mostly rains, not thirty-degree frosts.
Periodic maintenance of window fittings. Cleaning. Lubrication.
The ideal option for hardware repair is to prevent it. And for this, it is advisable to carry out periodic preventative maintenance of all moving window mechanisms. It is recommended to do this at least once every 2 years . This will dramatically increase their trouble-free operation time and avoid many troubles and, as a consequence, costs.
provides services for the prevention of window blocks, moreover, you can receive it as a gift when ordering services in the amount of 3,000 rubles or more!
Our specialist will remove accumulated dust and dirt from the sash trim and lubricate it with a special oil- or silicone-based compound (depending on the type and material of the window structure).
Selection of frame and profile
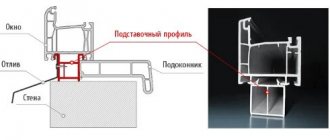
The frame of a plastic window is a structure consisting of several chambers. All these sections have their own purpose: for collecting condensate, for fastening fittings.
The main task when evaluating a frame is to study the quality of the profile. Profile assessment requirements:
- Structural strength.
- Safety for humans. The material should not emit toxic compounds, toxic fumes and impurities.
- The profile structure must be resistant to chemicals.
- Resistant to deformation due to impact and axial load.
Note!
- How to choose a washing machine: TOP-130 photos and video reviews of washing machine options. Types of washing machines, choice of manufacturers
- How to choose a vacuum cleaner - TOP 140 photos and video reviews of characteristics. Types of vacuum cleaners by power, filtration systems, cleaning methods
- How to choose a refrigerator: TOP-180 photos and video reviews of refrigerator models. Selecting the size, capacity, functions and materials of internal shelves
All of the above requirements are fully met by plastic. Therefore, window manufacturers chose this material.
To further strengthen the frame structure, steel profile reinforcement is used.
Hardware repair
The main load during the operation of window structures is borne by their fittings. It is she who moves, wears out, weakens, becomes loose and wears out. And naturally, no matter how high-quality and reliable it is, it may begin to function differently than you expect from it. Repair is a more gentle procedure, and is possible if the problem was noticed at an early stage and did not develop into something more serious:
- the appearance of suspicious sounds (clicks, crunching, creaking);
- the doors are weakened (“loose”);
- the tightness of the structure is broken (drafts);
- excessive effort when using window mechanisms (the sashes are difficult to open, the handle gets stuck or is difficult to move);
- The tilt-and-turn sash opens in 2 planes.
Positive sides
English type windows have the following advantages:
- Like any sliding systems, lifting windows significantly save free living space, making it possible to place flower pots or decorative elements on the windowsill, avoiding the need to remove everything to open the sashes.
Wood laminated vertical sliding windows
- The internal arrangement of the fittings eliminates the possibility of opening from the outside and thereby reliably protects the room from unauthorized entry from the outside. In addition, the design provides the ability to enhance security by installing alarm sensors.
- The lifting system of English windows allows you to ventilate rooms in any weather, as sliding sashes are not afraid of drafts, unlike swing models.
- The gaps between the moving elements of the window are sealed with sealing rubber bands, and the fittings are protected with special gaskets, which minimizes the likelihood of drafts and blows;
- Equipping small sashes with folding fittings allows you to easily wash frames and glass from the street side, even on the upper floors.
- Classic curtains look great on English-type windows, especially in combination with roller shutters or Roman mechanisms.
Types of work on repair and replacement of window fittings
offers a full range of services for servicing window fittings, which will eliminate various types of breakdowns:
Repair and replacement of window handles
If necessary, we are ready to offer various models of window handles, including handles with a key, for replacement.
Maintenance of strike plates
The strike plate secures the sash in the closed position; due to active use, it often fails.
Installation of the comb
A common service that gains popularity in cold weather. The comb allows you to fix the sash during ventilation.
Maintenance of "scissors"
Thanks to the “scissors”, the movement of the window sash is limited, preventing the window from falling out.
Top and bottom loops
They often break due to frequent use of the window system or under strong mechanical stress.
Our specialists will quickly correct breakdowns in the mechanisms of window systems. We are ready to offer qualified assistance with various breakdowns of PVC, aluminum windows and wooden Euro-windows.
Modernization procedure
So, now we know for sure whether it is possible to make an opening window from a blind window. It's possible. Transform the window opening in stages:
- Measure the blind sash.
- A new part is made for the old frame.
- Ready-to-install materials are delivered to the customer.
- Remove the old glass unit from the profile system.
- Outside the opening, fasteners for the mosquito net are fixed.
- Install window hinges and hang a new profile on them.
- The sash is adjusted and the fittings are checked.
- Check the tightness of the window system and the tightness of its fit to the base.
The cost of repairing or replacing window fittings
Many companies charge unreasonably inflated prices for hardware maintenance—Healthy Window is not one of them. You can view our price list right now:
| Name | U measurement | Price, rub * |
| Sash adjustment | per sash | 300-600 |
| Large door adjustment | per sash | from 500 |
| Balcony door adjustment | out the door | 500-800 |
| Adjusting the plastic entrance door | out the door | 800-1500 |
| Lubricating hardware | per sash | 100 |
| Cleaning the fittings | per sash | 100 |
| Hardware repair | per sash | 2500 |
| Replacing the white handle | PC | from 330 |
| Replacing a Colored Window Handle | PC | from 550 |
| Installing a handle with a key | PC | from 1900 |
| Cable lock | PC | from 2600 |
| Overhead child lock | PC | from 2300 |
| Mortise child lock | PC | from 2800 |
| Installation of the retainer on the window | PC | from 2100 |
| Installing a plug instead of a window handle | PC | from 900 |
| Sash lock (child lock) | PC | from 1200 |
| Striker | PC | from 150 |
| Installation of the comb | PC | from 350 |
* Prices for services are indicated taking into account measurements, costs of materials, delivery and work. The offer is not a public offer and is for informational purposes only.
You can find out more about our prices in the “Prices” section, and you can get advice on your window problem by calling: +7.
Advantages and disadvantages of sliding windows with a vertical mechanism
American sash windows have a number of advantages. Main advantages:
- stylish appearance, providing a harmonious combination with various interior solutions. Original frames will decorate any facade;
- ease of use due to the absence of protruding handles. Sliding frames not only open easily, but also harmonize perfectly with any curtains;
- the impossibility of opening English windows by small children, subject to the installation of special protection. The design allows the frames to be locked for safety;
- possibility of free access to the windowsill and placement of flowerpots on it. In addition, there is no need to empty the window sill in order to ventilate the room.
Window fittings brands
Our specialists have extensive experience and are ready to provide professional services for the repair of fittings from famous brands. We can easily fix broken windows with fittings from the following brands:
We also have original components, which allows us to carry out emergency replacements.
Our workers are equally successful in repairing windows from both well-known brands and little-known manufacturers. We always offer professional service, high-quality original components and a 1-year warranty on all work performed.
Ready-made solutions for your home
Window slider
- Total area: 1.26 m2
- Profile: MIKRON EnergyCore 82 (White)
- Accessories: Vertical slider
- Filling: 4M1-20-4M1
25,000 rubles
Window slider
- Total area: 1.26 m2
- Profile: MIKRON EnergyCore 82 (White)
- Accessories: Vertical slider
- Filling: 4M1-20-4M1
32,000 rubles
Window slider
- Total area: 1.26 m2
- Profile: MIKRON EnergyCore 82 (White)
- Accessories: Vertical slider
- Filling: 4M1-20-4M1
46,000 rubles
Replacing rotary fittings with tilt-and-turn fittings
Replacing rotary fittings with tilt-and-turn fittings
Do you want to increase the capabilities of your fittings? We will help! Replacing rotary fittings with tilt-and-turn fittings in Moscow and the Moscow region at low prices.
Replacing rotary fittings with tilt-and-turn ones modifies the opening mechanism if the original design of a plastic window or balcony door does not suit you.
Hinged windows are not always convenient, but are often installed at the expense of functionality due to their cheaper price. They resort to upgrading the fittings to tilt-and-turn fittings when they are faced with discomfort from the result of such savings for the developer of a new house or for previous residents.
Replacing a casement window will expand the functionality and correct errors in the original design solution.
Manufacturing materials
For the manufacture of classic models, wood is mainly used. The most preferable in this regard is laminated veneer lumber of coniferous or hardwood (pine, larch, oak). To make the material resistant to environmental influences, it is treated with special impregnations and sealed with a protective varnish. Colored products are tinted with stains.
Modern designs are often made from metal-plastic or aluminum profiles. These products, as a rule, are more practical and allow the implementation of a variety of design solutions; in addition, profile models are more suitable for the construction of warm systems.
Can a pivot window be made to turn and tilt?
Changing a casement window into a tilt-and-turn window is accomplished by modifying the window fittings.
By changing the position of the handle, you adjust the type of opening, tilt or width of the slot ventilation. Replacing the structure allows you to open the sash in horizontal and vertical positions without dismantling the window frame or purchasing a new double-glazed window.
Before installation, the dimensions of the window must be measured to calculate the weight and load on the mechanism. The manufacturer of the window profile is also specified; components from different manufacturers may not be suitable for each other.
Adventures of English windows in Russia
According to historians, windows in the so-called English style appeared in the 17th century on the Chatsworth estate in Derbyshire. That is, where one of the most luxurious palaces in Great Britain is.
Fans of England from the time of Domostroy can find English windows in modern Russia. What does the phrase “window in English” mean? What is the price of this design, where can I order it?
Read and enlighten yourself.
Replacing a swing sash with a tilt and turn sash
The Alma Windows company replaces the swing sash with a tilt-and-turn one at a price that is affordable for Moscow and the Moscow region.
More than 3 years of experience in installing and repairing plastic windows allows our specialists to carry out quick and accurate measurements, installation and configuration. Replacing the window mechanism will not require the expensive purchase of a new frame or double-glazed window.
In the event of a breakdown of existing components, we will carry out a quick and high-quality repair of the tilt-and-turn window mechanism or replace the lock handle on a plastic balcony door.
How did windows with vertically rising frames come about?
The vertical principle of opening window frames is very popular in the USA. For some reason, many people mistakenly consider such windows to be a purely American invention. However, the design of windows with vertically rising sashes originates in England. It was here in Derbyshire, during the construction of Chatsworth House, which was the main residence of the Dukes, that a special design of sash windows was first used.
The peak of popularity of slider windows dates back to the 18th-19th centuries. Due to their recognition, they have become a characteristic symbol of English houses and one of the signs of the Georgian style in architecture. It is quite possible that the English origin of windows is related to the peculiarities of climatic conditions. Indeed, in winter in England severe frosts are quite rare, but sharp winds often blow. Pivot windows did not catch on, as the design with vertically opening frames provided better protection from the wind.
How did vertical windows get from England to the American continent? It turns out that they appeared along with the first wave of New World colonists, who were attracted to North America. They were predominantly English. By the way, windows with vertical frames are not common throughout America, but only in its northern states.
How to make a turn-and-turn sash from a swing sash?
The idea of making a tilt-and-turn window yourself is justified if you have already installed window structures and have sufficient experience.
Otherwise, it is better to trust trusted specialists and avoid unnecessary complications.
Our craftsmen know how to make a folding plastic window without errors and saving your time and nerves.
In turn, incorrect installation leads to damage to the window structure and more expensive repairs.
What you need for adjustment
Masters adjust metal-plastic windows with a special universal key. But with the same success this can be done with a simple set of tools. Everything you need can be easily found at home or purchased at a hardware or auto store.
Here's what you'll need:
- hex key 4 mm;
- Torx key T15 (asterisk);
- 11 mm open-end wrench or pliers;
- flat screwdriver;
- knife;
- plastic linings;
- All-purpose grease or machine oil.
Bedroom
The bedroom is a room for night rest. In order for it to be of high quality, it is important to create a cozy and comfortable environment. It is preferable to purchase curtains made of thick fabric and complement them with voile curtains. You can also use various decorative elements - tassels, braid, beads. They will add a touch of homely warmth.
The density of the curtains is important to provide reliable protection from excess sun. Light curtains of the correct texture can also cope with shading. So don't be afraid to choose pastel colors.