Connoisseurs of classic barbecue are sure that for fun outdoor gatherings it is worth building a gas grill with your own hands, without overpaying for the finished product. This simple design will allow you to cook your favorite grilled dishes at any time of the year, and you can install it both in the gazebo and on the terrace or balcony.
Today, purchasing a gas grill for a barbecue is not a problem, but if you want to get a truly reliable design and save on buying a finished product, you can build a gas grill yourself. Let's figure out what this requires.
What can be made from an old gas stove
Have you purchased a new gas stove, but feel like throwing away the old one?
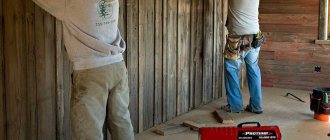
Then you can dream up a little and breathe new life into it. First, you will need to free the tile from the burners, remove the flame adjustment knobs from the control panel, and clean the entire surface of the stove to prepare it for painting.
In order for the cabinet to be airtight, the extra holes should still be sealed. Then you can start painting the future box. What color will he choose for you, will the box be monochromatic or multi-colored? Perhaps you have already decided what will be stored in the new place and will decorate it in this theme. After painting, the box can be decorated with decoupage or your own drawings. There will be room for your imagination to run wild.
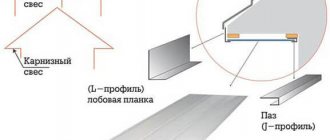
Material
Often such barbecues for the dacha are placed in open areas. And therefore you need to be very careful about the material of such a device.
It can be with a ceramic coating. In terms of ecology, this is an extremely clean material. It helps eliminate the loss of basic nutritional characteristics of products and the appearance of unpleasant odors during the culinary process.
Stainless steel is good for grilling. In terms of strength, this is an excellent option. However, over time, his good appearance fades.
The most budget-friendly type is enameled components. Their reliability is questionable. The coating deteriorates quite quickly. But, if the device will be used extremely rarely, this option is completely justified.
Cast iron is the leader in strength. And in terms of aesthetics, it is not much inferior to its competitors.
Whatever unit is chosen, it is important to base it on its parameters and purpose of use.
Smokehouse
With this option, you don't have to do a lot of modifications. First, get rid of the oven door and replace it with a sheet of metal. A fire will be built in the bottom drawer of the stove, and the firewood will be placed in the lower part of the oven. Be sure to drill holes in the bottom for smoke. The oven will have racks with fish or meat. A grease tray should be placed between the grates and the wood chips. The smokehouse is ready for use. There is a drawback to homemade smokehouses that you need to remember when cooking; you cannot regulate the heating temperature. This may affect the taste of the product. You should also be sure to clean the smoker after each cooking.
Operating rules
Any thing requires proper and timely care. To avoid unpleasant consequences, you should follow the operating rules.
All structural parts should be cleaned in a timely manner, namely:
- the grate, doors and subsequent parts of the oven should be cleaned of dirt and soot each time after use, waiting until the oven has completely cooled;
- the stove pipe must be cleaned of soot at least 2 times a year;
- empty the area of burnt coal and food debris after each use;
- you need to check the firebox for accumulated water or snow if there is no cap in the chimney or a canopy over the chimney.
Experts recommend strictly following these safety rules:
- Constant monitoring of flame intensity is required;
- absence of flammable things near the stove.
When using ignition products, it is worth remembering that:
- Only starters are allowed to be used, strictly following their instructions for use;
- the use of gasoline, kerosene and other lubricants is strictly prohibited;
- cover the barbecue with a lid at least 15 minutes after ignition to prevent ignition of accumulated flammable gas;
- Under no circumstances should you soak firewood with such substances, only spray it for ignition.
In the cold season, the barbecue must be dried for 20 minutes over low heat before use. This will prevent premature wear and cracks in the furnace structure from sudden temperature changes.
35f473e3303adac961761186881157e5.jpe c0cc224e88508d542cb6134829a077f1.jpe
d6cbe40569440f1117db602691bffc1a.jpe
Stove made from an old stove
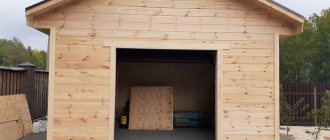
Another interesting idea for your summer cottage would be a stove made from a gas stove. It will perfectly replace the stove in summer kitchens and will look creative. This option will cost virtually no modifications. All you have to do is remove the burners, or the entire top panel and replace it with a flat sheet of iron, get rid of the glass in the oven door, if any, and also replace it with a sheet of iron. Place bricks inside the oven in one row for greater heat transfer. A fire will be lit in the oven, and on the top panel you can cook, or simply use such an oven for heating.
Creation of the gas-forming department (GO) and the furnace body
Work on the creation of GO begins with reducing the length of the cylinder used. Its length is 96 cm. 25 cm is subtracted from it. A part of the body is cut off near the welding seam (it is on the bottom). And the bottom is welded again.
To control the air supply to the GO, you need to make a triangular-shaped hole in the bottom. The latch will be attached to it.
A 7.5 cm hole is made in the other bottom (on the opposite side). Through it, the gas flow from the hot coals will flow into the combustion department.
Next, a rectangle of 30 x 20 cm must be cut out in the side surface of the body. A door or stowage hatch will then be located here.
Hinges are used to secure the door to the housing. Fastening method: welding. There is a gap between the door and the outer sides of the grill. To fill it, an overhead steel tape is used. Food grade stainless steel is often used. Rivets are used to secure it.
The furnace body is created using the same principle. There is no need to reduce its length. It is connected to the GO in this way: a hole is made in the right bottom, its diameter is 7.5 cm.
The joining of these bodies is carried out using a steel piece, the length and diameter of which are 7.5 cm. The seam between it and the inner plane of the bottom in each body is welded with a special electrode. It is called "green". It is used for welding stainless steel.
Before welding, the structure of these housings is placed on a pre-made stand. The cylinders are secured by welding points to the base of the stand. After joining, you can replace the points with full seams.
If you plan to use this device also as a barbecue, then make holes on the rear plane of the case. Their diameter is 8-10 mm. Distance between them: 7-8 cm. A splitter attachment is placed on the bottom. To create it, a piece of metal profile with cuts is used. This measure will ensure uniform distribution of the gas coming from the GO along the entire length of the furnace.
A piece of pipe with a plug is mounted (by welding) into the bottom of the furnace. Its length is 1.27 cm. Condensation and grease will drain through it.
To create a chimney, welding from a pipe in the format of two elbows is used. This pipe has thin walls, its parameter is 3.81 cm. A flat valve is placed at the top of the chimney. It will allow you to adjust the dynamics of gas supply to the combustion department.
Smokehouse with smoke generator
Making such a smokehouse is a little more complicated than previous options. At the bottom of the side wall you need to make a hole for supplying smoke. There should be holes on the top of the opposite side to allow smoke to escape. Detailed instructions for making a smoke generator with your own hands can be found on the Internet. The principle of operation is as follows: wood chips are poured into the structure of the smoke generator and set on fire. The air, supplied by an air compressor connected to a generator, inflates the wood chips and the smoke is supplied inside the smokehouse. In this case, you can regulate the air supply, thereby improving the taste of cooked products.
Summarize. How many interesting things can be made from old objects that, it would seem, could have been gotten rid of. By using your ingenuity, you can do a lot of interesting things, as well as refine existing options.
Source of the article: https://sdelat-iz-starogo.ru/chto-mozhno-sdelat-iz-staroy-gazovoy-plity/
Conclusions and useful video on the topic
Making a gas grill with your own hands does not require any special knowledge, because to do this you only need to understand the principle of operation of the structure. If you have all the necessary tools and materials, you can build a gas barbecue grill with your own hands with a connection to a gas cylinder, saving a round sum of money on the purchase of a factory grill.
With such a multifunctional gas grill, you can organize gatherings with friends while preparing a barbecue at your dacha:
If you can add to our material or share your own experience of creating a gas grill, please write your comments and ask questions in the block below.
Rework process
We will follow the path of least resistance. We still won’t be able to achieve some miracle of design thought, so there’s no point in perverting it. We are faced with the following task: remove the top platform, burners and innards from the stove. There is no point in removing the handle or door. They won't interfere.
Removing the cover
@youtube.com, channel Sergey Samodel
If you can’t dismantle the top platform with a screwdriver, a grinder . As in the case if the grate turns out to be significantly larger than the vacant area, it can also be trimmed to the required size. You can also use a baking tray of the appropriate size or use skewers.
Attention! Do not use an enamel grill. Take ordinary stainless steel.
Smoke removal and ventilation
For the chimney you need to do the following. Cut or drill a hole with a diameter of 60-120 mm , into which to insert the corresponding pipe with an elbow. But this is optional; it is quite possible to do without a chimney.
Several 15-20 mm holes are drilled at the bottom of the utility box for air flow.
I recommend leaving one baking sheet in the lower part of the oven , above which a wire rack with a fairly fine mesh is placed. The wood will burn on it. After burning, the coals will fall into the pan, and can then be easily removed.
That, in fact, is the whole alteration. Cheap and cheerful, just right for a dacha. Quite a transportable thing, by the way, and even with legs. If your soul wants some kind of aesthetics, then welcome to the store.
Which grill to choose for your home or apartment?
What to pay attention to:
- Choosing a frying surface. A smooth surface is suitable for cooking fish, poultry or lean meat. Seafood is also fried on it. For fatty meats, the best option is a grooved surface that allows fat to drain. The combined option is universal, but it costs more.
- Fuel. The most common are liquefied gas and methane. Less common are models that work with any type of raw material. It is better to determine the fuel that will be used in the future before purchasing the device.
- Grill grates. The choice is made between price and reliability. Steel gratings are durable, strong, and easy to maintain. However, they are not very economical in terms of finances. Cast iron grates are cheaper and retain heat longer, but are more difficult to maintain.
Photo 1. Cast iron grates of two types for the Master 2 gas grill from Sunday. They are more difficult to maintain, but stronger.
- Safety. Some models have built-in options such as shutting off the gas in case of flame extinguishment and auto-ignition. However, if you do not plan to use the grill more than twice a week, then auto-ignition is completely unnecessary.
- The burner must match the dimensions. Even if a large casing is placed inside the housing, there is only one burner. Because of this, the fire burns unevenly. The fire distributor available on some models will help correct the situation.
- Flame cutters. To prevent grease and dirt from clogging the burner, the grill is equipped with plates that are located on top and cover the entire burner. There should be no rust on the plates.
- The best case is double-walled stainless steel. Grilles are sometimes made of steel or cast iron with porcelain enamel. It is not recommended to clean the latter while they are hot: the porcelain becomes brittle and may crack or crumble. In this case, the iron will quickly become unusable.
- If the grill only has a one-year warranty, there will likely be a cost for repairs.
Shape and dimensions
Dimensions are given for the following models:
- Napoleon Rouge 425-SIB;
- Napoleon Rouge 425-SB;
- Napoleon LE-3;
- Fervor IC310;
- Fervor CL410.
Photo 2. Gas grill model Napoleon Rouge 425-SIB. Multifunctional device in steel color.
Externally, the installation itself is made in the form of a parallelepiped. Simply put, it's a tall box. Sizes vary depending on the company and model. On average, the grill is 120-160 cm high, 60-70 cm deep and 115-155 cm wide.
Nutrition
If we are not talking about liquefied gas, then there are several options. In the first case, the grill can be powered from a vent pipe or hose connected to the pipe of a natural gas stove.
The second possible source is individual gas cylinders. They are usually charged with propane. It is somewhat safer than the usual methane, since it is less sensitive to heat or shock, and also has a characteristic specific and rather pungent odor, thanks to which a gas leak is detected quickly. In this case, the cylinder is located close to the grill, insulated from direct contact with highly heated objects or open fire.
Additional functions: with automatic ignition or smokehouse
A necessary addition to a gas grill will be automatic ignition and gas shutoff. This will save you from gas poisoning or fire. If the burner goes out, the grill will either ignite it itself, or the gas supply will simply stop.
Among the optional ones, separated thermal zones and a smokehouse are noted. All options affect the cost of the product, so it is advisable to think about how necessary these functions are and how often they will be used.
The second life of an old gas stove - interesting transformations
After purchasing new equipment, the question always arises: what to do with the old one, for example, with a gas stove. It often happens that they replace an obsolete model that is still in working order. You can take it to a country house or country house and attach it to a cylinder, or simply give it through an advertisement to people who need it. And if you show a little imagination and think about what you can do for your dacha from an old gas stove, several interesting solutions immediately come to mind.
Don’t rush to throw away old things – you can give them a second life
Photos of various products
Before we get started, I suggest you look at photographs of products that can be made. There is no limit to the imagination of the authors: you can make a wide variety of designs to suit every taste and complexity. Estimate your strengths and real needs, only after that is it worth purchasing material.
Second life of an old gas stove
Home craftsmen have always been famous for their ideas; they have learned to benefit even from a gas stove. If it is not in working order and there is no way to dispose of it, and you cannot simply throw it in the trash according to the law, we offer several DIY options.
Only special services should dispose of the stove
Gas stove cabinet
To do this, you need to refine the facade and side walls. First of all, remove the old paint, clean it and apply a new coat. Any colored aerosol intended for painting metal surfaces will do. Or you can use the decoupage technique, you will get a rare thing that will immediately attract attention.
First, before starting work, you need to dismantle the burners and close all the holes. The thermal insulation in the stove is quite good, so it is quite possible to store various cereals, flour and sugar in it on the balcony or at the dacha.
Using a can of spray paint you can give the surface any shade.
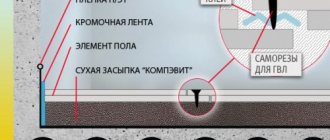
Waste incineration container
Ash in summer cottages is worth its weight in gold; it is an excellent mineral fertilizer for feeding many crops. When burning garbage on a regular fire, it is quite difficult to collect the ash later, and there is not always room for this. Therefore, a special waste incinerator will come in handy.
For this purpose, preparatory work is carried out.
- The burners, all pipeline elements, thermal insulation and plastic parts are dismantled.
- The glass is removed from the oven door and replaced with a regular sheet of tin.
- A hole is cut out on the back panel and an elbow with a pipe is inserted into it.
- Under the oven you need to assemble a grate from bricks and grates.
This creates a simple and completely safe waste incinerator for a summer residence, on the top surface of which you can heat water while burning waste.
Ash is an excellent plant food
Gas stove grill
In order to make a barbecue from a stove, it will take a little more effort. First you need to carry out all the manipulations, as for the incinerator, and additionally cut off the cooking surface.
- In place of the panel, install a grill, which can be taken, for example, from the gas stove itself or from an old refrigerator. Subsequently, skewers with meat, fish or vegetables will be placed on it.
- On the back wall at the top of the oven, cut a hole with a diameter of about 100 mm, into which a metal pipe should then be inserted.
- Make several holes in the utility drawer under the oven for ventilation.
- Leave 1 baking sheet in the oven and place a grate above it on which the wood will burn.
- After the wood burns, the coal will fall onto the baking sheet, which is then easily cleaned.
If the grille is larger than needed, you can trim it yourself.
The simplest design of a barbecue
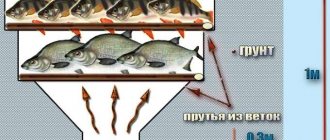
DIY smokehouse from an old gas stove
Dishes prepared in a smokehouse have a unique taste that is loved by many.
For a future smokehouse from an old gas stove, you will need many of its elements:
- you will need a wire rack to store food;
- a baking tray is needed to collect fat;
- all grooves in the block walls or guides will be used for their intended purpose: for extending grates and baking sheets;
- the thermal insulation of the oven will maintain the required thermal conditions inside the smokehouse;
- sealing rubber bands are needed to ensure the tightness of the chamber.
It is important to thoroughly clean the internal surfaces after each smoking.
In order for the smokehouse to last for a long time, you need to follow the required food processing regime and the correct approach to supplying smoke.
From old equipment you can make two different smokehouses, which differ from each other only in the principle of fuel loading; we will consider both options.
General design
A grill is a special portable or stationary installation for preparing various culinary dishes over an open fire. The classic form of this design is a deep metal container in which grates are installed at different levels: the bottom one is for placing coals, the second is for cooking.
The grill is equipped with a lid, but some models are made without it. The first option is more functional, as it allows you to cook in three ways:
- straight;
- indirect;
- combined.
There are three types of grill:
Classical. Connected to the mains. Grills of this type are used as additional equipment for professional and home kitchens. Operating on gas.
Options running on gas and electricity are more functional, but for country holidays many people prefer a charcoal grill.
Photo: grills of different types
A classic grill uses charcoal
A small cylinder is enough for a gas grill.
Electric grill is convenient to use at home
Table: advantages and disadvantages of a classic grill
| pros | Minuses |
|
|
Grill briquettes are more economical
What is the difference between a grill and a barbecue?
Quite often, people do not find the differences between a grill, barbecue and barbecue. Each of the braziers has individual characteristics, despite the fact that they are used for cooking food over coals.
The barbecue has the simplest design. This device is a metal box. Food is cooked on metal skewers. Hot coals are located at the bottom of the box.
High design legs create comfort during frying
The only difference between a grill and a barbecue is that the first does not have a lid, while the second is equipped with a spit and lockable hatches for air supply.
The barbecue does not have a lid in its design
Additional functions
Industrial systems are additionally equipped with:
- ignition switches;
- regulators - to guarantee reliable ignition;
- improved forms of burners;
- installing metal plates above the burners to allow juice and fat to drain from dishes;
- cleaning systems (tray);
- thermometers;
- heating pads;
- hooks;
- devices for synchronization with mobile devices.
When manufactured independently, barbecues are additionally equipped with metal plates, which provide heating at low ambient temperatures.
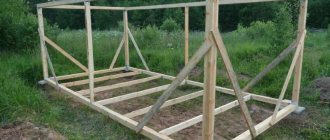
How to build it yourself?
It is possible to independently construct a gas fryer with significant savings. Below are brief instructions on how to do this step by step:
- Preparing the installation site (surface leveling required).
- Model selection.
- Preparation of drawings.
- Selection of materials and tools.
- Making the base.
- Making legs, base for the cylinder and sides.
- Making the bottom and lid.
- Coloring.
- Carrying out assembly and installation work.
- Checking the device.
This is a diagram of the work being carried out.
A detailed description of all actions is presented below.
Service
During operation, certain requirements must be met:
- After each use, the device must be wiped and soot must not be allowed to remain;
- it is very important to check the tightness of parts before starting cooking;
- the very first time involves a trial run to check the operation of the structure and the combustion of residual coloring agents;
- It is advisable to use a piezo lighter for ignition;
- When installing levers to regulate the flame level, it is recommended to consult a specialist.
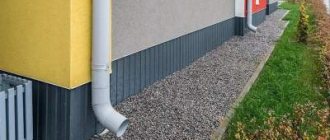
Preparatory work
At the preparatory stage the following work is carried out:
- The place is being prepared.
- A design project is selected.
- Drawings are being prepared.
The surface on which the fryer will be installed must be level
. To do this:
- The soil is cleared.
- The foundation is being made.
Bases can be made from:
- sand;
- gravel;
- paving slabs.
The selected materials require careful compaction.
If the barbecue is installed indoors, it is necessary to cover the floor with fire-resistant material.
The selection of the optimal model must be treated with special attention. This will help you draw up a drawing correctly and accurately calculate the amount of materials.
A correctly drawn up drawing is a guarantee of a good result.
The drawing must indicate all structural elements and the distances between them.
All lines must be clear.
Classification
There is a division of braziers by fuel type:
- coals;
- gas;
- electricity.
Accordingly, the first are called classic, the second – gas, and the third – electric.
All roasters, regardless of the type of ignition, are divided by type or transportability into the following varieties:
- stationary;
- mobile;
- portable.
The fryers are also divided according to the material they are made of:
- wooden;
- stone;
- metal.
The most suitable material for the gas variety is cast iron.
According to this division into types, built-in ones can be classified as stationary: their transportation is difficult.
Collapsible and “tourist” ones should be classified as portable. They are made of metal: mechanisms for disassembly and assembly require durable materials.
The most commonly used is cast iron.
Advantages
What can a gas grill offer as opposed to a coal grill?
Let's start with the pros:
- You have more control over the heat, which can hopefully improve the quality of your barbecue.
- No smoke or soot. The requirement for hood is significantly reduced and frying is more comfortable.
- Can be placed almost anywhere: in the garden, gazebo, indoors.
- There is no smoke - there are no carcinogenic substances from it in the meat.
- Ignition is not just fast, but very fast. And without any secrets: if you light it, it burns.
- Simple operation: all gas oven maintenance techniques apply.
- The design allows you to make a gas grill yourself.
And about the cons:
- There is no smoke in the kebab. If for you smoke is an obligatory “spice” of barbecue, then this is a big minus.
- You need to monitor the equipment, and always remember about the danger of explosion of gas leaks.
- The price is higher than for coal competitors.