When designing a foundation for a barn or large outbuilding, the main aspect is reducing the construction budget and ensuring the maximum possible resource. Therefore, floating slabs and MZLF tapes are rarely used; pile and columnar grillages are implemented. However, on complex soils, with high groundwater level and steep slopes, it is necessary to take into account SP standards and ensure the protection of underground power structures with waterproofing materials and insulation materials from moisture and swelling, respectively.
Features of building a foundation for a barn
For light change houses for equipment, the absence of a base is allowed. If the building is more massive, then the base must be completed.
The foundation gives the building:
- Strength.
- Durability.
- Thermal conductivity.
- Frost resistance.
First of all, you need to correctly determine the location of the future shed. Place it so as not to damage the landscape design of the site, for comfortable use or on soil unsuitable for planting.
Then you can start choosing the type of base.
Reinforcement mesh for foundation
Selecting a location
You cannot install a shed anywhere - first you need to carry out zoning, since you need to remember that the building will serve for more than one year and may become a hindrance to other buildings, or spoil the planned landscape design of the area. Therefore, it is necessary to allocate a place for it that will not be suitable for agricultural or decorative plantings, construction of a gazebo, garage, bathhouse, toilet and other buildings. If you install a shed in the far corner of the site, it will not only not interfere with the work process, but will also provide protection from prying eyes.
It is very important to think in advance about the optimal location for this outbuilding.
But if in the future you plan to build a woodshed in it, then you should not move the barn too far from the main building, since in winter it will be difficult to get to it, and firewood should always be at hand.
Having chosen a suitable area for installation, you can proceed to further actions.
Dependence of the type of foundation on the type of building
The choice of foundation type depends on the design features of the future barn, as well as on the purpose of the utility unit. Will it be a room for keeping livestock or a room for tools along with a workshop. All these functions performed will entail the choice of the type of base. Thus, lightweight buildings do not require powerful foundations, while capital structures will require a reliable, rigid foundation.
Light materials are considered to be wood, timber, and lining. Heavy materials for walls are concrete, brick, foam blocks.
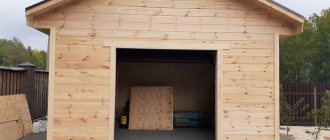
If the choice fell on a classic outbuilding made of timber with a gable or pitched roof, any foundation will do. Most often, columnar or screw ones are chosen due to their low cost and relative ease of installation.
A solid structure made of brick or foam blocks will require the installation of a more durable strip foundation, preferably a monolithic tile or block base.
Pile - screw
This is the simplest option for constructing a foundation structure in terms of speed of work. To do this, you need to select the piles themselves by size.
For one-story wooden buildings, which include a barn, it is better to use piles with a diameter of 89 mm and a blade diameter of 250 mm. This steel element can easily withstand loads of up to 3 tons.
Installation of screw piles is often carried out on heaving soils , so their length is chosen based on this indicator. But not less than 1.5 m for light buildings. They are simply screwed into the corners of the building to the required depth, and if necessary, intermediate elements are installed, after which the piles are secured with a metal profile or wooden beams.
Shed foundation depth
The depth of the base is selected according to the type of foundation, as well as taking into account the local level of soil freezing. Important: trenches are dug 15 cm more than the soil freezing depth.
Since a barn is most often a small-sized building, a shallow foundation will do just fine. Equally well suited for buildings made of wood or timber on clay or sandy soils. In this case, the hole is dug to a depth of about 60 cm.
For a more massive structure, for example, made of brick, as well as under unfavorable soil conditions, it is worth placing the foundation to a depth of up to 100 cm.
Which foundation to choose for a lightweight building?
When choosing any type of plinth, it is worth taking into account the main characteristics of the soil at the construction site.
The following soil properties are taken into account:
- availability of groundwater;
- soil compressibility;
- presence of quicksand;
- type of soil.
Based on the type of soil that predominates on the plot, the following types of plinth are selected:
- On sandy soil, which can “float” under high humidity conditions, it is more advisable to build a screw or columnar foundation. The freezing characteristic of such soil is usually 40–70 cm, this should be taken into account when deepening the base.
- The worst option for construction is sandy loam and loam. Such soil has a high degree of freezing (up to 2 meters), the ability to swell and contract, and often forms quicksand. For such soil it is worth choosing a screw base.
- Gravel soil is much less susceptible to freezing, is not subject to deformation and destruction, and is not subject to erosion. Here it is allowed to use both ribbon, columnar, and block views.
- The most favorable option for a construction site is rocky soil. It will not sag, will not freeze, and will not float. The only disadvantage of this soil is the labor intensity of processing, so any foundation can be installed except a screw one.
Metal piles
In order to make a foundation from metal piles, you do not need to dig pits and make drainage. They are either screwed into holes created with a hand drill, or directly into the ground, and go deep into the ground.
Metal pile foundationSource zwsoft.ru
At least two people are required to screw in the piles, as this is a rather labor-intensive process.
To strengthen and protect the inside of the piles, concrete is poured into them. First, the piles are screwed in to the required depth, making sure that they enter the soil strictly vertically. At the same time, rope markings are made in advance, which will show how to fill the columnar foundation level. To properly fill a columnar foundation made of metal piles, special funnels are used - as in the picture below.
Funnel for pouring concreteSource limtrade.nlA special funnel is installed in the pipe, which facilitates the filling process. Once the pipes are filled with concrete, it will take some time to set. Then it will be possible to weld the platforms for installing the grillage.
Required materials and tools
To save working time, as well as high-quality construction of the foundation, you should prepare in advance a set of materials and tools from the following list:
- crushed stone;
- water;
- cement with sand or a specialized building mixture;
- concrete mixer - in a pinch, you can get by with improvised means, but it will significantly save labor and time for mixing the solution;
- bricks;
- metal fittings;
- asbestos pipes;
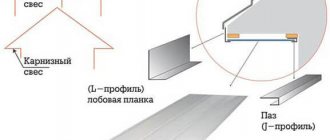
- waterproofing - polyethylene film or roofing felt;
- metal piles;
- Bulgarian;
- boards or plywood for formwork;
- foam blocks;
- Master OK;
- cord or twine;
- building level;
- pegs;
- rule;
- buckets and shovels (scoop and bayonet);
- roulette;
- tamper
The list may vary depending on the type of base and the preparatory work process.
Construction options
You can create several types of foundations from rubber tires. The most reliable of them, developed by specialists, are columnar and solid.
No hard-to-find tools or materials are needed to create a columnar or solid base.
But in any case, you can’t do without:
- rake or pipes for compaction;
- bricks (whole and broken);
- sand, roofing felt or linoleum;
- formwork boards;
- building levels;
- metal fittings;
- shovel
Columnar
A columnar foundation made of tires is especially needed for buildings that are being built in an area with increased seismic activity.
When it shakes, the tires will become a kind of soft buffer, capable of absorbing even strong tremors. They will protect the building from cracks.
Tires from trucks, agricultural and special equipment such as tractors or large snowblowers are best suited for building foundations.
They have a larger diameter, so the weight of the building is distributed more evenly. The foundation of large tires is stronger and more reliable.
At first:
“We clean the soil”, get rid of roots and stones. We remove the top 20-30 cm of soil saturated with moisture and dig a pit to lay the foundation. We do the installation only in two layers, then it will be much stronger and more reliable. We mark the boundaries with pegs. We put the tires on the pegs. We place the first tire exactly in the middle. Using a special tool (called a level) we perform horizontal alignment
It is very important that the tires are placed on the same plane to each other, otherwise they will not form a normal, reliable base. We fill all the voids between the tires with broken bricks. Cover it with crushed stone and compact it. We moisten the crushed stone. Pour the concrete solution (into the inside of the tires). The concrete will set in 4-5 days. Then it will be possible to begin installing the formwork (the height of its sides should be at least 10-12 cm)
You can remove it in at least a week and a half.
Solid
You can create a foundation with a continuous layer in different ways. The most common is the tiled option.
Such a foundation is a two-layer, evenly laid base made of tires.
We create a tiled base from tires like this:
- We clean the area, remove the moisture-rich layer of soil. There is no need to make a pit deeper than the freezing point of the soil.
- We lay down the tires. The tires should be the same, preferably with a larger diameter. These tires are more durable.
- We fill the voids between the tires with fine gravel or broken bricks. Sand is not suitable for this. If they fill voids, the foundation can quickly sink.
- We put roofing felt on the tires. Thanks to it, the surface intended for pouring concrete will become more even, and there will be no need to spend money on expensive waterproofing.
- Along the perimeter of the bus base of the building we build formwork with wooden sides at least 10 cm high.
- We lay reinforcement within the area outlined by the formwork.
- Cover with concrete mortar.
Without soil removal
A foundation made from car tires can be built without removing the soil at all. There is nothing complicated about it. We do this:
- We lay tires around the entire perimeter of the building.
- Fill with concrete mortar.
- We tie the tires with channels.
At the end, we bind the lower part of the building.
We invite you to read reviews from forum members about building a foundation from tires with your own hands for a barn, for a bathhouse or for a house on the Forum House website.
Construction technology
Construction technology is a set of measures aimed at creating a structure that meets the requirements of the selected type of structure. Construction as a whole consists of several sequential operations.
First of all, this is preparation of the site. The selected area is cleared of grass, small bushes, stumps, and a 10 cm layer of soil and carefully leveled. It is important to place the foundation on a flat surface to avoid further distortion of the structure.
Slab foundation
Warning of possible errors
Very often, when building foundations on their own, inexperienced builders make a number of mistakes that are subsequently very difficult, and sometimes impossible, to correct.
The most common ones are described below:
- An incompletely removed plant layer of soil from under the base of the future foundation threatens uneven subsidence of the latter. The roots and stems of plants, dying, will create additional pores in the soil, the location of which will be random and unequal.
- The sand cushion is not compacted enough, which also threatens uneven settlement of the foundation.
- The formwork is poorly secured. It may fall apart under the pressure of the concrete mixture.
- The reinforcement in the corners is connected “crosswise”, without providing sufficient contact between the bars. In case of high tensile stresses, the foundation in the corners may break and vertical cracks will appear.
- The installation of a protective layer of concrete is not provided. The fittings interact with air and begin to rust. Corrosion, spreading inward along the rod, destroys it and reduces its strength.
- The concrete being placed is too liquid. Often, when preparing water yourself, more than the prescribed amount is added to improve the workability of the mixture. As a result, the concrete delaminates - the coarse aggregate settles down, the fine aggregate “floats” up. It is necessary to carefully compact the concrete mixture poured into the formwork.
- It is not allowed to “dry” concrete to speed up hardening. Once it dries, it will dry out, but this will lose a significant part of its strength. On hot days, concrete is covered with film, tarpaulin or other similar materials. If necessary, water the structure with water to create the required temperature and humidity conditions.
Shed at the dacha
As a rule, auxiliary buildings and structures on the site are built with your own hands. This does not require knowledge of the same level as for the construction of a residential building with utility networks and communications. Therefore, it is quite justified to do the foundation yourself, without resorting to the services of third-party organizations. This will help reduce the cost of landscaping the site, and buildings made independently are easier to operate and maintain.
Detailed step-by-step instructions from marking to finished foundation
The first stage of construction is the same for all types of load-bearing structures - marking and routing. To do this, use a tape measure and wooden pegs to mark the corners of the future utility unit. The stakes are driven into the ground, a rope or cord is pulled between them and leveled to adjust the horizontal. Right angles must be checked.
Further, the construction processes differ fundamentally.
Columnar foundation
Future pillars are marked in each corner of the barn when building a simple structure. If the project is more complex, then it is necessary to install pillars every 1 - 1.5 meters of the perimeter of the structure. Using a garden drill, holes approximately 40x40 cm wide are dug in the designated places. Afterwards, a cushion of sand and crushed stone 20 cm thick is poured onto the bottom of each hole.
Next, the pillars are installed directly. Materials for use can be different:
- Brick - the pillars are laid out with standard masonry of one and a half bricks to the required height.
- Concrete blocks - this can be one large block or small blocks held together with cement mortar.
- Asbestos pipes of the required size are installed in holes and later filled with concrete.
- Formwork made of wood or plywood - in this case, concrete is also poured into the prepared cavity. After drying, the formwork is removed.
For strength, reinforcement rods are fixed inside the pillars whenever possible. Upon completion of the work, a layer of waterproofing is laid on top to prevent destruction by moisture.
Screw foundation
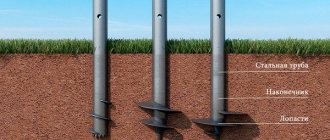
This design will not require additional soil preparation, because can be installed even on the most difficult types of soil. Here special metal piles with a sharp tip and cutting blades are used. Installation locations are outlined similarly to the columnar view.
The piles are screwed vertically into the ground by two to three people. To make work easier, there is a hole for crowbar at the top of each pipe. Be sure to check the entire structure vertically. Excess parts in height are cut off with a grinder. To give greater strength, it is recommended to fill the pile cavity with concrete.
Monolithic foundation
The most expensive and labor-intensive, but the most durable and durable type of base. To build it, you need to dig a pit the size of the proposed barn. A layer of sand and a layer of crushed stone, 10–20 cm each, are placed on the bottom. Everything is carefully compacted. Next, you need to build formwork 10–15 cm high above ground level. Connecting reinforcement or mesh is laid, and the space is completely filled with concrete.
Strip foundation
This type is intended for the basis of wall structures. According to the markings, a trench up to 50 cm wide is dug along the perimeter. It is important to maintain right angles. The bottom is covered with sand and compacted. Next, a formwork is constructed, rising 20 cm above the ground. A reinforcement frame is made using reinforcement and wire. Then the entire tape is filled with concrete mortar.
Block foundation
Installation of blocks in this design occurs on a monolithic base. If we are talking about a budget version of the base, then it is allowed to use concrete blocks on a specially prepared pad. In this case, a hole is dug to the size of the utility block, a layer of sand is poured, spilled with water and compacted.
Then a layer of crushed stone is also carefully compacted. Concrete blocks of the required size are installed on the constructed site along the perimeter and leveled horizontally.
Construction of a strip foundation
Do it yourself
The barn itself is an easy construction, because it is most often erected as a frame structure, which means it does not bear large loads on the foundation. A frame barn consists of four load-bearing beams installed vertically at the corners of the building, tied with timber at the top and bottom. This means that it is better to build a columnar foundation for such a structure, but screw piles can also be used.
In this case, the pillars are erected precisely at the corners of the building. If you need to build a large house, then, based on the length of the span of the walls, intermediate pillars are poured in increments of 2 - 3 m between the corner support foundations. By the way, the fastest way to build foundation pillars is to use ready-made concrete blocks rather than concrete mortar.
The construction of a foundation for a barn made of blocks is not inferior in load-bearing capacity to either metal piles or a monolith. It is important what sizes the blocks are purchased. Their main purpose is to create a strong and reliable support, so the main thing in this matter is to accurately determine the dimensions of the foundation pillars, both in height and in cross-sectional size. From which it follows that first of all it is necessary to determine the pressure that will act on the foundation from the side of the building.
Tips/Tricks
Before pouring the supporting structure, it is necessary to prepare a good, tenacious mortar from a mixture of cement, water, sand and gravel. The following rules will help you do this correctly:
- When purchasing dry cement or building mixture, you should definitely pay attention to the production date. Regular Portland cement will work here.
- To save cement, you should choose gravel of different diameters with large and small stones. In this case, the fine gravel will serve as a connecting link for the coarse gravel and less cement will be needed.
- Crushed stone should not contain debris or various impurities.
- Clean water should also be used, preferably drinking water.
- The sand must be free of clay and silt.
- The classic recipe for mortar: 3 parts sand, 5 parts crushed stone, 1 part cement - pour everything with water, mix until a thick, homogeneous mass is obtained.