Why is ventilation needed? Let's give some illustrative examples.
Lack of ventilation in the under-roof space will lead to increased humidity. The wooden substructure and thermal insulation will become damp. Wet insulation will no longer retain heat and will begin to deteriorate. The sheathing and rafter system will mold and rot.
If we mean a living space, due to insufficient ventilation the air will stagnate. The house will be too humid. Because of this, the wallpaper will begin to peel off and mold will appear in the corners. The fungus can trigger allergies or asthma in the residents of the house.
If the pressure in the sewer system is not balanced, unpleasant odors will not be removed. There will be a specific “aroma” in the house. To avoid this, natural ventilation must be provided.
High-quality ventilation is the key to a comfortable microclimate in the house. The air must actively circulate and be renewed. In this case, excess moisture and unpleasant odors will be eliminated in time.
We will tell you how to ensure ventilation in the living room and under-roof space. We recommend using the following items from the range:
- Ridge ventilation tape.
- Ridge valve (deflector).
- Ventilation outlet.
- Roof valves KTV and P-KTV.
- MP MAXI hood output.
- The output is universal.
- Hood outlet.
- Sewer outlet.
Let's consider their functions and features. We will also learn how to attach ventilation elements to corrugated sheets and metal tiles.
Ventilation ridge tape
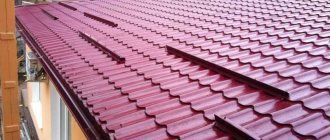
The ventilation tape protects the under-roof space from dust, debris, snow, rain, insects, birds and does not interfere with air circulation. With its help you will ensure ventilation of the roof made of corrugated sheets or metal tiles.
The central part of the tape consists of polypropylene fibers and geotextiles. Polypropylene has water-repellent properties and does not allow moisture to penetrate into the under-roof space. At the same time, the tape breathes.
The tape has corrugated edges. They are made of profiled aluminum. During installation, the edges are straightened and the tape takes the shape of any roofing material.
On the reverse side of the tape there are strips of butyl adhesive-sealant. They ensure reliable fixation of the tape on the roof.
Length - 5000 mm. Width - 250 or 300 mm.
For which profiles it is suitable : for all profiles of metal tiles and corrugated sheets.
How to install : the ridge tape is laid before installing the ridge strip. Roll the tape along the ridge, pressing it tightly against the roofing. The corrugated edges will straighten out, the tape will adapt to the relief of the metal tile or corrugated sheet. The tape has an adhesive layer, so it will stick straight into place.
Ridge valve (deflector)
Ridge valve (deflector) is a ventilation element for a roof made of corrugated sheets or metal tiles. It creates air flow on the skate. Thanks to this, the under-roof space is actively ventilated.
Manufacturer: Vilpe company.
How to mount:
- Install the ridge strip.
- Calculate the number of ridge valves. To do this, measure the length of the skate. Subtract 3 meters from it - the deflectors are mounted at a distance of 1.5 meters from the ends. And divide by 3 - valves are installed every 3 meters. You will find out approximately how many deflectors you will need.
- Mark the installation locations of the valves. The first 2 deflectors are mounted at a distance of 1.5 meters from the ends of the ridge. The remaining valves are at a distance of 3 meters from each other. Attention: if ventilation shafts and other structures that interfere with air circulation go to the ridge, valves are installed on both sides of them.
- Remove the ridge vent cover.
- Check whether the shape of the valve frame (base) matches the shape of the ridge strip. If the strip is round, there is no need to trim the frame; if it is triangular or U-shaped, trim the base of the valve. The frame has grooves for cutting.
- Attach the valve frame to the ridge strip and trace its outline.
- Cut a hole in the strip that matches the contour of the valve frame.
- Glue the end seals to the base of the valve.
- Fix the valve frame to the ridge strip with self-tapping screws.
- Place the valve cover onto the frame. Press until it clicks.
- Check if the valve cover moves. It should move along the ridge by 5 mm.
Features of the hip roof rafter system
The described roof is assembled from the following elements:
- Mauerlat/floor beams (used as support for rafter legs);
- Ridge purlin (this element affects what configuration the roof will be);
- Ordinary side rafters (required to connect the ridge and load-bearing walls);
- Diagonal (corner, slant) rafters;
- Central rafter hip;
- Narozhnikov (the so-called shorter rafter legs, with the help of which the slanted rafters and the mauerlat are connected);
- Struts and racks (used as additional supports);
- Crossbars (rafter legs are connected together);
- Sprengels (used as additional support for the diagonal rafters).
If hanging rafters are used when arranging a hip roof, then there is no need to install a ridge girder. It can be replaced by central trusses - rafter legs interconnected by crossbars. As for the rafter system in the center of the roof, it is done in the same way as in the case of the construction of a gable roof.
To ensure that all sizes fit perfectly, professionals recommend making roof trusses on the ground, starting from a pre-designed template. When installing a truss, it is important to check each structure regarding its vertical location. In order for the hips to have the correct geometry and be symmetrical, the outermost trusses must be at the same distance from the end walls of the house.
After the row is installed, bars or boards are installed from the formed system, which connect the trusses. Next, slanted rafters should be attached to the outer trusses, which rest on the corners of the structure. The next stage is the installation of the central hip rafter and the frames.
Ventilation outlet
The ventilation outlet ensures air circulation in the under-roof space. This element is characterized by high throughput. One ventilation outlet passes 200 cm2 of air.
Resistant to shocks and other mechanical influences. Does not rust because it is made from polystyrene. It looks aesthetically pleasing - the paint with which polystyrene is coated does not fade. The ventilation outlet can be ordered in the color of the roof - there are 9 shades to choose from.
The ventilation outlet is fully equipped and ready for installation. A sealant is applied to its base.
Products are made to order.
For which profiles it is suitable : for Lamonterra® and Lamonterra®X metal tiles. A ventilation outlet for a flat roof can be made to order.
The ventilation outlet is mounted on a roof with a slope of 15-45 degrees.
How to install : the ventilation outlet is installed on the slopes. The distance from the ridge to the valve is less than 60 cm.
Attention: in order for air to circulate freely from the eaves to the ridge, ventilation outlets must be installed in each rafter span.
- The vent kit includes a paper template. It shows the outline of the hole that needs to be cut in the roofing material. Attach the template to the roof and trace it with a marker.
- Along the contour of the template, cut a hole in the corrugated sheet or metal tile.
- Attach the ventilation outlet to the roof and secure its base. To do this, use 4.8x28 (35) mm self-tapping screws.
- There is no need to additionally seal the installation site. The ventilation outlet is hermetically connected to the roofing material, leaks are excluded.
What are the advantages of a ventilated roof?
This type of roofing has many advantages. These include:
1) Installation of this roof can be carried out even at sub-zero temperatures, if it does not reach minus twenty degrees Celsius.
2) When carrying out reconstruction, it is necessary to remove the old roofing covering to a minimum. And the preparatory work does not require much time. This will allow you to save money and time.
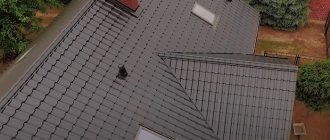
3) Over time, all roofing elements, such as floor slabs, roofing, and thermal insulation, dry out completely. This eliminates the possibility of rot and mold, which negatively affect the roof structure;
4) This type of roofing is resistant to temperature changes, frost, ultraviolet radiation and mechanical damage;
The ventilated roof is installed in the following order:
1) First you need to prepare the foundation for the work. To do this, it is necessary to eliminate cracks and holes. It is important to note that the roof slope must be at least 2-3 degrees.
2) Then a vapor barrier film and an insulating layer are laid. As a rule, mineral wool or glass wool is used as insulation. They provide high quality and low installation costs.
3) In the future, installation work may differ. They depend on the type of roof.
But most often a layer of waterproofing and a cement screed are laid.
4) roll fused materials are used as roofing.
They will provide high quality. A gas burner is used for installation. The overlap of the material should be 1-5 mm.
Roof valves KTV and P-KTV
Roof valves KTV and P-KTV perform the same function as the ventilation outlet. They are needed for ventilation of the under-roof space. Mounted on slopes.
Made from impact-resistant polypropylene, they are resistant to mechanical stress.
Manufacturer: Vilpe company.
Which profiles are suitable for : KTV and P-KTV differ in the shape of the base, therefore they are suitable for different materials.
The KTV roofing valve is optimal for Lamonterra®, Lamonterra®X metal tiles. The P-KTV roofing valve is universal, it is suitable for any metal tile profiles and corrugated sheets no higher than 38 mm.
How to mount:
- Take the paper template that came with the roof vent. Place it on the roofing material and outline it with a marker.
- Cut a hole in the corrugated sheet or metal tile along the contour of the template.
- Apply silicone sealant along the contour of the hole (for reliable protection against moisture). Unlike the vent outlet, there is no sealant at the base of the roof vent.
- Place the roof vent over the cut hole. Secure the base of the element with 4.8x28 (35) mm self-tapping screws.
Advantages of a ventilated roof
The design of a ventilated roof has been developed quite a long time ago, its high efficiency has been proven by many years of practice. The popularity of this technology is due to the following advantages:
- high degree of protection of all layers of the roofing cake from getting wet;
- no swelling of the roof covering;
- the possibility of using organic insulation;
- economical due to the possibility of installation on top of an old roof.
If a ventilated roof is built on top of an old structure , then the latter “comes back to life”: the wooden elements become dry again, moisture is removed from the materials of the roofing cake. As a result, the roof turns out to be double , its resistance to adverse weather conditions increases, and the whole house becomes truly warm and cozy.
MP MAXI hood output
MP MAXI output is used as:
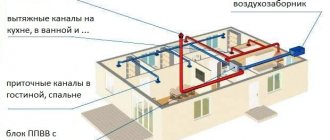
- exhaust outlet (provides ventilation of the living space);
- sewer outlet (eliminates unpleasant odors and normalizes pressure in sewer systems).
Differs in increased sizes. The total height is 770 mm, the diameter of the inner pipe is 125 mm.
MP MAXI is made of impact-resistant polystyrene and is resistant to mechanical stress. Even when the “snow cap” comes off the roof like an avalanche, it does not damage the hood outlet. Therefore, MP MAXI is in demand in the northern regions.
An insulated (insulated) pipe with a built-in cap and a passage element are supplied with the MAXI MP.
- The insulated pipe does not freeze. This is especially important for the harsh northern climate.
- The hood with wide ventilation gaps allows air to pass through, even if the hood outlet is covered with snow. It also protects the pipe from precipitation and debris. No ice forms on the hood, which could block the air flow.
- The upper part of the passage element rotates around its axis by 180⁰. Therefore, MP MAXI can be used on roofs with different slopes - 30-45o or 45-60o. You don't need any additional items.
MP MAXI does not fade and looks aesthetically pleasing. It is made in 10 shades, you can choose it to match the color of the roofing material.
Products are made to order.
For which profiles is it suitable : for metal tiles Lamonterra®, Lamonterra®X, Moncatta®, Tramontana®, Monterrosa®, Montecristo®, for profiled sheets S-21, MP-20, NS-35. Can be used on flexible tiles and standing seam roofing.
The permissible slope of the slopes is 30-60 degrees.
How to mount:
- Find out where the duct “exits” onto the roof. This is where you will install the MAXI MP.
- Trace the paper template that comes with the kit with a marker.
- Cut a hole in the metal tile or corrugated sheet according to the template.
- Connect the bottom of the insulated pipe and the duct. If the insulated pipe does not reach the duct, use corrugated pipe of the appropriate diameter.
- Seal the junction of the hydro-, vapor barrier and the outlet of the MP MAXI. Use connecting tape.
Physical heat transfer processes
Heat transfer process.
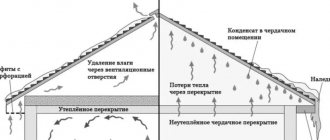
In a heated house, temperature changes and the presence of moisture in the air in the form of steam and condensation are inevitable. Steam is produced by human or animal activity, penetrates into building structures, cools and moisturizes them. The vast majority of building materials are permeable to some degree. Therefore, any residential building, individual or multi-apartment, is an air volume in which warm air rises upward through all structures.
In tall multi-storey buildings, a traction effect appears. Warm air rises to the upper floors, this is especially noticeable in the entrances, and penetrates outside through windows and attics. On the lower floors, on the contrary, there is an influx of outside cold air. This process also occurs in a one-story heated house, only with less dynamics.
On the other hand, warm air steam condenses in structures into water, which not only moistens them, but also has the ability to flow down, filling the cavities in the structures. The main function of condensing water vapor is assumed by the uppermost part of the building - the roof. In winter, this process occurs intensively and constantly, and in summer, mainly during the cool night time.
Universal output
The universal output can be used in two cases:
- to ensure ventilation of the under-roof space;
- to eliminate odors and normalize pressure in sewer systems.
Made from polystyrene, resistant to mechanical damage. Doesn't fade. Available in 13 colors, among them you will find an option for your roof. Equipped with a cap that protects from precipitation and debris.
The height of the universal outlet is 200 mm. The internal diameter of the element is 110 mm.
Products are made to order.
For which profiles is it suitable: for metal tiles Lamonterra®, Lamonterra®X, Moncatta®, Tramontana®, Monterrosa®, Montecristo®, for profiled sheets S-21, MP-20, NS-35. Can be used on flexible tiles and standing seam roofing.
How to mount:
- Find out where the duct “exits” onto the roof. This is where you will install the universal output.
- Trace the paper template with a marker.
- Cut a hole in the roof that matches the template.
- Secure the base of the universal outlet with self-tapping screws.
- Install a pipe - corrugated or insulated - under the outlet hood. Attention: if you are using a universal outlet as a sewer outlet, choose an insulated pipe. If you use a universal outlet for ventilation of the under-roof space , choose a corrugated pipe.
- Connect the bottom of the insulated or corrugated pipe to the duct.
- Apply connecting tape to the junction of the universal outlet and the hydro- and vapor barrier.
Rafter system
In order for the hip roof to be sufficiently rigid and reliable, it is necessary to arrange all its elements in a certain way.
Sloping types of rafters need to be attached to the internal corners of the walls, while diagonal ones - to the external ones . This is fundamentally important. Due to the fact that the slanted rafters bear a large load, their length should also be greater.
The slanted rafter legs should become a support for the shortened rafters of the slopes , which are called narozhniki. Most often they are made from two paired legs.
Diagonal rafters must be supported by one or two supports . For this purpose, racks made of timber are used. The struts should be placed in such a way that an angle of 45 degrees is formed between them and the horizontal support.
The intermediate rafter legs should rest on one side of the ridge beam and the other on the mauerlat . They should be placed in steps of 1-1.2 meters. Every second rafter is best connected to load-bearing walls using twists.
They can be made from ordinary wires, the radius of which is 2 millimeters. Using a reverse bracket, the intermediate frame should be connected to the Mauerlat.
IMPORTANT! A very important point of the entire rafter system is the junction of the central and diagonal rafters . To ensure that no problems arise in them, double bevel cuts should be made on the beams .
The half-legs or half-legs (as they are often called) should rest on the mauerlat on one side and on the diagonal leg on the other.
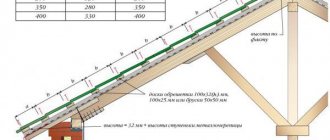
Construction of a hipped roof truss system: drawings and diagrams below.
Drawing of the rafter system
Rafter system diagram
Hood outlet
The hood outlet helps remove fumes and odors from the living space.
Made from impact-resistant polypropylene, not subject to mechanical stress.
Equipped with a cap and insulated pipe. The pass-through element must be purchased separately.
Available in 11 standard colors, choose any to match the color of your roof.
Height - 500 or 700 mm. External diameter - 160 mm, internal - 125 mm.
Manufacturer: Vilpe company.
For which profiles it is suitable: it depends on the type of passage element. The range includes options for metal tiles Lamonterra®, Lamonterra®X, for flexible and seam roofing. There is also a universal passage element Pelti, it is suitable for any profiles of metal tiles and corrugated sheets with a height of no more than 38 mm.
How to mount:
- Mark the installation location for the hood outlet - drill a hole in the roofing material and waterproofing.
- Trace the paper template that comes with the passage element and cut a hole in the metal tile or corrugated sheet.
- Remove the sheet of roofing material.
- Cut a hole in the waterproofing according to the seal template.
- Apply sealant to the seal.
- Apply the sealant to the waterproofing material. Press firmly.
- Secure the seal to the sheathing using self-tapping screws.
- Reinstall the removed sheet of roofing material.
- Apply sealant to the base of the feedthrough.
- Fix the passage element to the roofing material. Use self-tapping screws.
- Insert the base of the hood outlet into the passage element.
- Connect the insulated pipe to the duct. You can use a corrugated pipe for this.
Sewage outlet (regular and isolated)
The sewer outlet helps normalize the pressure in the sewer system and eliminate unpleasant odors. Made from impact-resistant polypropylene, resistant to mechanical stress.
It can be insulated (insulated) or non-insulated. The first is used in regions with sharp changes in day and night temperatures. When it is warm during the day and the temperature drops significantly at night, condensation forms at the sewer outlet. At low temperatures it freezes, which can negatively affect the ventilation element. If the sewer outlet is insulated, the temperature drop will be smooth. This will avoid condensation.
The insulated sewer outlet is equipped with an insulated pipe. The pass-through element and cap are not included in the kit; they must be ordered separately.
The sewer outlet is available in 10 standard colors.
Height - 500 mm, internal diameter - 110 mm.
Manufacturer: Vilpe company.
How to install : the sewer outlet is mounted in the same way as the Vilpe hood outlet. But they connect it not to the air duct, but to the sewer pipe.
The optimal angle of inclination of a hip roof made of metal tiles
For a standard four-slope scheme, all four slopes are located either at the same angle of inclination, or the hip triangular slopes are inclined more than the two main planes. From the point of view of the strength of the rafter frame, an angle of 35 o ensures minimal load on the hipped system and at the same time guarantees good drainage of water from the roof surface.
In this case, the small hips must be raised to an angle of 15°, otherwise water will flow in at the joints. Accordingly, the main pitched surfaces have to be positioned at an angle of 40-45 degrees.
Bottom line
We learned how to ventilate a roof made of corrugated sheets or metal tiles, what elements are required and how to install them.
Ventilation elements “Metal Profile” are equipped with everything except self-tapping screws. You do not need to choose caps, passage elements, or insulated pipes. Vilpe products will have to be “assembled” like a construction set: you will have to order passage elements and caps separately. But self-tapping screws and other necessary accessories (sealant, template, water seal ring) will be included in the kit.
Choose ventilation elements from the Metal Profile catalog. You will purchase high-quality products that will delight you with a long service life. You only need to select the required product and color.
Now you know how to ensure high-quality ventilation of a roof made of corrugated sheets or steel tiles!
Main mistakes in installing a ventilation system: how to avoid them
Considering that today many people install the roof of their home on their own, let’s look at the most common mistakes when installing ventilation systems.
- SNiP standards are not taken into account.
- Unsuitable ventilation elements selected.
- The ventilation ducts are not located symmetrically.
- The system throughput was incorrectly calculated and the heat balance was not taken into account.
- Installation work was carried out incorrectly.
The basic rule when designing ventilation systems is that the more proportional and shorter the ventilation is, the more efficiently and with less noise it will work.