Not a single dacha would be complete without a landscaped recreation area. And it’s better if it’s a structure where you can shelter from the rain, receive guests, and cook food over a fire.
A brick gazebo - a durable structure with a long service life - will become the pride of the owners and a decoration of the site. And if you make it yourself, it will save the cost of hiring a construction team.
When should the building be used: in winter or summer?
Due to the high thermal insulation properties of the material, such a permanent structure can be used at any time of the year.
In addition, a brick gazebo has other advantages. Among them:
- fire safety;
- ability to withstand heavy loads;
- resistance to the influence of precipitation and moisture;
- ease of repair;
- long period of operation;
- compatibility of appearance with any design direction.
At the preparation stage, construction may seem quite labor-intensive, but the result obtained in the form of a reliable building compensates for the time, effort and finances spent.
Harmony in the landscape
The location of the structure will affect the entire landscape composition. A selection of photos of brick gazebos in garden plots will help you find a suitable design and location in the garden.
The appearance of the gazebo should be harmoniously combined with other buildings on the suburban area
What you should pay attention to when placing a gazebo:
- The building will not be combined with parterre flower beds, lawns, or mixed borders. The front areas will be lost against the backdrop of the massive structure.
- Maintain the general style of the buildings. A rural chalet-style house will not look good with the pompous brick architecture of the gazebo.
- Size is important. A bulky structure will take up extra meters in a small area and will overload the overall space. Be sure to consider the size of the area.
- Sudden changes bring disharmony to the garden ensemble. Small architectural forms are usually placed on elevations.
- Select plant arrangements around the gazebo to suit your taste. Consider the type of soil and type of plant: some representatives of the flora are comfortable growing in the shade, while some species need bright sunlight; clay soils are suitable for some roots, while dry sand is suitable for others.
- Additional light sources in the garden will decorate the composition. Illumination of paths and gazebos will highlight the area at night and add mystery and romance to the overall atmosphere.
To illuminate the gazebo, use lanterns and lamps suitable for the chosen style direction.
Which design form should you prefer?
In fact, absolutely any geometric shape can become the basis of a gazebo.
The most popular are:
- Square. The optimal size is 4x4. Features quick and easy assembly. It allows you to make the most of your free space. Does not require special skills.
- Rectangular. Simplified design. You can easily build it yourself. Construction does not take much time. The most common size is 3x4. This form allows you to clearly calculate the required amount of building materials. A rectangular gazebo will suit any type of layout and style of landscape design.
- Round. Most often it is a type of open rotunda. Requires careful design, since any unaccounted detail can lead to distortion of the structure.
- Multifaceted. The best option is a hexagon shape. The original appearance will add elegance to the garden area. Materials need to be purchased in reserve, because most of them are designed for the construction of rectangular buildings. The entrance can be located anywhere, but such a decision will not be reflected in any way on the aesthetics of the overall picture.
- Combined. Involves a combination of different geometric shapes. Suitable for an area with a large area, where the seating, eating and cooking areas are separated.
Remember! By increasing the angles inside the structure, it will be possible to expand its dimensions, but at the same time, the usable area will decrease significantly.
Preparatory work
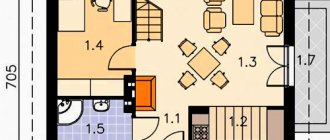
Before starting construction, it is recommended to make a diagram of it to clarify its dimensions and accurately fit it within the selected area. Based on such a diagram, it will be easier in the future to calculate the amount of consumables, and do not forget about utilities and necessary elements.
An excellent solution would be a clean and spacious place without trees nearby, since a powerful rhizome can then negatively affect the foundation.
The required area should be well prepared. The surface must be smooth and straight. After this, you need to perform marking. Next, remove the fertile soil.
Types of gazebos
It is worth highlighting the following types:
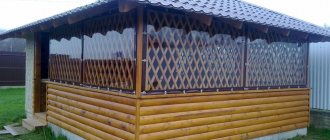
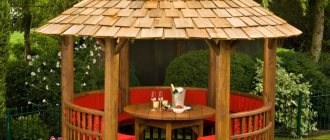
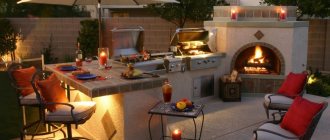
- Open. Consists of support posts made of metal or wood and a roof. Instead of walls, beautiful curtains, climbing plants. Not intended for use in winter. A grill or barbecue oven can be placed inside.
Photo: a combined version of brick and wood - simple and beautiful
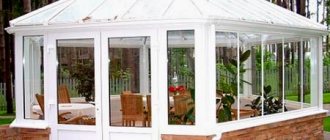
- Closed. It is a small house. Such a gazebo is glazed, doors are installed, and ventilation is adjusted. A fireplace is most often used for heating. Suitable for year-round use. There are no restrictions in the choice of furniture and interior style.
3D gazebo project
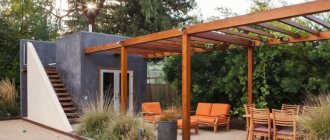
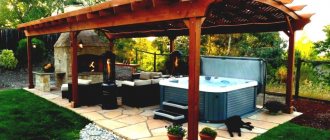
- Attached. The gazebo becomes a continuation of the main building. The installation of the structure is carried out to one of the walls of the house, which saves space on the site and reduces the cost of the entire structure due to less consumption of materials. Such a street building will be reliably protected from the influence of precipitation and wind. Materials are selected in accordance with the composition of the house. You can also install windows and doors in it.
- Freestanding. Requires the creation of a solid foundation. It is necessary to choose the right location, taking into account the climatic characteristics of the region. There are closed and open types.
Photo: closed version of the building with plastic windows
The price of ready-made gazebos will depend on the size, shape and cost of building materials. The average cost of work is 3000 rubles. for 1 sq. m.
If the owners have firmly decided to build it themselves, then the article will offer step-by-step construction instructions and photos of finished brick gazebo projects, among which the reader will be able to find a suitable option.
Drawing up a project and choosing a location
The project is based on the purposes for which the gazebo is being built. The size of the building, the required amount of materials, the shape and type of structure will depend on them. You can immediately think about decorating the object.
The most complex in terms of design are closed gazebos, which are additionally equipped with lighting and heating devices, plumbing, entrance doors and windows.
Another important point is the choice of location. The gazebo should fit into the design of the site and be located in a picturesque location. It is better to locate the recreation area near a pond or flower garden. It is better to build buildings that serve as a kitchen or dining room close to the house.
The selected area should be cleared and leveled before starting work. After this, the construction process can begin.
How to choose the right brick?
Before you begin creating a structure, you need to decide on the type of material used.
To do this you need to remember:
- White sand-lime brick will ensure neat masonry. Due to this, it, along with facing, is often used for finishing work.
- The foundation and walls of the future structure should be built of red brick. It is resistant to moisture and has a longer service life than white.
- The clinker type of brick does not require finishing. It is recommended to use it for outdoor masonry - it will give the gazebo an attractive look without any finishing. Before you begin creating a structure, you need to decide on the type of material used. To do this you need to remember:
Having decided on the basic material, you should prepare the site, tools and begin constructing the structure.
Floor
For the installation of floors in gazebos, materials are used that are resistant to fluctuations in humidity and temperature. In addition, caring for them should be simplified to a minimum.
This:
- ceramic and paving slabs;
- porcelain stoneware, stone.
- wooden or composite decking board.
Floor installation technology is determined by the choice of coating:
- Materials made of wood and wood materials are afraid of stagnant water, so they are laid on a ventilated base. Logs are installed at some distance from the ground. Boards, WPC, terrace or deck boards are attached to them with small - 3-4 mm - gaps. This provides the necessary ventilation and eliminates excess moisture.
- For laying ceramic tiles and porcelain stoneware, a concrete base is installed. A layer of mortar 5-7 cm thick is poured over the reinforcing mesh and leveled. You can use a semi-dry screed. The floor covering is glued using cement mortar after the concrete has hardened.
- Paving slabs and stone are laid on a layer of sand. First, the soil is compacted and drainage is arranged from crushed stone with a layer of at least 12-15 cm.
If you plan to use a stove or open fire, but prefer wooden floors, keep in mind that in the “hot” zone within a radius of 1 m, the flooring should be non-flammable, and the rest of the wood should be impregnated with fire retardants.
Step by step construction
In order for the building to last for many years, each type of work should be distributed in stages. Among them:
- Design.
- Pouring the base.
- Frame installation.
- Construction of the roof.
- Laying the floor.
- Finishing.
- Interior decoration.
In addition, you must immediately prepare:
- level;
- roulette;
- a trough for mixing mortar or a concrete mixer;
- bayonet shovel;
- welding machine;
- wooden pegs;
- rope (for marking the area)
- boards;
- cement;
- sand;
- crushed stone;
- fittings;
- waterproofing;
- trowel;
- beam;
- metal pipes;
- roofing material.
The key to successful construction is a well-drawn design drawing that will help avoid mistakes in the process of its creation.
Project development
First you need to draw a rough sketch of the future gazebo. Please take into account:
- So that the building fits harmoniously into the style of the surrounding buildings.
- Dimensions and shape of the structure for accurate calculation of the amount of building materials.
- Wind rose. If you plan to lay a fireplace or barbecue, you need to take this factor into account so that those around you do not drown in a smoke screen.
- Location of trees. Their roots will cause damage and destruction to the foundation over time.
Having chosen the location and type of gazebo, you can begin to create a construction diagram, which must include a detailed plan of the foundation, frame, roof, and indicate the method of laying communications.
The clarity of the project will be ensured by drawing up three drawings simultaneously. In them, the future gazebo must be depicted in cross-section, from the front and side.
When the development of the project is completed, a cost estimate is drawn up, which outlines how much each type of material costs and its quantity, and the total cost figure is displayed.
It’s not difficult to build a structure with your own hands that would decorate the site and serve as a place to relax with family or friends. The main thing is desire and skills.
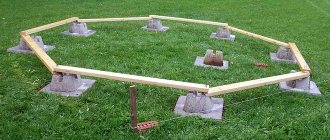
Selection, laying the foundation
The type of foundation must be selected based on the functional purpose of the building. Open structures are light in weight and a columnar design is suitable for them. But a closed gazebo should be erected on a monolithic, strip foundation.
Remember that a columnar base is not suitable for brick supports, since without a grillage they will become loose on the sides.
A good solution is to use a combined option, when the cooking area with a barbecue or oven will be on a strip, and the corner for summer relaxation will be on a column.
If the building site is covered with sandy, clayey soil, it is better to use a strip shallow foundation. This is a fairly cheap option, since 1 linear meter will cost 4.5 thousand rubles.
You can get it as follows:
- The area is leveled and the top layer is removed to a depth of 20 cm.
- Marking is carried out using pegs and rope.
- A trench up to 50 cm deep is dug along the perimeter.
- Sand is poured into it at a level of 20 cm. It is filled with water. It's being compacted.
- After which 10 cm of crushed stone is applied.
- The frame is knitted from 12 mm reinforcement. Formwork is formed from boards. The height of the tape should not exceed 60 cm and the width 40 cm.
- The base is filled with concrete mortar. After complete hardening, the formwork is removed.
- The last step is to apply a tape of waterproofing material on top.
If the project involves the construction of a fireplace or stove, a separate foundation must be built for them.
Frame and walls
Since buying bricks for a solid structure is expensive, combined buildings have become popular. For example, in gazebos made of brick and wood, half of the structure is made from the first material, and the upper part, including the roof truss system, from the second. The base is finished with natural stone. Forging elements are added around the perimeter.
The optimal solution is to make the support pillars from brick, and use wood, polycarbonate or simply glaze as the material for the walls.
In order to get a brick frame, you need:
- Weld 4 iron rods to the parts of the reinforcement sticking out from the foundation. Form them into a frame.
- Mix a solution of cement and sand in a ratio of 1 to 3.
- Prepare hollow bricks. Place the roofing felt on top and pull the welded reinforcement through them.
- The evenness of the order is checked using a building level.
- The width of the support pillar is 1 brick.
- The wooden post is attached to the masonry with an anchor pin, which is driven into the brick. And in its lower part a hole is cut for the thread. This way it screws in.
To ensure accurate application of the mortar and smooth seams, it is recommended to use stops made from reinforcement bars, which are pulled out after laying the next row of bricks.
Roof
When erecting the upper part of the gazebo, the angle of inclination of the slope must be at least 45 0. In this case, the snow will not linger on the roof and create unnecessary load.
The rafters are already mounted to the studs previously prepared in the masonry. After which they are covered perpendicularly with lathing.
If the gazebo will serve as a summer kitchen, the place where the pipe exits to the roof is covered with fireproof material.
In some cases, the roof deck requires the manufacture of counter-lattice.
Good for roofing:
- slate;
- polycarbonate;
- corrugated sheeting;
- metal or flexible tiles.
And also in the private sector you can see the option of an iron roof, which is then painted.
Floor
The economical and most practical solution is to fill it with a concrete screed. To do this, it is necessary to remove the top layer of soil and level the surface. If necessary, treat with chemicals to get rid of vegetation. The prepared area is filled with solution and leveled with the rule. As soon as the mixture dries a little, cover it with plastic wrap. This is a necessary measure to avoid the appearance of cracks. The floor will be dry in at least a week.
An alternative would be to lay paving slabs on a sand bed.
For closed gazebos, a wooden floor option is suitable, when boards are laid on top of the laid beams. There are many videos on the Internet that describe this technology for creating flooring in detail.
Decoration and interior design
When the basic processes are completed, the building should be given an attractive appearance. The corner part of the gazebo is treated with stone and decorative tiles. Siding is suitable for walls. Glass doors will look original and provide a good overview of the area. An open gazebo can be decorated with forged elements made of aluminum and steel. Plant climbing plants and shrubs along the perimeter.
There are no restrictions in choosing interior design. It is becoming popular to decorate a room in a rustic, “Country”, “Provence” style.
Their integral parts of the decor are antique furniture, plants in pots, sideboards with a lot of dishes. In the color scheme, preference is given to discreet tones of blue, lilac, yellow, and green.
Roofing device
For any roof you will need to install a frame - a rafter system. A support beam with a cross section of 100x100 or 150x150 mm is laid on the pillars.
The rafters are mounted depending on the shape of the roof - in pitched structures they rest on 2 opposite mauerlats, in hipped ones along the entire perimeter of the building and converge at one point.
Let's consider fastenings of the most popular types of roofing materials:
- Flexible tiles. A continuous deck of plywood, OSB or boards is laid on the rafters, with waterproofing on top. Each strip of tile (or individual elements) is glued and additionally nailed with roofing nails. The next row covers the place of fastening, thereby preventing the seepage of precipitation.
- Metal tiles. The decking for the roofing material is made sparsely. The boards are laid in increments equal to the wavelength of the tiles. Usually this is 35 cm. The sheet is fastened with roofing screws to the lower deflection. Each subsequent sheet is edged over the previous one and secured.
- Ondulin. The lathing for corrugated cellulose-bitumen sheets is installed in increments of 45 cm with a slope of 10-15° and 61 cm if the angle is greater. For fastening, roofing nails are used, which are driven into the upper part of the wave.
The installation of the roof is completed by installing the ridge element, wind board, and protective strips in the places where the chimneys pass.
If the gazebo is open, the roof structure ends there. In insulated rooms, the roofing pie is more complex. It is necessary to install not only a heat insulator, but also a waterproofing (top) with a vapor barrier (bottom). Dense polyethylene films and vapor-permeable membranes are used. To protect the insulation from condensation accumulation, vapor barrier materials must be absolutely impenetrable to vapor molecules, while waterproofing should not prevent the evaporation of moisture into the atmosphere.
Photo gallery
And to simplify the process of building and decorating a building, we offer several options for ready-made projects.
Option for a gazebo with a brick frame. Instead of walls and windows, polycarbonate is used.
The lower part of the building is made of brick, topped with stone. The supports are metal pipes. The openings on the sides of the structure are lined with wood.
The supports of this gazebo are made of brick. The fencing is made of forged elements. A wooden rafter system is used for the roof.
It is worth noting that it is much more pleasant to spend leisure time in a gazebo created and decorated with your own hands, because a piece of the soul of the owners is embedded in each part of it.
Elite, expensive, unique
Particular awe is caused by buildings that combine all the elements of expensive construction: high-quality materials (wild stone and decorative plaster), landscape and interior design, decorative elements, etc.
Project for 750 thousand rubles
When creating such architectural masterpieces, many builders focus on a certain style or design of a particular art movement. Many elements are admirable.
When it comes to such structures, people usually don’t talk about money. Nobody knows how much it costs, but everyone understands perfectly well that it’s a lot.
The inaccessibility of such buildings is very attractive, but it’s not at all necessary to “pump up” millions into building a gazebo when the nearby dacha doesn’t cost even 500 thousand rubles? It is enough to take the general concept, replace expensive material with cheaper one, reduce the size and the budget can already be reduced several times. And if you also add work on your own, instead of craftsmen, then everything becomes even more attractive.
Recommendations
To make a brick gazebo the most comfortable and reliable corner of your country garden, use these tips:
- Do not place the structure next to a noisy or dusty road.
- It is better to entrust roof calculations to specialists.
- To avoid mosquitoes in the evening, choose open spaces for the location of the building.
- A cone-shaped roof will avoid stagnation of water.
- To avoid problems with neighbors, follow the rules for the relative position of buildings.
- To calculate the required amount of bricks, use a special online program.
Having thought through every little detail, you will get a functional and strong gazebo, under the roof of which you can escape from rain, sun rays, gather in a large friendly company or enjoy solitude. A brick gazebo is the optimal solution for country life.