The foundation for a gazebo is one of the most important “nodes” of construction, on which the reliability and stability of the entire structure will depend. It is important not only to correctly make the foundation, but also to choose the most practical and suitable option.
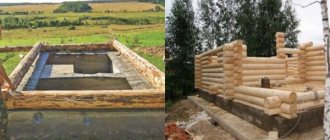
Interesting base of an octagonal gazebo made of blocks
It is not always advisable to use an expensive and massive base for an ordinary classic gazebo.
In most cases, you can save a lot of money at this stage.
This article will list the most popular options for constructing a foundation specifically for the construction of a gazebo, and also describe particularly complex and important steps in its installation.
Preliminary measures
You need to start building a 4 by 4 gazebo with design. At this stage, the location of the building is selected, as well as its appearance. The location should be on a flat area where there is dense soil and there are no roots or stumps.
To build the structure, you will need wooden beams with dimensions of 10 by 10 or 15 by 15. You can build a chopped gazebo using logs. The floor is usually covered with OSB boards or ordinary boards. Sometimes a concrete screed is made or tiles are laid.
The roof and walls are made of boards of various sizes: 75 by 2.5, 150 by 5 or 10 by 5 cm. Also, the use of logs and OSB boards is allowed for wall cladding.
Don’t forget about the material before creating the gazebo
It is best to give preference to wood. This material is easy to work with and construction is completed quite quickly.
To build a gazebo you will need the following tools:
- saw;
- hammer;
- screwdriver;
- level;
- tape measure and pencil for measurements;
- twine and wooden pegs for marking.
If concrete and tiles are used, then the list of tools will be supplemented with mortars, spatulas and the rules necessary to level the floor.
Summing up and future plans
The gazebo with a hip roof measures 6x4 meters and is very spacious. In one half of it we placed a table and benches, where it is convenient to meet guests and hold a holiday. The other half was temporarily given over to a hammock, creating a corner for relaxation and rest.
Thanks to the complete transparency of the design, it is convenient to read and do any work. Natural wood has a beneficial effect on the nervous system and, in general, we really like our gazebo.
In our future plans, we will arrange the floor using terrace boards, and also build a brick oven-barbecue in combination with a countertop and sink. For external lighting and gatherings in the evening, we will also install lighting; one of the possible options is lamps with solar panels.
You can find out about all further improvements on the Greensector.ru website and Youtube channel. Stay tuned for new articles and videos, subscribe, see you again!
Design
When designing a gazebo, the main thing is to correctly carry out all the necessary calculations. For clarity, you need to draw a drawing of the building on paper. The plan will allow you to accurately calculate the amount of materials required and the approximate cost of the structure.
To correctly create a building drawing, you only need to know the rules of school geometry, and also already decide on the appearance of the gazebo. In our case, the building should look like a square with a side of 4 m. The corners in the structure should be located strictly at an angle of 90°.
To construct such an angle, you should use the Pythagorean Theorem. You need to draw a triangle with sides 5, 4 and 3 m. The angle that will lie opposite the side with a length of 5 m will be rectangular. Next, two lines with a length of 3 and 4 m are drawn from this side so that another rectangle is obtained. After these steps, the diagonals in the square should be the same.
After receiving the drawing, it is transferred to the site. To do this, the same principle is used with the construction of triangles as when creating a building plan. Pegs are driven into the corners of two triangles, and a string is stretched between them. The sides are checked by level. They must be perfectly even.
Features of a gazebo on poles
When creating a columnar foundation with your own hands, you need to take into account several main features of this type of foundation. These are the key points that will ensure the technological correctness of the work on installing the gazebo. Therefore, the features of the foundation for the gazebo should be specified in more detail:
— the foundation can be made with your own hands from several types of materials. The classic option would be bricks and cement blocks. You can use wooden poles. The main thing is to ensure the stability of the structure. After all, the foundation will be subject to pressure from the rest of the structure, the masses of snow and wind;
Example of a columnar foundation
— the construction of the remaining parts of the gazebo is made of wooden elements. Parts with decorative carvings can be used as decoration. It is possible to use the glazing of the gazebo. It is important that the mass of the building is not too heavy for this type of foundation. Therefore, making a building from bricks or blocks is not recommended due to the large weight of these materials; - regardless of the material used for the foundation, the supports for the building will need to be concreted. Only in this way can a stable structure be achieved.
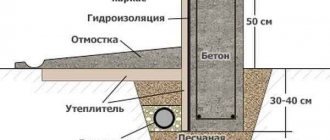
An important parameter when constructing foundations is the depth. The type of soil, as well as the depth of freezing, the presence and level of groundwater are of great importance for its determination. These three parameters divide columnar foundations into:
| Monolithic | Involves installing formwork and filling it with concrete. As a result, the structure is solid, which determines its reliability and durability. |
| Teams | In this case, the pillars are built from brick. The undoubted advantage of this method is its simplicity and relative cheapness. At the same time, its strength is significantly inferior to that of a monolithic one. |
| Recessed | The holes for the pillars are dug below the freezing depth of the soil, which helps prevent their movement in the winter. |
| Shallow | Such a foundation is most typical for sandy soils and assumes a depth of no more than 70 cm. |
It should be said that you can complete all the steps yourself and use a large number of available materials. As a result, you will be able to save significantly, creating a strong, durable building.
Construction process
After creating the drawing and transferring it to the selected area, you can begin building the gazebo. The construction of such a structure is carried out in stages. First, the foundation is laid out and the floor is poured. Then the frame of the structure (walls and roof) is created. Only then the entire structure is upholstered and given its final appearance. Let's look at each stage in more detail.
Foundation and floor
The gazebo is a fairly lightweight structure, so it can have a columnar foundation. The main thing when building such a base is to make all the pillars the same height. Otherwise, the building may become distorted.
The foundation is created as follows:
- First, the lower trim is formed. When creating it, you should definitely check the level. The bubble in the instrument should be placed in the center, between the lines.
- Holes 60 cm deep are dug in the corners of the future structure.
- A layer of sand 15 cm high is poured into the bottom of the pits. It is filled with water and compacted well.
- Next, crushed stone is poured into each hole. The thickness of this layer is 10 cm. Crushed stone is also compacted.
- Concrete solution is poured into the prepared pits. It is prepared from 3 parts sand (fine fraction), 1 part cement and 3 parts crushed stone.
The foundation is the first and main element of the gazebo.
The concrete in the holes should harden for about two days.
Next, brickwork is laid on top of it. Its height is 6 bricks. For waterproofing, roofing felt is laid on top of the pillars.
After the foundation is created, the floor is laid out. To create it, you should take “magpie” boards measuring 15x4x60 cm. Before use, all boards are additionally processed to protect them from moisture and insects.
If the first board is hammered straight, the rest will no longer form unnecessary holes and cracks. You should still leave a small gap of 1–2 mm between the boards. Water accumulating on the floor can easily drain through it.
The last board rarely fits in the remaining space. Therefore, it needs to be carefully trimmed and “shoved” into the last crack. You can knock down the last free space from cut boards. The beams are nailed on top of them.
Read also: what to make a strong floor in a gazebo from.
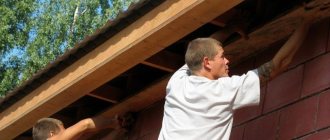
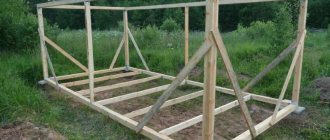
Frame
To build the frame, you should take beams with a cross-section of 10×10 cm. The lower frame frame is made from them. To form it, protrusions need to be cut out at the edges of the beams. With their help, as well as nails, materials are combined into a single structure.
After preparation, the beams are laid on top of the bricks. Next, pillars are attached to them, acting as supports for the walls. Then the vertical posts are installed. They are made from beams with dimensions of 10x10 cm. They will strengthen the structure and serve as a good basis for the walls and roof.
The strapping is again mounted on top of the installed racks. Its purpose is to connect the wall frame using corners.
Rafters and roof
It is best to construct a roof from 15×4, 10×3 boards and 10×10 cm beams. First, a diagonal tie is made. To create it, 15x4 cm boards are used. The boards are connected into half a tree.
Next, the cross-shaped structure is mounted in the piping area. To simplify installation, grooves are pre-cut on the beams. Due to the fact that the gazebo will be large, a support with dimensions of 10x10 cm is placed under each connection point of the boards in the roof.
After this, an octagonal beam with a cross-section of 10x10 cm is taken. Its height is 100 cm. This is the height the roof itself will have. Next, a cut is made in the support for the diagonal rafters. They are attached first.
The rafters are made from boards measuring 10x3 cm. They are connected into half a tree. Therefore, grooves are first cut out for them at the desired angle. They are made using a jigsaw. But for accuracy, you need to apply markings in the right places in advance.
The prepared rafters are connected to each other and inserted into the grooves. They are fixed with self-tapping screws. Next, the support and rafters are mounted on the roof. The support is installed at the center of the intersection of the boards in a diagonal bond. The corners of the structure are fixed with screws. Then the rafters are secured to the strapping.
The second pair of rafters is attached to the overlay. As a result, a 4-slope roof is formed. Then the frame is lathed and the roofing material is laid.
Important stages of construction
The construction of a foundation is indeed a complex process in terms of physical activity, but there are usually no problems with leaving the project and the sequence of work (this applies primarily to strip and monolithic foundations, since difficulties may arise with a columnar one due to savings).
Marking
After selecting the site and type of foundation, it is necessary to mark the site. For a columnar one, you need to mark the holes, and for a strip one, the width of the trench.
It is important to maintain the evenness of the pillars and trench. To do this, pull the cord and hammer the pegs strictly along it. In the future, you will need a level (a water level will be sufficient in most cases).
Marking strip foundation
Digging holes, trenches or platforms
Dug trench
Depending on the type of foundation, it is necessary to prepare a flat area for it with a certain depth. I’ll tell you a little experience that I gained in the manufacture of strip foundations.
We share our experience : my friend and I were digging a trench and it was necessary to go down to a certain depth (68 cm from the top edge of the formwork). Since the beginning of the trench was already ready, it was necessary to simply continue digging the soil to the same depth.
After we dealt with the roots of the cherry tree and pulled out all the necessary soil. To the eye everything was quite smooth.
To check the actual height of the foundation in each corner, it was necessary to take a meter ruler and lower it at several points . If the height was the same everywhere, then the trench could be called ready.
It turned out that our height difference is about 15 cm. This is not noticeable to the eye, especially when the soft, fresh soil is easily compacted underfoot. I had to dig up the remaining soil.
Manufacturing of formwork
The process is quite grueling, requiring the installation of formwork strictly to the level. To build it, you need chipboard or OSB sheets, boards, slats, screws, a screwdriver and a level.
Strip base formwork
All the work consists of leveling the walls in all projections, which, in addition, will also have to withstand the concrete solution and not fall apart. To do this, they are fastened with self-tapping screws. Connections should be as tight as possible.
Knitting reinforcement
Metal rods fastened with binding wire make the foundation truly strong and reliable. Without going into technological specifics, I will say: there must be at least some kind of reinforcement; under no circumstances should you refuse it, otherwise your concrete solution may fail.
Metal reinforcement inside the strip foundation
Each foundation uses its own reinforcement; for bored piles and a monolithic foundation it will be fundamentally different. I suggest you watch a video that clearly shows the process of knitting a reinforcement cage.
Preparation of concrete solution
There are three possible options here, each of which has advantages and disadvantages.
- Purchase of ready-made concrete mortar in a “mixer” (from 3,500 rubles per cubic meter plus delivery to the site). In addition to being expensive, you will need to sell the solution quickly, as it hardens quickly. In the case of mixing it yourself, the rush will be noticeably lower.
- Mixing the solution in a concrete mixer . The physical stress associated with manually mixing sand, crushed stone, cement and water is eliminated, and the solution is truly mixed (it is more difficult to achieve this result manually). A serious disadvantage is that the speed of pouring the foundation will not be able to move faster than mixing the solution in a concrete mixer. If we are talking about a large number, then this is very noticeable.
- Mixing the solution in a trough or film . The most labor-intensive method that does not require special equipment. You will need shovels, buckets and a great desire to stir, stir and stir again.
Store-bought concrete in a mixer
Mixing the solution in a concrete mixer
Manual mixing of solution
Car tires - an effective material or a fiction?
Tires have a number of advantages and only one drawback - they are toxic. True, harmful substances are released from rubber only when exposed to high temperatures, which is not relevant for foundations even in summer. But the advantages are undeniable:
- Swelling does not affect the stability of load-bearing structures, since for rubber, as a very plastic material, fluctuations in soil volume in winter are too insignificant.
- The seismic situation in some regions makes tire foundations indispensable.
- The moisture resistance of rubber makes such a foundation extremely durable.
- The cost of tires tends to zero.
How to do it?
The tire foundation can be constructed in two ways:
1. Monolithic slab (combined type). The entire area of the future building is a monolith. To create it, soil is removed to a depth of two tires (in height). The voids are filled with material that does not shrink significantly (crushed stone, broken brick, expanded clay, screenings). You cannot use backfills that cause severe shrinkage (sand, clay, earth). The surface of the site is covered with waterproofing material (roofing felt) and filled with concrete with reinforcement.
Tire foundation. Cheap and effective material.
2. Corner. Tires are used to create supports at the corners of the structure and at the junction of walls. To do this, select soil to the required depth, lay a layer of crushed stone, on which tires are placed one on top of the other. The interior space is filled with concrete.
Each tire must be level. Otherwise, the entire “sandwich” will lie crookedly and it will be impossible to correct this defect.
For heavy structures, truck tires are preferable; for light and medium-sized ones, tires with a smaller diameter may also be suitable.
How to dig deep?
The depth of the foundation depends on the type of soil and the depth of its freezing, characteristic of a particular region. You can roughly get your bearings using the following table, compiled according to SNiP (indicated in meters):
| Loams and clays | Fine sand (loamy sand) | Coarse sand | |
| Arkhangelsk | 1,56 | 1,90 | 2,04 |
| Pskov | 0,97 | 1,18 | 1,27 |
| N.Novgorod | 1,45 | 1,76 | 1,89 |
| Rostov-on-Don | 0,66 | 0,80 | 0,86 |
| Kazan | 1,43 | 1,75 | 1,87 |
| Surgut | 2,22 | 2,70 | 2,90 |
| Tyumen | 1,73 | 2,10 | 2,25 |
Maximum values: when drawing up SNiP, the most unfavorable conditions are taken into account. The presence of natural (snow, ice) and artificial insulation is not taken into account.
Even if the freezing depth is still far away: sand (not to be confused with sandy loam - fine, dusty, dense sand) does not swell significantly and can serve as a reliable support for the foundation.
Foundation depth. The freezing indicator becomes irrelevant when it is possible to “get to the bottom” of coarse sandy soil.
Optimal proportions, table
| 1. Hexagonal design, diagonal 290 cm. 2. The distance between opposite edges is 250 cm. 3. The width of one side is 145 cm. 4. Height to roof 220 cm. 5. Total area 6.5 m2. 6. Capacity for 10 people. |
| Oval hexagonal gazebo with dimensions: 1. Diagonally 350 cm, width 250 cm. 2. Edge width 205 cm. 3. Height 220 cm, at the ridge 280 cm. 4. Total area 8 m2. 5. Capacity 12 people. |
| 1. Diagonal 430 cm. 2. Width 250 cm. 3. Long side width 285 cm. 4. Height 220 cm. 5. Total area 9.5 m2. 6. Capacity 14 people. |
| 1. Length 420 cm. 2. Width 290 cm. 3. Height 220 cm. 4. Area 12 m2. 5. Capacity 20 persons. |
| 1. Length/width 290 cm. 2. Height 220 cm. 3. Total area 8.5 m2. 4. Capacity up to 16 people. |
| 1. Width 154 cm. 2. Diameter 402.4 cm. 3. Roof diameter 443 cm. 4. Capacity up to 16 people. |
Photos of various options
Finally, I have prepared a selection of photographs that will help you decide on the choice of a particular gazebo.
Before building any standard gazebo, it is recommended to explore as many options as possible. Perhaps among them you will find the structure that you will definitely want to build in your summer cottage.
Simple and beautiful
The gazebos presented below do not differ in any serious architectural forms. They are made in the usual style, from simple material, but they look impressive. In the first photo, notice the beautiful decorative sheathing made in a semicircle.
Projects for the garden
A couple of examples that are ideal for a summer cottage. Dimensions of 3 by 4 meters allow twelve people to comfortably fit, that is, you can relax in a big way. If the area on your site allows you to install such a structure, then it is quite possible to consider it.
Why do distortions occur?
It's all about the soil: it sags and squeezes out (heaves). There are two main reasons for its deformation:
- Seal. Loose soil can become compacted under the weight of the structure. Especially under the influence of rain and melt water.
- Swelling. Water expands significantly when it freezes, increasing the volume of the soil. The pressure exerted on the foundation in the horizontal plane (on the foundation walls) is insignificant. But vertical heaving is very dangerous - it raises the foundation. Since soil moisture is uneven, the movement of the walls is also uneven along the entire length. This leads to deformation of supporting structures, the appearance of cracks, and distortion of door and window frames (even to the cracking of glass!).
Heaving soils include clays and alumina. From pebble and sandy areas the water “goes” down. Its remains, expanding when freezing, fill microvoids. No swelling occurs.
Distortions and swelling. The result of ground movement.