Modern types of repairs have become better than before and now the need for a smooth wall surface is a prerequisite for a house or apartment.
True, even a brick house, a new building made of aerated concrete, has crooked walls, and older houses even more so.
In this regard, it is necessary to level the walls with wallpaper or other finishing materials.
How to level walls in apartments and private houses with your own hands, as well as leveling methods will be presented in the article.
How can I level a wall?
Construction technologies are developing rapidly, but leveling walls with your own hands is carried out, as many years ago, using two methods:
- Leveling the walls with putty.
- Leveling walls with plasterboard.
How to level walls with your own hands
If we talk about plaster, then many types of it are sold. The composition is different and it can be made of gypsum or cement, but when installing drywall on walls, adhesive is used for installation, a frame made of wooden slats or a metal profile.
Some people use gypsum fiber sheets (GVL) for walls instead of drywall. They contain gypsum material and plant fibers, but such material does not withstand impacts and other loads well; damage can occur even with light impacts. All this has led to the fact that GVL is rarely used. In some cases, drywall is replaced with OSB boards, whereas previously plywood was used. True, such materials are not the best alternative to gypsum plasterboard, which over time begins to crack along the plane and can swell. Chipboard is also used for uneven walls or floors, but the material is several times more expensive than drywall. Therefore, today it is best to use drywall for leveling.
Advice! Plaster and putty can also be used. This option should be chosen only if the walls are relatively flat and have small differences, up to 5 mm. In this regard, you can putty on already smooth walls in order to obtain an ideal surface.
Many craftsmen say that it is better to use drywall for DIY work. It’s easier and more convenient to work with, and wall decoration is cheap. But if you use alignment of the wall using beacons, then the work is also not difficult, a novice builder can do it, the main thing is to understand the technology and not rush into the repair process.
Required materials and tools
Each technology requires its own materials and tools.
Plaster
To level walls with “wet plaster” you need to buy:
- ready-made plaster or components: cement and sand;
- fiberglass;
- PVA glue;
- liquid soap - slows down the rate of hydration, makes the solution more plastic;
- wooden slats (shingles);
- plaster nails;
- wood primer;
- metal profiles;
- self-tapping screws;
- special clamps for fixing beacons with self-tapping screws.
The following tools and devices should be on hand:
- ladder;
- concrete mixer;
- hammer;
- screwdriver;
- hand saw for wood;
- roulette;
- Bulgarian;
- trowel;
- falcon;
- rule;
- plaster ladle;
- grater;
- grater;
- ironer;
- fry;
- plumb line;
- strong twine for hanging walls;
- construction pencil.
More information can be found here.
Panels
To install the panels you will need:
- siding or PVC panels;
- guide profile (PN);
- ceiling profile (PS);
- pendants;
- dowel-nails;
- "bugs";
- self-tapping screws with a press washer;
- liquid Nails;
- ladder;
- screwdriver;
- Bulgarian;
- level or laser level;
- roulette;
- construction corner;
- knife;
- plumb line
Drywall
To install gypsum boards, you will need the same materials and tools as for the panels. Exception: liquid nails are not required. Additionally you need to buy:
- serpyanka;
- gypsum putty;
- self-tapping screws for fastening drywall sheets.
You also need a narrow and wide spatula. The need for materials and tools is described in more detail in the work “How to level walls with plasterboard with your own hands?”
Lining
To install clapboard cladding you will need:
- well-dried lining boards made of coniferous or hardwood;
- wooden beam for sheathing;
- direct hangers, the same as for installing gypsum boards;
- brackets for fastening boards;
- wood screws;
- finishing nails;
- hand saw for wood;
- screwdriver;
- hammer;
- plumb line;
- roulette;
- level;
- pencil.
Fiberboard
You need to collect the least amount of tools and buy materials when leveling walls with fiberboards. You will need:
- fiberboard sheets;
- fiberglass reinforcing mesh;
- wood primer;
- gypsum plaster;
- gypsum putty;
- small nails - length 20-30 mm, thickness from 1.0 to 2.0 mm;
- hammer;
- a hacksaw with a fine tooth (can also be used for metal);
- putty knife;
- rule;
- grater;
- level.
Surface preparation and priming
Removing old wallpaper
Concrete walls or walls made of brick and other materials must be prepared before leveling. It makes no difference which type is chosen. Preparation consists of the following sequence:
- The old coating on the walls is removed, especially those that are weak.
- Cracks in the wall need to be repaired, then inspected and assessed how crooked the wall is. If the protrusion is large and very prominent, then it is removed with a hammer and other equipment.
- If you have old plaster that is firmly attached to the wall, you can assess its condition and the need for removal. It is enough to knock on the wall; if there is a dull sound, there is a void between the plaster and the wall, so when leveling, there is a high probability of the wall collapsing. It is recommended to beat everything down to the very foundation so that the old material does not spoil future work.
Alignment of problem areas
- If there are large depressions, you will need to seal them separately. A very thick layer of mortar or putty can fall off, due to this, defects are sealed, and the protrusions simply get knocked down.
- If the walls are painted, the paint may peel or simply fall off in pieces due to its perfect evenness. A primer will help solve the problem, namely its type - concrete contact, which makes the surface rough. In this case, the putty holds well and nothing falls off.
- To improve the adhesion of materials, notches on the wall are used. Previously they were made with an axe, today they use a grinder. For 1 sq.m. About 100 notches will be enough.
Based on the choice of putties, a primer is selected. The main purpose of the soil is to improve the adhesion of the plaster to the wall. The instructions on the packaging will allow you to make the right choice, and will also familiarize the person with the correct application to the walls. Often the compositions are ready-made, but there are also those that need to be diluted. You can apply the primer to the walls with a roller or other device. The preparation is simple, but the leveling process will be more difficult.
Let's sum it up
In order not to spend too much and not lose quality, when leveling the walls, adhere to the following rules:
- determine the volume and nature of wall defects. Deviations from the vertical are detected using a plumb line, from the horizontal - by a level, the depths of depressions and mounds are measured with a tape measure;
- decide how the identified defects will be eliminated. Wall obstructions from vertical and horizontal over 10 cm are straightened with plasterboard or panels on the frame, the same flaws up to 10 cm - with plaster, up to 5 cm - with putty;
- calculate the required amount of finishing materials, adding to them a reserve of 10% in case of damage;
- buy selected materials, focusing on the characteristics indicated on the packaging.
In any case, they turn to experienced craftsmen - they will dilute the mixture correctly, apply the plaster correctly, and will not damage the drywall and panels when cutting.
>
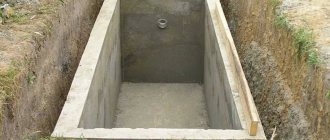
Installation of beacons
Installation of beacons
To make a flat surface from a curved wall, beacons are used to level the walls. This is a profile that is placed in one plane on the wall; the beacon will direct the plaster to the right places, filling voids and making the walls even. The beacon method involves the use of a galvanized steel profile; these are T-shaped profiles, although timber is also used as guides.
A metal beacon is more convenient to use than the timber method; it is easier and more convenient to install. The plaster layer will be approximately 8 mm. The disadvantage of the method is the cost, the amount is not large, but it is an additional expense. In addition, plaster and steel do not adhere well to each other, so when the mixture dries, the beacons are removed and the holes are sealed.
When using wooden slats, the process becomes cheaper, but even timber is more difficult to find. Moisture damages the wood, and the plaster layer is uneven. Some people use the solution as beacons. Initially, strips of plaster are applied to the wall, leveled, and after drying they are used as beacons. The method is cheap, but also more complicated than other beacon types.
Important! The evenness of the walls depends on the correct installation of the beacons. If you place the beacons exactly, then the result will be excellent; if there is an error, then the desired result will not be the best and the work may need to be redone.
To install on the wall, several cakes of plaster are made, a profile or block is sunk into them, everything is leveled to the desired degree, you can use a plumb line. When the cakes dry, you can continue working. The width between the beacons is taken from the calculation of the rule that is available.
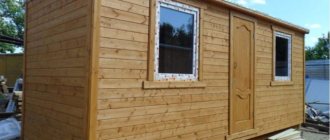
Plastering a wooden house outside why and why
There are two options for the development of events - either you buy expensive timber for the construction of a wooden house, impregnated with a good dozen chemicals (as you understand, such timber will be far from an environmentally friendly original source), and admire the view of your house, or after completion of construction, plaster the walls. Plaster essentially performs the same functions as impregnations in expensive timber - it protects the wood from rot and mold, from damage by termites and rodents, and from drying out, which can result in a lot of cracks through which dampness and cold can enter the house.
But in an effort to protect your home, it is important not to overdo it - if frame buildings made of wood can be plastered immediately after installing the roof, then plastering of walls made of timber and logs should be carried out no less than a year after the construction of the house, and even better after a year and a half. During this time, complete shrinkage of the walls will occur, which means that the protective layer will not crack or fall off the facade
Throwing mortar
Applying the building mixture to the wall using a spatula.
The plaster is prepared according to the instructions on the package, after which it is applied to the wall. The work will require a spatula or a painting ladle. After sketching, the order of work is as follows:
- You need to start pouring the mortar between the beacons from the bottom point, covering part of the wall.
- The rule is placed on the beacons at the lowest point, leaning on them, the plaster is pulled up. You need to lay the mixture by gently rocking it from side to side.
- It is necessary to putty until the mortar laying is continuous and even.
- The adhering mixture is removed with a spatula and again thrown onto the concrete or wall.
- The work is carried out to the top. After one strip of beacons, you need to lay the next one, and so on every square meter until the room has smooth walls.
This completes the first part of the work. The starting layer has been laid, but the walls still need to be leveled, even visually the unevenness is noticeable. It will be possible to completely level the wall with a more liquid composition.
When to level a wooden ceiling
Leveling a wooden ceiling is usually carried out if the old ceiling surface no longer satisfies the owners with its evenness and smoothness. Also, this work is carried out before installing the finishing coating, which requires a flat base. If the building is deformed, the foundations sag, then the ceiling may drop in one place.
Leveling the ceiling surface is often carried out before using one of the following finishing options:
- wallpapering;
- painting with paint or opening with varnish;
- installation of foam ceiling tiles;
- fastening other finishing materials without using lathing.
Leveling the ceiling in a wooden house is carried out in compliance with the following rules:
- To eliminate unevenness (up to 5 cm), it is allowed to use both wet and dry technologies. If the wet method is used, the base surface is first plastered and then covered with putty. The finished rough coating is suitable for wallpapering, painting or facing with foam tiles.
- If the unevenness of the base exceeds 5 cm, then only the dry method of eliminating defects is used. This method involves installing plasterboard ceilings.
- Significant unevenness is removed with starting and finishing putty.
- Minor defects can be removed only with a finishing putty compound, but differences of up to 20 mm can be eliminated by puttying using a reinforcing mesh.
Leveling for putty
Grouting and leveling the putty
If the first layer begins to dry out, but does not have time to harden, then it’s time to level the wall under the putty. All defects are rubbed over with a solution; in terms of consistency, it is necessary to use a mixture that is thinner. Application is done with a large spatula and leveled using the beacon rule. Thus, the entire perimeter is covered, it is better to make the layer thin and the base turns out to be close to ideal. This stage is necessary so that the putty consumption is minimal.
If the solution is like thick plasticine, the beacons are removed by prying them up with a screwdriver at the bottom. Next, the seam is filled with putty and the wall is leveled with a spatula; if necessary, the seam can be trimmed, because when the mixture is not completely hardened, it cuts perfectly.
Important! During leveling, you need to ensure that the plane remains level. This completes the alignment of the walls. Next, you can carry out interior finishing work, painting the walls in different colors, gluing wallpaper on them, laying tiles and other finishing materials.
Leveling the walls with your own hands (video)
Leveling walls with plaster
Plaster has two binders: cement-based and gypsum-based. Gypsum dry faster, but the maximum layer that can be applied is about 50 mm. Cement-based plasters can be applied in a layer of up to 10 cm, but they take longer to dry.
Beacon plaster is a reliable way to level walls
In addition to the thickness of the layer, when choosing the type of plaster mixture, it is necessary to take into account which of the finishes will be used later, as well as the conditions of the rooms in which you are going to level the walls. Gypsum is hygroscopic, so it is not used in damp rooms: the bathroom and kitchen must be plastered with a cement-based composition. Rooms and an entrance hall remain for plaster. That's basically what they do.
In our description we will use plaster plaster - Rotband - a popular brand that has good reviews from both amateurs and professionals.
Surface preparation
Removing everything that doesn’t stick well to the wall: beat it off, pick it out, clean it off with a spatula. If there are cracks, we repair them. Then we evaluate the degree of curvature. If there are very large protrusions that stand out too much, it is advisable to remove them (with a hammer and chisel or a hammer drill).
First we clean off everything that falls off
Often when starting to level the walls in an old house, they decide whether to knock down the old plaster if it does not fall off. In principle, the master should evaluate it, but you can try it yourself. Knock the wall. If there are places that differ in sound - they sound duller - then the layer here has moved away from the main wall. If you “hang” another layer of plaster on it, there is a high probability that the whole thing will collapse together. It will be much worse. So it is better to plaster previously plastered walls down to the base material.
If, during preparation, individual potholes that are too large appear, it is better to repair them separately. Putties have a minimum and maximum layer limit. Too much layer may fall off. Therefore, it is better to pre-fill holes or holes.
If the wall surface is too smooth, notches are made on it
When leveling a concrete wall or a surface painted with a film-forming composition, another problem arises: it is too smooth, which is why adhesion to the plaster may be poor. This can be helped by treating a primer such as “Betonokontakt”, which leaves a rough film on the surface, improving adhesion.
Another way out is to make notches. Once upon a time they were made with an axe, now they often use a hammer drill or grinder. With their help, a notch is applied. According to the norm, there should be about 100 notches per square meter.
Primer
Depending on the type of plaster chosen (gypsum or cement), a primer is selected. Its main task is to improve the adhesion of the wall and plaster. Read the instructions for using the primer carefully. Some require the base to be moistened before application, some require dust removal, etc.
Priming walls before plastering
There are two favorites in this group: Cerezit 117 and Betonokontakt. There are others, but these are used more often: good reviews. The composition may be ready for use or require dilution (concentrate). It can be applied with a roller or brush, a spray bottle, or even a garden sprayer to speed up the process.
Until this moment, there were no difficulties in leveling the walls on your own. Everything is elementary. Next - a little more difficult, but also - not to build rockets.
Installation of beacons
If you want to achieve a flat surface, you can level the wall only along the beacons. These are supporting elements that are placed in the same plane. A layer of plaster is then leveled over them. As beacons, you can use special galvanized “T”-shaped beacons or even wooden planks.
It is more convenient to use metal beacons - they are installed faster. But the minimum layer of plaster is about 8-10 mm (6 mm of the lighthouse + the mortar on which it is placed). Another disadvantage is their cost: although not very much money, it is still an additional expense. One more point: galvanized plaster does not “contact” well, so after the initial drying, the beacons are removed from the wall and the holes are sealed.
Installed beacons under plaster on a brick wall
Using wooden slats is a cheaper option, but finding a sufficient number of perfectly even bars in cheap material is problematic (you won’t use high-quality lumber). Even if this is successful, there is still a possibility that the tree will lead from moisture. As a result, the wall will no longer be level.
Some people make lighthouses from mortar. Pre-apply strips of plaster, leveling them. After they harden, they are used as beacons. The cheapest method, but the most labor-intensive, and requiring much more time.
How ideal the alignment of the walls will be depends on how correctly the beacons are positioned. We set it exactly - we got an excellent result. If you make a mistake, you will suffer, correcting the irregularities that you made with your own hands.
Throwing mortar
The selected plaster is diluted as indicated on the packaging. Then they throw it on the wall. Use a wide spatula or paint bucket. Start from the bottom, cover a piece of the wall with mortar from one lighthouse to another.
Beginning of plastering the wall along the beacons
Then they take the rule and set it below. Leaning on the beacons, pull up, slightly swaying from side to side. Several such passes are made until the solution is leveled. The compound adhering to the rule is removed with a spatula, again throwing it on the wall.
Leveling the putty along the beacons
Again - a portion of the mortar on the wall, leveled with the rule. So all the way to the top. Having tightened one strip, proceed to another. This is how the entire wall is gradually leveled.
The first stage of plastering is completed. But this is only the first. The surface turns out to be imperfect: if you look closely, there are small irregularities. They are leveled with a more liquid solution, achieving a more even surface.
Leveling for putty
When the first layer has dried a little, but has not yet hardened (no later than 2-4 hours after application), leveling for putty begins. Existing imperfections are rubbed down with the same solution, which was diluted a little thinner than required according to the instructions. Since it is more fluid, it is applied with a wide spatula, then stretched along the wall, usually resting on the same beacons.
Leveling walls for putty
So they go through the entire wall again, leveling it to a perfectly flat plane. This is necessary in order to reduce the consumption of expensive putty mixture.
Removing beacons and trimming
When the solution has dried to the state of thick plasticine (press hard with your fingers, it bends), you can remove the beacons. They are pryed at the bottom with a screwdriver and pulled out.
Removing beacons from a plastered wall
They are removed very easily. Actually, the reason they are taken out is that they form heterogeneity in the plaster, and therefore reduce its strength.
Now we take the rule, clean it from the adhering solution and, stretching it in different directions, finally level the surface. This should be done at the initial stage of thickening, when the gypsum plaster is similar to plasticine: cutting it off is usually easy.
Carrying out the rule in different planes, we finally level the wall
When the surface was leveled, diluted with Rotband. They are sealed immediately, without waiting for something: until the plaster has completely hardened, new layers stick to it well.
Sealing traces from beacons
The solution is applied and removed with a spatula. At the same time, make sure that the surface remains level. At this point, leveling the wall for putty can be considered complete.
When leveling walls with plaster in apartments, the problem becomes the angle in which the heating pipe runs. You can't get there with a rule, but you can't get it straight with a spatula. If you are familiar with this problem, watch the following video.
What types of mixtures are there?
Various dry mixtures are used for finishing. They all have different compositions and different characteristics. To level the surface, dry material is most often used, as shown in the table:
| Mixture: | Description: |
| Cement: | They come with different fractions of sand and cement. Some contain lime to improve the plasticity of the solution. Due to this, they distinguish: cement-sand mortar and cement-lime mortar. In the first type, large fractions of sand are used for the initial finishing, small particles of sand are used for the finishing layer. Calcareous species are more versatile. |
| Plaster: | Plaster is used for painting work and is popular. Allows wide application, excellent flexibility and fast drying. Additionally, it has heat and sound insulation properties. Plaster has a high water absorption, so it is better to apply the mixture in small parts. |
| Clay: | Previously, clay was often used, which was applied to the walls and then whitened. Today, the material is rarely used and only to create a specific effect. Clay is environmentally friendly and regulates the microclimate in the house. |
Disadvantages of wooden walls
High flammability
Wood is a fire-hazardous building material, therefore, when constructing buildings made of wood, extreme attention should be paid to organizing systems that prevent fire. Low moisture resistance. Wood absorbs moisture very well, which can cause such unpleasant consequences as rotting of walls, their deformation and destruction
The problem can be solved by using various impregnations and paints and varnishes that reliably protect wood from moisture and at the same time make the appearance of wooden walls more attractive.
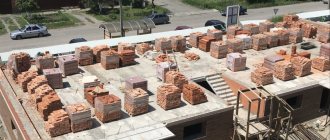
Wooden walls made of timber
A beam is a solid wood with a cross-section in the form of a rectangle or square. There are several types of timber:
- ordinary is a timber made from solid wood, without any additional processing;
- profiled is a timber with cutouts (grooves) in one or more edges. Their presence facilitates the installation process and reduces the likelihood that cracks will appear in the wall;
- glued laminated timber is a timber glued together from several boards. The main advantage of such timber is that, unlike solid wood materials, it practically does not shrink during the first time after the building is put into operation.
To erect walls along the perimeter of a house building, timber 15-22 cm thick is used. In the corners, at the intersection of walls and partitions, as well as every 1-1.5 meters, the crowns are connected with spikes with a cross-section of 2-3 cm and a length of 10-12 cm. Under the first crown A layer of roofing felt must be laid. To get rid of cracks, tow or antiseptic felt is placed between the beams.
Wooden walls made of rounded logs
A rounded log is a tree trunk that, after processing, has taken the shape of a cylinder. Wooden log houses are most often built from solid coniferous trees, as it is more durable and moisture-resistant.
The maximum permissible “runaway” (reduction in the cross-sectional diameter from one end of the log to the other) is up to 1 cm per 1 linear meter. In order to maintain a strictly horizontal arrangement of rows of logs, they are laid with the butt (the side of the log that was the base of the tree trunk) in different directions.
For the construction of external walls, logs with a diameter of 18-25 cm are purchased. For internal walls, logs with a thickness of 2-3 cm less are suitable. As in the case of timber, a waterproofing layer of roofing felt is laid under the first crown of logs. For greater density of the wall structure, longitudinal semicircular grooves are made in the beams along the entire length. The width of such a groove is about 2/3 of the diameter of the log. The crowns are fastened together with “teeth” - spikes with a round or rectangular cross-section.
Connecting logs in the corners of a house can be done using two methods:
- “in the oblo” - with a remainder when the end of the log protrudes around the corner. This way the log house turns out to be more durable and looks more attractive, but keep in mind that the logs will have to be taken about 0.5 meters longer;
- “into the paw” - without parts protruding beyond the corner. This technology is more complex, but it saves wood consumption, and therefore your budget.
Frame and panel structures
This approach to constructing walls made of wood is considered the simplest and most economical. First, the wall frame is assembled from beams 50-60 mm thick. The finished frame is sheathed horizontally, vertically or diagonally:
- outside - with 20 mm thick boards, lining, siding, etc.;
- from the inside - plywood, hardboard, chipboards, etc.
The most important question here is how to properly insulate walls of such a structure? Between the outer and inner plank cladding, a kind of “sandwich” is placed from two layers of roofing felt/glassine and any available insulation. If you use organic insulation, it is better to treat them with lime or some kind of antiseptic to protect them from rodent infestation.
As a result, the total thickness of the frame walls is about 140 mm: 40 mm - external and internal cladding, 100 mm - insulation.
These are the technologies for constructing walls made of wood. To choose which one is right for you, decide on the functional purpose of the building (summer cottage, house for year-round use, etc.) and, of course, your financial capabilities. Approach each stage of construction work responsibly and slowly, and you will succeed perfectly!
A very interesting technology for building a house made of wood is presented in this video:
Pros and cons of cement compositions
Cement mortars are good because they can be chosen for interior and exterior work; you can level the façade of a private house. A cement-sand dry mortar or with the addition of lime is used. These materials fit perfectly on walls. In addition, the material is cheaper than gypsum-based putties and is excellent for wet areas, for example, bathrooms, basements, and garages.
The disadvantage of this material over gypsum is that the texture is not very smooth. After application, sanding or applying a finishing solution is often necessary. The downside is that such plaster takes a long time to mature, so finishing the walls takes time; as a rule, the mixture will completely harden in 20-30 days.
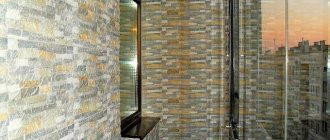
Leveling walls for tiles
Not everyone succeeds in leveling walls for tiles using the beacon method; the process is lengthy and the material takes a long time to dry. It is faster to level the walls using sheet plasterboard material. This method applies to the dry type of plaster, and the result is no worse. The walls are smooth, the interior will look decent and you can decorate the walls with any decorative material. This technology has some disadvantages:
- To hang heavy objects on the wall, a frame is made of wood or metal.
- Plasterboard material takes up a little space, which is not good for some types of housing, especially if it is a Khrushchev-era building.
Of course, if you attach drywall to walls without a frame, you can save space. The size of the room will remain the same.
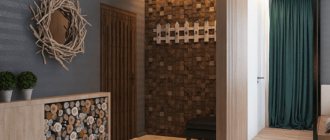
Leveling with wall panels
When to use panels
Wall panels are used when they want to solve two problems at once: level the walls and cover them with a finishing coating. The front layer of the panels imitates various materials: decorative plaster, wood, brick, concrete, textiles.
Most often, walls are lined with panels made of wood boards, plastic, and gypsum vinyl, since they are the most affordable.
Wood panels
made from fibreboards - fibreboard, chipboards - chipboard, high-density fibreboards - HDF, boards made from fine fractions - MDF.
Fiberboard and chipboard panels contain phenols that are harmful to health. Phenols enter the air during hot and humid weather.
Laminated chipboard panel Acacia Lakeland light H1277 ST9, density 8.1 kg/m 2, dimensions 2800x2070x10 mm - 2315 rubles, ExpoTorg online store.
Isotex Interior fiberboard wall panel, 2700x580 mm - 1486 RUR/piece, Izolux hypermarket.
In the production of boards from fine fractions of MDF and high-density HDF boards, phenols are not used. In addition, these panels are more moisture resistant.
MDF wall panel Aquaton Canyon beige with embossing (Russia), 2440x1220x6 mm, weight 10 kg - 1390 rubles, construction hypermarket "Izolux".
HDF wall panel Aquaton Flora Green 2440x1220x3 mm, weight 10 kg - 972 rubles, construction hypermarket "Izolux".
Plastic panels
made from polyvinyl chloride (PVC). They are waterproof and do not contain harmful substances. However, they turn yellow in the sun and are damaged if, during repair work, you accidentally hit them with something heavy - for example, a hammer.
White PVC lining, 3000x100x8 mm - 52 rubles/piece, Saturn online store.
3D PVC panel “Seasons”, 2700x250x8 mm - 210 rubles/piece, Perestroika online store.
Gypsum vinyl
- a gypsum board covered on both sides with cardboard, on top of which a layer of PVC film 0.5 mm thick is applied. A pattern is printed on the film that imitates various finishing materials - from matting to crocodile skin.
Gypsum vinyl is durable, does not fade under the sun, and does not contain harmful substances. But gypsum swells in rooms with constant high humidity. It is used in bathrooms if forced exhaust ventilation is equipped there.
STENPROK gypsum vinyl panels - 330 rub./m2, Stenella online store.
Wall panels are mounted on glue or a frame made of metal profiles.
How to save money
To save money, measure the height and length of the walls. Then the number of sheets is determined. The length and width of the panels are chosen so that a minimum of waste is generated. If you can do without a frame, put the slabs on glue - the work will be cheaper.
Cladding a wall with panels with an area of 15 m2 with a ceiling height of 2.7 m and a wall length of 5.5 m together with work will cost from 12,000 rubles when facing with white plastic lining.
Frame installation method
You can level any walls using frame technology with plasterboard, including the ceiling, window or door opening. Initially, a frame is created that needs to be leveled; it is better to use a laser level, so the accuracy will be higher. Assembly is carried out in stages:
Profile fastening
- A guide profile is placed at the level of the floor and ceiling.
- Fastening is carried out with dowels to the wall.
- On the installed profile, the installation locations of the vertical parts should be marked with an interval of 60 cm.
- When everything has been calculated, a vertical line is drawn on which the installation curtain is fixed.
- Bearing profiles are placed in the guide parts.
- Everything is leveled into one plane and secured with curtains.
Drywall installation
- Plasterboard material is screwed to the mounted frame. Preliminary measurements of the parts are made and the drywall is cut out.
- The space between the wall and the drywall can be insulated using mineral wool or polystyrene foam.
- A mesh is glued to the joints, then covered with putty and everything is leveled.
- All holes from self-tapping screws are also plastered.
As you can see, leveling walls with plasterboard is easy to do, and a step-by-step lesson will help you understand the essence of the process. At the end, such a wall needs to be sanded with plaster and finishing can begin. Make tiled walls, use any tile material, wallpaper or simply paint. It is recommended to use PVC panel for windows, and MDF for doors.
Assessment of wall surface roughness
All methods of leveling walls are divided into two fundamentally different groups:
- use of mixtures (plaster and putty);
- dry leveling (plasterboard is most often used).
One method or another is chosen, taking into account the degree of unevenness of the walls , so this stage is especially important. How uneven the walls are can be measured with a laser level or a regular building level.
The simplest and very popular way is to use plumb lines . First of all, a nail is driven into one of the upper corners of the wall, so that 2-3 cm remains on its surface. A plumb line can be made from a long thread and a nut or other weight. The finished plumb line is tied to a driven nail; the weight should almost reach the floor. When the thread with the load stops wobbling (i.e., the plumb line forms a strictly vertical line), you can drive a second nail at the bottom of the wall so that the thread and the nail head are at the same level. The same procedure is done on the opposite side of the wall. Four nails are connected with a cord and form a strictly vertical plane, which allows you to understand the degree of deviation of the wall level from it.
We evaluate the unevenness and choose the leveling method:
- depressions and irregularities up to 0.5-1 cm can be leveled using putty;
- differences of up to 3-5 cm are best leveled with plaster mixtures;
- differences of more than 5 cm are easier to level with sheets of plasterboard mounted on a specially constructed frame.
Installation of sheets
Installation of drywall sheets is simple; the work requires a standard tool:
- Screwdriver.
- Ruler.
- Screwdriver.
- Self-tapping screws.
Fastening drywall to the wall
Screw in the screws at a distance of 20-30 cm from each other. The fastener heads are sunk into the drywall so that at the end the wall is level and they do not stick out. If you don't have a screwdriver, you can use a drill with a bit. If desired, the work can be done independently in a day. After which the dacha, house or apartment will have smooth walls. It is worth considering that by leveling the ceiling with plasterboard material, the height of the room will be slightly reduced. When leveling a wall near a window, it is better to use a perforated corner at the corners to give the correct shape.
Sheet material is easier to use for leveling walls without a frame. Plaster, glue or other material is used for fixation. The mixture is applied to the wall, how much thickness should be depends on the walls. Next, the drywall is applied to the wall and adjusted correctly so that the slab is level. If necessary, the material is pressed against the wall using your hands.
Important! When the material is level, all edges are sealed with plaster. Next, you need to install the next piece of drywall. This is how the walls in the house are aligned. For reliability, you can screw the material directly to the wall after a day. The visual effect is excellent, the kitchen, loggia, bedroom and other rooms will have smooth walls.
The list of materials for leveling walls is large; the choice of materials depends on skills and preferences. During the work, it is recommended to check each section of the wall after leveling so that defects do not begin. Design methods can be seen in the photo on the Internet, and how to make house walls smooth is presented in the video:
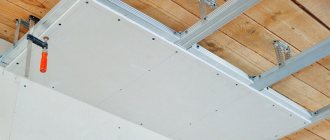
How to make curved walls straight in a new building using the dry method yourself
The second way to level walls in a room is to cover it with plasterboard. In addition to practical tasks, this material perfectly copes with a decorative function. Arches, all kinds of partitions, fireplaces, suspended ceilings, etc. are made from it.
Panels for leveling plasterboard: selection parameters, the best way to finish
For work, you should choose wall plasterboard with a thickness of 12.5 mm. Ceiling (9.5 mm) is not suitable for leveling walls, since it cannot provide the necessary strength with respect to mechanical loads.
In addition to the usual white, there are two more types of drywall on the construction market:
- red (fire-resistant) – the best option for renovations in wooden houses;
- green (moisture resistant) – suitable for lining walls in the kitchen.
When plasterboard on a profile is used in the kitchen: mounting the frame horizontally
A plasterboard box is often used in the kitchen to hide various communications, hide unevenness and other wall defects, and also recreate the original structure (niches, ledges, etc.). For these purposes, galvanized profiles and waterproof plasterboard are used.
To level a wall using the “dry” method, you need to perform a number of operations.
- Attach the profile around the perimeter, mark and secure the material in the middle of the wall. The planks should be mounted at a distance of 40-50 cm. The fastenings should be located at a distance of 25-30 cm.
- Drill holes with a hammer drill and drive plastic dowels into the fastening points.
- Install the frame using screws and self-tapping screws.
- Cover the frame with plasterboard sheets. To do this, you should cut the gypsum boards of the required sizes in advance and make marks on them in the places of planned fastening. The distance between the screws should be 25 cm.
- Seal the joints between the sheets with putty. Large cracks can be filled with polyurethane foam with a small expansion. After hardening, remove the remaining foam with a knife and cover with putty.
- The final stage is treating the structure with an antifungal primer. After it dries, apply a thin layer of putty to the surface of the drywall.
Is it possible to glue drywall to an uneven brick wall?
If the installation of drywall is carried out on a brick wall of uneven masonry, then it is necessary to use Perflix glue. It should be applied pointwise, along the entire perimeter of the sheet. The thickness of the adhesive layer should be 5-30 mm, and the spaces between the points should be 30-50 cm.
A device for leveling already plastered walls
To frame level the plastered walls, you will need the following devices and tools:
- drywall;
- profile;
- level;
- self-tapping screws or self-tapping screws;
- drill;
- screwdriver
Photo gallery of finished works
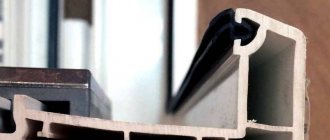
Technology for attaching a block to a “breathing” wall.
Tough, i.e. You cannot attach a block to a breathable wall using self-tapping screws alone. Requires a sliding mounting point. It can be implemented by fastening a sliding corner to the wall with a self-tapping screw through round holes, and using an oblong hole to attach the block to the corner.
Reasons for wall deformation
Before leveling the walls, you need to familiarize yourself with the reasons that may cause defects. At the time of installation of a house, a person stocks up building materials for future use. It is not possible to check all received timber for defects. Lumber must be made so that the core of the log is strictly in the center of the product. If this rule is not followed, drying will occur unevenly and deformation of the timber during construction or shrinkage of the building is inevitable.
Important! The best solution is to alternate multidirectional elements so that the elements compensate for each other's curvature.
Another reason for deformation of enclosing structures is considered to be incorrect calculation of loads. When compressed, any element of the building structure will bend. It is necessary to seek help from specialists who will help make important calculations and identify excess pressure in the structure. To redistribute the forces on the wall, you will need several additional racks.
The last reason for the deformation of enclosing structures is considered to be improper installation of inter-crown insulation, which can squeeze out the timber. There is no need to dismantle the wall; you need to remove the thermal insulation material and caulk the resulting gaps.