Dry method of leveling walls
I had to level the walls, paint them and lay tiles in a private house. When we arrived to take measurements to calculate the material, Kirill was surprised. I took him on as an assistant and said that in a month we would hand over the facility. The house was large, with bathrooms on each floor and utility rooms in the basement. The two of us will be plastering for a very long time. I calmed the guy down. We had to level the walls using sheets of drywall.
Advantages of the dry method of leveling walls
The method of leveling gypsum boards has many advantages:
- No dirt.
- The surface is smooth.
- Quick to install.
- Only joints and fasteners are sealed with putty.
- Wallpaper is glued in a couple of days.
- You can lay insulation and sound insulation.
- A good base for tiles.
- All communications are hidden under the sheets.
How to level walls using the frame method
Minus - the frame method of leveling walls reduces the area of the room by 10 - 15 cm around the entire perimeter. Under the mount for cabinets and decor, you must mount a profile in advance. The customer provided us with copies of the floor plan of the house indicating the purpose of each room. The bathroom and toilet already had pipes and markings for equipment. In each room we measured and recorded data:
- Dimensions, including height.
- Location and size of openings.
- The curvature of the walls.
- Type and level of the future ceiling.
Then we asked the owner where it was necessary to insulate and make sound insulation. On which walls will hanging furniture and heavy decorative elements be located? Now it remains to calculate how much material is needed, where we will use putty, and in which rooms we will use the frameless method of leveling the walls.
How to cover walls with plasterboard (video)
Preparing walls for finishing with plasterboard
Preparing the walls for leveling
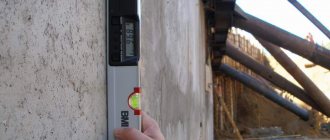
Preliminary measurements of the curvature allowed us to decide how to attach the wall plasterboard. Now we went over each surface with a level, marked the depressions and removed single protrusions. The brick and the mortar that holds it together absorb moisture and crumble. They will be covered with drywall, the dew point will move inside the masonry. Therefore, we first fixed the entire surface with a deep-penetrating primer, then treated it with antibacterial drugs against fungus and insects.
When making calculations, we took into account the method of attaching the plasterboard sheet and the room conditions. The table shows the main criteria that allowed us to select drywall.
| Wall characteristic: | Which drywall: | Marking: |
| Rovna. | Regular 12 mm. | GKL 12 |
| Partition: | Ordinary. | GKL 12 |
| Wall with insulation: | Regular 10mm. | GKL 10 |
| Kitchen: | Fire and moisture resistant. | GKLVO |
| Bathroom: | Moisture resistant 18 mm. | GKLV |
| Bathroom under tiles: | Moisture resistant 18 mm. | GKLV 18 |
| Boiler room: | Fire resistant. | GKLO |
A room with normal microclimate conditions is sheathed with a sheet of ordinary plasterboard 10 - 12 mm thick. A lightweight sheet of 6 - 8 mm is mounted on the ceiling. For damp rooms, moisture-resistant sheets are needed. The tiles are heavy; durable plasterboard with a thickness of 18–24 mm plus the appropriate properties to resist moisture is selected under it. Leveling walls with plasterboard in the kitchen takes into account the weight of the finish, humid air, high temperatures and fire in the kitchen apron area.
What you need for work
In addition to the plasterboard sheets themselves, you will definitely need other materials. You need to prepare in advance :
- self-tapping screws;
- guide profile - look for it in the store marked PN 28x27;
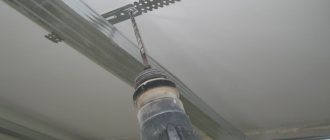
- straight suspension;
- ceiling profile - it should be marked PP 60x27 (if you plan to immediately install the frame on the ceiling).
And so that work is not interrupted by searching for a suddenly needed tool, it is better to immediately find/buy:
metal scissors;- roulette;
- thread, plumb line and regular building level;
- screwdriver;
- knife - they will need to cut plasterboard sheets.
Frame method of leveling walls
Installation of a metal frame
Answering Kirill's numerous questions, I told him the basic rules for installing a frame, why such sizes and materials were chosen. The plasterboard sheet has a width of 1200 mm; special moisture and fire resistant sheets are half as narrow. When installing the frame, we maintained the pitch of the posts for fastening the gypsum boards at 600 mm; if you plan to glue heavy wallpaper, then 400 mm. The self-tapping screw is screwed in the center of the wide sheet and along the edges, at a distance of 10 mm from the end.
A metal profile and wooden beams are used for the cladding. Each material has its own characteristics. Metal is stronger, more durable, faster to install, and cheaper. Wooden wood retains heat better and does not create cold bridges, but dampness causes the block to swell and become deformed. Wood is used for cladding walls and facades of log buildings, frame houses and internal insulation of external walls in high-rise apartments.
Drywall installation
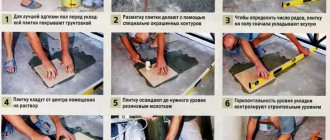
Kirill and I started leveling the walls in the bathroom with plasterboard to match the tiles, following a step-by-step work plan.
- We marked the profile installation line around the perimeter where the dry plaster will be installed, taking into account the location of the pipes in order to hide them.
- We screwed the starting U-shaped profile to the floor along the line.
- We marked the location of the racks taking into account the pitch.
- We set the outermost posts on the wall level, then stretched the cords to align with them, and aligned the rest. At the location where the valves and pipes were installed, a frame was made for the door, taking into account the size of the tiles.
- We coated the back side of the drywall with primer for additional protection from moisture. We secured the sheets with self-tapping screws.
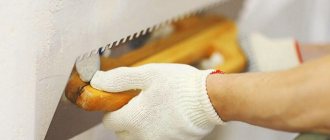
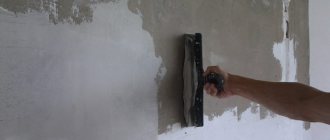
- We cut off the corners at the ends of the gypsum boards and filled the joints and fasteners with putty.
- We cleaned it, checked the flatness and coated all surfaces twice with primer.
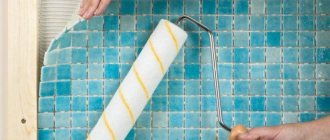
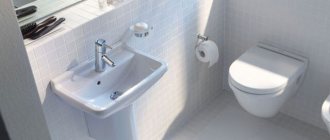
It's great that you don't have to sand the tiles. We simply went over it with coarse sandpaper, leaving marks in the horizontal direction. This will keep the tiles better on a vertical plane. The tiles were glued later, when everything had dried and a screed was made on the concrete floor. You can see how stylish this bathtub looks in the photo.
Important! When insulating walls, the technology for installing the frame is similar. The instructions provide for laying the insulation and fixing it before installing the gypsum board. In the basement, all external walls were insulated with glass wool, and in some cases foam was used. In the video you can see the procedure for performing drywall sheathing.
Options for gluing gypsum boards without a frame
The spacious room of the future bath allowed us to frame it and hide all the pipes behind the smooth cladding surfaces. The DIY method of leveling walls with plasterboard without a frame takes up less space, but you would have to make boxes to mask the pipes and glue the tiles to the shaped surface and cut them into pieces.
Technology for installing drywall with glue
Kirill already knew that the frameless method of leveling walls with plasterboard is used when their unevenness is up to 2 cm. We marked several rooms where the curvature reached 4 cm and a little more. Questions started pouring in again. There are many ways to level walls with plasterboard if there are large uneven areas without making a frame:
- Plastering.
- Place the beacon under the glue.
- Frame made of gypsum plasterboard strips.
The plastering method suited Kirill for training. There is no need to lay down a thick layer and completely level the wall. It is enough to fill the depressions and reduce differences. My instructions were simple. The guy needs to learn:
- Make a solution.
- Throw it on the walls so it stays there.
- Align to a plane of up to 5 mm, maintaining verticality.
How to install drywall on a wall using glue
After this, the composition is laid in piles on the gypsum board surface treated with a primer. Plasterboard boards can be glued, aligned with the markings. If the height of the room is greater than the length of the gypsum board, it is more practical to glue the sheets horizontally, with the vertical seam offset.
To level the surface, use the same sheets of drywall. They are used to make racks with crossbars 10–20 mm wide and glue them to the wall according to the level. It turns out a kind of lathing, only with a thickness of less than 10 mm. The gypsum board is then mounted on glue both vertically and horizontally. In places where the wall is strongly inclined, we installed special beacons - dowels with flat caps. After the solution in which we drowned them hardened, the drywall was glued easily.
Second and subsequent rows
Having glued one vertical row, we glue the second one in the same way, setting the plane as a rule, working as a rule over the entire area of the glued sheets.
We apply the rule in many places, achieving a flat plane with virtually no gaps
We fix the sheets in one plane, pressing and, conversely, lifting the sheet from the wall. The gap between the 2-meter rule and the sheet should ideally not exceed 2-3 mm. We pay special attention to the corners of the walls, places under the ceiling and above the floor, where floor plinths and suspended ceilings (or fillets - ceiling plinths) will be attached.
Alternative ways to level walls
The next question was from Kirill, what can be used to level the walls other than drywall and wet plaster. There are a number of slabs in the production of which wood is used, or rather its waste. Multilayer plywood is made from veneer, slabs are pressed from chips and shavings. They can be used to make a wall and a partition. The frameless method or fastening to a metal profile is mainly used.
At home, sheets of pressed wood chips and shavings are used as a substrate for laminate and parquet. In dachas and interiors in ethnic styles, wood chips are coated with transparent varnish, preserving the natural appearance of the material.
When is the best time to use plaster?
If you do not want to deal with repairs for a long time after completing the current work, you should choose plaster. She is ready to serve for several decades. Experts advise choosing this mixture also if you need the walls to be reliable and resistant to mechanical damage. Plaster is not only recommended, but also mandatory if you intend to hang heavy objects on the wall being finished, which cannot be done with plasterboard facing.
Attention! If you have grandiose plans for finishing the room, then it is better to choose drywall, since after its installation you can use any interior solutions, but plaster can only be painted, but other manipulations with it are unacceptable.