Even in modern buildings, walls are sometimes uneven - certain small differences are normal, both for factory-made materials and for monolithic reinforced concrete. In old houses, the curvature of the walls can reach several centimeters both horizontally and vertically.
Small differences are invisible to the eye and are not critical, however, significant irregularities look unpresentable and can interfere with the installation of wall coverings - wallpaper, tiles, etc.
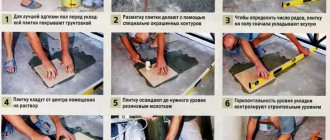
Large irregularities in the wall will be noticeable to the naked eye, however, a long level or rule will help to more accurately determine their extent. They are first applied to the wall vertically, starting from the corner of the room, and marked with a step of 30-50 cm from the point of contact of the instrument with the wall.
Next, the same thing is repeated horizontally from floor to ceiling. In this way, the most convex points of the wall become known. The depth of the recesses is determined using a bubble level. With gaps within one and a half centimeters, you can level the walls with plaster or cover them with plasterboard; for large differences, plasterboard sheets can be used.
Assessment of wall surface roughness
All methods of leveling walls are divided into two fundamentally different groups:
- use of mixtures (plaster and putty);
- dry leveling (plasterboard is most often used).
One method or another is chosen, taking into account the degree of unevenness of the walls , so this stage is especially important. How uneven the walls are can be measured with a laser level or a regular building level.
The simplest and very popular way is to use plumb lines . First of all, a nail is driven into one of the upper corners of the wall, so that 2-3 cm remains on its surface. A plumb line can be made from a long thread and a nut or other weight. The finished plumb line is tied to a driven nail; the weight should almost reach the floor. When the thread with the load stops wobbling (i.e., the plumb line forms a strictly vertical line), you can drive a second nail at the bottom of the wall so that the thread and the nail head are at the same level. The same procedure is done on the opposite side of the wall. Four nails are connected with a cord and form a strictly vertical plane, which allows you to understand the degree of deviation of the wall level from it.
We evaluate the unevenness and choose the leveling method:
- depressions and irregularities up to 0.5-1 cm can be leveled using putty;
- differences of up to 3-5 cm are best leveled with plaster mixtures;
- differences of more than 5 cm are easier to level with sheets of plasterboard mounted on a specially constructed frame.
Why choose plaster
Foundation irregularities are different and work with them in different ways too. Small bulges and dents are sealed with putty. Most often this is quite enough. But if the plane, as the builders say, collapses, you cannot do without plaster mixtures. They are used to remove significant deviations of the wall from the plane and correct its curvature. It is possible to level out differences of about 50 mm and even a little more. If you have to work with a significant deviation, several layers of plaster mixture are applied. To get a high-quality result, the height of each of them should not be more than 7 mm. For layers with a total height of more than 30 mm, reinforcement is required, otherwise, over time, delamination of the material will inevitably begin.
Instagram wesolastodola
In the most difficult cases, when deviations are significantly more than 50 mm, plaster is not used. There is too great a risk that the material will peel off over time. In such cases, drywall is chosen.
- Walls
Quick Guide: 3 Sure Ways to Level Your Walls
No. 1. Leveling walls with plaster
To level the walls, gypsum and cement plasters . Gypsum compositions allow you to achieve an optimal microclimate in the room, but are afraid of water, so they are suitable for bedrooms, living rooms and children's rooms. Cement plasters can be safely used to level walls in rooms where humidity will be constantly increased.
The sequence of work looks like this:
- preparation of the wall surface. In order for the leveling mixture to stick, the wall must be properly treated. First, all remnants of the old coating are removed, then priming is carried out for better adhesion to the plaster layer. For cement compositions, use a primer made from a solution of sand, cement and water, the so-called cement laitance; for gypsum plaster, it is better to use a special primer;
- if the layer of plaster is more than 2 cm, then at this stage it is better to use a reinforcing plaster mesh , which will not allow the composition to crumble. It is worth noting that if you use a ready-made factory plaster mixture, then you should pay attention to the composition: some manufacturers use polymer additives that increase the strength and degree of adhesion of the solution so much that a mesh may not be needed;
. Wooden slats or a perforated metal profile are used as beacons, which become a guideline for creating a flat surface. The latter will be more convenient for beginners, since such beacons will not have to be removed after the plaster layer has slightly hardened and then the recesses will be masked. First, two beacons are mounted at opposite ends of the wall, using a level, and the beacons are secured with gypsum mortar of the required height until ideal verticality is achieved. Three cords are pulled between the two resulting beacons: at the top, in the middle of the wall and at the bottom, and already focusing on them, intermediate beacons are installed so that they lightly touch the cord. The step between the beacons depends on the size of the tool that will be used to level the plaster mixture (usually a rule is used for this). In any case, the distance between the beacons should be 20 cm less than the length of the instrument;
installation of beacons
You can find a wide variety in construction stores. At the construction site, all that remains is to prepare the solution correctly, following the instructions. You can prepare a cement plaster solution yourself: mix cement and sand in a ratio of 1:6, then add water to a creamy consistency. Some experts recommend sticking to a component ratio of 1:2 or 1:3; the finished mixture is more plastic, and therefore easier to handle. The finished solution is used for 1-2 hours until it begins to harden;
plaster mixtures
. To do this, you can use a “falcon” and a trowel. The first is to take the mixture from a container, the second is to throw it on the wall in excess. The use of a “falcon”, a tool similar to a trowel, but larger in size, allows you to increase the speed of work. Now, as a rule, you need to evenly distribute the solution from bottom to top, leaning on the beacons. If the leveling layer is thick, then you can first apply a rough outline of the plaster, and after it dries, apply the main layer with leveling along the beacons. If wooden slats were used as the latter, then when the solution dries a little, they need to be carefully removed, the cavities filled with plaster and leveled with a spatula;
applying plaster
After the plaster dries, we obtain a smooth but rough surface. In order to make it smooth, you need to apply a thin layer of putty , and then sand the surface with fine sandpaper .
The main advantage of this leveling method is to maximize the preservation of the usable area of the room. The disadvantages are the labor-intensive process, the need to prepare the base and the presence of a large amount of dust.
Adviсe
- Moistened wallpaper will easily come off the wall.
- To protect non-renovated rooms from dust , the passage to the room can be covered with a damp sheet.
- Goggles and a mask (you can use a medical one) will help protect your face from plaster dust.
- The wiring of all communications can be hidden behind sheets of drywall , and lighting can be installed there.
- Drywall can be easily cut with a regular utility knife.
- In case of large uneven walls , leveling them with plasterboard will cost much less.
- Both plastering and installation of drywall sheets are carried out from the bottom up.
- Plastering can be done not only manually , but also by machine. The mixture is poured into the device and sprayed onto the walls under pressure through nozzles; you only need to manually level the surface, removing excess plaster. This option will allow you to level the walls faster and easier, but requires special, rather expensive equipment.
- Sanding by hand is a long and dusty process. No matter how you defend yourself, the plaster particles are so small that they can get everywhere. You can use a grinding machine, which will make the process faster and less dusty, because... has a dust collection container.
No. 2. Leveling walls with putty
The putty is suitable for final leveling of walls or for those surfaces where there are small differences in height, potholes and other irregularities. The puttying process is simple and can be done with your own hands. The sequence of actions is as follows:
- surface preparation : cleaning, treatment with antifungal agents, if necessary, and priming;
- putty can be either ready-made or in the form of a dry mixture, which must be diluted with the amount of water specified in the instructions and stirred until a creamy homogeneous state;
- The work is easier to do with two spatulas . One is small and serves to take the mixture, apply it to the second spatula and clean the latter. The second spatula is larger, its size depends on the degree of unevenness of the walls. They apply putty to the surface and level it. If there are not just unevenness, but also small vertical deviations, then it is recommended to level the putty according the building rule , which has a built-in level so that you can control the quality of the resulting surface. If the starting putty is performed in two layers, then it is better to use a reinforcing mesh between the layers, and the direction of application of the layers should be mutually perpendicular;
if the surface requires the application of two layers of putty , then the first after setting is additionally treated with a primer;- After the finishing layer of putty has set, it is lightly washed away with a primer solution to get rid of possible unevenness, then sanded with sandpaper. If you do not plan to paint the walls, then you can do without a thin finishing layer of putty.
Leveling the wall with plaster paste
Why choose plaster mixture
Types of material
detailed instructions
- Preparation
- Alignment
- Finish for putty
During the construction process, unfortunately, attention is not always paid to leveling surfaces. Especially if a multi-storey building is being built. Owners have to solve these problems themselves. Leveling walls with plaster yourself is quite possible. It's not as difficult as it might seem. Let's look at all the intricacies of the process.
No. 3. Frame method of leveling walls with plasterboard
When it comes to the largest unevenness and significant differences in wall levels, the best way to level the surface is to use drywall, and install it in a frame manner. In this case, this is the easiest , cheapest and fastest way to get a perfectly flat and smooth wall surface . In addition, you will not need to spend a lot of time and effort preparing the surface of the wall - it, with all its cracks, potholes and differences, will be hidden behind the frame and drywall. Moreover, some communications can be laid inside the frame or additional heat and sound insulation can be installed.
However, we should not forget that this method of leveling the walls will take up a lot of usable space , and if it is already in short supply, then the room risks turning into a hole. Walls covered with plasterboard sheets will be able to withstand less load than those lined with plaster. If we are talking about a room with high humidity, then you should use moisture-resistant plasterboard sheets.
Sequence of work:
It may consist of a wooden beam or a metal profile. The timber does not allow achieving the desired durability of the frame, it is susceptible to the influence of moisture and microorganisms, therefore in most cases today they are used guide and rack metal profile. The first two profiles are attached to the floor and ceiling. Using a level, draw a straight line on the floor at a distance of 5-6 cm from the wall (more is possible if the curvature is large or you need to hide communications). Using a vertical plumb line, the line is transferred to the ceiling. Guide profiles are fastened along the resulting lines with self-tapping screws, constantly checking the evenness of their level using a plumb line. Between them, perpendicular to them, supporting profiles are attached along the wall using self-tapping screws. The distance between them is 40-60 cm for plasterboard sheets 120 cm wide;
frame construction.- filling the frame with communications , heat or sound insulating material, if necessary;
- installation of drywall sheets . Sheets with a thickness of 12.5 mm are suitable. Installation begins from any upper corner, the sheets are fastened with self-tapping screws, the fastening step is 30 cm, the caps are recessed by 1 mm so that you can ultimately achieve a smooth surface;
- when all sheets are attached, caps and joints are puttied with gypsum compound. After it has dried, the surface is ready for further finishing. Experts do not recommend installing tiles on drywall, but painting, decorative plaster and wallpaper can be used. If you plan to glue wallpaper, then it will be difficult to remove it from the drywall, so it is better to putty not only the joints and caps, but also the entire rest of the surface in advance.
Using a similar technology, leveling is done with plywood or plastic panels, constructing a frame of wooden blocks .
Walls in country houses are often leveled this way.
How can I level a wall?
Although technologies in construction are developing rapidly, leveling walls is still done in two ways: plaster and plasterboard. Another thing is that there are different compositions of plaster - based on gypsum and cement, and you can install gypsum boards in two ways: on a frame and with glue. But that's all.
Smooth walls are a modern requirement
No. 4. Frameless leveling of walls with plasterboard
As you might guess, in this case there is no need to construct a frame from a profile, which greatly simplifies and speeds up the process. In this way, you can level out both minor unevenness and differences in level up to 2-5 cm.
Sequence of work:
- preparation of the base , dust removal and treatment with primers. The next stage begins when the primer is completely dry;
- cutting plasterboard sheets . At this stage, calculations are made and it is determined how many sheets will be needed and how they will be arranged. It doesn’t hurt to cut holes for sockets and switches;
- determining the level of the wall . For convenience at this stage, it is better to draw lines for the future wall level on the floor and ceiling. This will simplify the process of installing the slabs and help achieve better results;
. In case of minor unevenness, beds of gypsum glue are applied to the sheet of plasterboard along its perimeter and in the center in increments of 30 cm, the sheet is pressed against the wall, a level is placed on it and, using light blows of a mallet, the sheet is leveled vertically. Do not forget to focus on the drawn lines, otherwise at this stage the sheet can be drowned too much, and if there is a bump further on the wall, then it will not be possible to achieve a flat surface. Installation begins from one of the corners, adjacent sheets are tightly adjacent to each other;
drywall installation- for greater reliability, the sheets can be attached to the base with dowels in several places;
- the final stage is to putty the joints and places where dowels are attached with gypsum mortar.
Required materials and tools
For plastering:
- plaster;
- water;
- container for stirring;
- mixer attachment for drill;
- means for protection against dust (mask, goggles);
- skin;
- putty knife;
- rule;
- level;
- metal beacons;
To install drywall:
- metal profile and various fastenings for it in case of frame installation;
- glue in case of gluing sheets of material;
- plasterboard sheets;
- metal scissors;
- screwdriver;
- drill;
Why is this necessary?
The surface under the wallpaper should be smooth. Especially under thin ones that show the slightest irregularities remaining on the wall after its preparation. Ensuring the absence of flaws is the most important task of the finisher leveling the walls.
Advice. When taking prepared walls, use rights and a crowbar. If the work is done well, its edge will fit tightly to the wall.
Some building materials, such as precast concrete, initially have a smooth surface. Therefore, whether it is necessary to plaster concrete walls under wallpaper is decided individually, based on specific circumstances. In 90% of cases, you can get by with careful putty, saving:
- time;
- materials;
- money.
How to properly remove old wallpaper
In old houses, step-by-step instructions for finishing the surface invariably begin with removing old wallpaper. Otherwise, the master will not be able to see possible defects in the wall that have formed since the previous repair. And this will protect the future coating from unpleasant stains and streaks.
Before you begin preparing the walls for wallpapering, you must take precautions: put on overalls and turn off the electricity.
Removing old wallpaper from the wall
This work begins from those areas where the wallpaper has already begun to lag a little. Such places include seams. First you need to remove everything that can be easily removed.
However, the material in the middle of the sheets may not be removed so easily. To remove wallpaper in difficult areas, you can use a spray bottle or roller dipped in warm water. After the coating has become wet, it is carefully removed with a spatula.
To speed up the process, you can add a weak solution of vinegar or adhesive solvent to the water. Sometimes special chemical compounds are used for these purposes. But if preparing walls for wallpapering with your own hands involves using finances to a minimum, such means are not used.
Why is it necessary to prepare the surface before gluing?
Often, in order to save time, wallpaper is glued without first preparing the wall. This is fraught with some inconveniences. So, the unevenness of the wall can be clearly visible even to someone who comes to visit for the first time. And if new material is pasted over old wallpaper, after a certain period of time, streaks may appear on the coating, or the pasted room will be spoiled by the pattern that has appeared, so preparing the wall for wallpapering is carried out to achieve the following goals:
- The prepared surface becomes porous before gluing. This allows you to ensure reliable attachment of the material. In addition, this eliminates the possibility of unpleasant surprises in the form of unstuck seams.
- During preparation, cracks are covered, recesses are hidden under a layer of putty, and protrusions are removed, which is often required in a panel house. This process not only improves the aesthetic effect of the renovation, but also fulfills practical properties. Thus, sealing defects increases sound insulation and allows the room to better retain heat.
- Such restoration is especially important for those structures that are in contact with the street. After the preparatory work, the flow of cold air from outside into the apartment will be reduced, which will protect the room from fungus and mold.
- Uneven surfaces can cause rubbing or other damage to the wallpaper.
Although preparing walls for wallpapering can increase the repair time, it will make it better, and the service life of the coating will increase from 5 years to 10 or more, but to achieve the result you need to follow the correct sequence of work.
Preparing surfaces for leveling
Before you start leveling curved walls in your house, it is important to carry out a surface preparation procedure. It is this moment that has a significant impact on further work.
The first step is to remove the old finishing material, if any. After this, the initial correction begins: excess protrusions are cut off. The room can have brick, monolithic, reinforced concrete, cellular, stone or wooden walls. The type of substance has a direct impact on the adhesion characteristics of the leveling material and the surface.
The base is also cleaned of dirt and stains. Traces of oil are degreased, fungus and rotten elements are removed if possible, after which the area is treated with an antibiotic composition.
If there are traces of rust or soot on the walls, then these also need to be eliminated. It will not be superfluous to carry out waterproofing. All wires are hidden in the surface. Switches and sockets can be replaced if necessary.
All cracks and any other defects are cleaned of dust, after which a primer is applied. You can also install reinforced rods and beacons.
Before starting leveling, it is important to let the wall dry thoroughly.
You might be interested
How to choose workers to renovate an apartment 12 deception schemes when renovating apartments How you can save money when renovating
If the wall was covered with paint
The situation when a wall needs to be cleaned of old wallpaper occurs quite often. But how to prepare the walls for wallpapering if paint was used before? Several approaches are used for this.
Firstly, such a coating can be preheated using a hair dryer, and then separated from the surface with a spatula. But it is worth remembering that with this cleaning method it is necessary to ensure fresh air circulation. When exposed to high temperatures, paint can release toxic substances, a high concentration of which in the body can lead to serious poisoning.
Secondly, you can separate the paint layer using a grinder or a grinder. The disadvantage of this option will be a large amount of dust and dirt in the air during cleaning, so it is worth organizing good ventilation of the room where the renovation is being carried out and closing the doors to other rooms to avoid the entry of construction debris.
The above methods are not recommended for people with asthma or dust allergies.
The most effective and safest option for cleaning painted walls is to use paint strippers. But subject to compliance with the precautions specified by the manufacturer.
How to level an uneven surface with putty yourself
The puttying process requires a certain skill, however, having studied all the intricacies, you can do this work with your own hands.
Before you putty on uneven ceilings and walls, you need to determine the degree of unevenness. To do this, you can use a rule. By applying it to the surface, you can see the gaps that need to be puttied. The rule is applied in different directions and the defects are marked with a pencil.
If the gaps are large, then before leveling the walls in the apartment yourself with putty, you can use beacons. Rigid slats are fixed across the entire area for the length of the rule perpendicular to the floor. Plumb lines are attached to the ceiling and lowered down along the slats, making marks on the floor. The slats are leveled vertically. Then the space between them is filled with putty starting solution and smoothed with the rule.
Description of the process step by step, how to do it yourself
Before leveling the walls with putty, you still need to study the technique of the process.
To do everything right, you need to start work from the corners. The corners themselves are formed last with a regular or corner spatula.
- The building mass is also leveled with a spatula, moving vertically and horizontally.
- Some masters advise smoothing the first layer in one direction, and the next in another.
- For convenience and speed, use two spatulas - long and short. The mixture is applied first, and the excess material is removed from it second. Also, use a short spatula to scoop up the solution and distribute it over the long one.
- Each time the movement of the spatula begins to overlap with the previous layer of solution.
- When an area of about a square meter is processed, they walk over it as a rule to remove excess mass.
- The first layer is ready, you need to wait until it dries completely.
- The finished surface is sanded with sandpaper and checked for evenness.
- Next, it is recommended to perform finishing putty to obtain perfectly smooth walls or ceilings. Now you can start decorating.
Leveling with putty for finishing
If the walls were relatively smooth, then there is no need to use plaster or drywall. To do this, it is enough to putty the surface. For the master's work I use starting, finishing or universal compositions. Starter putties allow you to fill voids up to 30 mm deep and are therefore excellent for leveling. Finishing mixtures are relevant if the differences are small - up to 10 mm. Such compositions are used before the final interior decoration of the room.
Modern compositions are easy to apply and level Source serveiestacio.com
Before leveling the walls, the master decides what type of mixture to choose:
- plaster;
- polymer;
- cement;
- limestone
The first three options are great for finishing the wall and leveling it. The lime mixture is comparable to plaster, so it is used for work on the outside of the house. If lime paint is used for finishing, it is better to level the surface with cement or lime putty.
A worker checks the evenness of the wall using a rule Source dizainexpert.ru
The master dilutes the composition or uses a ready-made mixture. Using a wide spatula, large surfaces are processed, and medium and small irregularities are treated with a small spatula. At the final stage, the surface is treated with emery cloth - then the wall is completely ready for finishing.