Change houses are modular buildings and structures for temporary residence, warehouse storage and other household purposes. They are mobile and easy to use, made from different materials and have different prices. The supporting basis of most structures is a wooden or metal frame. Double cladding of walls, floor and ceiling with insulation inside allows you to create quite comfortable conditions for temporary and permanent residence of people.
Construction _
cabin designs must provide:
- possibility of mobile use;
- easy installation and dismantling;
- long service life;
- reusable;
- Possibility of use for various purposes.
The choice of module design depends on the specific operating conditions and intended application.
Features of cabins for various purposes
Change houses are simple structures for temporary use. The main elements of these structures include:
- wooden or metal supporting frame;
- external and internal cladding inside which there is insulation;
- door frame and door leaf;
- window blocks;
- wooden floor and ceiling;
- roof.
In addition, depending on the purpose, construction and summer cottages can be equipped with lighting and heating devices, a bathroom, washbasin, kitchen and other equipment.
External cladding and interior finishing can be made of materials such as:
- board or timber;
- profiled metal sheets;
- natural or plastic lining;
- plywood, chipboard or fiberboard.
To insulate the trailer, mineral wool mats, polystyrene foam, polystyrene foam and polyurethane foam are used. Doors and windows are made of wood or metal-plastic. Plastic blocks are most often installed in window openings of metal structures; in wooden houses you can most often see blocks made of wood.
Dimensions and structure of a standard cabin
Specifications:
- Size: 6m - length; 2.4m - width; 2.5m - height.
- Weight of a standard cabin: - 2.2 - 2.5 tons.
- Frame: metal (profile 100x50x3mm, bent corner 90x90x3 mm).
- Exterior finish: galvanized or painted corrugated sheet C-8.
- Insulation: mineral wool 50-100mm.
- Vapor barrier: technical film.
- Subfloor: 25mm softwood board.
- Interior finishing of walls and ceiling: fiberboard, lining, PVC panels.
- Finish floor: Linoleum.
- Window: 800x800mm.
What and how are they built from?
The toilet appears first on the site, and then the change house
Almost all cabins are built using frame technology. The building materials for the frame are wooden beams of at least 100*150 mm or a profiled metal pipe 60*60*2 mm.
For cladding, the choice of materials is much wider. Use:
- edged board;
- sheet material - plywood, OSB, chipboard;
- profiled sheet;
- siding.
In any case, the cladding is done on both sides - outside and inside. The outside can be metal, but the inside is often made of either lining or stuffed with plywood or OSB.
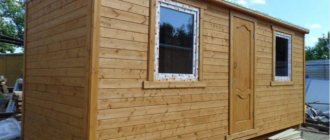
One of the options for a garden shed
Thermal insulation is laid between the two skins. Although the structure is temporary, spring and autumn, and sometimes summer nights, can be very cold. Therefore, without insulation there is no way. Any insulation can be used. Better - mineral wool, cheaper - polystyrene foam. Extruded polystyrene foam has the best characteristics, but also the highest price. Just when choosing insulation, keep in mind that foam plastic almost does not muffle sounds, so those who are particularly nervous will not be able to sleep. Therefore, the optimal choice is mineral wool. What layer? If you think about it, then in central Russia, preferably 100 mm, but at least 50 mm.
Please note that the floor also needs to be insulated. Especially the floor. There is a lot of pressure from below. Therefore, it must be double: first, rough, on top, across the board, logs are laid, insulation between them, and then the finished floor.
Required building materials
After choosing the type of construction and layout, you need to build drawings of the cabin with your own hands and prepare a list of building materials. Let's look at what is needed for a wooden frame structure. This is an inexpensive and practical option.
- A 100x50 mm beam is used as a base of strapping beams or racks. If insulation is planned, space is required for a heat insulator. Then you will need racks with a large cross-section. 50x50 mm bars are chosen for jibs and jumpers.
- The floor joists, as well as the rafters under the ceiling, are made from edged boards with a section of 50x100 mm. The roofing sheathing is assembled from 25x100 mm boards.
- For cladding inside and outside, you can use wooden lining, preferably class A. Other solutions are possible. For example, wood boards on the inside and siding or corrugated sheets on the outside.
- A tongue and groove board with a thickness of at least 30 mm is suitable for the floor.
- Mineral wool is usually used as insulation. To operate the room in winter conditions, you will need to lay a layer at least 10 cm thick. For autumn-spring use, a layer of 5 cm is sufficient. It can also be insulated with other insulators, for example, polystyrene foam.
- For the roof, choose ondulin, corrugated sheet or euro slate.
- Small concrete blocks or solid bricks will be needed for the foundation.
In addition, you will need hydro and wind protection; it is better to take a film membrane, door and window blocks, metal corners, and fasteners. Before work, all lumber is treated with an antiseptic and fire retardant to protect against water and flame.
Instagram bashstroydom
Instagram bashstroydom
- Country cottage area
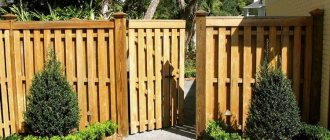
How to build a fence at your dacha with your own hands from wood, chain-link mesh, corrugated sheets and other materials
Layout and drawings
Despite the fact that the building is considered temporary, it often turns into a bathhouse or guest house. That’s why even in a change house there is such a thing as a layout. Even temporary housing should be relatively comfortable.
Cabin trailer
There are two main types of cabins: trailer and vest. In a “trailer” type building, the entrance is on the side, there is no separation inside; in extreme cases, they put a partition - 1.5-2 meters from the entrance. This room is used as a vestibule-dressing room and a warehouse for storing instruments. This is the simplest possible option.
Drawing of a trailer cabin with dimensions
The drawings will contain graphic and digital symbols, their explanation is in the photo below.
Designation on drawings
Baby vest
The most popular layout is the vest. This is when the entrance is in the middle. Moreover, the middle is fenced off and used as a vestibule, storage room, etc. The purpose of the other two rooms may be different. Some people use both as bedrooms, others use one as a kitchen.
Two rooms and a vestibule
With a fenced-off small storage room
Only vestibule without storage room
Change house with toilet and shower
Not everyone agrees, even at a construction site or at a dacha, even temporarily, to lead a Spartan lifestyle. At least basic amenities are required. Although, it is probably better to build them separately.
Read how to build a toilet in your country house here.
The sanitary block is located on the edge - a wiser decision, especially if you make a separate entrance
With toilet
Having chosen a drawing, do not forget, when developing a frame for a change house, that racks must be installed at the junction of the walls. If doors are attached to the racks, they must be reinforced - double.
Foundation for a cabin
Since the structure is temporary and light, the foundation is usually columns or blocks. More often - blocks. Preferably concrete, standard. No - you can use any construction materials, but they are high-density and not hollow.
Example of a column for a foundation for a cabin
They are placed on a prepared base. If the soils are normal, you can simply remove the turf and level the areas. For greater reliability, dig a small pit for each block about 20-25 cm deep. Medium-fraction crushed stone is poured into it and compacted well. Blocks are placed on such a substrate.
Note! The top edge must be level (in the same horizontal plane). It is also necessary to check the geometry of the foundation: the angles are strictly 90°, the diagonals are equal.
If the width of the cabin is no more than 2.5 m and wooden beams are used for the frame, blocks are placed in each corner, as well as under those places where the partitions extend. If the building is without partitions, the spacing - every 1.5-2 m - depends on the cross-section of the timber and the planned cladding, as well as the weight of the roofing material. With a width of 3 m or more, an intermediate beam and a base under it are required. In this case, three rows of blocks are obtained.
An example of a foundation for a three-meter wide country house
To prevent dampness from entering the premises, waterproofing is laid on the blocks. You can use two layers of roofing felt, or you can use another waterproofing material, even a film. Another option is to coat it with bitumen mastic. At this point the foundation can be considered ready.
Step-by-step instructions: photo reports with explanations
It is difficult to understand some things from the description. No matter how much you read, you won’t understand until you do it, or at least watch how others do it. This is why photos of the construction of cabins are useful: you can look at how the units were made and find a solution for yourself. This is a kind of manual for those who decide to build on their own.
Construction of a wooden cabin
A cabin was built from wood at the dacha. Dimensions 3*6 m, insulated - for temporary residence during the construction of the house. The following materials were used:
- board 50*100 mm - 28 pcs;
- timber 100*150 mm - 5 pcs and 50*50 mm - 24 pcs;
- blocks 20*40*20 mm - 20 pcs;
- roof boards 25*150 mm - 10 pieces;
- tongue and groove floor board 30 mm thick - 21 pcs;
- lining class A 5 packs of 6 meters and 6 packs of 3 meters;
- roofing felt 4 rolls;
- polystyrene foam - 4 cubes;
- windows 90*90 cm - 2 pcs;
- doors;
- Senezh Ultra - 10 l;
- corners and plates to strengthen strapping connections;
- fasteners (nails, screws, finishing nails), polyurethane foam. This is what the materials on the site look like
Since prices for materials greatly depend on the region, there is no point in talking about the cost of construction. But from this list, you yourself can determine with fairly high accuracy how much a self-built shed will cost.
Please note that this list does not include roofing material (ondulin was planned) and there is no glass. Also, lining for interior decoration has not been purchased.
Before construction began, all wood, with the exception of the lining, was treated with Senezh Ultra antibacterial impregnation. Covered in two layers. So the quality of processing should be normal.
Wood processing
They marked out the area for the building. We decided to place the blocks on a sand bed. They dug holes 25-30 centimeters deep, poured sand, and compacted it. Blocks were placed. First we set up the two outermost ones, put a flat board on them, and a level on it. This is how the outer blocks were set up. Then the intermediate ones were adjusted to the height of the boards. So on all sides.
Setting up blocks
Next, the harness was laid. Beam 100*150, cut into half a tree. They folded it and secured it with pins for security.
This is how they cut into half a tree
And this is how to lay the middle beam
After checking the corners and diagonals, we knocked them down with pins
The next step was to lay the floor joists. They were placed every 50 cm, and we will also install the racks every other one. They were made from a 50*100 mm board placed on a narrow part.
Floor joists installed
We decided to immediately assemble the racks with rafters on the ground, strengthen the connections with corners, and then install them ready-made. They were assembled from the same 50*100 mm board.
We knock down the front pillar - it is longer, the rear one and the rafters
They beat with nails, and screwed the plates with self-tapping screws
The racks were secured with temporary jibs
The posts were nailed down with long nails. Then, for reliability, all attachment points were reinforced with corners and plates. They were already mounted on self-tapping screws.
50*50 mm bars were nailed to the sides of the joists. The result was “nests” for laying polystyrene foam. It was placed on polyurethane foam: both hermetically and reliably. A floor board was nailed on top.
They nailed the block on both sides of the joists
Styrofoam laid
The floor was laid on top
Next, the sheathing stage began. First, we installed additional racks on the sides and reinforced them with jibs.
Additional racks and jibs give greater rigidity to the building
Now comes the actual plating. On the short side there was a lining made of packs of 3 meters, on the long side they nailed six-meter ones.
Beginning of plating
Having completed the sheathing halfway, we laid the sheathing under the roofing. A 25*150 mm board was nailed in increments of 30 cm, with increments of 20 cm at the edges (so that the overhang could withstand). Then we continued with the paneling.
In the places where the windows will be located, they installed mortgages - a board that lies across the counter. The window frame will rest on it. They were fastened with nails all the way through, but the joints were additionally reinforced with corners.
Installed mortgages in places where windows are supposed to be fastened
When the back and blank side walls were sewn up almost to the top, roofing felt was rolled out onto the roof. He will lie there until we buy ondulin.
Sheathing continues
The outer skin is almost ready. The doors were bought without finishing - only the frame covered with fiberboard
Start of door trim
While we were finishing nailing the clapboard on the outside, work was also in full swing inside - they were installing foam plastic. The width of the sheet is 100 cm, the distance between the posts is 95 cm. We have to cut thin strips.
We put foam between the posts
To prevent it from “falling”, we grab it on top with thin corners, which we attach, of course, only to the beam of the rack.
This is what a foam-lined room looks like from the inside
The corners at the top that hold the foam are visible
We started lining the inside, but the lining ran out. For now we have switched to painting the outside. It turned out well, it seems.
This is what a painted cabin looks like from the outside
We had to buy additional lining and finish the interior finishing.
The inside was also lined with clapboard
We started making the partition. It was assembled from the same boards - 50*150 mm. The joints are traditionally reinforced with corners. They covered it with clapboard.
Drains under the partition
Lined on one side with clapboard
We started insulating the roof. They used the same foam and the same technology - they propped it up with corners.
Insulating the ceiling of a cabin
The joints with wall insulation were foamed with polyurethane foam.
The joint with the wall insulation is foamed
Then we started covering it with clapboard.
Beginning of lining the ceiling with clapboard
The ceiling trim is finished
We started laying the roofing. We bought ondulin and laid it with overlap on one wave. They were attached to each wave with special hardware purchased along with ondulin.
Mounting ondulin on the roof of a garden shed
Then we started finishing up the interior. The partition was also insulated with polystyrene foam and lined with clapboard on the other side.
Almost sewn up partition
Finishing the piece above the doorway
This is how the wall looks in the final version
The inside of the lining is coated with water-based varnish. It only gives a slight tint to a slightly darker color. There seems to be no film on the wood. If you look directly, it generally seems that the tree is not covered with anything. Only when viewed from the side at a certain angle is the shine visible.
This is after painting
On the floor, the varnish is already with a film: so that the wood does not wear out. Covered in two layers.
Then we started finishing the overhangs. They were sewn up with the same clapboard. In general, working with the clapboard took the most time.
Seal the roof overhangs
The front is almost finished
Side view
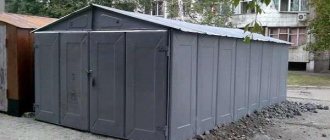
Metal frame for a change house
Metal was chosen as the basis as it is more reliable and durable. The thought that the change house might have to be moved also played a role. If the frame is made of metal, she will not be in any danger.
We are going to build something like this type of cabin
The dimensions were determined based on the length of the angle rods: 11.7 m. The following dimensions emerged: 2.8 * 5.8 m, height - 2.5 m. The frame was welded from an angle with a shelf 75 mm, thickness 6 mm.
The foundation is made on pillars cast independently: construction began in the fall, and there’s still nothing more to be done. So it was decided to fill in reinforced columns: six pieces. First, the area was marked, after which the locations for the foundation columns were determined.
Marking the area and the base for the posts
Holes were dug 50*50 cm, total depth about 30 cm. Crushed stone was poured onto the bottom in a layer of about 10-15 cm and compacted tightly. There is the same amount of sand on top, also with a tamper. As a result, the bedding came to the same level as the ground.
Roofing material is laid at the bottom so that moisture does not escape from the concrete, and it “ripes” normally and does not dry out. Next, the formwork was assembled and the reinforcement was laid in it.
This is what the formwork for the post and reinforcement looks like
The area is dry, the water drains normally, so there should be no problems. I just mastered welding, so it’s not clear whether the reinforcement is welded or twisted.
Before pouring concrete
Everything is filled with concrete, covered with film: the end of October, and in order for the concrete to be of normal strength, it needs to be wrapped.
The columns are wrapped up
The frame frame took a long time to cook - all winter: frosts, workload, did not allow us to operate with the required frequency. The base was made from a 75 mm corner, 6 mm thick, and 40*2 mm was used for reinforcement.
The beginning of the cabin frame from a metal corner - the bottom frame
The side parts were cooked entirely, then with the help of 4 people they were placed in a vertical position and fixed in this way. Profiled pipes 40*40*2 mm were used on the racks to which the window and door frames would be attached.
Frames are assembled lying down
The most inconvenient moment is measuring diagonals alone. You have to constantly monitor them, but doing it alone is inconvenient. But it is necessary to set everything, otherwise there will be a distortion.
To give greater rigidity, I welded strips of metal in the corners. I got them by loosening the corner (40 mm). It was possible to buy an additional strip, but I used cuttings of a corner.
Strips for rigidity in the corners of the frame
View from inside the corner
It was difficult when we were installing the frames: in the cold we only wore thick gloves, and it was difficult to hold them firmly. That’s why they propped it up with boards and whatever they could. But the angle was strictly maintained.
The first circuit is exposed
To ensure a rigid attachment to the frame, metal plates are welded at an angle.
Having exposed the sides of the frame, they were rigidly connected using a metal angle
The entire frame was gradually assembled.
Sidewalls are raised and welded
We finish cooking the plates in the corners: top and bottom
We weld several beams at the top. Now the frame for the change house is “iron”
The frame from the metal corner for the change house is ready
Now all that remains is the casing. It can be anything: even the same lining, block house, or an economical option - plywood and OSB. To attach the bleach to the corner, it is more convenient to screw the beam, and then attach the sheathing and everything else to it. The same situation applies to the rafter system: a block is screwed around the perimeter with self-tapping screws and pre-aligned, and the rafters are attached to it.
Application of panels in construction
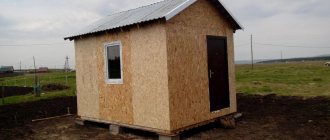
Having prepared the foundation and erected the frame of the walls and roof with your own hands, they begin to install the sandwich panels. This is a simple procedure, but it still has its own nuances. Fastening the panels to the surface of the frame is best done using self-tapping screws. Since perfectly even frames are not always obtained, when installing panels, cracks form at their joints, which must be sealed; for these purposes, polyurethane foam is used liberally, the price of which is now low. The corners also require insulation; they are covered with overhead parts. Having finished insulating the walls, we proceed to the ceiling. To insulate the roof, special sandwich panels are used, the installation principle of which is practically no different from wall insulation.
The process of assembling a cabin from sandwich panels
They are made from lighter and thinner materials, so their price is lower than usual.