When carrying out work in the house and in the country, we often need to bend pipes to give them the shape we need to perform our specific task. In order for the pipe to bend correctly and the pipe to serve for a long time, we will need a special machine, a pipe bender. These machines are sold in stores; there are many varieties and models, but our task will be to make a pipe bender with our own hands.
Why do you need to bend pipes with a pipe bender?
Metal collectors can be bent in a simple mechanical way, having first secured one end of the tube, using gas welding, or other methods.
But in order to give a thin-walled steel or metal-plastic pipe the required shape of the highest quality, it is best to use a homemade pipe bender.
Using this method, the product will bend very well and its structure will be completely preserved.
The use of a pipe bender is due to:
- the least risk of unnecessary pipe deformation;
- ease of use;
- the ability to work with risers of any diameter;
- complete safety when working with the device.
Plus, there is no need to waste time and money heating the product, the number of joints (welded or threaded) is reduced, and the design of the line will be more reliable and impact-resistant.
When installing a pipeline, use a manual, hydraulic or electric pipe bender (ET). Today, the last option, which you can do yourself, is considered the most popular.
When is an electric pipe bender used?
For working with a large number of products
Such a homemade pipe bender can be used to perform not just complex, but also the most important work on the required section of the pipeline.
Important! Using an electric pipe bender, you can bend steel pipes of any diameter and with any wall thickness used in the installation of pipelines, the required bending radius.
Unlike the manual design, which is most often used at home, an electric machine is used to process risers in large quantities.
When laying pipe communications, you often have to deal with structural elements with turns. It is clear that the ideal option in such cases is ready-made devices.
But, firstly, they are not always at hand, and secondly, it happens that standard jumpers cannot always be used for a specific section of the pipeline.
For making connections with precise angles
For example, if it is necessary for a pipe to run at an angle of 90⁰, then using an electric pipe bender you can easily make the necessary connection with your own hands with an accuracy of one degree. The main advantage of such a homemade device: the hands and the frame do not feel any recoil, although its force is equal to the force created by hydraulic equipment. Therefore, the pipe bending machine can be placed on soft surfaces and even shaky bases.
A device (manual machine) for bending reinforcement with your own hands
The principle of operation of all designs of manual devices for bending metal (sometimes called manual machines) is the same: a “lever of the first kind” is used. If you have:
- the desire (initiated by need) to create a bending device for reinforcement;
- plumbing skills;
- necessary tools (including a bench with a vice)
- then you have come to the right place. With our hint, you can create a device (manual machine) for bending reinforcement with your own hands. The device of the proposed design can bend steel reinforcement with a diameter of ≤ Ø 15 mm.
What tool will you need?
In addition to a set of plumbing tools, which every skilled owner has for performing “work around the house and in the country,” you will need:
- any welding machine. You will perform MMA welding on it;
- electric drill;
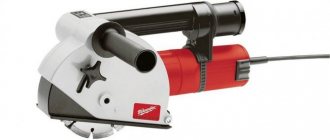
- cutting machine (angle grinder) and cutting disc “for steel”;
- abrasive machine.
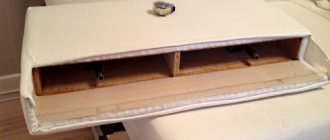
Description of the bending device
The bending device consists of two parts:
- motionless. It's called the base;
- mobile. It's called a lever.
The processed rod is placed between the mandrels and is deformed under the influence of a pin installed on the lever. The amount of force is determined by the length of the lever handle (usually about 500 mm long) and the physical capabilities of the mechanic. If necessary, provision should be made for extending the handle (for example, with a hollow pipe).
Manufacturing technology of fixtures for bending reinforcement
It is necessary to prepare 3 mandrels Ø 20 mm and a pin Ø 25 mm, 50 mm long each (see drawings). The lever should fit freely onto the pin. This is achieved by processing a size of Ø 25 mm on the pin using an abrasive machine.
Base
For the base, we cut out a steel plate with a thickness of ≥ 10 mm (see plate drawing below). Drill holes on it:
- Ø 20 mm for mandrel;
- Ø 25 mm for pin.
The basis of the bending device.
If you are the happy owner of a durable and strong workbench, you can drill 4 holes Ø 8...10 mm (indicated Ø 8 mm in the drawing) in the base to attach the fixture to it. If the strength of the workbench is in doubt, then the base should be welded to a corner 100 x 100 (mm) with a length of 1000 mm and the above holes should be drilled in the corner for fastening. Insert a mandrel and a pin into the drilled holes Ø 20 mm and Ø 25 mm (as shown in the drawing) and weld.
Lever arm
For the lever, we cut out a steel plate with a thickness of ≥ 10 mm (see plate drawing below). Drill holes on it:
- Ø 20 mm for mandrel;
- Ø 25 mm for pin.
Bending device lever.
We weld a mandrel and a handle Ø 20 mm and length 550 mm to the lever. To prevent industrial injuries, you can put some kind of protection on the end of the handle (for example, a plastic champagne cork).
Conclusion
After all work has been completed, the welding area should be cleaned from welding slag with a carriage brush. All sharp edges should be “filled” using a fine file. The device will be used outdoors, and therefore an anti-corrosion coating should be provided - in this case, pentaphthalic paint of the "PF" type is sufficient (just do not forget to prepare the surface - clean it with an appropriate solvent). At the junction of the lever with the pin, the surfaces should be lubricated with any grease (solidol, autol, grease, etc.). The condition of this unit should be constantly monitored and lubricated (this will greatly facilitate your work and extend the “life” of the device).
Operating rules
The principle of operation of this device is extremely simple - it is easy to understand if you look at the photograph. Simple safety rules should be followed:
Video
The video shows how it works, the machine is a little different, but the essence is clear.
Compliance with these simple requirements will save your health.
;
Address: 117997, Moscow, st. Obrucheva, house No. 21;
Phones: +7-(495)-647-92-71, +7-(495)- 647-69-81;
The company sells a manual machine for bending reinforcement with a diameter of up to 16 mm. Cost: 3999.00 rubles.
Features of the functioning of a homemade electric pipe bender
Thanks to this electric machine, a minimum of effort is applied during operation. The tool is used in the process of carrying out more complex operations with pipes made of any materials that are beyond the strength of hand tools.
Although manual pipe benders are also designed to work with pipes made of various materials, such a tool is most often used to perform small-scale work in the household. To operate an electric pipe bender, you do not need to apply human force, since all the work is done by the hydraulic unit. Manual machines have one connector and are designed for a pipe of a specific diameter. And only individual copies can be used to work with tubes of different sections.
A self-made electric pipe bender is universal, since creating such a unit with which you can process a pipe of the same radius is obvious waste. And it’s true: with such equipment you can quickly and efficiently perform a large amount of work with pipes of different sections. True, the use of such equipment in small facilities is unprofitable due to the high costs of ensuring the operation of the device.
The operation of a self-made electric pipe bender is similar to the principle of operation of a manual device. The difference is that the mechanical drive in the design is replaced by a hydraulic rod, the shafts of which are driven by an electric drive rather than a chain drive.
Important! A homemade electric pipe bender can be used to bend several pipes at the same time. To do this, you need to make special cuts on the rollers.
In addition, you can make an electric pipe bender with your own hands for profile (square, rectangular, diamond-shaped, etc.) pipes. Schemes, drawings, components, the principle of operation is the same as the device for round pipes.
Do-it-yourself device for bending reinforcement
page » Do-it-yourself » Do-it-yourself reinforcement bending machine » A device (manual machine) for do-it-yourself reinforcement bending
The principle of operation of all designs of manual devices for bending metal (sometimes called manual machines) is the same: a “lever of the first kind” is used. If you have:
- the desire (initiated by need) to create a bending device for reinforcement;
- plumbing skills;
- necessary tools (including a bench with a vice)
- then you have come to the right place. With our hint, you can create a device (manual machine) for bending reinforcement with your own hands. The device of the proposed design can bend steel reinforcement with a diameter of ≤ Ø 15 mm.
What tool will you need?
In addition to a set of plumbing tools, which every skilled owner has for performing “work around the house and in the country,” you will need:
Description of the bending device
The bending device consists of two parts:
- motionless. It's called the base;
- mobile. It's called a lever.
The processed rod is placed between the mandrels and is deformed under the influence of a pin installed on the lever. The amount of force is determined by the length of the lever handle (usually about 500 mm long) and the physical capabilities of the mechanic. If necessary, provision should be made for extending the handle (for example, with a hollow pipe).
Manufacturing technology of fixtures for bending reinforcement
It is necessary to prepare 3 mandrels Ø 20 mm and a pin Ø 25 mm, 50 mm long each (see drawings). The lever should fit freely onto the pin. This is achieved by processing a size of Ø 25 mm on the pin using an abrasive machine.
Base
For the base, we cut out a steel plate with a thickness of ≥ 10 mm (see plate drawing below). Drill holes on it:
- Ø 20 mm for mandrel;
- Ø 25 mm for pin.
The basis of the bending device.
If you are the happy owner of a durable and strong workbench, you can drill 4 holes Ø 8...10 mm (indicated Ø 8 mm in the drawing) in the base to attach the fixture to it.
If the strength of the workbench is in doubt, then the base should be welded to a corner 100 x 100 (mm) with a length of 1000 mm and the above holes should be drilled in the corner for fastening.
Insert a mandrel and a pin into the drilled holes Ø 20 mm and Ø 25 mm (as shown in the drawing) and weld.
Conclusion
After all work has been completed, the welding area should be cleaned from welding slag with a carriage brush. All sharp edges should be “filled” using a fine file.
The device will be used outdoors, and therefore an anti-corrosion coating should be provided - in this case, pentaphthalic paint of the "PF" type is sufficient (just do not forget to prepare the surface - clean it with an appropriate solvent).
At the junction of the lever with the pin, the surfaces should be lubricated with any grease (solidol, autol, grease, etc.). The condition of this unit should be constantly monitored and lubricated (this will greatly facilitate your work and extend the “life” of the device).
Operating rules
The principle of operation of this device is extremely simple - it is easy to understand if you look at the photograph. Simple safety rules should be followed:
You should not process steel reinforcement with a diameter ≥ Ø 15 mm; before starting work, you should check the technical condition of the device. If the fastenings of the mandrels or pins are loose, it is necessary to carry out repairs and only then begin work;
the workplace should be freed from all unnecessary things.
The video shows how it works, the machine is a little different, but the essence is clear.
Compliance with these simple requirements will save your health.
;
Website: https://mosmonolit.rf/;
Address: 117997, Moscow, st. Obrucheva, house No. 21;
Phones: +7-(495)-647-92-71, +7-(495)- 647-69-81;
The company sells a manual machine for bending reinforcement with a diameter of up to 16 mm. Cost: 3999.00 rubles.
Use of diagrams and drawings
Not everyone knows how to make a pipe bender at home, but many would like to learn how to do it.
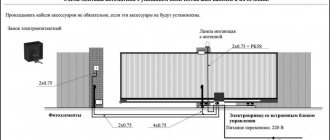
Pipe bending device diagram
Before you start making an electric pipe bender with your own hands, you need to calculate everything, familiarize yourself with several drawings, and choose among them, in your opinion, the most suitable one. When a person does not have special education or has never done such things, it is not so easy to make even the simplest equipment on their own. It is clear that it is best to consult with a specialist who already has experience in manufacturing such devices. If such a master is not nearby, it doesn’t matter, since the World Wide Web will come to the rescue. With its help, you can not only familiarize yourself with textual information, but also select diagrams, drawings, and watch a video on how to properly make an electric pipe bender with your own hands. Although, it is advisable not only to watch, but also to download the necessary drawings and videos, which describe step by step the process of manufacturing a device for bending round and profile pipes.
For example, you can use this drawing to make an electric pipe bender, with which you can easily make a device for bending pipes yourself.
Important! When making a device with your own hands, its cost will be significantly lower than a similar factory tool, but the quality will be the same.
Character traits
At its core, this is a mechanical device (installation) that bends a straight profile to the desired radius, from 1 to 180 degrees. Suitable for both metal (aluminium, steel) and plastic elements.
Factory equipment is standard, but it assumes you have experience with it. Therefore, it’s worth making a pipe bender for a professional pipe with your own hands, if only because you don’t have to get used to it. You will know exactly all the features of its design and understand what loads its elements will withstand.
Advantages
An electric pipe bender has a number of advantages compared to manual counterparts.
These include:
- the quality of the bending process, which consists in the fact that the final product has a bend accurate to a degree;
- decent pace of work performed;
- high efficiency of the tool for bending steel, copper, aluminum, metal-plastic and pipes from other materials;
- the ability to configure the optimal operating mode of the equipment.
It is interesting that with the help of such a device the pipe is bent as needed, and not as it turns out. Plus, with such a high quality of products, a minimum of physical effort is expended, which is very important when installing a pipeline network yourself.
Classification by bending method
Based on the nature of the profile impact, the following types are distinguished:
- Segmental - pulls the workpiece through a series of rollers, each of which has its own effect and changes the geometry.
- Crossbow - its main element is a device that sharply moves forward, bending the fixed rolled product along the required radius.
- Spring - equipped with grips that straighten and bend the structures being held (if they are made of not the most durable material, for example, plastic).
When performing work, say, assembling a frame for a country greenhouse, you should not chase big corners. Remember, the more you deform the part, the more likely it is to break under load.
Well, now let's move on to the features of creating the simplest mechanisms.
Basic principles of structural assembly
Recommendations for assembly
When assembling equipment, you should adhere to these recommendations.
To make the base, it is best to take a profile rectangular thick-walled pipe (3-4 mm thick) or a corresponding square. At a distance of 3 cm from the end, it is necessary to make a hole through it, the cross-section of which would coincide with the diameter of the axis inserted into it. It is best to start installation by installing the control lever, along with the pulley, and the stationary pulley.
Using a hacksaw for metal, cut off the excess profiles, remembering that the amount of trimming is affected by the maximum bending angle that we plan to obtain during bending.
You can make the lever and axle for the pulley yourself. To do this, you need to take 2 steel plates (thickness - 5 mm, and width - must correspond to the required diameter of the axis), fold them, put on a steel tube that will serve as a jumper and weld everything.
Important!
It is better to use cotter pins for fastening rather than welding, since there should be minimal play of individual parts of the device during bending, which is impossible with welded parts of the tool. Main stages
First, you need to install the feed shaft on the tool frame, and attach the pulley to the end of it. It is connected to the engine rotor using a belt drive. The drive sprocket should be fixed at the second end to carry out transmission using a chain.
Install the second shaft on the frame of the structure, which should also be equipped with a driven sprocket at the end.
Place the latch pin and screw in the latch.
An option is possible when deforming rollers (upper and lower) are installed at the top and bottom of the structure. It is advisable to install a third roller at the bottom of the equipment, but this procedure will entail the necessary cutting of a hole in the frame.
The grooves of trapezoidal plates are used to position the deformation roller shaft. You can also use a U-shaped fork to place it, the legs of which are welded to the side of the device frame. Moreover, when the roller moves along the grooves, on the one hand its movement is limited by the piston rod, and on the other by the deformable pipe.
Important! When installing shafts, it is possible to use not only standard cups with bearings, but also the use of trapezoidal plates that are welded to the side of the frame. In this case, it is necessary to replace the shafts with rope rollers.
That's all, the homemade manual pipe bender is ready. But after that it must be connected to an electric drive, then it will become an electric tool. The entire process of assembling the structure can be seen in full and in sufficient detail in the video.
Device options
If you make it yourself, your hands are free. For example, nothing prevents you from implementing a lever-type installation so that the force is concentrated at a certain point, making it easier to ensure the desired radius of curvature. This configuration allows you to create templates that can be easily removed and replaced with others. Let there be 2–3 of them - for rolled products of different diameters.
The mechanism can also be crossbow or drone, that is, as compact as possible, designed for short sections of pipes. It will be very convenient during installation, when laying communications, in confined spaces.
Operating principle
The main element of any electric pipe bender is the motor, which must be well tuned, since it is it that provides a gradual rotational load on the product. To do this, you need to install a special attachment on its rotor, which can be of various shapes.
In addition, the design provides for the presence of:
- special clamping mechanisms, which, if necessary, can protect the operator of the machine from possible injuries. With their help, bendable products are also securely fixed in the device;
- protective housing;
- control panel;
- a set of fasteners with the help of which the bent pipe is fastened and, necessary for work, placed.
Classification by drive type
The motor is equipped with quite powerful models, which, in the factory version, are actively used in production. But such equipment can also be assembled personally (based on drawings and diagrams) for subsequent use in a home workshop. Essentially, you will get a machine that looks like this:
- Hydraulic – stationary, powerful, designed for diameters from 3 inches. It is best suited for industrial facilities, as it allows for large-scale work to be carried out with a high degree of productivity.
- Electromechanical is a good choice for bending main elements. It is convenient because it can be used to calculate with maximum accuracy both the optimal clamping force and the required angle.
- Manual – focused on small sections and low intensity of use.
Determining the allowable bend radius
Depending on the material, diameter and wall thickness, the minimum bend radius is determined, which can be found using the data in the following table (for steel pipes:
| Diameter, mm | Min value of bending radius, mm | |
| Wall thickness ≤2mm | Wall thickness ≥2mm | |
| From 5 to 20 | 4 diameters | 3 diameters |
| From 20 to 35 | 5 diameters | 3 diameters |
| From 35 to 60 | — | 4 diameters |
Video