Sliding gates are no longer uncommon in suburban areas. The construction of such structures is more complex than conventional swing ones. However, you can make individual elements of the gate yourself. It is worth taking into account some of the subtleties of the work, without which it will not be possible to build a structure.
Rollers for sliding gates can be made using a certain technology. These moving parts are only a small part of the design, but special attention should be paid to their design.
Features of sliding gates
The foundation plays a significant role in the design of sliding products. It is important to follow the installation steps exactly. This will help you achieve better results. The roller mechanism is installed precisely on the base. The weight of the entire sash will act on it, so you should make the device as strong as possible.
The movement of the rollers is carried out along the guide beam. To achieve good fixation, two supports should be installed. Sliding gate elements are welded together to achieve maximum strength.
The trolley supports move along a guide beam. Their upper part is located on the lower part of the sliding gate. This facilitates easy movement of the canvas. Modern gates are equipped with an automatic drive. In this case, the process of opening and closing the structure is much simpler.
Video description
To familiarize yourself with the installation process, we recommend watching the video:
If all installation operations were carried out correctly, the gate should roll back easily and clearly lock in the two extreme positions. And the last two operations: installing handles and a lock on the sliding gate.
Now, as for the electric drive. Let us immediately note that they are present in the widest range on the market. Each manufacturing company has its own installation features. They are fully described in the instructions included in the package. Again, don’t go into things where you’re not an expert. And although the manufacturer indicates the entire process in a clear sequence, let professionals do it.
Advantages and disadvantages of sliding gates
Sliding gates, in comparison with swing gates, have some advantages. They also have disadvantages that you should be aware of. The main disadvantage of creating sliding gates is the high cost of their construction. Before work you will need to prepare many elements. Most of them cannot be built on your own. For example, an electric motor has a complex design and must have high technical performance.
Attention! However, some elements can still be made at home. This will allow you to significantly save on the construction of sliding gates.
Another disadvantage of such gates is the area of land near the fence, which is needed to open the gate. Some fences are modified specifically for the installation of such gates. This results in additional expenses. This concludes the list of disadvantages of sliding structures.
Before starting construction, it is important to determine the advantages of sliding gates. For example, they can allow a car of any height to pass. If the system is made correctly, it will function properly for 50 thousand cycles. You can sew up the structure with any material of your choice. Typically, corrugated sheets, wood or polycarbonate panels are chosen for this purpose.
Another good reason is that sliding structures are very convenient to use. This is explained by the presence of automation, which quickly opens and closes the sash. If you want to save money, you don’t have to install an electric motor. Opening and closing in this case is carried out manually.
Design and calculation of the sliding gate structure
Before you start purchasing components and materials, you need to draw a diagram or drawing of the sliding gate. It must contain a schematic representation of the general structure, where the main dimensions should be indicated. This approach to work will help to avoid surpluses and not purchase excess material.
If the design assumes the presence of a gate with a wicket, this should be reflected in the future diagram and additional material should be provided for it.
When making such a canvas, it is necessary to take into account the fact that an additional opening can weaken the overall structure, therefore, solutions to strengthen the structure should be included in the design in advance.
Preparing to create videos
To create rollers for sliding gates, you will need to find the appropriate components. The reliability of the entire structure depends on the quality of the following elements:
- top rollers;
- roller bearings;
- plugs;
- end roller;
- rail;
- sash catchers.
All these sliding gate parts have their own purpose. Only with coordinated teamwork of such elements will the entire system function normally.
When creating a project, special attention should be paid to the choice of guide rail. It is necessary that it has sufficient rigidity. If such an element turns out to be insufficiently reliable, it will overclock during operation, which will lead to the failure of the entire system.
Attention! For the rail to have optimal reliability, it must be made of steel. In this case, the thickness of the material must be at least 3.6 mm.
The roller carriages bear the entire load from the sash. Therefore, you should pay close attention to them when constructing rollers for sliding gates. It is necessary to install high quality bearings. Otherwise, every time you move the sash, an unpleasant squeak will be heard. In addition, with such use, the rollers can quickly collapse.
When assembling the rollers, each part must be clearly secured. There should be no backlash. Otherwise, the system will fail pretty soon. To ensure long-term operation of the gate, you can choose reinforced bearings.
The sash is fixed using upper rollers. They are made of rubber. When using the gate, plastic will quickly damage the paintwork. The steel used in the structure must be at least 4 mm thick. The end roller works in tandem with the bottom catcher. The main task of the first is to remove the load from the main rollers. The second one is made in such a way that the limit switch can fit into it freely.
The plugs must be installed at the end of the work. Their main purpose is to protect the guide from precipitation. To build the rollers you will need all these elements.
frame frame
We mark the pipe. To do this, it is better to make a marking scheme in advance to reduce material consumption. Use a grinder to cut the pieces according to the diagram.
Next, if you are not involved in welding, then entrust the next stage of work to a professional so that he can weld the frame of the future gate quickly and efficiently. Don't forget to weld the U-shaped guide rail to the bottom.
After completing the welding work, clean the metal with a special brush until it has a metallic shine. It’s even better and faster to use a grinder with attachments for cleaning.
The next thing to do is degrease the surface with a solvent and apply two layers of primer. After it has dried, you can start painting.
When the paint has dried, we cover the frame with corrugated sheets. They must be fastened with metal screws or rivets.
Selection of materials
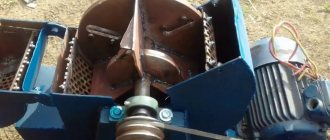
Carts, or roller carriages, transfer the load from the sash to the foundation. Thanks to these elements, it is possible to move the profile with the frame along the opening. Each carriage contains 8 rollers. They can be made of both metal and polymers. Factory carriages are of higher quality than homemade ones. However, if you make them correctly with your own hands, such elements can last a long time.
Materials needed to create a carriage:
- To make the rollers, you should find generator bearings from Lada cars. Their internal diameter should be 14-40 mm. This condition must be met so that the bearing does not easily fit into the pipe, but also moves freely along it.
- The carriage axles are made of M18 studs. They need to be cut into pieces of the required length.
- In addition, you need to prepare a steel plate with a thickness of more than 8 mm. The base of the carriage will be made from it. It is better not to use metal of smaller thickness. In this case, the part will not withstand the load from the structure. If such steel is not available on the farm, several plates can be connected to each other.
The carriage is made quite simply - first you need to mark the metal plates, and use a grinder to cut off the excess pieces.
Next, the following actions are performed:
- Holes are drilled for installing bearings. In the case of thin metal, the plates should be welded together and the seams should be thoroughly cleaned.
- The holes for mounting bearings must have a diameter that matches the diameter of the axle - 18 mm. When drilling metal, oil is used for cooling.
- The axles need to be fitted to the holes, and then cut to the required size.
- Afterwards you need to put the washers on the axle, then the bearings and fix them well.
- Bearings must be filled with lubricant. To do this, you need to prepare metal cylinders with machine tools of at least 5 mm. If the gate is heavy, it is worth preparing parts with a wall thickness of 1 cm.
It is necessary to prepare two bearings for the diameter of the cylinder and install them in it. A weld is made along the edges to prevent the bearings from falling out.
A round rod should be placed inside the bearings and the edges should also be welded. In addition, trapezoid-shaped plates are welded to the rod, which must subsequently be fastened with a square of metal. Now the work on creating videos can be considered complete.
Kinds
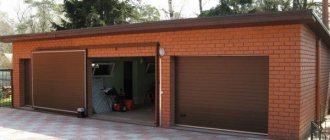
Sliding gates can be divided into several subtypes, differing in design: suspended and cantilever. Suspended ones are more often used for installation in the openings of hangars and other technical buildings. They are reliable, but their installation is associated with some difficulties and requires special equipment.
Cantilever gates are easier to install and, due to the guide devices located below, allow them to be installed outdoors. They are not afraid of snow or dust, and are resistant to strong winds. The weight of the structure is distributed on the foundation located on the side of the opening.
For small gates, screw piles can be used instead of a concrete base.
Gates with roller mechanism
When constructing such a gate, you will need to prepare certain tools and materials. It is important to follow the instructions exactly. The technology for constructing sliding gates with a roller mechanism is not complicated.
Preparation of materials
When the issue of making rollers for sliding gates has been resolved, you can begin to prepare materials for constructing the sash and frame. To create a complete structure, you will need to find:
- profiled metal flooring;
- support pipes;
- steel profiles;
- bearing type rollers;
- wrench;
- steel corners;
- materials for concrete production;
- guide beam;
- electric drill;
- shovel;
- electric drive;
- drills of a suitable size;
- welding machine.
When all these materials are prepared, you can begin making sliding gates.
Instructions
Before installing sliding gates, you need to dig two pits. Each should have a depth of one and a half meters. It is better if they are half a meter in diameter. The foundation for the sliding gates will subsequently be poured into these recesses.
Attention! Markings for the base must be done in advance. It must take into account the expected loads transmitted by the rollers from the sash.
Then you should do the following:
- Install support metal pipes. To check the vertical, use a building level. Then crushed stone is poured into the holes. The support pipes must be connected. It is better if a metal support is used for this task. The joints are welded.
- Mixing cement mortar. Sand and cement must be added to the mixture in a ratio of three to one (respectively). The volume of water makes up 25% of the total mass.
- The resulting mixture is poured into the holes. The foundation will completely harden after a week. At this time it is worth starting to create a collar fabric.
- The construction of the collar cloth should begin with the connection of steel profiles and angles. They must be laid on a flat surface in the shape of a rectangle. After adjusting the position of the elements with a level, it is necessary to weld all the elements together. To add rigidity to the structure, crossed profiles should be added.
Then you need to make a triangle that will serve as a counterweight. Metal profiles are prepared for this task. They need to be placed on a flat surface, then the corners should be checked and welded together. The triangle is welded to the sash rectangle.
Then you should proceed with the further construction of sliding gates:
- Corrugated sheeting is welded onto the frame. You can also secure the material with self-tapping screws.
- A guide beam is welded to the lower base of the blade.
- Then you need to find the base support plate and weld the adjustment strips. After this, the roller holders are installed. Fixation is best achieved with roller holders. At this stage, the basis of the structure, due to which the gate will move, can be considered completed. It remains to install additional parts.
- Catchers are installed on support posts. The adjustment roller must be fixed to the bracket at the top. He will become a limiter. To install these elements, you will need to use an electric drill. Using this tool, you should make holes in the supports. The sliding gate fixing elements are dowels. To increase the reliability of the structure, steel plates should be used.
- After creating the rollers for the sliding gates, you can begin manufacturing the leaf. The blade is inserted so that the rollers fit into the guide beam. The bottom and top edges should fit into the corresponding grooves.
- After installing the canvas, its horizontalness is checked. If design inaccuracies are detected, the rollers are corrected. A wrench is used for this purpose. It is important to check how the sash will move.
- At the last stage of installation of sliding gates, an automation system is installed. Due to it, the entire structure will move. The drive must be placed on a concrete base. It is necessary that the gear fits into the appropriate grooves.
Now the sliding gate can be considered complete. It remains to ensure proper operation of the device. If you hear a creaking sound when the gate moves, it is necessary to lubricate the internal parts of the roller mechanism. For this purpose it is better to use solid oil.
Other kit items
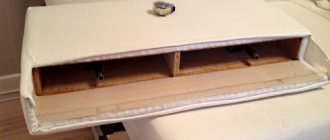
The main thing in the design is the beam and carriages. A limiter is made from a metal plate to hold the sash. If the gate is large, then a limiter with 4 rollers. For standard gates, 2 rollers are enough.
Catchers are used for fixation after closing. Made from concave plates. It is important to choose the right metal thickness.
Rubber and plastic are the main materials used for factory plugs. Homemade plugs are made from scrap materials. You can simply seal the ends by welding.
conclusions
Building sliding gates is quite difficult. However, the result will certainly please the owners. It is very convenient to use this design. At the same time, check-in and check-out from the site is quite quick. The durability of the entire structure depends on the quality of the assembled roller mechanism.
For this part you will need to select certain materials. For example, you need to prepare bearings for making rollers, a plate that will become a support, and axles. Each of these parts has special requirements. Only if they comply with them will the structure be strong and durable. Self-manufacturing of a roller support for sliding gates involves the need to select high-quality parts and strictly follow the work technology.
Recommended Posts
Landscape design of the site: borders and fences
Wrought iron front gardens + photos
DIY gates + drawings
Beautiful gates and fences
Fence made of metal picket fence
How to Install Gate Posts
Tips for laying concrete in a hole
Working with concrete requires compliance with certain rules and recommendations.
In order for everything to be done efficiently, it is worth considering the following nuances:
- The supply of concrete must be smooth so that the leveled structure remains motionless;
- To avoid the formation of air bubbles, after laying the concrete mixture, it must be pierced with reinforcement in several places;
- The channel must remain clean; for this, after each laying and leveling of a layer of cement, it must be wiped with a damp cloth.
Complete hardening of the concrete takes about two days, but for better installation of the gates, they should be installed only a week after the solution has set.
Those who are familiar with the installation of sliding gates should not have any problems. For beginners, such a large-scale undertaking may involve many pitfalls that can be easily resolved by a specialized specialist.