Fresh warm air, a green forest, a clean river, fruits from your own garden, vegetables from a garden you planted with your own hands... What else can you dream of on the asphalt melted from the heat in a metropolis. In order not to breathe heavy smog, at least in the summer heat, most city residents move to their dachas during the holiday period.
Many summer residents acquire entire plots of land with a cozy house, a vegetable garden, and a well with cool water. However, most often at the dacha there is a lack of basic household amenities - a shower and toilet.
But city dwellers, accustomed to fully enjoying the benefits of civilization, find it difficult to get by with bathing in a basin and a toilet in the form of a clumsy booth. Naturally, good owners immediately try to equip their summer cottage with at least the simplest but most comfortable bathroom.
A comfortable restroom should serve to relieve natural needs, as well as meet the needs of the owners and sanitary standards. A shower is necessary after working in the garden and just at the end of a hot day; in it you can not only wash off sweat and dust, but also invigorate and refresh yourself. Usually these utility rooms are built in the yard, not far from the house. They are built with their own hands from scrap materials. Wealthier owners buy more modern construction materials and equipment, and invite qualified workers for construction. What to do, everyone decides for themselves, in accordance with their physical and material capabilities.
- 2 Types of shower
- 3 Design and principle of operation
- 4 Advantages and disadvantages
- 5 How to build it yourself
5.1 Video: how to make a shower yourself
How is the construction of the above-ground part of the toilet carried out?
After the summer resident has decided on the choice of latrine pit, it is worth thinking about the upper appearance.
Here everything depends on a person’s imagination, and various building materials will help make a toilet in a country house not only a necessary, but also a beautiful room. First of all, you need to choose the optimal size of the building. They should not be too large, but not too small either. Otherwise, an obese person simply will not fit there. As drawings of a toilet for a summer house, you can take at least the following diagram, or order an individual calculation from specialists.
Drawing of a country toiletSource stroypay.ru
- First of all, they build the lower base, on which the next step is to install the frame. Timber is mainly used as a building material here.
- The back wall should be about 10 cm lower than the front wall. This is done to ensure the slope of the roof. The door must be secured to the front wall. If necessary, cut a hole for the window.
- Next, the frame is sheathed with the selected material. If the toilet is supposed to be without a toilet, then the seat under the high chair is also covered.
- The outer part can be made of any materials. The design can also be varied.
Design options for a country toilet Source vannayasovety.ru
Advantages and disadvantages
Among the advantages of such combined buildings:
- Space saving, summer cottages are small and every meter counts.
- It will be possible to use less materials when compared with the construction of a separate shower and toilet.
- It will take less time to create a country shower and toilet under one common roof.
- There is only one drainage hole, which means there is no need to lay additional communications to it and think over the location on the site, which, again, is difficult given the small areas.
Among the disadvantages:
- The unpleasant smell from the toilet cesspool can get into the shower.
- It is inconvenient to fill the container of a summer shower if a pump is not provided in its design.
- If there is no direct sunlight, heating the water will be difficult.
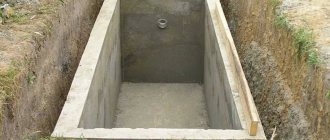
Construction of a cesspool
At the site where the outdoor toilet is installed, a cesspool is dug, giving it a square or round shape. The depth of the septic tank pit should not exceed 1.5 meters, and its diameter should not exceed 2.5 meters. But as practice shows, cesspools that have a round shape are more functional. They are characterized by increased strength and can withstand heavy loads and pressure.
Tip: When digging a hole, it is better to use a shovel with a short handle. With such a tool it will be easier to turn around in tight spaces. A crowbar or pick is useful when digging in tougher soil such as gravel, heavy clay or limestone.
Digging a hole of the required size, compact its base. Instead of tamping, the bottom can be lined with a bed of gravel. To ensure the necessary sealing of the device, the walls of the pit are lined with brickwork, or concrete rings are installed.
Construction of a cesspool
The brickwork is reinforced with reinforced mesh or reinforcement. All joints are carefully sealed with cement mortar, followed by installation of a waterproofing layer. This allows you to protect the crop from impurities and preserve groundwater from pollution.
Foundation preparation
For the strength and stability of the utility block, you first need to build a foundation. For sheds made of wood or those that are collapsible, a columnar foundation is suitable. If the building is made of brick, then a strip-column foundation is needed.
Recent posts Chainsaw or electric saw - what to choose for the garden? 4 mistakes when growing tomatoes in pots that almost all housewives make Secrets of growing seedlings from the Japanese, who are very sensitive to the soil
The process of pouring pillars is very simple. For the posts, you need to take a garden drill and dig round holes located in the corners and in those places where the load of the shed will be maximum; the depth of these holes should be approximately one meter and twenty centimeters. If you have the financial means, you can use asbestos cement pipes.
But it’s cheaper and faster to make your own pipe from roofing felt with the diameter of the hole. Then at the bottom you should make a cushion of sand and gravel from one hundred to one hundred and fifty millimeters, and install a pipe, and inside it a frame made of reinforcement. First, concrete is poured to one third and the pipe is pulled out one hundred millimeters. After two hours, you can add the rest of the concrete.
A strip-column foundation is more difficult to pour. It is necessary to fill the pillars, and between them it is necessary to dig a trench fifty centimeters deep. It should be fifty millimeters wider than the shed wall. Next, formwork is made, reinforcement is laid and concrete is poured.
Ground part design options
Country toilet
A toilet in a country house can, at the owner’s request, look like:
1
Birdhouse. A wooden building with a one-sided sloping roof. The simplest and cheapest design that does not provide a level of comfort
Birdhouse design
2
Teremok (hut). A building with two sharp roof slopes, which is well insulated due to its unusual shape
"Teremok"
3
Triangle (hut). One of the most common forms, with high moisture resistance due to the gable roof. This structure is not afraid of even strong gusts of wind.
"Shalash"
4
Little house. A comfortable option with enough space for a person. Features increased strength
"House"
Quite unusual design solutions in the form of a double sanitary building or a bathroom combined with an outdoor shower are also popular.
Bathroom combined with shower
The choice of the above-ground part of the toilet depends on several parameters:
- weight of the building (should not be heavy so that the soil does not sag or fail)
- strengthening the foundation
- expected frequency of use
- material for construction (wood, plastic, corrugated board are best suited)
- availability of a ready-made construction scheme or the possibility of its manufacture
- financial possibility of maintenance and cleaning
Double toilet
Standard dimensions of a toilet building in which a person can comfortably stay both standing and sitting:
- Height 2.2–2.3 m
- Width – 1–1.2 m
- Depth – 1.4 m
Do-it-yourself drip irrigation device in a greenhouse: from a barrel, a plastic bottle, or even an automatic system. For tomatoes and other crops (Photo & Video)+Reviews
Dimensions
Clear standards are provided exclusively for toilet design. They are taken into account when planning the future bathroom. Bathroom dimensions are recommended only when a person with disabilities lives in the house.
Functionality matters:
- if the bathroom only contains a sink and toilet, an area of 1.2 x 1.7 m is sufficient;
- if there is only a toilet in the room, its dimensions can be 1.2 x 0.85 m;
- with a linear arrangement along one wall of the shower stall, sink and toilet, the area of the bathroom can be 1.2 x 2.3 m;
- when placing a toilet with a sink and a shower on adjacent walls, the dimensions of the bathroom can be 1.4 x 1.9 m;
- when the bathroom requires a bath, its area should be larger (from 5 sq. m);
- you can fit a bathtub, toilet, bidet, sink, washing machine and table in a room with an area of 2.4 x 2 m;
- You can install a bathtub, a countertop for 2 sinks and a toilet, leaving a lot of free space, with dimensions of 2.5 x 1.9 m.
7 photos
Typically, spacious types of bathrooms are located in a large house (7x8, 8x8, 8x9 sq. m.). Sometimes, in addition to a bath and shower, they have space for a relaxation area. Masters believe that for a combined bathroom in a private house, it is enough to allocate a space of about 4 square meters. m. If the bathroom and toilet are separate, a room with an area of 3.2 square meters is sufficient. m, in the second - 1.5 sq. m2.
Construction stages
A country wooden toilet is a fairly simple construction. After the improvement of the waste storage facility is completed, the main part of the work begins.
- First, the foundation is formed. Posts are driven in around the perimeter. They will serve as a support. The posts can be metal, brick or wood.
- They knock together the frame. Ruberoid is applied to the rear part so that water does not “undermine” the base. The frame is located on posts.
- With the help of racks, frames and crossbars, the frame of the future cabin is formed - walls, seat, window for ventilation, ceiling, roof slope, door.
- The frame is installed and secured to the foundation.
- The frame and cladding boards are treated with an antiseptic.
- They knock together the door and attach it to the hinges.
- The floor and seat are covered with wood.
- For hygiene purposes, the circle around the hole and part of the floor are tiled to make the seat easier to clean, and dirt and water do not accumulate on the floor (they also use a regular plastic toilet seat, and cover the floor with a rug).
- Cover the roof.
- They conduct electricity and screw in a light bulb.
- A pipe for ventilation is attached to the rear wall.
These are the main steps - the rest depends on the type of toilet and the wishes of the owner regarding the decor and design of the cubicle.
The construction of a toilet box begins with assembling the boxSource byk.vykola.ru.net
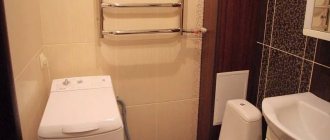
The nuances of choosing and constructing a bathroom under one roof
The more carefully you approach the choice of design (or development of a project), the more comfortable and durable the structure will be. When arranging a building, pay attention to the following subtleties:
- Calculation of parameters . The area and height are calculated based on the preferences of the future owners and the expected amount of plumbing and furniture. The usual height of the structure is from two to two and a half meters.
Household block with terrace Source promstroy-torg.ru
- Selection of building materials . The characteristics of the materials determine the magnitude of the load and, therefore, determine the type of foundation.
- Convenience of planning . It should be convenient for you to use both the toilet and the shower, so separate entrances are provided with free access to each door and the possibility of simultaneous use. The needs of children and elderly family members must be taken into account.
- Attention to detail . The location of the washbasin and other elements depends on which direction the door opens.
See also: Catalog of companies that specialize in construction and design of small architectural forms.
Organization of utility unit
For ease of use, sometimes in dachas they use a combination of toilet, shower and shed at the same time. The resulting structure in one block takes up less space and is economically beneficial from the point of view of waste disposal. If living in a dacha occurs in the summer, this is an ideal option.
Plan of the Cheburashka economic block
Layout of a utility block with a utility room
The combination in the order of warehouse-shower-locker room-toilet is popularly called “Cheburashka”. The implementation is similar to building a cabin using support posts and wooden blocks, but differs in size. With proper installation and location, the construction is compact and expedient in the future process of its operation.
Layout of the utility block (toilet-shower-shed)
Right view
As you already understand, building a country toilet with your own hands is not so difficult, since this process does not involve any heavy technical operations. The design of the cabin depends only on your capabilities and imagination. The main thing to remember is that the decisive factor in the successful construction of a country toilet is its ease of use and correct location.
Tools and materials required for work
Firstly, you will need almost all working tools: shovels, hammer, saw, level, screwdriver. Nails, screws, self-tapping screws, studs, construction foam, and bitumen mastic are also required. Building materials you will need:
- bars;
- edged boards;
- pipes (for ventilation);
- plywood;
- tiles (for roof);
- gravel or sand;
- corners (preferably metal);
- cement;
- fittings;
- formwork;
- channel;
- Styrofoam;
- bricks.
The amount of materials is calculated depending on the selected drawing and the size of the building. In this case, boards and other wooden materials must be dry, without cracks or other defects. Be sure to check when purchasing. Now you can start building a utility block with a toilet for the dacha.
Construction of a cesspool
For seasonal living or rare visits to the dacha, you can use a cesspool as a place to dispose of sewage waste. It is located under the toilet. The size of the storage tank depends on the volume of waste. Standard parameters:
- depth – 2 m;
- side size – 1×1.1 m.
The finishing of the pit is essential; the degree of safety of the structure depends on it. Among the popular options for finishing pit walls:
- brick;
- reinforced concrete rings;
- monolithic concrete structure;
- plastic container.
Each method has pros and cons that should not be overlooked.
Brick finish
A popular and economical option for arranging a drainage pit. After leveling the walls, brick laying with cement mortar begins. The bottom of the structure is filled with sand and concreted. The result is a durable and reliable design.
Reinforced concrete rings
This option is good for its durability and strength, but requires a lot of labor to install heavy rings. The bottom of the pit is filled with concrete, the walls of the rings are covered with waterproofing.
Monolithic design
A complex and time-consuming process allows you to create a sealed chamber for wastewater. It will not endanger the territory of the site.
Plastic tank
A storage tank made of polymers has many advantages: it is easy to install, sealed and durable. The only drawback of the choice is frequent pumping with a sewer truck.
Plastic container for waste
Country toilet and shower: choice of material and features of wooden models
When choosing a project, special importance is attached to the material, since it is it that sets the parameters of the future design. Wooden buildings are in greatest demand. This can be explained simply - wood is relatively inexpensive and is famous for its good thermal insulation, and wooden walls are pleasant to look at. Such buildings have several features:
- A foundation on blocks or screw piles is used as the base .
- beam (or similar values) is used as a frame
- All wooden elements, including the strapping, are treated with preparations that protect against dampness, sunlight and fungus.
- The turnkey structure is finished on the outside with clapboard , blockhouse or imitation timber. You can order lining with eurolining. This material boasts chamber drying and a paint coating that prevents the action of ultraviolet radiation.
Visualization of a winter toilet and shower for a summer house Source rsastroy.ru
- For interior decoration of walls and ceilings, eurolining .
- The roof type is traditionally chosen to be single or gable ; A flat tank can be placed under a high enough roof. For covering, galvanized iron roofing, corrugated sheeting or flexible tiles are used.
- Doors and partitions , as a rule, are made of frames .
- If the utility block project includes a small terrace or canopy in front of the entrance, it is possible to change the depth of the premises.
Toilet for a summer residence - general information
Buy or build?
You can buy a ready-made toilet for an outdoor toilet; there are a huge number of models on the plumbing market. But if you wish, you can save money and build an equally practical structure that will be cheaper and made with your own hands. The final choice will be made by the owner of the dacha himself, but first you will need to familiarize yourself with all the available options.
A country toilet for an outdoor toilet is often also called a podium, pedestal, or throne. Such designs do not differ in functionality, but they differ in the type of installation.
If you decide to install a separate room, which will be located on the street, you will receive many advantages:
- Compost that costs nothing. As many people probably know, latrines in summer cottages have a large amount of fertilizers, with which you can easily and cost-effectively increase the productivity of your garden.
- Unloading the main toilet in the country house. Since suburban areas are rarely connected to a centralized sewer system, its functions can be performed by a septic tank or cesspool, which has limited volumes.
- You don't have to go into the house. When the planting or harvesting season begins, you don’t want to be distracted from the garden! This is where a separate toilet, located on the site, will help out. It is also suitable if you have a large area and you sit with guests in a gazebo - no one will need to go into the house, since a comfortable toilet will be nearby.
- Decorative effect. If you approach this issue creatively, you can get a beautiful and stylish garden design element.
A country toilet, which is installed at the very end of the site, is an important element of use. On the materials market you can find suitable elements that will help you create an aesthetic and comfortable building and easily install the toilet.
The operating features of the toilet for a country toilet make it possible to use it in every suburban area. For such garden structures you will not need a “knee”, since water should not stagnate there.
Types of toilets
Stereotypes are so ingrained in a person’s head that many of us still associate country toilets with something bad, uncomfortable and unpleasantly smelling. But when arranging a modern toilet, you can buy a comfortable toilet, which will make using the toilet more comfortable. For the most part, this is the merit of manufacturers of plumbing equipment, who are customer-oriented and have developed a whole line of toilets through which waste will flow into the cesspool, and not into the sewer.
Types of toilets for factory-made cottages
- Plastic. This is the most popular option for a summer residence. The toilet seat and frame are made of durable plastic, and it does not have a flush tank.
- Ceramic. Its distinctive features are its beautiful appearance, heavy weight and durability, the latter significantly complicating the installation process of the equipment.
- Wood. This design is short-lived and consists of a hole, a cesspool and a platform. There are many varieties of such toilets: with a seat, in the form of a chair and others.
- Dry toilet. To install such a toilet for a summer cottage, it is not necessary to dig a cesspool, since, unlike other types, it can be used as a stand-alone application. The waste will go into a separate compartment, and the toilet bowl will be cleaned using a special cleaner.
Any garden-type toilet must meet certain requirements. Here you need to highlight strength, lightness, wear resistance and durability.
But it will also be important that the toilet itself is easy to use and maintain, and also has an affordable price
If you choose a heavy-weight country toilet for an outdoor toilet, there is a risk that it will fall into the cesspool. For this reason, experienced craftsmen advise giving preference to those models that are made from lighter options. Ideally, you should choose a design that can be quickly installed and removed if necessary.
This utility unit combines three functions;
This utility unit (pictured on the left) is designed for storing garden tools, storing tools or equipment. After harvesting, the harvested supplies can be dried and packaged indoors.
The toilet room is located inside the woodshed (there is no need to install an additional building on the site), and it will significantly save your budget, since buying a separate toilet and delivering it will cost a tidy sum. Our development of a 3 in 1 utility unit will help you save a lot and free up space for beds and flower beds.
The woodshed is designed for storing and drying firewood. This woodshed can accommodate up to 8 meters of cubic firewood.
Types of toilets
The simplicity of the design allows you to equip a toilet in your dacha with your own hands, drawings and standard sizes of which can be studied in company catalogs or calculated yourself. Wood is the most popular and affordable material, easy to process and does not require special tools for construction. The structure itself consists of a frame sheathed with boards and covered with roofing material. It’s easy to build a country toilet with your own hands; you don’t need to make complex calculations; you just need to know the standard dimensions, study the construction instructions, prepare the material and tools and start rebuilding the bathroom. Diagram and design of a wooden toilet for a country house. Ready-made assembled toilet made of wood in a country house. Simple design of a country toilet. It is worth noting that building a house is half the battle, the other half is creating a special tank for waste disposal. There are several categories of toilets that differ in how they process waste.
Backlash closet
In this type of toilet, only the lower part of the toilet is installed, with a technological slope of the floor towards the disposal tank. Thanks to it, the residues flow into the equipped cesspool on their own. The waste container itself is installed behind the cabin, and is emptied as it is filled. Schematic design of a closet backlashDrawing of a closet backlash for a summer house or home This design is good in that it can be installed indoors, creating a warm bathroom, and the waste storage tank can be dug outside the house. To do this, attach a polypropylene pipe with a diameter of 100-150 mm to the toilet.
In this situation, there is no need to install expensive full-fledged communication. Names of elements of the closet backlash
Important! When arranging a country backlash closet with the pit removed outside the house, there will be no foreign odors in the bathroom. It is worth taking a responsible approach to arranging a reservoir for residues; it is well insulated, covered with a sealed lid and a competent ventilation system. The process of building a backlash closet in a country house The disadvantage of such a toilet is that when arranging it, you will have to violate the integrity of the wall
Powder closet
The simplest design and design of toilets for a summer cottage. To construct it, it is enough to dig a hole, which will serve as a waste storage facility, over which a wooden house is installed. To prevent the appearance of odor, waste should be poured out after going to the toilet. Sawdust and peat are used as powder. A drawing with the dimensions of a toilet powder device. A design of a toilet powder in the country. To build a toilet in the country with your own hands, it is not necessary to draw up drawings; you can make a simple schematic sketch to understand the stages of work. When purchasing a similar design in a store, a container with bio-powder is included in the bathroom kit. It’s easy to use, just put a bucket of sawdust or peat and use a scoop for the powder. The process of building a powder toilet in a summer cottage The advantage of these toilets is the use of waste as fertilizer. When filling the hole, the structure is moved and the tank is filled with earth, leaving until humus is obtained. Minus, the soil will be contaminated with liquid wastewater, which is not entirely useful. If bottom waters lie close to the surface, then it is not recommended to install such a building on the site.
Dry toilet
This toilet, a mansion made of wood, is equipped with a factory-made storage tank in which waste is processed by bacteria without access to air. A drawing with dimensions for installing a dry closet in a country house. Bacteria are poured into the storage tank along with a preparation of biological origin. It can be purchased separately at a specialty store. The waste is quickly processed, you don’t have to empty the container often, and the waste can be immediately used as fertilizer for the site.
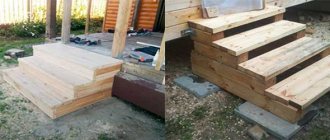
How to build a toilet to last: pour a concrete floor
I don’t argue that you can reduce the cost of the structure and make a wooden floor, or put a couple of channels and add something between them, or use any other of dozens of methods. But I personally trust only concrete and believe that there is nothing better than making a 10 cm thick reinforced concrete “lid” on a pit with 60-70 cm overlaps on the ground - just to be sure. Concrete is not that expensive, but a self-made outdoor toilet will last more than one or two years and will withstand any fun adventures.
This stage is perhaps one of the most difficult, it is better to analyze it step by step and tell you how to make the floor so that only a few materials are used and everything is extremely smooth and simple. We will make the floor in the toilet in the same way as we filled the lid of a brick septic tank in another article. Reinforcement will be performed by pipes and rods that hold the OSB sheets. Let's look at how to build a toilet step by step now.
STEP 1: laying the substrate. We cut or take OSB sheets, plywood or boards (whoever has what) already used on the foundation and lay them so that they overlap the pit on all sides by at least 60 centimeters. We didn’t line the pit with bricks, since I have pressed clay on my site, there’s no point in it, but I decided to do it for “every fireman” before building the toilet myself. Although it is lightweight, it was supposed to be made of foam concrete.
STEP 2: cover reinforcement. We lay pipes, fittings and any other type of longitudinal metal on top of the OSB sheets so that it is no shorter than the OSB sheets. Next we use aluminum brackets. Place a bracket on top of the pipe and screw the edges using a screwdriver. It's not a tricky thing, it's very fast. The fasteners should be located over the entire area of the sheet, at least every 15 cm in a checkerboard pattern.
STEP 3: make a hole. You can take any drawings and build a toilet, but you can determine the location by eye; precision is of no use. In order not to spend half a day hammering the concrete, it is better to immediately take a couple of bricks or a piece of foam concrete and place it in the location of the intended hole, so that later you can simply knock it out of the concrete with your foot or remove it with a light tap of a hammer.
STEP 4: pouring concrete. Now I’ll tell you how to build an outdoor toilet exactly right, and not quickly. If you pour concrete into one point and straighten it, it will go much more, since the structure will sag a little. In addition, there is a chance that the sheet will collapse altogether and tear out the fastenings. We begin pouring concrete along the edges first, where the sheets are still on the ground. Then we take a smoke break for a couple of hours and move another half meter towards the center from the edges, along the perimeter. Again, take a short break and add everything above the reinforcement by 3-5 cm.
It seems like we looked at how to build a country toilet, or more precisely, its foundation, but this was the most difficult stage, then creative work will come. If you are building it from lightweight material, you can start in just a couple of days. If you want to use sand-lime brick or cinder block (and you never know), then you need to wait 14 days according to technical standards.