A heated towel rail in the bathroom is a simple and at the same time functional device, the purpose of which is not limited to drying wet towels. There are at least three more reasons to install such a plumbing fixture in a house or apartment. If connected correctly, it allows you to improve the microclimate in the bathroom; in addition, it can be used as an additional heating radiator during the cold season or a place for drying small items after washing. If you have not yet selected a heated towel rail that is suitable in design and construction, you can do so here.
Installing or replacing a heated towel rail in a bathroom is not an overly complicated task: if you have basic DIY plumbing skills, you can do the connection yourself. In this article, we have collected important installation tips, as well as photo illustrations with basic diagrams that will allow you to install a heated towel rail or monitor the work of hired craftsmen.
Principle of operation
First of all, let’s figure out what modern heated towel rails are. As a rule, we are talking about a pipe of a zigzag design, which is installed on the wall of the bathroom and connected to the hot water supply circuit. In older designs, the operation of which was based on the continuous circulation of a heated coolant fluid, the so-called “loop” principle was used. At the same time, the residents of the multi-storey building were provided with hot water, which was supplied through pipes from the upper floor to the lower ones, and when the water flow reversed from the bottom up, heat was collected for the heated towel rails.
The main technological condition for the correct connection of the heated towel rail was that its loop-shaped pipe corresponded in diameter to the pipes of the riser itself. Only in this way was the correct circulation of the coolant in the hot water supply circuit ensured without excessive hydraulic resistance.
How does the shape of the device affect installation?
The efficiency of water circulation and the absence of stagnant or airy areas depend on the shape of the heated towel rail.
The most effective are U- or M-shaped structures that do not have complex intersections or bends.
Water enters them from one end of a curved pipe and leaves the other without changing its speed or stopping.
However, modern substation designs, made in the form of ladders or in the form of complex spatial lattices, are more convenient for operation. They provide more options for drying towels, but require proper connection.
Types of heated towel rails
Nowadays, instead of outdated and not particularly aesthetically pleasing coils of the Soviet period, modern models of heated towel rails are increasingly being installed in bathrooms, which can be divided into three main groups.
- Water appliances connected to the pipes of the hot water supply circuit.
- Electric models operating from a general power supply.
- Combined heated towel rails, the main feature of which is the ability to operate both from the hot water supply circuit and from the mains (in the event of a temporary shutdown of hot water in the house).
From a technological point of view, connecting a water heated towel rail is considered the most difficult: installing such a plumbing fixture without the proper experience is quite difficult. At the same time, errors in the connection often lead to the fact that the bathroom remains cold and damp, and the coil pipe itself warms up unevenly or does not heat up at all. That is why connecting water models should be trusted exclusively to professionals who have practical experience working with such plumbing equipment.
An electric heated towel rail is a device that requires only free access to the power supply to operate. Its connection is a standard installation of a household electrical appliance and usually does not cause difficulties. As for combined models, they are usually installed in the bathroom if there is periodically no hot water in the house, and the rules for connecting such heated towel rails are generally similar to the rules for installing water coils. Let us immediately note that the article will focus on the nuances and features of installing and connecting water-type devices.
Water leaks
Water leaks at the junction with the main line are quite common, but such troubles can be eliminated easily and independently.
You need to unscrew the heated towel rail mount, replace the old gasket and “winding” with new, more airtight elements.
If a water leak occurs due to a crack in the body of the product, repairing it yourself is impossible. This problem can only be solved by a professional or you will have to completely replace the clothes dryer.
Corrosion is the main cause of heated towel rail failure.
Considering such a problem and its simple repair, you will experience the benefits of a water device. Unfortunately, repairing an electric heated towel rail is not so easy. Any leak or other problem must be resolved exclusively by a professional.
Connection options
Most often, water heated towel rails are connected to hot water supply (DHW) pipes. However, in private cottages and houses with individual heating, there is still a scheme in which a heated towel rail is embedded into the heating circuit. On the one hand, this installation technology can be called convenient and quite economical, however, in the warm season, when autonomous heating is not needed and is turned off, the heated towel rail in the bathroom does not work.
Another option is to connect a heated towel rail to an individual hot water system, working with an indirect heating boiler with automatic circulation. Regardless of the chosen pipe connection scheme, different installation options can be used.
Features of installation of electric models
Unlike water models, electric dryers can be installed anywhere, since they do not depend on the location of heating pipes and hot water supply. In this case, special attention should be paid to the quality of the electrical wiring.
Requirements for installation of electric heated towel rails:
- The installation location is selected taking into account the level of protection of the device from moisture. The distance to the bathroom or washbasin is at least 60 cm.
- The minimum distance to the floor is 20 cm, to the wall – 30 cm, to the surface of furniture – 75 cm.
- The heating device must not be placed directly under the outlet.
Connection to the electrical network is carried out in accordance with the international standard NFC-15-100.
The optimal location is zone No. 3. When installed in zone No. 2, protection of the device from splashes is required (+)
Electrical wiring under the heated towel rail is carried out in compliance with electrical safety standards in rooms with high humidity:
- connection via a three-wire cable with grounding;
- Only hidden electrical wiring is allowed;
- the socket must have a rubber seal and a cover covering the contact holes;
- Copper wires of the VVGng and VVGng-LS brands are used for the electrical network.
A prerequisite for the installation and operation of electrical devices is the use of an RCD that turns off the device when the current operating characteristics are exceeded.
Oil heated towel rails require rigid fixation, while cable radiators can be installed in any position
Recommended connection diagrams
How to properly install a heated towel rail in the bathroom? This question can often be heard from many owners of houses and apartments who want their bathroom to be warm and dry all year round, regardless of the presence or absence of heating (individual or centralized).
As already mentioned, in the past, the standard schemes by which heated towel rails were installed in the bathroom corresponded to the scheme of the DHW circulation riser. Such a system did not in any way affect the performance of the entire network, since the diameters of the coil and the riser pipe were the same. If the bathroom is equipped according to this scheme, the hydraulic resistance in the network is minimized even when the line is extended. As long as heated coolant circulates through the system, the heated towel rail installed in the bathroom will remain warm.
The preferred scheme is one in which the heated towel rail is installed in the bathroom using a lateral or diagonal pipe connection. Such a scheme can be considered universal and works successfully when installing ladder-type devices that do not require narrowing the bypass. A pipe connected using this method does not require any displacement or narrowing and does not depend on the total pressure of hot water through the riser.
General rules
- When inserting into the riser, the lowest point of the heated towel rail pipe in the bathroom should be below the lowest connection pipe.
- Regardless of the layout of the bathroom, the design of the liner sections does not allow any bends. Otherwise, all existing bends will collect air and thereby prevent the natural circulation of coolant along the circuit.
- Do you want to install your heated towel rail correctly? Use pipes with a diameter of at least 20 mm (DN 20).
- Experts recommend installing pipes in the bathroom using a layer of thermal insulation material. If the heated towel rail pipe is installed in a hidden way (in a groove cut into the wall), the circuit must be thermally insulated in any case.
Advantages of lateral connection
- It is possible to modify the system if the supply pipe needs to be positioned differently.
- The efficiency of the device, as well as its performance, does not deteriorate in any direction of water supply.
At the same time, you need to understand that with a “ledged” insertion pattern (as shown in the last figure), the heated towel rail will in most cases require additional installation of an air vent.
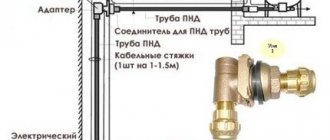
Features of dryer installation, pipes and fittings used
It is worth noting that in modern new buildings and individual houses, polymer pipelines are widely used when laying hot and cold water supply lines. Among several types (cross-linked and heat-resistant polyethylene, adhesive polyvinyl chloride), the leader in use is polypropylene (PP) pipes. They are the ones most often used for laying pipeline lines to heated towel rails.
If the hot water supply (DHW) riser is made of steel, metal outlets with external or internal threads are welded to it to connect the dryer.
There are the following three main installation methods and the corresponding design of popular ladder heated towel rails:
External side connection. To implement it, two side outlets are made in one of the vertical pipes of the dryer as close as possible to the pipe ends.
The connecting pipes are located in the same plane as the coil and usually have external threads of different diameters (3/4, 1, 1 1/4, 1 1/2 inches).
The disadvantages of the external side connection scheme include the low aesthetic appearance of the connection - often all fittings, as well as shut-off ball valves, are in plain sight.
In principle, it is possible to organize a hidden connection with side fittings extending to the side to pipes hidden in the wall. But for this you will have to use corner shaped elements connecting the coil outlets to the water sockets.
Rice. 9 Designs of dryers with side outlets and fittings for their connection to the hot water pipeline
Directly into the wall. With this design of the heated towel rail, the connecting threaded pipes are located behind the grille perpendicular to its plane. Usually they come off from the side or bottom; less common are options for a diagonal connection. To connect the dryer, straight adapter couplings (futorki), extensions in the form of barrels with double-sided threads, and American type detachable connections are used.
The main advantage of this design is the minimum number of butt joints when installing the dryer due to the use of straight types of fittings.
Corner into the wall (universal). This is one of the most common designs of ladder heated towel rails.
To implement it, internal threads (or external threads on the two lower ones) are cut at the four ends of two vertical pipes. Usually, a Mayevsky valve is screwed into the two upper threaded pipes to bleed air from the convenient side and a plug. The two lower pipes with external (internal) threads are connected to the hot water supply pipeline using corner adapter fittings.
The universal design of the dryer allows, in addition to the bottom, to easily implement its lateral and diagonal connection, if you rearrange the plugs and direct the water supply to other pipes.
Also, in some designs of dryers with bottom connections, instead of corner connections, tee adapter fittings with valve axle boxes (shut-off and control valves) are installed. With their help, you can disconnect the ladder heated towel rail from the water main, as well as carry out work to start it up in the absence of heating.
Rice. 10 Equipment, fittings and bottom installation of the heated towel rail-ladder
Article on the topic:
Connecting bimetallic heating radiators - instructions from “A” to “Z” . On our website there is a separate article about bimetallic radiators and their connection to the heating system of a house or apartment; it may be interesting to read it before connecting a heating radiator to polypropylene pipes.
Schemes with an offset or narrowed bypass
A heated towel rail with an offset/narrowed bypass is rarely installed. As a rule, plumbers use a similar tap-in technology when it is necessary to install an offset or slightly narrowed bypass on an existing heated towel rail. In this case, the pipe is connected according to one of the standard schemes, selected by a specialist.
In practice, in most cases this technology is not used. This is explained by the fact that the coil pipe, which, in fact, is a heated towel rail, is still not an additional heating radiator, and fundamental alterations in this case will be impractical. Moreover, the installation scheme for a heated towel rail with an offset or narrowed bypass is effective only if the bathroom is equipped with an overhead hot water supply system.
Features of installation with an offset bypass
As a rule, offset is used when wiring radiators. This option is often used when plumbers are installing the heating system. At the same time, this approach is often justified when installing heated towel rails, when there is a need to preserve the old outlets on the riser, to which the old coil was connected (it was discussed at the beginning of the publication). In most cases, there is no need to replace the entire riser: the device can be installed with a bypass. The only condition in this case is the circulation of coolant water from top to bottom. If this condition is not met, the pipe acting as a heated towel rail may end up remaining cold.
Step-by-step installation of a water heated towel rail
The technology for installing a water heated towel rail with your own hands is the same for different connection schemes. The step-by-step progress of work includes dismantling the worn-out device, supplying pipes from the riser, installing taps and fastening the coil.
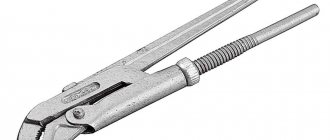
Preparation of tools and materials
The set of tools required to install and replace a heated towel rail depends on the type of water pipes in the room. For installation through polypropylene pipes you will need: ball valves; mounting brackets; polypropylene pipes; soldering iron and knife for cutting PP pipes.
The standard equipment of the heated towel rail includes:
- transition corners;
- silicone gaskets;
- locking units;
- telescopic brackets;
- Mayevsky crane.
It is advisable to use components from the same metal in the system to avoid electrolytic corrosion.
All connections are sealed with gaskets, threaded detachable units are sealed with plumbing tape (+)
Dismantling of old equipment
Before dismantling the outdated coil, it is necessary to coordinate the actions with the house management organization. Disconnecting the riser from the water requires special permission.
Following actions:
- If the towel dryer is not integral with the hot main, then the threaded connections must simply be unscrewed.
- If the device is welded to the riser, then it should be cut off with a grinder. The remaining portion of the pipe connection should be sufficient for threading.
- Remove the used device from the brackets.
The height of the cutout in the riser must exceed the distance between the pipes of the new device by the length of the couplings and bends required for inserting the bypass jumper
The size of the dismantled area must be determined with maximum accuracy. It’s better not to cut a little, and after “trying on” the device to the installation site, adjust it according to the fact
Installation of bypass and ball valves
The coil can be mounted without installing a bypass, but experts recommend providing a jumper in advance. Ball valves are installed at the ends of the heated towel rail. If necessary, the coolant supply to the device can be shut off, while water will circulate freely through the riser.
The bypass is inserted into a riser made of PP pipe using tees and couplings (+)
To install valves on pipe sections, cut a new thread using a die of the required diameter. If after dismantling the old device the thread has survived, then it is enough to “drive” it with a die to improve the connection. Install shut-off valves on the prepared pipes.
Installation of the jumper in the steel pipeline is carried out by welding. The bypass diameter is equal to the cross-section of the riser pipe
Attaching the heated towel rail coil
The procedure for “hanging” and connecting the device is as follows:
- Apply markings on the wall for the brackets - it is necessary to ensure that the placement of the coil is horizontal.
- Prepare the holes and insert dowels into them.
- Screw the brackets to the heated towel rail, place the device against the wall and secure with screws. It is important to adhere to the recommended distance between the radiator and the wall cladding.
- Connect the unit to the valves on the jumper using fittings, seal the connections with linen wrap.
Depending on the type of connection, straight or angled threaded fittings are used.
At the end of installation, inspect the tightness of the joints and smoothly open the taps to check the functionality of the device. There should be no leaks or drops
Bottom connection circuits
Is the bathroom equipped with a pipe with a bottom connection? In this case, you can use alternative schemes to those described above. In most cases, the pipe is installed in a similar way for hidden installation of the liner, while the bathroom (more precisely, its interior) will not be damaged. With a bottom connection, the pipe is partially masked by accessories located along the walls.
Structurally, the pipe with a bottom connection is a mini-ladder and has a very stylish and impressive appearance. At the same time, this technology is called less effective compared to structures connected laterally or diagonally.
Installation in the presence of an old tie-in with a displaced bypass
In some cases, the pipe is cut in using the bottom method, but the previous cut with a displaced bypass remains on the riser itself. Most often, apartment owners do not see much practicality in remodeling. In this case, the upper outlet is usually located high, but according to the rules it must be located below the connection point itself. A way out of this situation is possible only if two basic conditions are met.
- The scheme itself implies an upper supply of water, since if the coolant flows from below through the pipe, the so-called “locking” of the internal circuit of the system is highly likely to occur. As a result, the bathroom will remain cold.
- The upper outlet of the riser is located below the upper edge of the coil itself. Otherwise, such a device will, in principle, not be able to function.
Automation of welding of heated towel rails using ORBITEC equipment
In the summer of 2021, equipment from the German company ORBITEC was delivered to a manufacturing company at a plant in the Tver region, which has been producing water and electric stainless steel heated towel rails since 2003. Their heated towel rails can be found at construction markets and chain stores throughout Russia.
One of the company's production workshops is located on the territory of a correctional facility, where convicts cut, prepare, grind, weld and assemble heated towel rails.
Manual production of heated towel rails was carried out according to the following algorithm: holes were drilled on the surface of the pipe with a certain pitch into which jumper pipes were inserted between the main pipes, thereby forming “saddle” welded joints.
| Such welded joints are difficult to automate due to the curvilinearity of the joint. Welding was carried out using a manual TIG machine. Despite the fact that during welding the heated towel rail was rigidly fixed in the jig, the frame of the heated towel rail was constantly deformed during welding. |
The leads were caused mainly by the lack of contact area between the pipes and jumpers in the hole of the main pipe, which is why welding did not give a stable result. It is also worth noting that with this shape of the joint and welding method, the resulting shape of the weld has a significant undercut along the entire length of the seam.
In order to minimize defects by automating the process, in order to improve product quality and the possibility of increasing the warranty service life of heated towel rails, the customer company is changing the technological approach to production. For welding, purchase an orbital welding kit from the German company ORBITEC:
|
The main feature of this kit is the compact welding head “OSW 40”. Due to its small size, it is capable of welding parallel pipes located close to each other (70 mm between pipe walls), which is especially important in the design of heated towel rails. The kit was equipped with a special welding torch holder, which allows you to fix the position of the welding torch at an angle and direct welding to hard-to-reach places.
When preparing pipes, namely, for drawing out the outlet necks on the surface of the main pipes, an automatic machine from the Finnish company T-DRILL is used, which makes it possible to obtain an even joint that can be easily automated.
The use of the equipment described above has changed the production technology of heated towel rails:
- a drawing machine drills holes and pulls necks out of them on the surface of the main pipes;
- Threaded flanges are welded at the ends of the main pipes using the OSW 4 welding head;
- jumper pipes are inserted inside the elongated necks with an arbitrary allowance of half the diameter of the main pipe;
- the entire heated towel rail assembly is installed in a rigid conductor;
- alternately, a welding head “OSW 40” is installed on each jumper pipe with the welding torch tilted at an acute angle, and welding is performed.
In this case, the elongated neck, rising 1.5 mm above the surface of the main pipe, is melted onto the jumper pipe, thereby forming a wider and more reliable welded joint than when manually welding a “saddle” joint. Welding one joint lasts about 30 seconds, based on this, taking into account the changeover time, one heated towel rail with ten jumper pipes will be scalded in an average of 40 minutes.
During the development of welding technology by employees, a number of comments and suggestions were made that adjusted the production technology of heated towel rails, taking into account the capabilities of the equipment in order to improve quality:
- In both manual and automated welding, jumper pipes inserted inside the main pipes form an acute angle between the outside of the jumper pipe and the inner surface of the main pipe. This joint geometry negatively affects the formation of a reverse weld bead; during the formation of a weld pool, excessive surface tensions are created, which provoke the development of cracks in the intercrystalline lattice of the metal structure.
- The height of the neck of the resulting outlet neck (1.5 mm) is extremely small for uniform formation of the weld pool, but the ratio of the diameters of the main pipe and the neck for the jumper pipe does not allow increasing the height of the neck of the resulting outlet neck due to a lack of metal during drawing.
- The shape of the weld seam is uneven: on the sides of the heated towel rails the seam has a barrel-shaped appearance, and closer to the axis of the main pipe the shape is leveled out.
The above-described comments can be eliminated by changing the lap joint to a butt joint. To do this, jumper pipes are prepared to size without allowance, and the necks of the bends are drawn to a smaller diameter (instead of 18 mm on the inside, necks - 18 mm on the outside). In turn, reducing the diameter at the neck of the outlet will allow the neck of the neck to be pulled out more evenly to a height of two or two and a half millimeters.
Below are photographs of the pipe-flanging butt joint. The photographs show the actual dimensions of the resulting welding joint; they show that the thickness of the flange wall varies: closer to the axis of the main pipe, the size coincides with the welded tube, and from the side of the slope of the main pipe, the walls of the neck become thinner. Therefore, the welding joint has a wider shape on the slope side of the main pipe.
Despite the difference in thickness and uneven heat dissipation, the TIGTRONIC Basic 3 orbital welding controller made it possible to precisely adjust the welding mode so that the weld seam obtained by lap or butt joint had an even shape and stable penetration.
The use of ORBITEC orbital welding technology allows you to weld pipes with higher quality, and the use of flanging allows you to assemble products more accurately, while the performance of the welding head is not inferior to the work of an experienced welder. The resulting welding seams are more resistant to heavy water of the winter-summer cycle and water hammer. Taken together, this minimizes the risk of destruction of the intercrystalline structure of the seam and, as a result, allows the manufacturer to increase the warranty service life of heated towel rails.
Basic connection errors
Very often, inexperienced plumbers make a lot of technological mistakes, trying to please a customer who is trying to aesthetically design old sections of wiring or who wants to use channels in the walls intended for other purposes for installation. Such mistakes often lead to the fact that the pipe does not heat, and the bathroom turns into not the warmest and most comfortable place in the house.
We list the main technological errors when installing heated towel rails.
- The pipe has a kind of “hump” in the upper part of the structure in the area of the upper connection. This creates a loop in which air will sooner or later accumulate. Typically, such a scheme is mistakenly used to disguise part of the pipes under the suspended ceiling.
- The lower outlet is located in the network much lower than the lowest point of the heated towel rail. At the same time, two main mechanisms mechanically enter into a kind of “confrontation”: natural and forced circulation of the coolant in the circuit.
- A particularly difficult case is a scheme in which two insertion points are located higher than the lowest edge of the heated towel rail. In such a situation, water simply cannot flow through the small circuit. Moreover, when using this erroneous scheme, a couple of bags (a kind of “traps”) are formed at once, in which the cooled coolant will be collected.
- Another problematic scheme is the location of the upper part of the supply system under the ceiling, and the lower part in the cement screed of the floor. In this case, the coil does not work for several reasons. The first is the accumulation of air masses from the ceiling, the second is the formation of the same “bag” that prevents the natural circulation of the coolant. As a result, the circulation of hot liquid is disrupted, and sooner or later the bathroom becomes a room with not the best microclimate.
Experts identify several more technological errors that are under no circumstances recommended to be made when installing a water heated towel rail in the bathroom. In particular, two omissions are considered the most glaring.
1. Unintentional narrowing of metal-plastic pipes. This phenomenon is often due to some nuances in the design of press fittings. As a result, increased hydraulic resistance occurs not only within one apartment, but also along the riser.
2. Incorrect installation of shut-off valves (taps) in front of the coil structure. On the one hand, taps installed in this way will theoretically allow you to turn off the heated towel rail if it is not needed at the moment. However, turning off any tap will simply stop the riser from working on all floors. At the same time, the coolant circulates, but its volume, devoid of mobility, sooner or later cools down. As a result, to obtain hot water, you will have to pour a fairly substantial volume of cooled liquid “into nowhere.” In the most severe cases, the so-called “airing” of the entire riser in a multi-storey building occurs in the network, which once again confirms the fact that shut-off valves cannot be installed on a heated towel rail.
Why should you choose polypropylene material?
Domestic plumbers and craftsmen trust German materials most of all, and no wonder.
German-made polypropylene pipes differ:
- small thermal expansion;
- low pressure loss;
- pipes do not require stripping during welding;
- affordable cost of pipes;
- ease of installation;
- high service life.
As many years of experiments have shown, polypropylene pipes can function for up to 50 years at high temperatures reaching +700.
For the circulation of hot water, experts recommend reinforced pipes. Such polypropylene pipes are called “stabi pipes”. In all their technical characteristics, such pipes are close to aluminum products.
This unique material – polypropylene, cools quickly after welding and easily returns to working condition, so you won’t have to wait long.
When choosing the best option for a heated towel rail, carefully consider all possible options. Study reviews and quality of devices. And only then will you see that it is polypropylene that makes the drying mechanism work longer than any other device and with better quality than any other device.
How can you tell if your heated towel rail is connected incorrectly?
In the event that the household appliance was connected with gross technological errors, the drying coil will at first seem to be fully operational. At the same time, the main problem that invariably accompanies the listed installation errors is a noticeable difference in temperature (the lower part of the loop-shaped pipeline will be colder than the upper). As a result, the coolant will begin to circulate through the hot water riser, bypassing the heated towel rail, which will turn into an inoperative and useless element of bathroom decor.
Heated towel rail repair in Moscow and the Moscow region
A faulty or damaged heated towel rail in an apartment or house always causes serious inconvenience to the owners and can cause an accident with significant damage. It is not recommended to carry out the work yourself without the appropriate skills. Poor execution often only makes the problem worse and increases costs. To quickly troubleshoot your heated towel rail with a guarantee, contact the Mossantechnik service. Our specialists carry out prompt repairs of heated towel rails in Moscow and the Moscow region of any level of complexity.