The bathroom, like any room, is furnished with furniture that makes it comfortable and practical. Furniture is selected not only for its functionality. It becomes part of the interior and is therefore selected so that it fits harmoniously among other interior items. The same criteria are used to select a sink cabinet. It can be selected by shape, dimensions, material, and method of fastening. It is necessary to go through three stages of work in order for the installation of a sink with a cabinet to be considered complete: assembling the furniture according to the instructions, fastening it, connecting it to the water supply and sewerage pipes.
Features of installation on brackets
The wall-hung washbasin can also be installed on brackets.
For this installation option, first, the fastening elements are applied to the sink, determining the distance required for installation, after which they make the appropriate marks on the wall and drill holes in the designated places using a drill. After drilling, dowels are inserted into the holes and the brackets are fixed to the wall. The faucet is inserted into the washbasin, after which the wall-mounted sink is hung on brackets. As in the previous case, the last stages of work involve connecting the washbasin to the water supply and sewerage system. Provided that it is installed correctly, the sanitary ware is firmly fixed to the fastening elements and does not move.
Hanging sinks on brackets can only be attached to strong walls that can support the significant weight of the washbasin. The height of the sink in the bathroom corresponds to the height of the brackets and usually varies between 80-85 cm. If there is no free space in the bathroom, you can choose a corner wall-mounted washbasin model
In this case, it is important to measure the same distance from the floor to the sink level on adjacent walls and position the washbasin symmetrically relative to the corner
Installation of plumbing and doors
After the finishing is completed, the last stage remains - installation and connection of plumbing. After connecting the toilet, sink, faucets and washing machine to the water supply, you should check everything for leaks and leaks.
The renovation work in the bathroom is completed by installing an interior door with a handle, a locking lock and platbands.
Answering the question of how much a bathroom renovation costs is quite difficult. The price of work and materials depends on the requests of the home owner. The cost of work is approximately the same, but finishing materials can vary in price very widely. Before starting repairs, you should decide on a budget and, based on the given amount, purchase everything you need.
Materials
Furniture with a washbasin should be functional and beautiful, but if it is made of low-quality materials, then all its benefits are reduced to zero. Since the quality and service life of the entire structure depend on the materials. The main requirements for cabinet materials are their ability to withstand sudden drops in temperature and moisture resistance. Materials that have such qualities are MDF panels, chipboard, artificial stone and wood. The surface of furniture made from MDF is usually processed using two methods:
- By painting. First, a primer is applied to the surface of the material, and then it is painted with paint in several layers. This makes the furniture highly protected.
- Treatment with a special composition. The material, both outside and inside, is treated with a special moisture-resistant liquid, which prevents the process of reproduction and spread of fungi, mold, etc.
A cabinet made of chipboard is cheaper, and it is not afraid of various mechanical damage. The surface of this material is covered with sheet plastic, which prevents delamination and swelling of the material. There is no doubt about the reliability of furniture and sinks made of artificial stone
The only thing that is very important is that there is no damage to the surface of the furniture, including scratches that could destroy the integrity of the material. If the furniture is made of wood, it must be coated with a special moisture-resistant product
In terms of cost, furniture made from natural wood is slightly more expensive than those made from MDF or chipboard.
The quality of the fittings is of no small importance. Over time, the doors may begin to creak and become loose.
Therefore, the more firmly they are installed, the longer they will serve you.
As for the sink itself, it can be: ceramic, porcelain, earthenware, cast iron, steel, stone and glass. In this case, the materials of the cabinet and sink must be combined.
Depending on what materials the entire structure is made of, its cost changes. At the moment it ranges from 1,050 to 325,600 rubles.
Preparatory work
The basis of all repair work carried out is the leveling of surfaces. To do this, the surfaces of walls and ceilings are inspected for the presence of irregularities and the horizontality of the surfaces is measured with a level, and the verticality of the walls is measured using a plumb line.
The option of quickly leveling with plasterboard as in living rooms will not work, since there is dampness in the bathroom, and the presence of space between the main wall and a sheet of plasterboard, even waterproofed, will contribute to the formation of fungus. You will have to buy a primer, apply it to the surfaces to be treated and plaster, and fill the floors with cement mortar. If you want to hide all the pipes in the bathroom, you must immediately install them into the walls until they are level. To do this, you need to hollow out grooves in the wall, or carefully cut them out with a grinder, if the width of the walls allows this.
If you really want, you can build up the walls. Such alterations lead to a change in the area of the premises, which means that it will be necessary to obtain permission to carry out work and change the data in the technical passport for the property. Wiring for lighting and other purposes is also carried out at this stage.
Using building mixtures it is possible to level only height differences of up to 60 mm.
- First you need to install special beacons. To do this, there is a protruding place on the wall, focusing on which, nails are driven in at the corners and a thread is pulled horizontally across them, then the same operation is carried out in the vertical direction.
- Knowing the height of the layer, metal slats with the appropriate thickness (6–10 mm) are selected and mounted evenly along the threads on the wall. The pitch width of the slats should be a meter to one and a half. Check the installed slats for level.
- After this, plastering is carried out on the slats. After the plaster has dried, the beacons must be removed, and the resulting grooves must be sealed with plaster mortar. If the wall covering is resistant to corrosion (for example, tiles will be laid), the slats do not need to be removed.
- Leveling floors is done in the same way as walls. Depending on the technology chosen, beacons may or may not be used. If the height differences are large, then you cannot do without a concrete screed, which is done along the beacons, and if the unevenness is minor, a self-leveling floor will be washed.
- If beacons are used, then after the solution has hardened, they must be removed. In addition, the screed is equipped with a waterproofing layer with a material overlap of 10% of the layer width. Aquaizol or polyester is used as an insulating layer. The joints are lubricated with resin to ensure better sealing for at least 250 mm.
- The ceilings are leveled using a special adhesive-based putty to ensure better contact with the surface. If there are significant differences in height on the ceiling, then several layers are applied, which are then rubbed down with sandpaper after drying. Ceilings can also be leveled by using a suspended ceiling, which is attached using metal profiles.
Required Tools
Since installing a sink is not a very complicated process, you don’t need too many tools for this:
- drill or hammer drill. It will be necessary to drill holes in the wall;
- screwdriver or screwdriver. Insert dowels into the holes and tighten the brackets with screws;
- building level. Make even markings;
- tape measure and pencil. Measure the required height;
- hammer. For driving dowels;
- gun for a bottle of sealant. Seal the seams.
Here, in principle, is the entire simple set of tools for fixing the washbasin. Read on to find out what the height standard for installing a sink in a bathroom is.
The following video will tell you what you need to have with you before installing the sink:
https://youtube.com/watch?v=AVjqVh9FW5o
Preparing for installation, determining the location of the fastener
When planning to purchase a wall-hung model, it is important to determine in advance the optimal size of the sink. The dimensions of the bathroom are preliminarily measured, and the future location of the plumbing product is determined
The suspended version of the sink can only be mounted on a solid base, so it is better to avoid plasterboard walls.
If there are water supply and sewer lines, the location of the existing water inlet and drainage must be taken into account. The height of the bathroom sink is selected so that adults can use it comfortably (it is advisable to provide a special chair for children)
Ideally, the height of the sink from the floor should be 85 centimeters. But you can adjust this value up or down. The exception is a wall-hung sink with a bathroom cabinet. In this case, the installation height of the washbasin depends on the size of the piece of furniture.
The following points are important:
To attach sinks to suspended structures, screws and dowels or brackets are used (a desirable option if the sink is made of marble or granite). In the latter case, the height of the sink determines the level of support for the washbasin; You can attach a washbasin to a plasterboard wall only if the sheets are installed on a frame base and tiles are provided on top
Fastening is carried out using “helicopters”, which are drywall bolts with distributed loading; In order for the sink to hang securely on the wall, the fastening elements must be immersed into the wall by at least 70 mm, so you need to select fasteners whose length is at least 100 mm. Also, it is important to pay attention to the diameter of the screws - it must correspond as closely as possible to the size of the mounting holes (minimum 6 mm ).
Important nuances
Attaching the cabinet and sink to the wall is advisable if it is strong enough.
In other cases, it is important to use a supporting frame. The installation height of the washbasin is selected individually, the average range is 80–85 cm. To make the sink comfortable for children to use, you can install it lower, and higher for tall people. Plain paper will help to identify minor leaks after installing the washbasin (or make sure there are no leaks). It must be placed under the threaded connections and left for half an hour. If the paper remains dry, everything is fine. If wet spots appear, disassemble the connections and repair any leaks.
Read our previous article about which countertop to choose for your bathroom.
Section not found
Choosing a cabinet when you need hanging models
Wall-mounted furniture is considered the best for small spaces. Leaving the floor free, it visually enlarges the room and simplifies cleaning. But this is not all the advantages of fashionable plumbing and furniture.
Wall-mounted washbasin with cabinet
The undeniable advantages of suspended models ↑
A wall-hung cabinet with a sink has the following advantages:
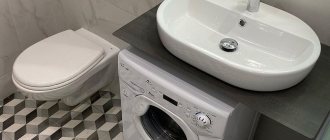
The bathroom floor is equipped with a heating system. This means that the furniture for this room must either stand on legs or be hung on the wall. If you remember how the metal coating of the legs is affected by constant humidity, the choice becomes obvious. A wall-hung cabinet under the sink is the best solution in this case. For those with tall or, conversely, very miniature stature, it is better to adjust the height of the sink mounting to suit themselves. And wall-mounted models are ideal for these purposes. For rooms with a small area, owners often choose a layout in which the washing machine is located under the washbasin. This composition looks more aesthetically pleasing if a hanging cabinet is installed under the sink in the bathroom. In order to place a communications system behind a bedside table that stands on legs, you often have to cut holes in its back wall. Installing a wall-hung sink does not have such inconveniences. The flying design visually makes the room more spacious, adds lightness and weightlessness
This is especially important if a massive, most often double, sink is chosen. The wall-mounted cabinet eliminates the heaviness of the washbasin.
Wall-mounted furniture for a small bathroom
Harmony of Yin and Yang in bathroom design
Installation of a wall-mounted sink, despite all its advantages, has a number of limitations:
- First of all, when installing a bedside table, the reliability of the fastenings is important. Therefore, if the bathroom has flimsy walls, made, for example, from plasterboard, you should not choose a wall-mounted model. But don't rush to despair! If your renovation is still at the planning stage, simply provide embeds in the wall for further installation.
- If it is not possible to hide the sewer pipe in the wall, you should not install a wall-hung sink for aesthetic reasons. After all, the appearance of such a structure under the cabinet is not very pleasing to the eye.
Spacious drawers for small items
Variety of models - what are the types of hanging cabinets ↑
Hanging bedside tables for bathrooms can be divided into several categories:
- by location: corner and classic;
- by type of sink: with mortise and overlay bowl;
- according to the type of material: wooden, made of MDF, chipboard, etc.;
- with and without table top.
For miniature bathrooms, it is better to choose corner models. Bedside tables equipped with a tabletop are much more convenient to use.
Creative metal model with marble topCompact corner model
Creative ideas and practical tips ↑
Mounted models open up the widest possibilities for creativity. Some interesting ideas for proper organization of space:
- A practical option is to choose a hanging cabinet with a built-in towel rack or an open shelf for storing them. This will help keep the room tidy and make it feel more spacious.
- An additional highlight of the bathroom can be the installation of lower lighting. A pebble path with built-in lamps mounted under the sink will also look very beautiful. This will give the room charm and mystery.
- When choosing a double sink for a bathroom, it is better to choose a long mirror that matches the size of the cabinet. This way the composition will look complete.
- A hanging cabinet with a sink makes it possible to conveniently place a children's high chair! Is it difficult for your child to reach the faucet due to his short stature? Provide a stable stool for him, hiding under the structure with the washbasin.
Stone path under the hanging pedestal
A towel storage unit connects two cabinets into a single structure.
Mobile “steps” for a child are created in the same style as the interior of the room. Wall-mounted sink without a bedside table.
Design Features
Such kits must meet several requirements.
Among them:
- ensuring the safety of things inside;
- moisture resistance of the material used in their manufacture;
- stability of the stand itself, as well as shelves, drawers and other contents;
- tightly closing doors;
- minimum occupied space;
- compliance with the overall design of the room.
Installing a cabinet with a sink attached to the wall
The stand for a bathroom sink can be wall-hung or floor-mounted, which determines the installation features. In the first case, the cabinet is mounted directly under the washbasin and has no support, and in the second, it is equipped with a pair or four legs.
The hanging cabinet has a stylish and attractive appearance. Such furniture is especially appropriate in combination with a washbasin of a similar design in a miniature bathroom, since the lack of support contributes to the visual expansion of the space. In addition, when choosing wall-mounted cabinets with a sink, you don’t have to worry about the negative consequences of the furniture coming into contact with water that gets on the floor during washing or wet cleaning (cleaning itself is greatly simplified). Another advantage that a hanging cabinet under the sink gives is constant air circulation under the washbasin, which prevents the growth of germs and bacteria that prefer a humid environment. Of course, such models are more difficult to install (especially if you choose a corner wall-hung sink with a cabinet), but the result is worth it. Combined hanging models can only be installed on load-bearing walls.
A wall-hung washbasin with a bathroom cabinet of a floor-standing model is convenient because the installation of the piece of furniture does not depend on the type of wall. Both compact corner models and wide rectangular options for washbasins of the appropriate size are available.
When choosing, it is important to correlate the sizes of both elements in advance
Installation of the washbasin is carried out almost similarly to the two previous options. Before attaching the sink to the wall, first check how freely the siphon and mixer are connected and whether the internal equipment of the cabinet interferes with the process. If such a nuance is present, it may be necessary to make special holes for the washbasin elements in the back wall of the furniture.
When all the points have been clarified, they install the hanging fasteners in the form of brackets and fix the cabinet, on top of which the sink itself is installed. After checking the parallelism to the floor and the reliability of the fixation, the washbasin is connected to the water supply and sewerage system. To attach the sink to the wall if there is a cabinet, use anchor screws or silicone (the second method does not require the use of a drill, but is less reliable.)
https://youtube.com/watch?v=8d-LyqQfngQ
WATCH THE VIDEO
Thus, installing a wall-hung washbasin, subject to a responsible approach to choosing a model and preparatory measures, is quite possible on your own, which ensures noticeable savings. The main thing is not to miss important points, securely fixing gaskets, fasteners and threaded connections, and then the operation of the installed plumbing product will not cause any unpleasant moments.
Niches for bathrooms
Leaving this surface open is considered not rational - high humidity conditions will ruin any product or decor placed on it. A worthy solution is to install cabinets with frosted perforated glass. On such a surface, stains and traces of limescale are less visible. Although you still have to wipe them.
Such cabinets will allow you to place a fairly large number of items on your shelves.
You need to select bathroom furniture based not only on your own preferences, but also taking into account the dimensions of the room. Sometimes you can save space by placing the cabinet higher or attaching it directly to the wall. It is quite possible to install any furniture in the bathroom with your own hands, even for an inexperienced craftsman.
The final appearance of the finished furniture depends on the imagination of the home craftsman.
Kinds
Nowadays you can find many types of furniture with a washbasin. They have different shapes, sizes and installation methods, and are made from different materials and parts.
Depending on the mounting method, there are two types of bedside tables with a washbasin:
- floor;
- hanging.
The advantage of the first group of cabinets is that:
- they are easy and simple to install;
- you can move it to different parts of the room as much as you like;
- there are a huge number of floor models of cabinets, designed in different ways;
- they are able to withstand enormous weight, which is why you can see marble washbasins on the floor cabinets.
Floor cabinets can have different bases, for example, models with legs or with a plinth. The second subtype is also called cabinets on a monolithic frame.
Cabinets with legs
The installation process for such models is simple. If the structure does not need to be mounted on the wall, then it is enough to assemble it and simply place it in the right place. Such models can be installed in rooms with a heated floor system. They do not prevent the legs from moving freely and cleaning the room easily and without hindrance. The most reliable cabinets are those with legs, the material for which is chrome-plated metal.
Nightstands with plinth
They are very convenient to use and can be simply placed in the desired location. Such bedside tables are reliable if the base is made of reliable materials protected from moisture. Otherwise, the entire structure may lose its integrity after some time.
Corner cabinets
Ideal for small spaces. They take up minimal space and still perform their tasks perfectly. They look quite stylish and very neat. Despite the fact that they look compact, they can accommodate many items. Corner furniture models with a washbasin are also available as floor-mounted or wall-mounted. It is precisely these cabinets that are in increasing demand today, since they are installed in the most often unused place - the corners of rooms.
Washbasin-moydodyr
It is a washbasin with a large mirror, a built-in washbasin and storage cabinets on legs underneath.
Hanging cabinets
Like corner models, hanging cabinets are becoming increasingly popular among buyers.
Their advantages are obvious:
- They can be installed in small bathrooms. At the same time, they are able to visually increase the space.
- They are easy to use.
- They do not interfere with cleaning the room at all.
- If a flood suddenly occurs, they, including the items stored inside them, will not be damaged in any way.
- They look very fashionable and stylish.
The only drawback is that it needs to be mounted on a very solid wall. Such cabinets must be mounted using dowels or anchors. In this case, the surface must be either a solid panel or a brick partition.
Tips for choosing materials and accessories
To assemble the kit, it is better to prepare foreign-made fittings and materials. High-quality parts will last much longer than cheap analogues. When choosing fittings, you need to take into account the characteristics of the furniture and its configuration. The assembly material must withstand high humidity and be reliable.
When choosing hinges and handles, you cannot save money, since during use they will be worn out and lose their original appearance. Plastic parts for the bathroom are not recommended. Instead, it is better to buy metal fittings with stylish chrome plating.
Possible installation problems and methods for solving them
If the water supply and sewerage come out of the floor or are in an inconvenient place, resort to sawing the furniture from below (if necessary, then in the shelf) and from behind in the right places using a jigsaw or an ordinary hacksaw, after which the connection will be made without problems. It also happens that the sink cannot be attached to the wall, since there are no corresponding holes or a pipe runs in a place suitable for drilling holes. This problem is solved by gluing the sink to the lining using silicone. The washbasin will hold quite firmly.
Alternative
The financial limit forces the use of chipboard. The first step is to develop a diagram, determine the main dimensions and number of elements. We take a 20 mm sheet as a basis.
Calculation tips:
The author of the following video, using a computer program, received detailed details. By simply adding legs, the design turns into a floor-standing design.
It is problematic to cut perfectly with a jigsaw; you will have to align the edges. Only an experienced carpenter can avoid blockages and maintain straightness and parallelism. Errors will be reflected when edging is performed with an iron. It makes sense to entrust the job to a specialized company; you will be left with the assembly according to the sketches.
Semi-professional chipboard cutting.
Note to experimenters:
We fasten the constructs with confirmations.
We provide a stiffener jumper. We attach it to the edge of the sidewall. We try on the sink.
We mark the arc of the part to be cut out using a metal ruler. We cut out the segment and check by applying it.
Screw the fitted part.
We assemble the frames of the boxes according to the specifications.
Donyas are often made from laminated fiberboard, nailed or stapled. Fiberboard is not durable, nails and staples become loose from shocks. It is more reliable to tighten with self-tapping screws with a diameter of 2.5 - 3 mm through washers. To avoid cracks, the chipboard is drilled with a 1.5 - 2 mm drill, respectively. Spare no expense, buy stainless screws.
We nail the bottoms with laminate inside.
If desired, the uncovered ends of the fiberboard are primed with drying oil 2-3 times and painted with oil paint.
We select ball guides; the video explains the installation nuances:
Mark the middle of the side panel.
We separate the ball guide. Screw the runner in the middle, maintaining parallelism.
We mark the places for the response nodes and install them.
We drill holes for fastening the facade. We press the front panel. We tighten the screws.
The legs of the floor modification are secured from the inside.
It is reasonable to ask to silicone the seams, removing the excess with a dampened glove.
Finally, screw the handles.
Information on assembling the ordered kit:
Choosing a vanity unit
When choosing a bathroom vanity, you need to follow some simple but important rules
First of all, pay attention to the interior of the bathroom. If all its elements, including plumbing fixtures, hanging cabinets and shelves, are made in a soft style with smooth lines, a strictly rectangular cabinet will be out of place
If the bathroom is decorated in a classic style, which is characterized by luxury and wealth, installing a sink with a cabinet in a minimalist style will not be acceptable in this case. Ideally, this piece of furniture should match the materials and colors of the overall interior design.
When choosing furniture, consider the overall color and interior of the bathroom.
In addition to design, it is necessary to pay attention to other important points, for example, the correct choice of fittings for the product. Handles, legs and hinges must be made of chromed metal
A bedside table with plastic gold-plated or chrome fittings usually loses its original appearance after a couple of months. When purchasing furniture with a colored coating, you should know that the paint on its surface must lie evenly.
The arrangement of the bathroom is also of great importance. For example, if the room has a heated floor, you should not buy furniture with a plinth; it is better to buy a sink cabinet with legs
Such a thing will not heat up from the floor, will significantly facilitate the cleaning process, and will provide the necessary ventilation of the product, which is important for rooms with high humidity.
In terms of furniture functionality, you can be guided by personal preferences. A good option is a cabinet under the sink with a laundry basket, which significantly saves room space. For small bathrooms, there are corner models that take up minimal space, while being quite practical and functional. It’s good if the shelves in the cabinet are adjustable in height, so they can be adjusted to the height of detergents and cleaning products. A roll-out cabinet is another interesting solution for decorating a bathroom. It can be moved to any place, but it has a significant drawback - the difficulty of installing a sink, because all communications (water supply and sewer pipes) are installed permanently. So, you need to choose this piece of furniture based on the purpose of its installation: it will be used to store all kinds of household accessories or simply hide the pipes to the sink.
Buy or make it yourself?
You always want to make your bathroom not only beautiful, but also functional. And well-chosen furniture and other interior items will help with this. As a rule, a lot of bottles, jars, and rags are always stored in this room, which are needed not only for taking care of yourself and your appearance, but also for cleaning the premises. And when it’s all just put together haphazardly and using whatever, the picture turns out to be unflattering. It is much better to use some kind of furniture to store items.
Small cabinet under the washbasin - DIY options
One of these interior items is just a cabinet under the sink. Usually it not only hides the drain running from the sink itself to the sewer pipes, but also has a lot of shelves hidden behind the doors. And on these shelves you can put all kinds of bottles and boxes - there they will not be conspicuous and disturb anyone with their presence.
Of course, the easiest way is to just buy a sink cabinet. Nowadays all kinds of products are produced from a variety of materials, having any shapes and sizes. But it cannot be denied that our apartments are such that they do not always meet any standards. And for this reason, choosing a cabinet for a sink is often not easy. In this case, you should just think about doing it yourself.
Built-in vanity unit
On a note! The question arises - why not order a cabinet from a professional? The answer is simple - not everyone can afford to pay for an expensive custom-made designer item. Sometimes it is much cheaper and easier to do everything yourself. But you will have to spend your personal time. Plus, private craftsmen can be very busy with work, and they will have to wait for more than one month for their cabinet.
It is important to understand that not everyone can make a cabinet - you need to have certain work skills. But if there is a desire, then even a beginner will definitely succeed in creating a cabinet. You just need to put in more effort and study all the necessary information in advance. And it’s better to choose a model that is as simple as possible - complex options may not work out the first time without the proper skills.
Cabinet with drawers under the sink
How to properly install a sink with a cabinet in the bathroom
When installing a sink with a floor cabinet, the procedure is as follows: Place the washbasin on the cabinet. Using a level, make it strictly horizontal - adjust the legs of the cabinet.
- Mark on the wall where the washbasin will be fixed.
- Make holes in the wall. Their depth must correspond to the size of the fasteners used. For tiles, take a feather drill, for concrete - with a carbide tip, and use the drill in impact mode. Fix the washbasin with anchor screws or metal pins screwed into dowels.
- Install a mixer and outlet with a siphon. Place the washbasin on the cabinet and press it to the wall with nuts, screwing them onto the studs. Be sure to place plastic spacers under the nuts to protect the housing from damage when tightening the nuts.
- If necessary, make holes in the cabinet for laying pipes.
- Connect the washbasin to the utility systems. Corrugations or pipes can be used to connect to the sewer system. Rubber seals are always used. To connect to the water supply, flexible hoses with union nuts are used. Install instrument taps on the water supply pipes. Check if there are spacers on the nuts. Connect the hoses to the taps, carefully tighten the nuts and tighten them with a wrench.
- Seal the gaps between the bowl and the wall surface with silicone sealant.
- Open the tap and make sure there are no leaks in the area of the threaded connections. If leaky connections are detected, disassemble the connection, add a thin braid of combed flax to the threads or apply 5-6 turns of FUM, re-tighten the connection and tighten it.
- If desired, attach a mirror to the wall above the sink. Using a tape measure and a level, mark the location of the holes for the fasteners, drill them to the optimal depth, insert the dowels and screw the hooks into them. Hang a mirror on them and check its horizontalness with a level.
Installing a wall-mounted cabinet under the sink in the bathroom has some features, which we will describe below.
Instructions in a few steps
Let's look at how to make a very simple hanging cabinet for a bathroom sink from 40 cm thick pine furniture board.
Step 1. First of all, you need to make the appropriate markings on the pine board and saw it. There should be several parts - the sides of the cabinet, as well as its upper and lower parts. You need to saw strictly along the pencil lines drawn in accordance with the dimensions.
Cutting furniture board
Step 2. Next, you need to make cuts at the edges of the walls at an angle of 45 degrees. This is necessary to ensure the correct joint of the parts.
Cuts are made at an angle of 45 degrees
Another photo of the process
Step 3. Then both side walls and the bottom need to be laid exactly in one row and connected with tape. You need to glue the elements with adhesive tape on the front side of the shield. This measure will help to smoothly glue the parts into a single box.
The walls are connected with tape
Step 4. After this, you need to carefully turn the workpiece over and coat the cuts (45 degrees) with wood glue, then assemble the box.
The saw cuts are coated with glue
Step 5. Now you need to attach the tabletop to the top of the box. The cuts also need to be coated with glue beforehand.
The top part of the box is attached
Step 6. After this, you need to tighten the box with tape and zip ties.
The box is secured with tape
Screeds are also used
Step 7. Next, you need to ensure the reliability of the connection between the sides of the box. Dowels will be used. To do this, you need to drill deep holes with a drill of the required diameter in the end parts of the future cabinet so that they pass through the lower and upper parts of the box and its end parts. Then you need to pour glue into the holes and insert a wooden dowel there, also coated with glue.
Holes are drilled
Glue is poured
Wooden dowel winds up
Step 8. The cabinet needs to be left in this position alone, and when it dries, you need to saw off the excess protruding dowels.
Excess dowels are trimmed off
Step 9. It's time to start sanding the product. The first step is to sand off the protruding parts of the dowels, then sand the entire surface of the cabinet.
Sanding the structure
Step 10. Places where dowels are inserted, as well as all connections in the area of joints and corners must be puttied. Before further work, the putty must be dried.
Applying putty
The putty must dry
Step 11. Now you need to sand the product again.
Re-sanding
Step 12. Next, the cabinet needs to be painted and treated with protective compounds. By the way, there are certain paints and varnishes that will not only give the tree a beautiful look, but also additionally “preserve” it and protect it from exposure to water. The coating layer must be thoroughly dried. The main part of the cabinet is ready.
Treating the cabinet with a protective compound
Step 13. It's time to start making the facade. It will be made of plywood. You need to cut out the façade part to the required size.
Facade detail is cut out
Step 14. Now the facade blank needs to be sanded.
The workpiece is polished
Step 15. After sanding, smooth plywood must be carefully primed. Do not skimp on the primer composition - this measure will reduce the consumption of paint and varnish material.
Primer is applied
Step 16. Next, the surface of the facade needs to be sanded again.
Re-sanding of the facade
Step 17. Then the facade needs to be coated with a layer of varnish and left to dry.
The facade is covered with a layer of varnish
Step 18. Now you can return to the cabinet itself. It should be additionally reinforced from the inside with a chipboard frame. To do this, you need to cut the elements to the required size and secure them inside the box with self-tapping screws, repeating the outline of the cabinet. The dimensions of the inner chipboard box should be slightly smaller than the main size of the cabinet.
Chipboard parts are cut
Formation of the inner box
Step 19. Next, inside on the sides of the cabinet you need to attach telescopic guides for the drawer to the self-tapping screws. They should be parallel to each other.
The guides are attached with self-tapping screws
Attaching telescopic guides
Step 20. Now you need to make a drawer for the cabinet. It will have a curly shape, in the back there will be a recess, which is designed to ensure that the box fits where the pipes will run. The side walls of the box must be cut from chipboard to specified dimensions, and the bottom must be made from plywood.
Drawer parts are cut out
Another photo of the process
Step 21. It is best to assemble the box using glue with an additional tie with self-tapping screws.
Assembling the box
Box assembly process
Step 22. Telescopic guides need to be attached to the drawer. To do this, they need to be screwed with self-tapping screws to the walls of the drawer from the outside, maintaining a small gap at the bottom between the drawer and the bottom of the cabinet.
Fastening the guides
Step 23. At the top of the back of the cabinet you need to screw fasteners that will allow you to fix the cabinet to the wall. These can be simple but strong corners secured with self-tapping screws.
Fasteners are screwed on the back of the cabinet
Step 24. The cabinet needs to be hung on the wall. It needs to be placed under the sink and the locations for drilling holes in the wall should be marked. Next, you need to drill holes in the wall, install dowels and hang the cabinet.
The cabinet is hung on the wall
Step 25. In the upper part of the cabinet you need to make a hole where the drain pipes from the sink will pass. When the hole is cut, it is necessary to coat it from the inside with sealant.
A hole is made in the upper part
The edges of the hole are coated with sealant
Step 26. All that remains is to attach the facade. To do this, you need to screw in self-tapping screws in the box at the place where the facade is attached, but not all the way, but so that they come out a little bit through the front side of the box. Next, the facade needs to be placed in its “rightful place”, leveled using wedges (in this case, the role of wedges is played by folded pieces of paper) and a little pressure is applied to it. When the façade is removed, there will be small recesses on its reverse side - imprints of self-tapping screws. Now you can drill holes in the place where these marks appear, and then simply screw the facade with self-tapping screws to the box. The cabinet is ready.
Façade alignment
The facade is attached to the cabinet
Step 27. All that remains is to install the bowl on the cabinet.
Finished vanity unit
It is better to coat the bottom of the bowl with sealant and place it on the countertop. The work has been completed. All that remains is to connect all communications.
Video - Cabinet made of aerated blocks
Wall cabinet installation technology
Correct installation of the selected model will help save time and avoid the need to redo everything from scratch. Strictly following the instructions will also protect you from property damage and unpleasant health consequences.
Subtleties of installing mounted models ↑
Installing a wall-hung sink, which comes with a cabinet, requires compliance with several rules:
- Securely attach both the cabinet and the washbasin to the wall (if we are talking about a built-in sink).
- For installation, you must choose a wall made of durable material (not plasterboard). Or install mortgages at the stage of rough finishing work.
- All connections must be tightened very carefully, without fanaticism, so as not to damage the coating of the model - excessive efforts can lead to cracks.
For suspended models, anchor bolts (left) and dowels (right) are used.
Step-by-step instructions with video for proper fastening ↑
After all the necessary communications have been brought to the mounting location, we proceed to the installation of the structure itself. How to install a sink with a cabinet in the bathroom:
- We mark the wall for installation and level the cabinet.
- We remove the internal shelves for ease of fastening and install the cabinet on the wall. To do this, you can use anchors (100–140 mm), dowels or a kitchen hanger with evenly spaced dowels.
- We place the sink on a wall-mounted cabinet and use a pencil to mark the locations of the slots in the wall for fastening.
- We remove the washbasin (and possibly the cabinet) and drill into the wall in the marked places. We install anchors or studs for fastening.
- We fasten the cabinet (if it was previously removed), apply sealant along the side edges, install the sink on it, hanging it on studs or anchors. If there is a gap between the cabinet and the washbasin, place silicone furniture pads in this place.
- Carefully install the plastic bushings, washers and nuts included in the kit. Lightly tighten the nuts with a simple open-end wrench.
- We fill the gap between the wall and the surface of the washbasin with sealant.
- We install the siphon and mixer, return the shelves to their place.
https://youtube.com/watch?v=Xf47zggDHtg
Video: installing a cabinet with a sink in the bathroom
Hanging models of bedside tables for bathrooms, romantically called “floating” in English, are a new step in bathroom design. Convenient and easy to install, they are quickly gaining popularity in world markets. Choose a model to match your interior according to your idea, and be on trend!
Components
Installing a sink with a cabinet in the bathroom requires understanding and ability to understand the main components of this furniture.
So, the main elements of a sink with a cabinet are:
- sink or washbasin, or sink (wall-hung, built-in, surface-mounted or on a pedestal);
Sink
- vertical mixer with flexible or rigid connections;
Mixer
- drain siphon;
Siphon
- fastening the sink (brackets or anchor screws, bolts, rubber gaskets, nuts, FUM tape, metal corners, screws, dowels, metal-plastic pipes, as well as polyurethane foam or silicone sealant);
- cabinet.
Cabinet
In this case, from the tool kit you will need to purchase the following to install a sink with a cabinet in the bathtub:
- screwdriver;
- perforator;
- hole saw or circular saw;
- roulette;
- wrench;
- putty knife;
- pencil and ruler;
- building level.
Design
When choosing furniture for any room, you need to pay attention to the appearance of the furniture. It must match the design of the room
This is not difficult to do; it is enough to know some of the features of various styles in the interior. For example, for a room designed in a classic style, the following are perfect: a marble countertop, a porcelain sink, a natural wood cabinet with elegant legs. A gold-plated faucet will complement this luxurious interior.
For those who want to create a more modern, airy style, we recommend turning your attention to glass models of cabinets. It is better to choose fittings for furniture with a sink in a different color that does not match, but is in harmony with the color of the furniture
For example, if the cabinet is light, then it is better to choose handles for it in dark shades, but if the cabinet is dark, then select elements in light shades. Thus, if you decide to buy a cabinet with a sink, then you need to do it carefully and with love, so that the bathroom becomes not only comfortable, but also cozy. Allow yourself to safely experiment with different styles, having first familiarized yourself with their features.
Bathroom remodeling and plumbing dismantling
It often happens that residents are not satisfied with the separate bathroom of modern apartments and they decide to redevelop, combining two small rooms into one or taking over part of the corridor.
If the bathroom is being remodeled for the convenience of the residents, there will be no special problems, but if the apartment is planned to be sold, then obstacles may arise when preparing documents. Therefore, before deciding to take such a step, it is better to think everything over carefully.
A combined bathroom is much more convenient than a separate one: it can harmoniously accommodate not only all the plumbing fixtures, but also special bathroom furniture. To do this competently and beautifully, you can pick up interesting ideas for renovating a bathroom after remodeling from magazines and online store catalogs.
After the decision to redevelop has been made, work should begin to dismantle the dividing wall, plumbing products and finishing materials.
After the plumbing, mirrors and furniture have been removed, you will need to shut off the water supply and sewerage system and disconnect the heated towel rail. Next comes the dismantling of the partition, due to which the area of the room will become noticeably larger.
Installation
Installation of a cabinet with a built-in sink consists of several stages. To successfully complete all these stages, you need to follow some rules.
Choosing a location
Usually a new sink is installed in place of the old one. In this case, there is no need to rack your brains over how to install water supply and sewerage. If you want to install a cabinet in a new place, you will have to solve this problem. In addition, the furniture itself should fit there comfortably, and its cabinets should open and close freely. If you are going to buy a wall-mounted vanity unit, make sure the wall is strong.
Carrying out calculations and markings
Carrying out calculations and markings makes it possible to lay the pipes exactly, without damaging the cabinet itself. Fittings, that is, connecting parts of pipelines, must be located above the middle shelf. Incorrect measurements can cause them to rest against walls and furniture shelves. This also applies to the sewerage system. For the drain pipe that comes out of the floor, you will have to drill a hole in the bottom and shelves of the cabinet. Then the corrugated hose will stretch from the bottom to the top. Therefore, it is better to measure everything accurately in advance and run all the pipes through the wall.
Purchasing materials and preparing the necessary tools
During the installation process you will definitely need:
- adjustable wrench;
- FUM tape;
- screwdrivers of different sizes;
- screwdriver;
- mixer;
- siphon;
- plastic corrugated hoses.
If you purchased the furniture unassembled, you will have to first assemble it using a screwdriver. The attached furniture assembly instructions will help you with this. During this procedure, make sure that each part is firmly connected to the other. Because after you install the sink on it, it will no longer be possible to tighten the screws any more.
Installing a vanity unit with a sink
Having gone through the previous stages and successfully prepared all the necessary items and tools, you can begin the process of installing furniture with a sink:
- Turn off the water supply. Connect the faucet with hoses and secure the faucet to the sink. The best type of mixer for a cabinet is a modern single-lever model.
- Use FUM tape (fluoroplastic sealing material) to seal the connecting parts.
- Install a siphon on the drain hole.
- Attach the sink to the surface of the cabinet.
- Move the assembled furniture to the installation site. Do not install the sink cabinet close to the wall, as lack of ventilation may cause mold growth. If you need to attach it to the wall, do so using special bolts. But before that, do the calculations and make notes.
- Move the cabinet away from the installation site and drill at the marked points on the wall. Insert the dowels there, return the cabinet back and secure it with bolts.
- Connect the sewer pipe and the water supply system. This completes the installation process.
In the process of installing furniture with a washbasin, difficulties sometimes arise. For example, if the sewer hose prevents the furniture from fitting tightly to the wall, then it will be necessary to saw off part of the shelf, bottom or wall of the cabinet. To do this, use a hacksaw or jigsaw. Or, for example, there are no holes in the sink for bolts to install it on the wall. In this case, you can glue it with silicone glue.
Sink testing
After completing the assembly and installation of the cabinet with washbasin, check the functionality of the entire structure. First, check the reliability and stability of the cabinet, then turn on the water and check that there are no leaks anywhere. If everything works properly, then you can safely hand over the work or enjoy the new furniture.
How to do it?
The installation process can take place according to one of two algorithms.
Assembly of furniture from “semi-finished products”. Includes:
- Drawing up a drawing on a computer.
- Purchase of chipboard.
- Sawing and edging workpieces in a carpentry workshop.
- Assembly of finished components into a single structure.
- Installation of accessories.
This method is a little more expensive, but it eliminates unpleasant moments with damage to the material, and also allows you to make a structure that is completely protected from moisture.
Assembling furniture yourself. In this case, the master makes all the parts himself. Build process:
- Drawing up a drawing on paper or computer.
- Marking a single sheet of chipboard onto a part.
- Cutting blanks.
- Machining the ends of parts.
- Assembly of all components.
- Installation of accessories.
In the second case, more time will be required for processing and edging of parts. These are necessary actions. They increase the hydrophobic properties of the final product.
Where to place
Taking into account the fact that in any bathroom, be it a new apartment or an existing home, there are connections for sewer and water pipes for hot and cold water, it is recommended to install a sink with a cabinet either in the place of the previous one (during renovation) or not far from the water supply (in a new apartment).
In any case, first you need to carefully measure the room, taking into account the further planned location of all other pieces of furniture and possible household appliances, and also, depending on the type of cabinet being installed, pay attention to the material of the supporting structure and the finishing of the floor and walls
When installing a hanging cabinet, it should be taken into account that the greatest load falls on the mounting points with the wall due to its large weight (taking into account what is being filled). Thus, it is advisable to install hanging cabinets under the sink only on durable finishing materials, such as ceramic tiles on a concrete or brick base. Otherwise, at any moment the entire structure may fall under its own weight, which will lead to costly repairs in the future.
Floor cabinets are not recommended to be installed on a soft bathroom floor, as over time, damage caused by its weight will be inevitable.
A cabinet with a lower plinth should not be placed on heated floors, in order to avoid heating the structural parts and their further deformation.
It is necessary to correctly connect the pipes coming out of the wall with the installed cabinet, since they should not come into contact with the internal elements of the furniture, namely, with the end surfaces of the existing shelves, which is achieved by preliminary measuring the distance from the coupling connections of the supplied pipes to the floor covering. For proper installation of the cabinet under the sink, the supply pipe must be level above the middle shelf of the cabinet.
Sewer drainage should be combined in the same way. If the sewer drain is located in the floor, a hole is made in the lower part of the cabinet through which the drain hose will connect the sink siphon and the sewer.
Sources
- https://bezsantexnika.ru/ustanovka/rakoviny-s-tumboj.html
- https://serviceyard.net/stroitelstvo-i-remont/ustanovka-rakovinyi-s-tumboy-v-vannoy.html
- https://vezuvdom.ru/articles/ustanovka-rakoviny-s-tumboy-v-vannoy/
- https://seberemont.ru/kak-ustanovit-umyvalnik-s-tumboj/
- https://krasivaya-vannaya.ru/santehnika/249-ustanovka-rakoviny-s-tumboj.html
- https://www.stroy-podskazka.ru/vannaya/rakoviny/s-tumboj-ustanovka/
What is included in the list of main works?
- Disconnecting and dismantling old plumbing.
- Removing old finishing material from walls, floors and ceilings.
- Replacement of pipes.
- Leveling walls and floors.
- Plastering walls and ceilings.
- Installation of new plumbing.
In each case, it is necessary to determine in advance the desired end result, on which the range of work will depend. You should also be prepared for additional problems to arise due to faulty pipe fittings, or installation errors that were not foreseen at the planning stages.