The development of an indoor electrical network can be planned both during its initial design and during the operation of ready-made wiring. In any case, you want to connect distribution boxes, mounted socket boxes, and switches with each other with minimal material costs. Disconnection of the power cable is not necessarily carried out exclusively in installation boxes, which are hub splitters. For example, there are many ways to connect a switch to an outlet, and vice versa. Some of the switching can be done in any box, the main thing is that there is no danger of shorting the contacts.
Installation features
It will not be difficult to install a combined unit without the involvement of a professional electrician, since connecting modern models requires a minimum of wires.
The installation process will have only a few features that need to be taken into account:
- You need to prepare the necessary tools in advance ; you won’t need many of them: an electric drill with a drill core; several screwdrivers of different sizes; pliers and wire cutters.
- To ensure safety during work , make sure that the handles of all tools are insulated.
- Some modern varieties are designed for external installation, that is, when installing them, you can completely avoid drilling holes in the wall surface.
- You can choose a variety with an increased level of protection from environmental conditions ; such models can be installed not only indoors, but also outdoors. Such devices also have an additional element in the design in the form of a special lid that helps prevent liquid from getting inside the device.
- All modern types of blocks are suitable for installation in walls made of any material and regardless of the type of finish.
Design
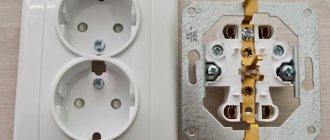
All sockets have a protective housing, contacts and terminals for connecting wiring. Modern double models are equipped with several distribution strips and a plug connector. This socket is mounted in one box.
Two separate mechanisms covered by a single strip are not considered a double socket. As part of the structure, you can often find a grounding contact. It protects against the appearance of increased electrical potential on the housing.
Basic options for connecting a combined socket and switch
Today, there are two main options that allow you to install and connect a combined unit:
- Aligning wires with each other in the distributor without aligning the electrical outlets. This is an outdated technique that was actively used in times when devices combined in a single housing were not common. Today, practically no one uses such a scheme; it is intended only for situations where, for some reason, it is not possible to install two devices side by side and at the same height. A definite advantage of the circuit is the ability to individually select both the socket and the switch, after which they are combined into a single circuit; the whole process can be done with your own hands.
- Using a special ready-made unit , in which the socket and switch were connected during production. Compared to the first option, this method is much simpler to implement, since the number of wires used is reduced and there is no need to additionally check the correctness of their connection. The installation process is also simpler, since there is no need to measure the level of each outlet; the height only needs to be determined once. If necessary, the entire system can be moved without any difficulties; this will only require re-tensioning of the working cables. The classification of such devices is carried out depending on the number of sockets or keys on the switch.
Methods for upgrading an outlet
There are two ways to install several sockets in place of one, which are often used in everyday life:
- installation of a double socket;
- installation of a block of several sockets.
The methods are not equivalent, so to make the right choice you need to know the features of the devices used.
Advantages of a double socket:
- the ability to select a model suitable for installation in an existing socket box - without causing damage to the finishing of the apartment by installing an additional mounting socket;
- lower cost than two single ones.
Disadvantages of a double socket:
- less rigidity of fastening on the base - the outer part is much larger than a standard socket box;
- the total permissible current for both pairs of plug connectors is 16 A (single sockets are designed for the same amount);
- plug connectors have a fixed orientation, limiting the ability to rotate the device by 90o during installation.
The installation of a double socket, both indoor and outdoor, is identical to the installation of a single socket:
- The built-in device can be selected according to the size of the existing socket box. If the double socket has a mounting box of individual dimensions, then a socket of the appropriate dimensions is made for it.
- The external socket is mounted according to the manufacturer's instructions, on a flat socket box.
For reference. In addition to ease of installation, overhead double sockets are convenient in that they can be connected both externally and hidden - by placing them over the point where the cable exits the wall.
Recommendations for choosing wires
In houses made of brick, aerated concrete blocks, and cinder blocks, interior wall decoration is required, which means that a hidden method is used for laying wires.
To provide additional protection, and in case of repair to quickly replace the cable, it is placed in a corrugated sleeve of non-flammable polymer.
In houses made of timber or rounded logs, to preserve the retro style, they use an open method of laying wires, purchasing decorative products - twisted wiring, rollers, stylized switches and sockets
To select the correct wire cross-section, specialists perform calculations related to determining the load.
However, based on standard diagrams and many years of experience, qualified electricians adhere to the following parameters:
- lighting circuits – 3*1.5 mm² or 3*2 mm²;
- socket groups – 3*2.5 mm²;
- electric stove/oven – 3*4 mm²;
- air conditioning – 3*2.5 mm², for appliances more powerful than 5 kW – 3*4 mm²;
- heating boilers – 3*4 mm² or more (according to the manufacturer’s recommendations).
The optimal type of cable is three-core copper: VVGng, ShVVPng. It is impossible to use wires with a cross-section smaller than the specified one, as they will not match the load and will begin to melt, creating a dangerous situation.
Characteristics
The technical characteristics of this product include: voltage, power, current and frequency of alternating current. Most sockets are designed for 220-240 V. In industry, three-phase models designed for 380 V are more often installed.
The current for household appliances should not exceed 16 A, and the maximum permissible power is 3.5 kW.
It is allowed to increase the current to 32 A only in three-phase products. The current frequency, according to international standards, is acceptable within the range of 50-60 Hz.
Safety Basics - Mistakes and How to Avoid Them
Ignorance or inattention to details can lead to installation errors. With further operation, such wiring in the house will cause problems, damage to property, and sometimes a fire. There are simple rules that allow the master to act not at random, but according to safety rules:
- In a new building, before laying the wiring, a location for the distribution board is selected. It is installed close to the entrance, in a frost-free room. When drawing up a switchboard diagram, it is wise to immediately think about the RCD (residual current device), ground loop and other protective devices.
Wall-mounted switchboard
- All work on replacing electrical wiring (in an old home) must be carried out with the power supply turned off at the electrical panel. It is required to leave a warning sign on it to avoid an unpleasant surprise.
- Wiring in the house is preceded by drawing up a detailed network plan and connecting electrical appliances.
- Even if all circuit breakers are turned off, before starting work, check the presence or absence of voltage on the contacts or conductive surfaces with an indicator screwdriver.
A warning sign must be hung on the opening machine.
The most common mistakes
:
- Use of aluminum wires. According to the requirements of the PUE (rules for installing electrical equipment), in residential buildings it is allowed to use aluminum wires with a cross-section of at least 16 mm². Wires of this diameter are typically only used in cables that carry current to, but not inside, the home. When replacing wiring, a combination of copper and aluminum parts is unacceptable - at the point of their connection, the contact will burn out over time due to transition resistance.
- Insufficient waterproofing. For long and safe operation of the system, care must be taken to carefully insulate all wires in rooms with high humidity. Poor insulation most often shows up in the bathroom, pantry, kitchen or terrace.
- Stroba. The optimal depth is 2-2.5 cm. Grooves with a shallower depth are difficult to plaster.
Chasing a wall for wiring
- Working with cable. Diagonal laying is prohibited; The wire cross-section must be calculated in accordance with the system parameters.
- Distribution boxes. To avoid confusion and ease of maintenance, they are placed under the ceiling.
Combined devices
The combination type of switches was not familiar to electricians until the mid-twentieth century. The current way to control light sources was a single-key switch. Two identical products were placed side by side. A little later, manufacturers released two-key switches for controlling individual groups of chandelier lamps.
A three-key switch combined with a socket appeared on the territory of the Russian Federation during the period of development of the construction of panel houses. The devices were intended to turn on lights in the kitchen, bathroom and bathroom.
The socket was installed in the bathroom for ease of use of a hairdryer and electric razor. After the popularization of washing machines, they began to be connected to a combi-appliance with or without grounding.
In modern high-rise buildings, double structures are used for kitchens, bathrooms and living spaces. The reason lies in European standards, according to which:
- switches are located at a height of 160 cm from the floor;
- sockets are installed at a height of 30-90 cm from the floor.
This connection allows you to place the switches at eye level for ease of use and furniture placement. Removing the socket allows you to conveniently turn off the lighting without changing the position of your hand.
Low-mounted socket groups in the bedroom are convenient in terms of masking wires. In the kitchen, they are placed above the work table and serve to illuminate the food preparation area and connect household appliances. In studio apartments, general and local light is used as a method of zoning space.
An example of drawing up an electrical wiring diagram in a private house
The future electrical wiring diagram is drawn up based on the plan of a private house. It consists of two parts, electrical and installation. The main elements are outlined schematically, “for yourself.”
- Electrical diagram
. The electrical wiring diagram in a private house shows how energy consumers are included in the circuit and their number.
An example of an electrical wiring diagram in a country house
- Wiring diagram
. Determines the installation locations of devices. This data will help you calculate the number of cables and additional consumables needed.
Installation version of the wiring diagram
The main elements of the network include wires, sockets, switches, meters, fuses and relays, distribution boxes, in addition:
- external power cable entry point;
- RCD;
- connection points for high power household appliances;
- ceiling and wall lighting fixtures.
The beginning of the electrical supply to a home is the electrical panel. A power wire is supplied to it from the outside (usually via an overhead line), supplying single-phase or three-phase current.
Materials
When choosing materials, manufacturers take into account their resistance to fire. The socket body is predominantly made of heat-resistant plastic. The terminals and contacts are made of low resistance metal. Such alloys are reliable, can withstand high temperatures and are not susceptible to corrosion.
Copper, brass and bronze contacts are the most common options. The bases for attaching the contacts inside the socket are made of plastic or ceramic.
The material protects the terminals from overheating and is an insulator. Ceramic pads are more reliable.
We mount installation elements
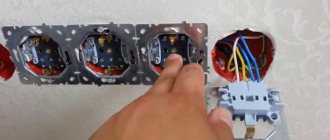
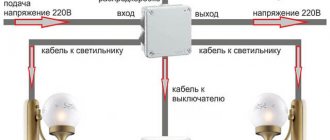
For maximum clarity and clarity, we will analyze the full circuit installation cycle from start to finish. Thanks to this, we will give the most detailed answer to the question of how to connect an outlet with a switch. As an example, let’s take a diagram of hidden electrical wiring, something that is usually located under a layer of plaster.
We install the distribution box.
Next we need two sockets. Detailed instructions for installing a socket box (mounting cup) are described here.
We will install a switch in one, and a socket in the other.
Now let's mount the DIN rail, in our case it will act as part of the power cabinet; a circuit breaker will be installed on it, which will protect the electrical circuit from short circuits and overloads, which have such a detrimental effect on all elements of the circuit.
The preparatory work can be considered completed.
The last detail that completes the first stage of installation is the lighting element. In our example, it will be a light bulb with a socket, clearly, simply and clearly. Therefore, we will move its installation to stage number two.
Laying the wires
First of all, let's connect the wire feeding the junction box. In our example, we use a wire of the VVGngP brand; a three-core wire with a cross-section of 2.5 squares is used as the power supply. The cross section was selected using the calculation method based on the load on the chain; you can easily perform these calculations on your own. Here you will find a detailed description of how to independently calculate the cross-section of a wire; I assure you there is nothing complicated here.
On both sides it is necessary to leave a reserve of wire for connecting electrical wiring elements (breaker, socket, switch) of 10-12 centimeters, in the junction box 10-15 centimeters. Wires that are too short will be inconvenient to connect and connect, so it’s better not to save much.
Next, let's connect the wire to the socket.
Here you will need a wire with a core cross-section of 2.5 square.
1.5 square meters per switch.
Now, let’s lay the wire for the lighting; for us it’s a light bulb with a socket.
We have laid all the wires necessary to complete the circuit, let's move on to the third stage.
Installation and connection of electrical wiring elements
Let's start by installing the security device. For our circuit we use a two-pole circuit breaker rated at 25 Amps. The selection of the required amperage of the protection device is made after calculating the cross-section. We immediately decide on the color of the wire:
- blue, white with blue stripe - zero (neutral)
- yellow with green stripe - ground (grounding)
- the remaining wire will be the phase usually it can be black, white, brown, red, orange or white with a black or brown stripe
In our example, there are two types of phase wire colors: white and white with a brown stripe.
In order not to get confused in the colors of the wires, it is best to use wire from one manufacturer.
A power outage will be required before further work can be carried out. Turn it off. We check the absence using a voltage indicator. How to do this is discussed in detail in the article voltage indicators. We remove the outer layer of insulation of the wire, measure out the required amount for connection, remove the required amount of the second insulating layer from the copper core and connect the wires to the circuit breaker. For more details about the connection, read the article, instructions for connecting a two-pole circuit breaker.
We connect the yellow-green core to the ground wire through a contact clamp. This connection makes sense if you have a grounding loop in your apartment or house and your supply wire, namely its grounding conductor, is connected to it. You can find out more about whether your apartment has grounding by reading the article, Grounding in an apartment.
Now we connect the outlet. We strip the wires, measure the required amount, insert the wires into the contact clamps, tighten the screws, and check the reliability of the fixation. For more details, see the article about connection; you can read the article on how to connect an outlet.
We install the socket mechanism in the socket box.
Next, we connect a single-key switch. We prepare the wires, remove the outer insulating layer, measure out the required amount and connect the stripped wires to the contact clamps. We isolate the unused ground wire.
A connection example is discussed in detail in the article, instructions for connecting a single-key switch.
We install the mechanism in the socket box (mounting cup).
Read more about connecting and installing various electrical wiring elements (sockets, one and two rocker light switches, illuminated switches and more) here.
We connect the cartridge. We remove the insulation from the wire, measure out the required amount of phase and neutral conductors for connection, strip it and connect. We tighten the contact screws well with a screwdriver, and make sure that they are securely fixed by shaking the wire from left to right.
All elements of the circuit are installed and connected, let's move on to the next stage.
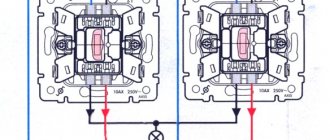
Connection diagram for a socket-switch unit with two keys
Devices that have more than one button in their design differ in the connection process, since they have an increased number of conductors that perform connecting functions between the lamp and the switch.
For their successful connection and subsequent proper functioning, you must adhere to the following algorithm of actions, which is suitable for devices with two keys:
- To implement the scheme, it will be necessary to lay five conductors that will be pulled from the distributor to the coupled electrical system.
- Connection of ground and neutral , which come out of the distributor, is carried out only to the socket.
- The internal structure of the switching block implies the presence of a special jumper, which is necessary to supply a phase to the switch.
- The two remaining free wires must be connected to the corresponding contacts of the switch, since it is through it that the phase will be supplied to the controlled luminaires.
- Inside the distributor, it is necessary to twist together the wires intended to supply the phase through the switch, and the free conductors leading to the sockets in the lamp.
- The neutral and grounding of the lamp are also twisted and the stripped bare ends are connected to another twist, which is used to connect the socket.
- If you are not satisfied with the functions performed when you press the keys, they need to be corrected. To do this, it will be enough to swap the wires that are connected to the contacts of the switch.
These types of blocks are most often used for installation on a partition, which is installed between the doors leading to the bathroom and toilet. Sometimes the design of the device also has a third key designed to control lighting in the kitchen.
The process of connecting a three-key device will not have any fundamental differences; the number of conductors will simply increase.
If the switch is being added to an existing outlet
Minimizing the consequences - replacing the socket with a block. The procedure itself is simple; we drill a hole nearby for the box and carefully install the new module.
There is no need to install a power incoming cable; it is already in the socket. But the output wiring, to the lighting device, will have to be extended. This is an individual decision, there is no universal way. The connection diagram is very simple: both the neutral and phase wires are laid not from the box, but from the socket box.
Naturally, you will have to install contact blocks. Although many connect the output wire directly to the socket contacts: some models allow such a connection.
If there are several sockets in a group, you can replace any of them with a common block (socket - switch). You simply choose a convenient location (from which you can run the wire to the lamp) and connect the switch to the outlet.
If you need to organize an additional light point in the hallway, you can use wall sconces. They are placed in close proximity to the outlet-switch block, and you do not have to destroy a large piece of the wall for wiring.
General safety rules
Of course, before starting such work (especially on a completed power supply system), you should de-energize the line and check that there is no voltage. Selecting a power cable will not cause any difficulties: a cross-section of 1.5 mm² is sufficient for organizing lighting. Since we are connecting the switch to the socket, and not vice versa, the primary (socket) cable will be more powerful: 2.5 mm².
Connecting cable cores to block contacts
To switch exactly such a model as in today’s example (grounded socket and single-key switch) you will need 4 wires. Their number can increase by one for each additional key. Here, 3 wires will be incoming - these are phase, zero and ground, and one outgoing (signal) through which power will go from the switch to the lighting.
For example, a three-core cable with an additional fourth core is used
If the unit is purchased assembled and not manufactured independently, then the socket with the switch is already connected by a jumper. There will be tension running through it. If a home craftsman independently assembles such a block, then it is worth remembering that a phase must pass through such a jumper. Passing through the zero switch is not allowed by the PUE standards. This is dangerous not only during subsequent maintenance of lighting devices, but also during their operation. We will look into this issue in more detail below.
Connecting the phase wire
The phase wire must be connected to the contact on which the jumper sits. This will allow you to simultaneously power both the outlet and the switch contact. The most convenient option would be to use a four-core cable. Here it is easy to figure out the connection according to the color coding. A conductor of any color, except blue and yellow-green, can be used as a phase wire. In a four-core cable, just two cores will be used as phase wires - for input and signal.
In our case, a regular white wire was used as a phase wire.
Jumper between the switch and the socket - this is where the phase wire is connected
Grounding conductor
If the outlet has a clamp or grounding pin, it must be connected. For this, a yellow-green cable core is used, which is connected to the desired contact. It should be understood that grounding is only necessary for the outlet. The switch does not require this.
Important! If a private house does not have a ground loop, it must be equipped. As for old apartment buildings, in which no attention was paid to the arrangement of grounding, then here you will have to make do with only protective grounding. If you do everything correctly and install an RCD or difavtomat in the input panel, then grounding will be practically in no way inferior to grounding, with the exception of some nuances.
The yellow-green wire is connected to the grounding contact of the socket
Zero core and its connection
As expected, the blue wire was used as the neutral wire in today's example. It must be connected to the second (free) contact of the socket. The neutral doesn’t go anywhere else; it’s not needed in switching the switch.
Many people believe that it does not matter what passes through the switch - zero or phase. After all, when both one and the other are opened, the light will still go out. However, such a misconception is quite dangerous. After all, if the zero breaks and the lamp is turned off, the voltage will still remain on it. Now imagine that you need to change the emitter. The master stands on a stool or stepladder, grasps the cartridge and, under certain conditions, receives an electric shock.
In addition, energy-saving lamps, which Russians have become so fond of in recent years, react rather poorly to such a connection. They periodically blink when the switch is open due to the fact that there is a capacitor in their circuit. It slowly accumulates voltage from the phase wire, and when it reaches the capacity limit, it discharges a discharge to the lamp.
The neutral conductor is connected only to the socket, like grounding
Signal wire
The last one to connect is the signal wire, through which voltage will be supplied to the lighting devices. It should be slightly longer than the others for ease of installation. The signal core is connected to the remaining free contact of the switch. It is usually located at the very bottom of the block. In our case, a white core with a red stripe running in the cable was used for the connection.
After the last core is fixed to the contact, you can assemble the block in the reverse order and secure it in the right place.
Lastly, the signal core is switched, which will go to the lighting fixtures
Installation of an apartment or house electrical network
During repairs, there is often a need to install a new electrical outlet.
To figure out whether it is possible to install an outlet from the switch, you need to have a good understanding of the structure of the home electrical network. Understanding its structure determines the possibilities for making modifications.
Main diagram of the apartment electrical network
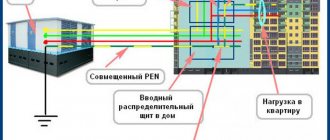
The path of apartment wiring begins with the input panel, which is powered by a cable coming from the external house electrical network. The panel device is located in the entrance of the house or at the entrance door of the apartment. Inside there is a circuit breaker, which receives power from the cable. In Soviet-built houses in which the electrical network has not been updated for a long time, switches perform the functions of an automatic device. Cables from the panel switch are directed to the electric meter and then to each of the machines serving the group. The groups do not communicate with each other, and their number is determined by how many loads there are in the apartment. They can be distinguished according to criteria such as ease of placement or type of load used. A strict rule is to separate appliances located in living quarters and those located in the kitchen and bathroom into different group connections. From each of the machines, the cables are pulled into distribution boxes (one or more), to which apartment light switches and sockets are connected. This design optimizes maintenance of the electrical network and masks utility networks.
Possible wiring diagram in the apartment
Connecting switches and sockets
Connecting an outlet
To understand how to properly connect an outlet to a switch or to a network, you need to remember the instructions from the Electrical Installation Rules. They establish that the process of connecting an outlet to the electrical network requires three cables with different functions. To simplify the visual determination of the functions of the wires, they should differ from each other in the color of the insulating material (in practice, electricians sometimes ignore this rule).
When connecting the socket, use the following cables:
- Phase, the function of which is to power the serviced outlet, carrying electric current to it. This is the only wire whose insulation color is not regulated by the rules: the main thing is that it differs from the colors of the other two cables.
- Neutral wire with a blue or light blue sheath. Like the phase, it is connected to the power contacts of the socket in the distribution box.
- Grounding, whose role is to protect residents from electric shock when touching the body of an electrical appliance, as well as to prevent short circuit situations. Its insulating material is yellow or green. The wiring is connected to special socket contacts designated for grounding.
It is practiced to combine sockets with each other with a parallel connection to the network or serial. In the first option, each of the combined elements remains independent.
Connecting a switch
In the case of connecting a switch, only two cables are required, and both of them are phase cables. One is placed at the input of the connected device and connected to the group line phase. The other is led from the light switch output to the junction box and connected to the phase of the lighting device. The neutral wire of the latter must be brought out into the box, bypassing the switch, to the power cable.
How to choose a suitable block?
The wide range of models and modifications of such devices presented on the modern market often significantly complicates the selection process.
In order to buy a suitable unit and not regret your choice in the future, you must take into account the following important criteria:
- The required number of sockets and switch buttons that must be included in the design of the unit. Today, there are a large number of different options and it is best to immediately make an accurate calculation of consumers so that in the future you do not have to use extension cords.
- Installation method , which differs for external and internal devices. The first option is recommended for rooms with open wiring, since visually such a unit will look more noticeable and bulky.
- Design of the device , which will allow it to fit harmoniously into the overall interior design of the room.
Model overview
To illustrate the range of such devices, we will provide an overview of models with different designs that were produced by leading manufacturers in this area:
Combined block from the manufacturer Makel
The design of which included one socket and a switch with one key . It has compact dimensions of 12.3x7.3x5.9 cm, strong and durable ABS plastic was used to make the case, and has an IP protection level
The price of such a device is about 300 rubles.
There is a modified version of such a unit, in which an increased degree of protection IP55 was implemented, and a special protective cover for the socket was added to the design, which allows this device to be used in outdoor conditions.
The modification price is 450-480 rubles.
If we consider two-key units from Makel, then the technical characteristics and dimensions correspond to those of the single-key version, but the price for such a device is higher and amounts to about 350-380 rubles.
A modified version of the two-key device, with additional grounding and degree of protection IP55, costs about 500-550 rubles.
Viko
Used for outdoor installation of the unit. If we compare them with the reviewed Makel models, the external devices have increased dimensions with similar technical parameters, and their cost is lower. So, a two-key Viko outdoor unit will cost about 300 rubles.
Etude
Domestic products manufactured by Schneider Electronics. The socket fully complies with European standards; a combination of metal and durable plastic was used to make the case; the device has an IP protection rating. At the same time, a two-key unit intended for internal installation costs about 240-300 rubles, which is much cheaper than imported analogues.
Bella
A domestic version with low cost, which is produced by the Russian company. The organization offers a wide range of models, which, among other things, differ in shape and different colors.
For example, you can take a three-key switch combined with a socket, brand BKVR-212. Taking into account its functionality and design features, the unit was manufactured and installed not in the classic horizontal, but in a vertical position, which simplifies the operation process. The device is intended for indoor installation and has a degree of protection IP20, the price does not exceed 190 rubles.
How to connect a lamp through a switch from an outlet
Connecting a lamp through a switch from an outlet
Use conductors with three or four cores that perform different functions, and when separated, strip them of insulation to a few centimeters. Of course, the apartment must first be de-energized. Wires and individual cores are connected according to a pre-designed circuit, making sure that they are drawn in smooth, straight lines and do not form knots or interweaves. If the installation is carried out in a room whose walls are made of wood, it is necessary to lay out the paths in advance using plastic insulating plates. To lay electrical wiring routes hidden, you need grooves. Special channels are allocated for this option in reinforced concrete buildings.
When planning to replace a socket with a light control device or link them together, it is advisable to first evaluate the limitations imposed by the procedure appropriate to a specific task. Having decided to carry out installation work, you can purchase the necessary device with parameters suitable for the selected electrical circuit.
What do you need to know before connecting a double socket?
Before starting work, it is necessary to determine what phase and zero are in electrics, i.e. wire affiliation. To do this you will need a tester screwdriver and rubber gloves.
The cover of the old socket is removed and measurements are taken using a tester. In phase, the indicator will light up, and the neutral wire will be indicated by the absence of a light signal. Of course, there is color marking of cables, but it’s better to be safe.
Then the line must be de-energized through the meter - this is a basic safety rule. The machine levers are switched to the off position! This is the bottom position of the switches.
The voltage at the installation site of the double socket is checked again.
Before installing a double socket, you will need the following tools and materials:
- insulating tape;
- sharp knife for stripping wires;
- Phillips and flat head screwdriver;
- pliers.
Double sockets are single terminal devices equipped with distribution strips.
The cable is of the same cross-section as the main wiring in the room. The materials must also be the same. If the wiring is made with aluminum wire, it is also used when connecting sockets.
Use of the device requires caution. The total load on this type of outlet should not exceed 10-16 A
Video description
About errors in installing wiring in a wooden house, watch the video:
Completion time and approximate cost of some work
Turnkey electrical installation in a cottage is completed on average in 4-6 days. Complex installation will cost 18-60 thousand rubles, replacement of wiring - 15-36 thousand rubles.
Electricians will carry out wiring on the floor of a private house for 9-12 thousand rubles.
A comprehensive replacement of wiring in a wooden house will cost 18-29 thousand rubles.
Laying a cable with a cross-section of up to 4 mm in a groove - 25-30 rubles. for m/p.
Laying a cable with a cross-section of more than 4 mm in a groove - 42-55 rubles. m/n.
Grilling gypsum walls – 75-85 rubles. for m/p, brick - 92-100 rubles. for m/p, concrete – 105-112 rubles. for m/p.
Assembling an electrical panel (meter + 3 machines) – 980-1100 rubles.
Connecting an electric meter with installation (220 volts) – 665-720 rubles.
Connecting an electric meter (380 volts) – 1050-1130 rubles.
Loft style interior with exposed ceiling wiring
General rules for connecting to the electrical network
Following the installation of electrical wiring, automatic devices, RCDs and electrical appliances are installed. To commission the electrical equipment of a private house, a specialist from the energy supervision authority is invited, authorized to conduct acceptance tests.
After checking the safety of the electrical installation, a “Connection Certificate” is issued, allowing further use of the equipment. Based on this document, the energy supply organization enters into an agreement with the owner of the house and connects the home to the support.