- Design and principle of operation of a two-key switch
- Preparatory work
- Connecting a two-gang switch
- Connecting a two-key switch with backlight
- Useful tips
A two-key switch is a very important element for adjusting the level of lighting in an apartment or private house. The light bulbs can be arranged in groups or one at a time, and the light can be supplied to them by a separate key.
Very often during repairs when carrying out new wiring, the question arises of how to connect a two-key switch to provide several lighting modes. How to connect a two-key switch taking into account the necessary safety measures - read on!
Design and principle of operation of a two-key switch
The design of the two-key switch is quite simple. It consists of:
- Two keys (moving parts up and down).
- Housing (shell), which is removed before starting work with electricity.
- Terminal blocks (those places to which voltage or current is supplied).
Rarely, the third element - terminal blocks - can be replaced in the design with screw terminals. The difference is that the former hold the wire for a long time and securely, and the latter do the same, but not by pinching the wire, but by twisting it, so the first option is easier to connect and lasts longer. The design may also include additional lighting - a dimmer located on each key. Read below about connecting a two-key switch with dimmers.
Inside the two-key switch without backlight there are two wires running parallel to each other and an input for the phase. Each of the terminals suitable for the keys can, independently of the other, open or close the contact, as a result of which one lamp (part of the lamps), the second lamp, or all the lamps together turn on
.
Note! If you need to supply current not to one, but to several light bulbs at once. It is imperative to use stranded wires. This is exactly what the two-key switch model allows you to do.
The principle of operation of the switch is to vary the degree of illumination:
- You can turn on only one key so that one light bulb (or the first group of lights) lights up.
- It is possible to turn on the second key - the lighting will change, since some parts of the room will be clearly visible, while others will be slightly darkened.
- The third option is to turn on “to the fullest” - both keys are in the “on” position - then the room receives maximum illumination.
By the way, some two-key switches consist of two single-key devices isolated from each other. In this case, it is customary to call them modular.
In addition to the external component, such a device can also perform the functions of saving energy and creating a varied atmosphere. Two-button switches also increase safety, since when they are installed in a room, the number of points with electrical voltage is reduced.
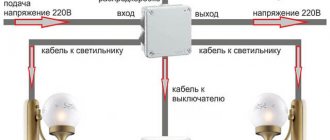
Before starting work on preparing to connect the switch, we suggest that you familiarize yourself with the diagram of the two-key switch below:
Types of terminals for connecting wires: tips for choosing
RCD connection diagram: instructions, methods, errors
How to choose?
Nowadays there is such a huge range of switches on the electrical goods market that you can find a suitable model and color for any design solution or interior. However, you understand perfectly well that shade and appearance are far from the main indicators that you should pay attention to when choosing a device. When purchasing a three-key switch, check the following:
- The presence of modern self-clamping terminals, they are more convenient to use. Simply insert the wire into the hole and it will immediately be fixed.
- The outer side of the product is without burrs, scratches or damage.
- Normal operation of all terminals; they must ensure reliable fixation of the wire cores.
- The keys do not stick when pressed (on or off) and work clearly, with a clearly audible characteristic click.
- On the reverse side there should be a connection diagram for the triple switch.
Try to avoid cheap Chinese electrical wiring products. Buy devices from trusted companies and manufacturers.
Preparatory work
When working with electrical equipment, extreme precision and caution must be observed, therefore all materials and tools needed for the work must be prepared and purchased in advance:
- flat and Phillips screwdriver;
- pliers;
- side cutters;
- insulating tape;
- a good construction knife with a sharp blade (for stripping wire ends);
- for crimping it is more convenient to use a special tool - a crimper (it is not necessary if the wires are not stranded);
- switch;
- wires.
Attention! It is very important to turn off the power supply before starting work!
It is extremely important (especially for non-professionals) to correctly draw the connection diagram and lay out the wiring in advance.
The circuit should include the following three wires:
- Ground wire (exited to the light source, indicated on the diagram as “0” or with an arrow pointing down).
- Neutral wire (also led to the light source, designated by the letter “N”).
- Phase is a live wire that, when turned on, should provide power to the light bulbs (the terminals for the phase wire are designated by the Latin letter “L”).
You can install the wiring in one of two possible ways: open or closed. For the first, you will need additional materials - corrugated pipes or grooves, for the second - you need to cut grooves in the walls.
Please note that wiring is done before plastering the walls and ceiling. This means that only after all the wires have been laid and are sufficiently insulated, you can begin finishing work.
To make a small recess under the switch, you will also have to use a chisel and a hammer (this is not necessary if the switch will be installed in the old place).
What is an RCD in electrical engineering: types, principle of operation
How to connect a pass-through switch: connection diagrams
: How to connect the Sunny Boy inverter with built-in Wi-Fi to a local wireless network
- About this blog
- Archive
- Technical documentation and updates
- Deutsch German de
- English English en
- Français French fr
- Nederlands Dutch n.l.
- Italiano Italian it
- Español Spanish es
- Türkçe Turkish tr
- 中 Chinese 9000 9000 j9a
- News
- Company
- Solutions
- Bibliography
- Hub of the future
- English
- Search
- Menu
Solutions.
Connecting a two-gang switch
Before making the connection, you must first strip the ends of the wires by 1-1.5 centimeters to ensure good contact with the terminals. If the wires are powerful, multi-core, at this stage you need to press off their ends.
A switch with two keys should have three wires. One of them is input - phase, and the other two are output, which will supply voltage directly to the lamp itself.
The neutral wire and grounding, as already mentioned, are connected directly to the light source (to the light bulbs, or more precisely to their contacts).
After this, you need to find the phase wire and the entrance to it (unlike the outputs, there is only one). Look at the switch, previously freed from the top casing. At least one arrow must be drawn on it. It usually indicates where the phase will come from and where it will go. Near the base of the arrow, the phase wire should have an entrance.
As a rule, in such switches the terminals for the phase input are marked with the symbol “L”, in turn, the terminals for the output cables are marked with arrow symbols.
To accurately find the phase, use a special device. And if it is not there, you can determine this experimentally by temporarily connecting a chandelier or lamp.
So, you need to alternately connect one wire with pliers in pairs (not simultaneously!) to two others. That is, you select one wire and connect it first to one of the remaining ones, then to the other. This wire, from which first one or another group of lamps (luminaires) will light up, is the phase.
When a phase is found, it can be connected to the input of the switch (this is the first wire that goes to the switch), and the other two wires - to the two output terminals, respectively (these are the second and third wires that go to the switch). Next, all that remains is to insulate the dangerous places on the wires and insert the structure into the socket box, which should be screwed into a place prepared in advance for this.
Afterwards, all that remains is to install the accessories and you can check the device in operation.
To better understand the connection diagram, we suggest watching the video below, which describes in detail and shows examples of the connection diagram of a two-key switch:
Calculation of cable cross-section by power: practical advice from professionals
Calculation of electric current by power: formulas, online calculation, selection of machine
Read also:
- Is it possible to install VVGng cable without corrugation behind a false ceiling? Vyacheslav Hello, ElektroAS! Is it possible to install VVGng cable without corrugation behind a false ceiling? Hello, Vyacheslav! You must install the cable using a corrugated pipe or other pipe made of non-combustible materials. Can …
- Electrical installation work is being carried out in my apartment. Igor Good afternoon! Electrical installation work is being carried out in my apartment. All installation is performed using NYM and VVG cable. Do cables need to be laid corrugated? These are the floor and walls. Is it possible in one...
- I am interested in electrical cable installation over the air, do I need a support in this case? Pavel Hello. They responded so quickly, it’s nice. I am interested in electrical cable installation over the air, do I need a support in this case? If the cable is a little sagging, what is the risk? Hello, Pavel! There is no support for you...
- Does the PUE (electrical installation rules) allow electrical installations inside an apartment using a VVG cable rather than a VVGng cable? Alexander, please tell me, does the PUE (electrical installation rules) allow electrical installations inside an apartment using a VVG cable, and not a VVGng cable? Thank you! You have the right to carry out electrical wiring not only with VVG cable, but also with ordinary wire. ...
- Will it be considered a violation of the rules if we lay the cable and install the junction box on the floor, that is, it will then be below floor level? Mikhail Ivanovich Good time! We run cable lines along the floor of the room to the refrigerated display cases. The screed will be laid on top, then the tilers will lay the tiles. Will it be considered a violation of the rules if we install a junction box...
Connecting a two-key switch with backlight
The backlit switch makes small additions to the circuit described above. Namely: two more wires appear (so that when the light is turned off, a red indicator on each of the two keys lights up - this makes it easier to find the switch in the dark).
So these extra wires come from the mini LEDs located on the keys. Next, you need to connect one of them to the phase that goes from above, and the second, which comes from below, to the wire that goes to one of the two lamps (groups of lamps).
i12 TWS Guide to Troubleshooting Earphone Pairing Problems
In the process of using i12 TWS earbuds, you will definitely encounter some usage problems, especially pairing problems. For example, when pairing i12 TWS with a phone, the left and right earbuds do not connect properly, or the left earbud makes a “di” sound when connected. How to deal with this? Don't worry, keep reading.
How to pair left and right i12 TWS earbuds?
Generally, i12 TWS earphones are matched when shipped from the factory. The two i12 TWS earphones will turn on and automatically pair with each other after being removed from the charging case. The left earbuds will flash blue and the red LED of the right earbuds will turn off when they are successfully paired with each other.
If not, follow these steps: (Reset i12 TWS)
Step 1: Clear the pairing information of the left and right earbuds (reset i12 TWS). In pairing mode 5, press the power button until the LED turns RED.
Step 2: Press and hold the Function key for 5 seconds to turn on i12 TWS.
Step 3: Enter pairing mode, pairing time is about 5 seconds, “Pairing Mode” prompt will sound.
Step 4: The left indicator flashes blue, the right indicator is off, pairing is successful, and the “Connected” message appears.
How to connect i12 TWS headphones to phone?
The i12 TWS headphones support both binaural and monaural connections. For more information on how to connect, follow these steps.
● Binaural connection
Step 1: Take out both earphones from the battery compartment at the same time, the earphones flash red and blue light.
Step 2: Turn on your phone's Bluetooth and search for Bluetooth devices.
Step 3: Once connected, a “Connected” prompt will appear.
● Monaural connection
Step 1: Take out one of the earphones from the battery compartment at the same time, the red and blue light on the earphones will flash.
Step 2: Turn on your phone's Bluetooth and search for Bluetooth devices.
Step 3: Once connected, a “Connected” prompt will appear.
When connected, the left earphone makes a “di” sound, is this normal?
● If the i12 TWS headset only uses one side of the left ear, it is possible that the left ear will try to find the right ear after a certain interval, and a drop will occur at the same time, which is normal.
● Another situation is that the headphones do not have enough power or the Bluetooth signal is bad, perhaps the sound is dripping. This is also normal.
● If the i12 TWS headset continues to make the “dee” sound, please try resetting the i12 TWS headset .
When connected, only one i12 TWS earphone works?
When you connect to i12 TWS, but only one of the earbuds can hear sound, you may have switched to mono mode or the connection is not working normally. At this time, you can restart i12 TWS as recommended above. In addition to the above method, there is another way to try: Left or Right i12 TWS Earbuds Not Working? Just click here to find out! .
For Gearbest customers: If you purchased i12 TWS from us and the problem persists after using the firmware, please feel free to contact us. Just fill out a ticket with your questions in our support center and send it to us. We will do our best to solve your problem as soon as possible. We are always happy to help.
| ● More than 300,000 products ● 20 different categories ● 15 local warehouses ● Several leading brands | ● Global payment options: Visa Express, MasterCard ● PayPal, Western Union and bank transfer are accepted. ● Boleto Bancario via Ebanx (for Brazil) |
| ● Unregistered airmail ● Registered Airmail ● Priority line delivery | ● 45-day money-back guarantee ● 365-day free repair guarantee ● 7-day Dead on Arrival (DOA) guarantee |
.
Useful tips
- Calculate in advance the required (sufficient) cross-section and length of the wires depending on the power of the light sources. The cross-section cannot be less than one and a half square millimeters.
- In addition to the distribution box, it is also recommended to purchase an additional protective device that will protect against short circuits and overloads in the electrical network.
- Choose terminal switches rather than those with screw-in screws, as the first connection option is stronger and more durable: the screws will need to be tightened after a while.
- You can adjust the lighting using a single-key device! But for this, additional equipment is purchased and installed - the so-called dimmer.
- If you install a similar structure to illuminate a bathroom or other damp place, do not mount the switch indoors under any circumstances.
- Note: if the switch is modular, then there is always another one near the input terminal. These two terminals must be connected to each other with a separate wire.
- All connections and connections are strictly prohibited outside special junction boxes. And in the case of complicated environmental conditions, additional protection must be made (for example, from water, humidity, ingress of other solid and liquid substances).
- If you install a switch, for example, for a toilet, then one of the keys can turn on the light in this room, and the other can turn on the hood.
Connecting a switch that controls the light with two keys is not difficult if you strictly follow the instructions given above. Read all the instructions and useful tips first so that you don’t miss anything, then everything will work out!
leave a comment
Where to apply such a scheme?
Pass-through switches were invented so that the same lighting fixtures (or groups of them), located in long corridors or large rooms, could be supplied and removed from different points.
The connection diagram for a pass-through switch from exactly three places is most often used under the following circumstances:
- When there are long corridors from which there are exits to several different rooms or premises. At the entrance to such a corridor, the lighting is turned on by one switch, and then somewhere in the middle there is a second, and at the end of the room a third switching device. With their help, you can turn off the lighting from the point where you are currently located, rather than returning to the beginning of the corridor to do this.
- In country houses for lighting a personal plot or yard. For example, when leaving the house, there is one switch installed that turns on the lights in the yard. And the other two are installed on some yard buildings (garage, shed), upon reaching which you can turn off the lighting.
- The apartment buildings have three floors. Upon entering the first floor, they turned on the lights in the entire entrance; when they went up to the second or third floor, they turned them off. In this case, the connection diagram for walk-through switches allows you to significantly save electricity, because it often happens that the lights in the entrances are on for days on end.
- When a large children's room has several sleeping places. A total of three switches are installed: one at the entrance to the room, the other two near the children's beds. Entering the bedroom, the child turns on the light, reaches his sleeping place, goes to bed and turns off the lighting.
- In country houses, using a pass-through switch, you can control the lighting of staircases or flights from three places. One device is installed at the bottom at the beginning of the stairs; when ascending, it turns on the lighting of the entire flight. Going up to the second floor, another switch is installed that turns off the light. And the third is located higher, where the staircase approaches the attic, so that when you go up there, turn off the lighting of the entire flight and not wind up extra kilowatts while you go about your business in the attic.
In fact, there are still a lot of options, we have looked at the most popular ones, but this also shows how much the connection diagram for a pass-through switch with 3 places will make our life more comfortable.
Main types of closing devices
Switches, including triple switches, depending on the control method, come in keyboard and touch versions. The first are set in motion by pressing a key, the second - by touching the panel in a certain place.
Most models of touch switches are equipped with a dimmer - a device for smooth six- or seven-step adjustment until the light turns off
When choosing a dimmer, it is important to focus on the total load of the switch. Experts recommend purchasing devices with power reserves. For example: for a three-arm chandelier with lamps with a power of up to 100 Watt, choose a dimmer labeled 300 W
For example: for a three-arm chandelier with lamps with a power of up to 100 Watt, choose a dimmer labeled 300 W.
Read more about what a dimmer is and how to choose one in this material.
Depending on the type of installation, triple switches are of three types:
- for external installation;
- internal, involving penetration into the wall cavity;
- combined models that have a common housing with a socket.
Combined models equipped with a socket have a narrower scope of application. This is due to the fact that their installation is impossible without altering the electrical wiring.
When installing a combined device, you have to connect two separate wires for the socket to the same point and at the same time remove phase wires from them for lighting
Installing a triple switch combined with a socket in a common housing is justified in situations where it is intended to install open wiring. Electrical safety rules strictly regulate the height of placement of switches and sockets - 150 cm from the floor.
For this reason, such models are installed in places where sockets are used quite often, provided that switches at this height are convenient to use.
Combined models are most widespread when arranging bathrooms with placement near mirrors and bedrooms in the area of bedside tables.
A separate subspecies includes triple wireless switches, which can be installed anywhere and placed on any surface.
The wireless model is a different type of switch, which is more similar in design to a remote control
Wireless devices are equipped with two modules:
- The receiver is a relay-type device built into the light source. When it receives a signal, it closes the lighting circuit.
- The signal transmitter is the switch itself, equipped with an energy generator. When you press a key, it processes the energy pulse into a radio signal.
Such high-tech devices are expensive. Instead of the usual electrical wiring, they use infrared or radio waves.
Switches equipped with backlight are also available for sale. They are convenient in the sense that in the dark they create a light signal, which serves as a good guide for quickly finding the device.
The backlight on the switches additionally acts as an indicator, which signals the non-working state of the lighting, since it turns on when voltage is not supplied to the device
When choosing such models, you should pay attention to the type of lighting source. Illuminated switches do not cause trouble only when connected in a circuit with conventional incandescent lamps or their halogen counterparts. If fluorescent lamps or LED strips are used in a circuit with such a device, then even when turned off they will continue to emit a slight pulsating glow
If fluorescent lamps or LED strips are used in a circuit with such a device, then even when turned off they will continue to emit a light pulsating glow.
Criteria for choosing wisely
When purchasing a triple switch, carefully inspect it, study the physical quantities, and check for the presence of a connection diagram.
Key points to consider when choosing a product:
- The body of the product must be free of any kind of defects: burrs, dents and chips.
- The keys should operate easily and without jamming.
- Sound effects – when each key is turned on, a characteristic click should be heard.
- The core must also be free of burrs, and its terminals must work properly.
When planning to install a switch in a room with high humidity, you must choose a device with protection.
The working elements of a waterproof switch have an additional rubber or plastic shell, which protects the mechanism from direct contact with water
To simplify the installation procedure and ensure the longevity of the device, preference should be given to models whose cores are equipped with screw or clamp type terminals.
During the installation of imported triple switches, especially Korean and Chinese products, difficulties may arise that are worth thinking about in advance:
Areas of use
The three-circuit device has many advantages. The three-key switch looks aesthetically pleasing. Laying electrical conductors to the connection area is extremely simple. The box is placed in a technological niche. When choosing other types of devices, you have to make several holes in the wall.
Three-button switches are used for buildings with non-standard layouts. Switches are used for long corridors and for controlling the lighting of several rooms from one place.
View this post on Instagram
Posted by Electrical Products (@sistemplus) Oct 25, 2018 at 5:26 am PDT
Wiring through junction box
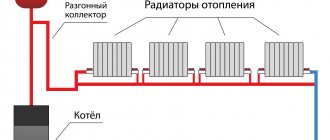
It is better to use the same one fine to bring all three phase wires to the distribution box again, and then use the common upper fine to bring them to the lamps. If we are doing wiring to a chandelier, then the last option is the best.
Triple switch: connection diagram to the chandelier
L – phase to the switch (red); then the phase (yellow, brown, pink) goes to three groups of chandelier lamps; N – working zero (blue), goes directly to the chandelier and is separated by the chandelier terminal block into groups; PE – grounding (yellow-green), connected to the chandelier body
Thus, before connecting the triple switch, it is necessary to prepare all the wiring.
All work should be carried out with the lighting circuit switched off. To search for zero and phase, the power is turned on, but after the indicator finds them and marks them, it turns off again.
Next, the following work is performed:
- Search for existing wiring: you need to find the junction box, the fines that will be involved in the wiring. It is necessary to mark the walls for treatment. A place is marked for the hole where the three-key switch will be installed, and for routing the wiring to and from it.
- Opening existing channels and punching new ones.
- Laying and securing cables from the box to the installation site. The wires for phase, neutral and ground (if any) must be marked. If possible, you should adhere to the standard colors of the wires: blue for neutral, yellow-green for grounding and other colors for the phase.
- Installation and fastening of socket boxes. The wires are routed inside them.
Connecting a triple switch
Identifying the wires in the junction box to which the wiring should be connected. Phase and zero are indicated by the indicator. They are marked (with electrical tape).
This work is carried out after inspection has confirmed that the previous actions did not cause damage to the wiring. After this, the lighting circuit breaker is turned on and the phase phase of the distribution box wires to which the connection must be made is determined. The wires are marked, after which the power is turned off again.
The wires of the new wiring are connected to the junction box, their ends are securely insulated with special caps.
To check the correct connection, turn on the machine again and, making sure that everything is normal, check the phase on all wires. It should be located on only one phase wire going through the socket to the switch. The rest should have zero: on the neutral wires going to the lamps, on the ground wires and phase wires going from the switch to the lamps, since they are open.
- Having turned off the machine again, you can connect the switch by connecting the wires to the terminals according to the connection diagram. After this, the switch can be put in its place, secured in the socket box according to the design.
- The wires are connected to the lamp sockets or terminal blocks of the chandelier. Each cartridge must have two wires - zero and open phase.
Before connecting each wire to a chandelier or lamp, you need to know exactly which of them are zero (coming from the junction box, blue according to the norm) and which are phase. Color identification of each wire helps. But in order for them to connect correctly, you need to turn on the machine to determine it and check each of them in turn with an indicator, including the corresponding button of the three-button switch.
After installation and checking that all lamp units are connected, the work can be considered complete.