Modern design has affected not only the living room and bedroom; you also want the toilet to correspond to the status of an apartment or house. But such aspiration can be hampered by sewer and water pipes located in plumbing units. If a sink or bathtub can be matched to the interior, then what to do with the toilet cistern? In this case, installing a hidden toilet cistern will help you. What it is and how it’s done will be discussed in this article.
What options can you use?
Installing a hidden cistern in a toilet can be done in two slightly different ways. Everything will depend on the type of toilet. So, a hidden tank can be mounted:
- with attached toilet;
- with wall hung toilet.
In the first case, a hidden installation of the tank is carried out with the flush key brought to the surface. Then the toilet is installed on the floor and all connections are made. This method is more familiar; the user gets the impression that the plumbing fixture is firmly on the floor.
It would be more modern and elegant to install a hidden cistern together with a wall-mounted toilet. In this case, installation work is carried out in the following sequence:
- A supporting frame is mounted on the wall or in a niche, which will support the toilet itself and the flush cistern.
- Next, the plumbing unit and tank are installed and all connections are made.
- The drain key, as in the previous case, is brought out.
How to choose a suitable design
When choosing a specific model of an attached toilet, the first thing you should pay attention to is the type of outlet: horizontal, vertical or oblique. If the outlet of the model you like does not match the one installed in your apartment or house, then before installing the tank, you will have to purchase special corrugations and couplings for the adapters. However, many companies now produce toilets with a universal outlet, which is more practical and it is much more profitable to buy such a model.
Also pay attention to the type of bowl. Funnel-shaped ones are considered the most hygienic, as they clean better than plate-shaped or bowls with a shelf.
It is also important to consider the type of drain. The most powerful is cascade. This is installed on wall-mounted toilets by most European manufacturers. But it works flawlessly only if there is an anti-splash system.
The dimensions of the toilet must correspond to the dimensions of the room. After you have decided on the key parameters, chosen the design, shape, color, it is advisable to conduct testing. Plumbers always advise trying to sit on the toilet before purchasing. This is the only way you can make sure that the chosen model fits the bowl size and height.
What devices are used
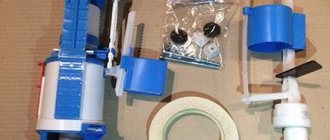
To install a toilet with a hidden cistern, you must use special tools. Some companies produce a set of two perforated metal slats. With their help, you can easily attach a small plastic drain tank to the wall using self-tapping screws and dowels.
But most often for hidden installation a special design is used - installation. There are two main types of such devices:
- block;
- frame
The first option is a metal structure with drains and fastenings. This installation is used if the installation is carried out with fastening to a load-bearing wall.
The block type of installation can be used when installing both wall-hung and floor-mounted toilet structures.
A more common type of installation can be considered frame. The basis of this design (even judging by the name) is a metal frame. It is fixed at four points. In this case, the installation can be attached to both the wall and the floor. This feature allows it to be used when installing on partitions, even those made of plasterboard.
Frame installations are available in different sizes; some models are designed for two plumbing units at once (for example, a toilet and a bidet). In addition, installations are produced that can be installed in the corner of the room.
Tools and materials
To install on tile floors, you will need the following tools:
- a marker, pencil or chalk to mark the outline of the base on the tile or floor;
- a drill designed for ceramics and a drill for plastic dowels;
- product - sealant to ensure waterproofing;
- standard set of screwdrivers;
- drill or hammer drill;
- core for cleaning the top layer of tiles;
- wrench and adjustable wrench;
- bolts for attaching the toilet to the floor;
- pliers;
- grinding machine with diamond wheel;
- connecting hose;
- tap;
- an adhesive (for example, liquid nails), if you plan to use method No. 3 to attach plumbing fixtures to a heated tiled floor;
- plastic dowels;
- plastic spacers for bolts;
- spatula to remove any remaining sealant or adhesive.
Choosing a tank
For hidden installation, an unusual drain tank made of ceramic is used, and its plastic counterpart. This choice is due to the smaller dimensions and light weight of the structure. But besides this feature, the tank will have one more feature - a drain button. Only this detail will be visible from the outside.
When choosing a button, you need to build on your habits and needs. There are several varieties on sale:
- Regular button. When pressed, the entire contents of the tank are drained.
- Button with two modes. This is a more modern design that saves water consumption. When you press the button once, half the volume of the tank will pour into the toilet, and when you press it twice, all the water will pour out.
- Stop-flush button. This is an even more economical design. The first press starts the descent, the second time it stops.
There are other models of buttons for the flush tank. For example, devices that do not require pressing. Draining begins when any object crosses the infrared beam. You can find devices that operate using a remote control, but these are already “super” modern gadgets.
Taffeta fastening
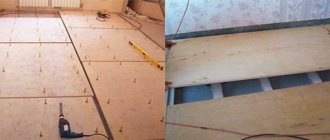
This method is usually used if the bathroom floor is wooden. Taffeta is a wooden backing about 3 cm thick; plumbing fixtures are attached to it. Since the bathroom is a room with high humidity, the wooden stand must be treated with drying oil.
The taffeta is installed using anchors. Usually they are driven in in a checkerboard pattern so that they protrude a couple of centimeters.
The recess for the toilet is filled with cement and then taffeta is installed there so that the anchors are at the bottom. It turns out that the surface of the taffeta should practically not protrude above the floor, but be flush with it.
The solution must harden thoroughly; for this, the toilet is left alone for twelve hours. After this, installation can continue. The equipment is additionally fixed with screws. In this case, it is necessary to use rubber spacers. Then the surface of the device will not be damaged when fixing the screws, that is, when tightening them.
Experienced craftsmen recommend lubricating the screws with graphite or grease before installation. Then, if necessary, they will be very easy to remove. Instead of wood for taffeta, you can use rubber 0.5-1.5 cm thick. A rubber mat is ideal for this. A support made in this way should be a couple of centimeters smaller than the toilet support.
Using installation
Most often, a so-called frame installation is used for hidden installation of a cistern. This device is a frame that is either attached only to the wall or additionally attached to the floor.
In addition, a special tank is used for hidden installation. This design is made of plastic and has small dimensions. The width and height of the tank can vary, and the depth of placement in the wall rarely exceeds 9 cm. Such a device can easily be hidden in a niche or covered with plasterboard.
The progress of the work itself will look like this:
- At the first stage, marking of places for attaching the installation frame is carried out. In apartments with an old layout, there is a niche in the toilet in which the sewer and water pipes are placed. The installation is perfect for such a place. But if there is no niche, then you can fix the frame to the floor and load-bearing wall. Some installation models can also be attached to plasterboard partitions.
- After marking, we secure the frame using self-tapping screws and dowels.
- Next, if you are using a wall-hung toilet, studs are screwed into the frame to mount it. It's best to do this before finishing, otherwise you'll have to drill holes.
- After this, the drain tank is installed on the installation and connected to the water supply. For this purpose, flexible hoses are used, which are included in the kit or purchased separately.
- Next, the installation is covered with plasterboard or other material. At the same time, do not forget to leave space for installing drain keys. Now you can hang and connect a wall-mounted or side-mounted toilet.
The last stage will be finishing the wall. Many experts recommend making a small hidden hatch. Sooner or later, even the most modern and expensive device will fail and require repair. In order not to dismantle the wall and not carry out repair work throughout the toilet, it is better to use the hatch and replace the failed part.
Non-standard installation of hanging plumbing
Under conditions dictated by the specific features of the bathroom, different types of installation of wall-hung plumbing fixtures are possible, including non-standard ones:
Installation of a wall-hung toilet with a plasterboard partition
This option becomes necessary when remodeling buildings. We will consider carrying out work in such conditions using the example of using the Geberit installation system:
- the connecting profile of the plasterboard partition must be assembled in such a way as to ensure high-quality fastening of the installation system in it;
- install the frame at a given height and adjust it using a building level;
Securing the installation between profiles
- secure the frame between the profiles;
- connect the profile using self-tapping screws;
- fix the sewer pipe using a plastic clamp;
- connect the water;
Connecting the supply pipeline
- make a technical hole to accommodate the flush key;
- sew up the front side with plasterboard;
- install a wall-hung toilet;
- install a flush button.
Tank lined with plasterboard on the outside
Geberit Combifix
Hidden Kombifix cisterns from the German manufacturer Geberit are designed specifically for installation in solid walls - brick or concrete. This series of plumbing is a comprehensive program: installation with a sound insulation system, drain pipe, necessary fasteners. The water supply is carried out centrally at the rear or at the top. The flush volume is adjustable. The factory setting is for 3 and 6 liters, you can change the range to 4.5/6/7.5 liters. The manufacturer's warranty on Kombifix equipment is 10 years.