In small typical bathrooms, large appliances take up the lion's share of free space. At the same time, it can take up storage space, make it difficult to get to the shower, and cause many other problems. We have to come up with alternative options: for example, taking the device out into the hallway or into the kitchen. In this article we talk about an interesting solution for small apartments - placing a sink above the washing machine: what are the pros and cons, how to choose and what to consider during installation.
Advantages and disadvantages
Advantages
- The main advantage is saving space in a small bathroom, especially if the area does not exceed 2-3 square meters. This is a solution for bathrooms in Khrushchev-era apartment buildings or small studios, where in the kitchen there is often no room for an additional large unit.
- Since there is a sink here, all water communications are nearby, and there will be no difficulties with connecting hoses and drainage.
- The machine can be easily disguised by being built into a cabinet under the washbasin, which can be closed with beautiful doors. Relevant if you don’t like open appliances or the bathroom is decorated in a classic, eco-friendly or vintage style.
Instagram @_marina_ky
Instagram @pepper_sasha
Flaws
- Most likely, it will not be possible to place a unit with a large tank volume under the sink. But for one person, a couple or a family with 1-2 children, a medium-sized car is quite enough.
- After washing, it is advisable to ventilate the room, so if you have one bathroom in the apartment, you need to take this point into account and think about the use of the bathroom.
- If the machine is closed on all sides by a cabinet, the result is a static structure, the approach to which may be inaccessible. As a result, it will be difficult to move, clean and repair.
- The space under the sink will be occupied. But with proper use of free space, you can easily compensate for it and organize storage.
Instagram @goodsantehspb
Instagram @design_by_idesign
Attach to wall
This is a rather rare option, but it exists and perhaps it will suit you. This is explained by the high price of the machine itself and the complexity of installation. However, the machine is quite light and hardly vibrates, so the likelihood of it falling is low.
Sink selection
Model
Not every type of sink can be installed above a washing machine. You can choose from the following options.
- “Water lily” with a side drain - hanging models with a hole at the bottom can be used, but they will have a fairly large depth (about 20 cm), which means there will be a large gap between the bowl and the machine, which does not always look aesthetically pleasing.
- Rear drain - this option is more similar to the classic models with the drain at the bottom in the center, but here it is moved to the back of the sink, and the machine will be located in front of it.
- Built-in - the bowl is immediately built into the countertop, and the appliance will be located under it. This is one of the most popular options, since the additional layer visually unites the parts of the structure and also protects the surface of the unit from splashes and moisture.
- The overhead is an easy-to-implement and effective solution when the bowl is simply placed on the countertop under which the machine is placed.
Instagram @simple.arch_design
Instagram @design_denis_serov
Instagram @eurougol
Material
The most common materials are porcelain and earthenware. The first one is heavier and more expensive, but it will last longer. This is an environmentally friendly material that is resistant to mechanical stress. No cracks form on it, so less dirt accumulates and, accordingly, maintenance is easier.
A ceramic bowl costs significantly less because this material is made from cheaper raw materials. Then it is covered with a special glaze. Earthenware is not afraid of aggressive detergents, dyes and temperature changes. The downside is that over time, the glaze cracks, small roughness appears on the surface, and the bowl loses its former luster. To avoid the accumulation of microbes and the appearance of stains in these cracks, you can take a model with an additional anti-dirt coating.
Another option is artificial stone. Bowls made from this material can be of any shape and size, and are often made to order. Additionally, they are coated with a special antibacterial coating. They are resistant to mechanical stress and do not require complex maintenance. In terms of technical properties, artificial stone even surpasses natural stone in some ways, but is just as expensive.
Instagram @_marina_ky
Instagram @ans_remont_design
- Plumbing equipment
Which sink is better to choose for the bathroom: studying 3 important parameters
Tabletop
The surface can be part of a full-fledged cabinet or “float” in the air, mounted on the wall. In the first case, in addition to the washing machine, a storage system is also organized under the bowl: shelves or closed drawers. But this option is not suitable for very tiny bathrooms.
If the area is very limited, the entire space under the sink will be taken up by appliances, and the countertop will serve as a protective layer. It can be made of wood, natural or artificial stone, acrylic or chipboard with marble or wood lamination. The main thing is that the material is waterproof itself or coated with a water-repellent varnish in the case of wood.
A sink above a countertop washing machine can be either surface-mounted or built into it. An interesting technique - the surface of the sink extends to the sides and plays the role of a countertop.
Instagram @albert_remont
Instagram @krylova_design
Instagram @krylova_design
Instagram @durnaya_ya_baba
Put it in the closet
A practical way for a small area is to place a washing machine in the lower section of a tall cabinet with shelves. And place household chemicals and towels on the shelves. This option is best suited for combined bathrooms.
Selecting a machine
Type
Of the two types of washing machines - vertical and horizontal (front) loading - only the second can be placed under the sink.
You can choose a stand-alone device, but some manufacturers offer ready-made solutions for complete installation. The cost of such washing machines averages from 15 to 60 thousand rubles. There are also special models of washbasins that require installation above the washing machine - they are compatible with a number of models, from which you need to choose.
Instagram @_marina_ky
Instagram @olgagoldilocks
Instagram @mynewlove_remont
Dimensions
Optimal dimensions of the equipment: height from 60 to 70 cm, depth - from 35 (ultra-thin models) to 45 cm. The average tank volume is 3-4 kg of laundry. The width is selected according to the parameters of the sink and the size of the bathroom.
Instagram @interior_spb
Instagram @ks_nails76
Instagram @viz_diz
- Technique
How to choose an automatic washing machine: useful tips
Place it on a stand or podium
Installing a washing machine on a podium is a non-standard solution that provides new storage space both below and above. If installing a podium is not possible, you can consider a cabinet - this is a ready-made and beautiful solution. The only thing you will need to guess is the size.
The main advantage is more convenient operation of the machine - you don’t have to bend over.
Installation Rules
When installing a sink above a washing machine in the bathroom (photo below), you need to remember a few basic principles.
- When planning co-location, consider the location of communications so that there is no direct contact between water and electricity.
- Please note that you will need a special siphon for the washbasin: with an outlet for the washing machine, a splitter or with a check valve. The latter blocks wastewater and prevents it from reaching the drain if the pipe becomes clogged. It is also advisable to install a special overflow drain that will prevent water from overflowing the edge of the bowl.
- Installation occurs in the following order: a plan with markings for the brackets, their installation (attached to dowels or anchors), installation of all sink elements, connection of the washing machine and communications. Afterwards, be sure to check whether the equipment works.
- If the bowl is shallow, provide the washing machine with protection from splashes - the best solution for this is a countertop.
- Since equipment vibrates during washing, ensure there is space between the walls of the appliance, siphons and fastenings so that they do not get damaged or become loose. For the same reason, it is better not to place the unit close to the wall - constant vibration will not benefit the finish. And to reduce movement when washing, you can put a rubber mat down.
- After the machine is installed, check that all connections are tight. It is better to additionally secure them with clamps. This is necessary to avoid water leakage, which will be difficult to clean behind equipment installed under the surface.
Instagram @ekaterina_kodinceva
Instagram @projection_design
Instagram @krylova_design
Connection features
The operating conditions are slightly different from other kitchen electrical appliances. Primarily due to the vibrations that occur during operation and the need to properly organize the drainage of waste water.
The housing must be installed on a rigid, moisture-resistant base. It is not recommended to place the machine on a soft or shock-absorbing surface. Attempts to install on a shock-absorbing base most often lead to unpleasant consequences. Any spongy material does not reduce noise and vibration, but only increases the risk of rapid bearing failure.
It is best to use a concrete screed or tiled floor as the base. If there is already parquet or linoleum, then a plywood sheet with a thickness of 17-25 mm must be laid under the equipment.
Regardless of the location and installation option, the connection must be made taking into account the manufacturer’s recommendations.
Basic Rules:
- The equipment must not be more than 5 meters away from the drain hose connection point.
- The distance from the wall to the back of the housing must be at least 11-17 cm, electrical wiring and pipes must not come into contact with the kitchen unit or equipment housing.
- Water is supplied to the fittings using a safety valve.
- The distance from the outlet is no more than 1 m.
- The horizontal part must not be filled with any things that are always in abundance in the kitchen.
- There must be a distance of 22-27 mm wide between the side part and the kitchen unit. This is required to improve heat dissipation and simplify maintenance.
It is strictly forbidden to place a microwave, various boxes, and much more. Under load, the position of the legs is deformed, this disrupts the operation of the balancing sensors. Also, when skewed, the water level changes, and the float in the chamber shuts off the drainage system before the waste water is completely poured out of the tank.
As a result, a characteristic smell of rot is formed, and the body and seals are subject to rapid corrosion.
When the washer is installed, you need to align the position of the legs. This will ensure normal operation of the drain and also reduce vibrations.
Step by step it looks like this:
- The surface is cleaned and impregnated with mastic.
- The cracks are sealed with putty.
- If it is impossible to lay a plywood sheet on a plank floor, the boards are simply wedged.
Leveling with a wide dish or building level. When leveling the dish, place it on the washing machine, then pour in a little colored liquid. Deviations from the level can be easily read along the water's edge.
To connect the washing machine to electricity, a three-core wire with a core diameter of at least 2.5 mm is used. The best option is to choose industrial wires, where there is a heat-resistant backfill under special insulation. This cable can withstand almost 24/7 loads without deformation.
Attention: it is prohibited to connect to the electrical wiring of appliances already in the kitchen, for example, a water heater or air conditioner. The wires must be reliably insulated and routed through corrugation.
When the equipment is fully connected, a test wash is started, which will show whether all installation steps were followed correctly.
Regardless of size and location, it is a very important assistant in any home.
Photo of sinks above the washing machine in the bathroom interior
Let's look at ideas and photos of examples of interesting interiors with a sink above a washing machine.
When there is little space
Even a tiny bathroom can fit a washing machine. In such cases, it will not be possible to organize storage under the washbasin, since there is only enough space for the unit itself. There are two accommodation options.
- Sink, countertop, machine - everything is compact, with minimal width and depth.
- The sink and the appliances immediately underneath it - in this case, you need to immediately think about protecting the appliance from moisture.
Instagram @natali_sh13
Instagram @ulianaamur
Instagram @evahaos
Space optimization
If space allows, you can organize at least minimal storage under the sink, on the side of the unit. These can be narrow open shelves, a compact shelf or full-fledged drawers, if the bathroom area allows.
Instagram @nazacasa
Instagram @_marina_ky
Instagram @alexey_volkov_ab
Instagram @irooms.design
Hidden storage
The equipment, as well as all storage under the sink, does not have to be displayed: you can choose a cabinet with hinged or sliding doors that will hide both the equipment and, if necessary, the shelves.
Instagram @evgeniya_matveenko
Instagram @3dgroup.design
Instagram @_marina_ky
Instagram @nazacasa
The car as an accent
You can go the opposite way and turn the washing machine into an accent element of the interior. For example, dark models look very stylish, especially against the background of the same muted finish in deep shades. For a light bathroom, on the contrary, a snow-white product is suitable, which will stand out and harmonize with other plumbing fixtures.
The surface can be either contrasting in relation to the device or matched to the tone, merging with it into a single visual composition.
Instagram @alexey_volkov_ab
Instagram @p.anastasi.a
Instagram @design_studio09
Instagram @annie3dart
In place of the bath (using a shower stall)
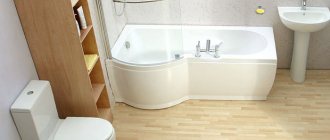
A compact shower cabin will help free up additional space in the bathroom. This option is suitable for those who prefer a 10-minute shower to an hour of relaxation in a bubble bath. The space along the wall freed up after dismantling the bathtub will accommodate a shower stall, an automatic machine, and shelves above it.
The compact arrangement frees up space for movement.
Step-by-step installation instructions
Having chosen the optimal water lily model that suits your washing machine, you can think about installing it yourself. This process is not as complicated as it might seem at first glance.
In order for the installation of a wall-mounted water lily sink to be successful, you must carefully study the recommendations provided by the manufacturer. As a visual aid, below we will consider a step-by-step installation, generously supplied with photos.
Step #1 - installing brackets
First you need to determine the location of the household washing machine and sink
At this stage, it is important to carefully take measurements, installing the machine, but not connecting it
When installing, the manufacturer recommends maintaining a distance of 2-3 cm between the upper part of the washing machine body and the lower part of the bowl.
You need to place the sink on top - here you will need an assistant to hold the product while you measure everything and make marks on the wall for installing the brackets.
First, holes are made in the wall for the brackets, which are mounted in accordance with the markings made using the bolts supplied in the kit.
It is important here not to overtighten the connection, leaving a small gap of up to 7 mm
A typical sink package includes: 1 – brackets with bolts; 2 – hook; 3 – siphon; 4 – the sink itself. But there is no self-tapping screw or dowel to secure the hook; you will have to purchase them yourself
If the installation is carried out in a Soviet-built apartment, where the brackets installed during the construction of the house are still in the bathroom wall, then the “Kuvshinka” brand sink can be safely mounted on them.
These holders are strong and reliable, and their size is just right. But this rule does not apply to products from other manufacturers.
Step #2 - siphon installation
The next step is installing the siphon. Its design and components may differ from typical ones. Therefore, you must first carefully study the instructions, and then assemble according to the diagram included in the kit.
It is important not to forget to place a conical gasket under each threaded connection
Vertical drainage is more convenient in terms of speed of water removal, but placing the siphon directly above the body of the machine is extremely undesirable and even dangerous. After all, any leak can result in a breakdown of the programmer
The siphon is assembled, all that remains is to install it on the sink. To do this you should do the following:
- place the assembled structure under the drain hole at the bottom of the bowl;
- place a thick rubber gasket on top of the siphon;
- Place a rubber seal on the inside of the sink;
- place a decorative grill on top of the seal that will cover the drain hole;
- secure the assembled connection with the bolt included in the kit.
Most often, this type of sink has a siphon with a pipe for connection to the washing machine. This connection is also made using a rubber seal - a valve gasket.
The siphon design may have an S-shaped or flask-shaped valve. Immediately behind it, a corrugated section of pipe is connected, which must be connected to the sewer, then check the tightness of this connection
Step #3 – final fixation of the sink
After attaching the siphon, you can begin to secure the washbasin. To do this, you first need to insert the hook into any hole on the back wall of the sink (right or left). It is attached to the wall with a self-tapping screw and dowel.
Then you have to tighten the mounting bolts of the brackets until they stop.
For reliability, experts and the manufacturer recommend applying a silicone-based sealant to the contact points between the sink and the wall and brackets.
At this stage, it is advisable to install a mixer if it is common for the bath and sink or is mounted on the wall above the washbasin. The structure must be assembled and installed in accordance with the instructions that come with it.
If your model has a hole for the mixer, then it is advisable to install it strictly according to the instructions, not forgetting to place a sealant at the joints.
It remains to check the quality of the completed installation by turning on the water. If everything is sealed, you can place a washing machine under the sink and connect it to the communications.
Tips for decorating a small bathroom
Optimizing space will help you use the usable area wisely. Small objects clutter up space, so household chemicals are hidden in cabinets and niches. The less decor, the more interesting. The measured amount of decorations corresponds to the chosen style.
Lighting is an important element of a small room. In a bathroom without a toilet, lighting is provided for the bathtub (shower stall), storage systems and niches. In the combined room, spotlights are installed around the perimeter of the ceiling.
If the room is narrow, then mirrors will help to visually expand it. Reflective surfaces of furniture facades give the bathroom an unusual look. A shower stall or bathtub behind a glass partition creates a feeling of airiness and weightlessness. The height of the space will be increased by a stretch ceiling made of glossy material.
Finish and style, it is easy to correct the shortcomings of a small bathroom. Original ideas for decorating a bathroom with a washing machine will visually expand the space.
Comparison table of characteristics
To make your choice easier, we offer you a comparative table of the main characteristics of the models described above.
| Model | Maximum load, kg | Number of programs | Spin speed up to, rpm. | Dimensions (WxDxH), cm | Noise level, dB |
| Candy AQUA 1D1035-07 | 3.5 | 16 | 1000 | 51x46x70 | 56/76 |
| Eurosoba 1100 Sprint Plus Inox | 4 | 14 | 1100 | 46x46x68 | 40/63 |
| Zanussi FCS 825 C | 3 | 21 | 800 | 51x51x67 | 53/70 |
| Electrolux EWC 1350 | 3 | 15 | 1300 | 50x51x67 | 53/74 |
| Candy Aqua 114D2 | 4 | 16 | 1100 | 51x44x69 | 56/81 |
| Eurosoba 1000 Black and White | 4 | 12 | 1000 | 46x46x68 | 44/61 |
| Zanussi FCS 1020 C | 3 | 16 | 1000 | 50x52x67 | 53/70 |
Manufacturing materials
What sinks are made from determines the lifespan of the products. The following material is used:
- Plumbing faience, including porcelain. Fits organically into the interior, sold at a price lower than other materials, smooth surface, inert to detergents.
- Artificial stone - can imitate many types of natural stones.
- Glass is expensive and requires extensive care, since contamination of any origin is visible. Tempered glass can withstand heavy loads and is safe to use.
- Metal - primarily stainless steel is used. But its use leads to high noise levels unless special measures are taken. The mirror surface deteriorates from abrasive and acid-containing detergents.
- Marble - rich look, high price, smooth surface.
- Wood is rarely used and requires regular and careful maintenance. After processing it looks like plastic. Products made from it perform rather a decorative function.
Varieties such as sanitary ware and ceramics have the best performance characteristics.