When arranging a bathroom in a residential or office space, convenient placement of plumbing fixtures and furniture is necessary. The height of the bathroom sink is specified by SNiP regulations, which are advisory in nature. Drawing up a layout of components in the bathroom is complicated by the small size and increased functional load on the room.
Bathroom.
Optimal sink height according to SNIP
Current sanitary standards SNiP section 3.05.01-85 require the edge of the sink to be located at a height of 800-850 mm from the floor. The requirements apply to residential and public premises. Regulatory acts allow deviations from the specified values in the direction of increasing or decreasing by 20 mm. The parameters are designed for a person of average height, so the standard height of the washbasin is inconvenient for tall people.
Optimal washbasin height.
There are additional sections of SNiP that regulate the installation height of washstands in child care institutions:
- for nurseries - 400 mm from the floor surface;
- for preparatory preschool groups - 500 mm;
- for bathrooms in primary school premises - from 550 to 600 mm;
- for middle and high schools - from 650 to 850 mm.
Depth selection
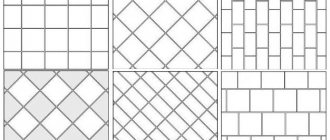
As practice has shown, washbasins with a depth of 48-61 cm are considered the most convenient. When deciding on this parameter for your sink, you start from the average arm length of family members. To do this, simply extend your hand over the sink. The result is considered normal if the opposite cut of the cup ends in the middle of the palm or opposite the fingers.
The depth of the washbasin bowl is also extremely important: the size of the bathroom washbasin determines whether the water flowing from the faucet will splash. An excellent solution in this regard are the “tulip” and “half-tulip” models.
Installing the sink in relation to other appliances
Distance in the bathroom of furnishings.
The distance from the sink to the rest of the interior of the bathroom or combined toilet is regulated by the requirements of SNiP 3.05.01-85. The standards are developed based on the area of a small apartment, where it is important to use every centimeter of space. For example, the size of the free zone in front of the washbasin must be at least 700 mm (when installing the equipment on the wall). When placing the sink in a special niche, the radius of the free zone increases by 200 mm.
Minimum distance from the sink to the rest of the equipment (in accordance with SNiP):
- to a floor-standing toilet or bidet - 250 mm;
- to the edge of the bathtub or shower cabin - 300 mm;
- to the side walls of the room - 200 mm;
- to the heated towel rail pipeline - at least 600 mm;
- to household power outlets - 600 mm.
Hanging models
Wall-hung washbasins for the bathroom are a classic, most often chosen due to many advantages: versatility (combines perfectly with any type of interior); ease of installation (on horizontal brackets); Possibility of placement on any surface; ease of care.
The dimensional positions of wall-hung sinks can be different and are selected individually:
- the width of products for large bathrooms can vary from 60-150cm; for standard ones - up to 60cm; for small ones - 30-40cm;
- the height of the structure can be very diverse: from 45 cm to 120 cm;
- in depth - from 25 to 50 cm, depending on the preferences and height of family members.
Is it possible to move the sink
When renovating a bathroom, there may be situations that require changing the arrangement of elements:
- Rearranging equipment within the premises. For example, if the owner wants to turn the bathtub 90° and move the sink into the vacant corner, then he does not need to obtain additional documents for this.
- Moving the sink in the bathroom (heightwise or to the side). The distance and installation location are chosen by the owner of the premises at will. No documentation is needed for the transfer.
- Installing an additional washbasin in a bathroom also does not require special permission.
- Removing the sink into a residential area requires filing an application for such changes. Since the ceilings of rooms do not protect against water leakage, such reconstructions are prohibited by regulatory authorities. Detection of unauthorized alterations will result in a fine and a requirement to remove the sink and water pipes from the premises.
The special permit is not required to specify the installation of an additional washbasin.
What to focus on
In general, the requirements for sewerage installation have remained virtually unchanged since Soviet times. The experience of many years of standard construction has made it possible to develop rules, the need to change which is stipulated only due to acceleration and an increase in the average level of human growth. This suggests that the indicators and requirements have remained virtually unchanged.
Washing in the apartment
In public spaces and special-purpose buildings, each load-bearing wall, water tap and window glass is installed taking into account the safety and convenience of any person who will have to be there.
Do I need to follow the standard?
The standard sink installation height is observed when renovating bathrooms in government institutions, schools and preschool institutions. In a residential area, the owner himself plans the level of installation. If both adults and children live in the apartment, it is necessary to provide for the use of plumbing by the child. In country houses, sinks of the “moidodyr” type are often used, having a standard height of 850 mm. The water tank is installed separately, which allows you to install the tap at a convenient level.
At dachas, Moidodyr sinks are used.
Dimensions for connecting non-standard plumbing equipment
Let me clarify: the above values are common and standard, but with the current variety of manufacturers and models, it is necessary to approach them individually in each case.
If you intend to install some new, exclusive plumbing equipment, you should first look at the technical map of the installation and connection dimensions for this particular equipment. This needs to be done before supplying water and laying a sewer system - so as not to have to redo it, so it is better to purchase the desired plumbing fixtures in advance (if there is space for storage).
Practical calculation of optimal height
To determine the installation level, a technique based on a comfortable hand position is used. Studies have shown that the distance between the working surface of the washbasin and the user’s elbows should be from 50 to 80 mm. The owner of the premises can independently calculate for himself the distance based on which water pipes and drainage will be installed.
The distance from the sink and the user's elbows should be 50-80 mm.
Algorithm for calculating the distance from the floor to the top edge of the sink:
- The user stands on the bathroom floor and an assistant measures the distance from the floor to the elbow.
- From the obtained value, the size of the gap between the sink and the elbow is subtracted (50-80 mm).
- This parameter is reduced by the height of the washbasin, which the owner of the room must select in advance.
- If the bathroom is not finished, then the type of flooring that will be used in the room is additionally taken into account. When calculating, you must remember that the floor will rise to the height of the tiles and the thickness of the adhesive layer. If leveling the coating or installing floor heating is planned, this is also taken into account when calculating the installation height of the sink.
- The height is increased by the thickness of the floor covering. The obtained value allows you to comfortably install a sink for one family member, so similar parameters are calculated for other residents using a similar method. The results obtained are averaged (for adults), and the sink is set at a level that is comfortable for all family members.
Installation features
Actually, most of the information has already been told, all that remains is to assemble the purchased components in accordance with the design idea.
Pipes are assembled from the riser (inlet pipe) towards the consumer. In other words, the pipes that are closest to the drainage point into the common house riser are installed first.
At each connection, the pipe should fit into the socket of the previous one by approximately 50 mm. If the cuff in the socket is too tight and you cannot insert the outlet, then you need to lubricate the cuff with liquid soap or detergent - things will go much easier.
Plastic pipes are cut using any available means: a grinder, a hacksaw. You can even do the cutting with a regular wood hacksaw. The main thing is to clean the cut edge from all kinds of burrs - burrs inside the pipe will cause blockage, and burrs on the outside will prevent the parts from being assembled properly.
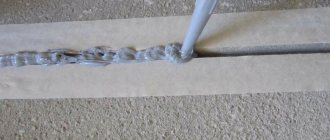
Some craftsmen practice applying silicone (sealant) to the cuffs of assembled parts - supposedly the joint becomes even more airtight. The effect of silicone is very doubtful, because polypropylene (which is what plastic drainage systems are made from for indoor use) is a chemically resistant plastic and silicone does not stick to it properly.
“Correct” pipes should be assembled together with some effort and not leak without additional sealants. However, it happens that parts are assembled together too easily - components from different manufacturers, used parts, etc. In this case, of course, you can use silicone sealant. The main thing during assembly is to apply it not to the cuff (because part of the sealant will get inside the pipe), but to the pipe along the outer diameter.
In some situations, it is necessary to secure two parts together so that during operation one does not come out of the other. This should absolutely not be done using self-tapping screws, which some craftsmen screw into the end of the socket. The sharp tip of the screw sticking out inside the pipe will collect hair and cause a blockage. If for some reason the assembled unit experiences mechanical stress to “undocking”, both parts need to be secured using brackets or other fastening techniques.
To form and control the required pipe slopes, it is very convenient to use a laser level. Having built a horizontal beam slightly higher than the horizontal beam, you can control the slope by placing a tape measure on the controlled areas and comparing the distances from the pipe to the beam.
That's basically all. We have covered the main points of installing a sewer system in a bathroom, and perhaps I will add something over time.
Types of sinks and installation heights
Bathroom sinks vary in shape, color, side height, type of material and method of fastening. The owner selects equipment based on the size of the room and the required level of installation. For example, small sinks with a width of up to 450 mm are used in bathrooms, and products with a width of 550 to 750 mm are installed in the bathroom.
Types of sinks in the bathroom.
Types of sinks:
- Suspended type devices located anywhere in the room. Flexible hoses are used to ensure water supply and drain contaminated liquid. The disadvantage of the design is the open location of the siphon. In addition, the space under the sink remains unused.
- Equipment equipped with a “pedestal” of a fixed size. The advantage of the design is the ability to place hoses inside the “pedestal”. Manufacturers produce bases with different dimensions, which allows you to adjust the installation level of the sink.
- Sinks with cabinets, inside of which there is a siphon and connecting hoses. When making furniture to order, it is possible to change the position of the sink. It should be taken into account that particle board is destroyed by moisture.
- Special equipment with a convenient height adjustment mechanism. It is characterized by high cost.
Sink with cabinet in the bathroom.
Basins with a choice of heights
The owner of the premises can independently determine the installation height of the washbasin. This is possible when installing a wall-mounted product or a sink equipped with a “half-pedestal”. The installation level of such equipment is determined by the height of the water pipes and sewerage outlets. The location of the lines is taken into account when carrying out renovations in the bathroom.
Hanging sinks in the bathroom.
Hanging equipment is installed on the walls of the room using decorative brackets or through holes made on the back wall of the product. The brackets provide additional fixation of the bowl using screws or guide pins.
Since the products weigh more than 10 kg, installation must be done only on solid concrete or brick walls.
After installing the fixtures and sink, flexible hoses for supply and drainage are installed; the section under the sink can be covered with a floor cabinet.
Wall-hung sink with cabinet in the bathroom.
Then the attachment points for the decorative casing are marked on the wall, which is attached to the wall with screws screwed into plastic dowels. The installation height of the washbasin is limited only by the size of the “semi-pedestal”, which is in the range of 400-500 mm.
Fixed height
The category of equipment with a fixed mounting height includes sinks with a “pedestal”. The base can be placed on the floor covering or placed on a brick or concrete platform. It is possible to reduce the dimensions of the “pedestal” by cutting off the area at the top or bottom, but when cutting, the earthenware cracks and splits. A neat cut can only be made on a machine (without guaranteeing the quality of the work performed).
Pedestal sinks in the bathroom.
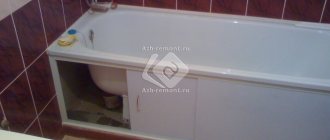
Another option is equipment designed to be inserted into a tabletop, which is mounted on brackets or on a cabinet. The overhead washbasin is placed in a pre-made hole; a factory template (included in the sink kit) is used to determine the configuration.
Then the product is installed flush with the surface and fixed using standard plates. The installation diagram does not impose strict requirements on the height of the sewerage system or the location of the outlet of water pipes.
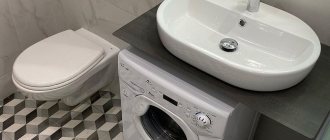
Sink in the bathroom above the washing machine.
In small spaces, the practice of installing a sink above a washing machine is practiced. The equipment has an original shape with a reduced depth of the washing part. The sink is hung on the wall using a special fastening; a siphon of a non-standard shape is used to ensure the drainage of dirty water. Some modifications are not equipped with a window for mounting the mixer, and the distribution tap will be located on the wall of the room.
Between the lower edge of the sink and the upper plane of the machine body, it is required to maintain a gap of 150-200 mm, which reduces the risk of damage to the equipment by vibration that occurs during operation. Taking into account the height of the sink side in the range of 80-100 mm and the height of the washing machine body from 700 mm, the installation height is in the range of 930-1000 mm, which exceeds the standard values. This installation scheme is suitable for people 180 cm tall and above.
With height adjustment
Equipment with a smooth height adjustment function is designed for people who use a wheelchair. The sinks are designed for use in medical institutions, but they can be used at home. To adjust the position of the sink, a mechanical or pneumatic drive is used. Installation of the washbasin begins with marking the surface of the wall on which the base of the rod is attached to move the carriage with the installed sink.
Sinks with height adjustment.
The design of the equipment includes elastic water connections and a special flexible hose connecting the drain channel to the sewer pipe (parts must be purchased separately). To adjust the height, use a lever located on the left or right side of the sink. The switch operates a mechanical actuator or pneumatic control valve that supplies air to the actuator cylinder.
The height adjustment range of the product is from 200 to 400 mm (depending on the manufacturer and design features).
The German manufacturer Viega supplies sinks with a console adjustment mechanism. The device is mounted discreetly in a niche under the sink; there is a decorative screen covering the hose connection points. To control the position of the washbasin, a button located on the wall is used.
The maximum height adjustment range is 200 mm. The set with the sink contains all the necessary components for installation and connection.
Accessories for installation of sewer pipes
Let's look at the various corners and joints for plastic sewer pipes used for installation.
Tee 90 degrees, diameters: 32, 40, 50, 110 mm. One of the main and frequently found spare parts. Used to organize drainage to the toilet and in other solutions. You often hear from “very experienced” plumbers that the toilet outlet should not enter a horizontal bench (pipe) at an angle of 90, otherwise there will be constant blockages. I can say with full responsibility: this is not so - in my practice there are a great many toilet connections with such a tee and during operation there is no hint of blockages.
In general, plumbers have a rule: if possible, do not make 90 angles on the “ditch”, it is better to put two 45 angles
. This is indeed true and it is worth adhering to this rule, however, in the case of a toilet, in 9 out of 10 cases it is technically more convenient to make the connection with a 90-degree tee. And there’s nothing wrong with that!
Transitional eccentric coupling 110-50 mm.
, popularly called “bottle”. Designed for transition from the 110th pipe to the 50th. In the bathroom sewer, it is used, as a rule, after organizing the outlet to the toilet - then the 110th diameter is unnecessary and installation continues with the fiftieth.
In the photo above we see the assembly: cross 110-110-110-50
and "bottle". This is how the outlet to the toilet is organized, the continuation of the D50 lounger to the left and the D50 outlet up. The upper outlet in the example above is used for the drain of the washing machine.
When purchasing crosspieces, you need to be careful: they differ in left and right.
In addition to the cross and bottle, there are many variations of transitions with 110 mm. by 50 mm. Most of these connectors are differentiated into left and right
. Some examples below:
Unlike tees 110 mm, for a diameter of 50 mm. and smaller is better to use smooth 45 degree angles - technically there is no obstacle to using two 45 angles instead of one 90.
Regardless of the pipe diameter (32, 40, 50 or 110 mm), 45 and 90 degree angles are not the only ones. There are angles of 30, 67, 87 degrees. Thanks to them, various installation problems are solved when the idea is to turn the pipes at an angle other than straight.
It is worth noting that recently a great many variations of angles and transitions have appeared; it is practically impossible to show all the existing ones.
White sewer pipes and fittings are increasingly common
colors. They fit perfectly with gray ones and differ only in color and wall thickness. The walls of these pipes are thicker, so the movement of wastewater is more silent.
Now let's discuss pipe fastening. Standardly, there are two types of brackets for fastening sewer pipes - adjustable and non-adjustable.
Non-adjustable plastic clips are used primarily for mounting on walls, since there is no possibility of creating a slope when mounting to the floor. Although a “savvy” master will find a way to attach the clips to the floor at different heights, if you have no choice, you can attach the clips to bars of different thicknesses.
The clamp sizes are standard, for pipes D32, D40, D50 and D110.
A pipe clamp with a pin gives more room for action: diameter adjustable within small limits, adjustable height of mounting on the floor or mounting on walls. These fasteners are very versatile and are suitable for any pipes, not just sewer ones. Dimensions suitable for plastic sewer:
«1»
(adjustable diameter 32-36 mm. for D32 mount)
«1¼»
(38-43 mm for mounting D32 in socket and for D40)
«1½»
(47-51 mm for socket D40 and D50)
«2»
(57-61 mm for D50 socket)
«4»
(110-116 mm for D110)
The studs for these clamps come in different lengths, with M6-M10 threads. Sometimes it is convenient to purchase a long hairpin separately and make the desired length yourself.
The fasteners should be placed near the sockets (or on the sockets directly). Usually one fastening per horizontal elbow is sufficient. When secured to a socket (as in the first photo of the publication), the assembled pipes will be difficult to disassemble without loosening the clamps, this must be taken into account.
Siphon connection diagrams
Regardless of the design of bathtub sinks and methods of their installation, siphons are traditionally used:
- single-turn;
- double-turn;
- bottle.
The use of a one- or two-turn siphon is typical for “water lilies”, when it is necessary to free up as much free space under the sink as possible to accommodate a washing machine or other household items.
The name “single-double turn” was obtained due to the presence of one or two pipe bends in the circuit. Due to such bends, a hydraulic seal is created inside the line.
Another option, “bottle”, is the most common. It differs from the first in the absence of bends, the functions of which are performed by a special “bottle” with a drain pipe diverted from the top of the structure. This scheme is more convenient than the first when performing maintenance - cleaning the line in case of a blockage. At the bottom of the “bottle” there is a technical cap that can be easily unscrewed.