Not every person can purchase a marble countertop. A tabletop made of tiles has undeniable advantages. This design is quite often installed in the bathroom. You should know that the countertop in the bathroom will be exposed to moisture and high temperatures. The tiles that are laid on the countertop must be combined with the tiles that are laid on the floor and walls.
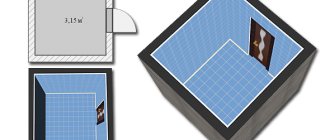
Scheme of tile laying options.
Manufacturing
The entire countertop manufacturing process consists of several stages:
- creating a sketch, during the work you need to decide on the shape and dimensions of the future product;
- marking at the installation site;
- creating a frame;
- sheathing;
- performing finishing work.
Create a sketch
When creating a sketch of a future countertop, you need to focus not only on aesthetic appeal, but also on convenience and functionality. There are standard parameters:
- height – 80-110 cm;
- the distance between plumbing elements is 70 cm or more;
- the distance from the wall to the washbasin bowl is 10 cm or more.
However, these are standard settings, so they can be changed for convenience. For example, if everyone in the family is tall, then you can place the tabletop at a higher height. In addition, you need to consider the need for additional parts - shelves, niches, etc.
Marking
After the sketch has been created and the materials have been purchased, you can begin marking. First of all, you need to free the installation site from unnecessary objects so that nothing interferes with the work. If the countertop is not built immediately after repair, then you need to carefully inspect the finish to identify defects.
If they are found, then you need to take measures to eliminate them (fill potholes in the flooring, replace broken tiles, etc.). The markup is done like this:
the height of the tabletop is noted and a mark is placed on the wall (if the floor is uneven, you will first have to mark the zero level, and then measure the height of the tabletop from it); then, at the height of the tabletop, its length is marked; next you need to make a projection of the future structure on the floor, measuring its length and width; Marking is done using a level; it is very important that the lines are laid strictly vertically or horizontally without distortions.
Assembling the frame
Now you need to cut the profile or beam according to the dimensions of the sketch. It is recommended to try on each part on site and number it so as not to confuse where to install which during the assembly process. Once all the parts are prepared, installation can begin. To complete the work you will need:
- a hammer drill or drill with an impact function for creating holes in a concrete wall;
- screwdriver;
- dowels;
- self-tapping screws
Completing of the work:
- drill holes in the frame elements for installing dowels in increments of 20 cm;
- the prepared part is applied to the installation site, a point on the floor or wall is marked through the hole in the part;
- holes are drilled at the designated points;
- drill holes in the walls and floor, the diameter of the hole should be 6 mm, and the depth should correspond to the length of the dowel;
- install the frame parts in place, insert the dowels and screw in the screws. During the assembly process, you need to periodically check the correct installation using a level;
- to make a protruding stand, you need to use two identical sections of the profile, they need to be inserted one into the other and fastened with self-tapping screws. A double profile is much more reliable than a single one, so it’s not worth saving;
- It is also advisable to make horizontal jumpers (stiffening ribs) double. The prepared jumpers are inserted into the groove of the profile installed on the wall and secured with self-tapping screws. The jumpers are attached to the protruding post through a bracket, which can be easily cut from a profile trim;
- the upper part of the frame is reinforced with stiffening ribs; when placing jumpers, it is necessary to leave space for installing the sink. The spacers must be made double, otherwise the finished tabletop will sag, even with a slight load;
- The last stage of frame installation is the final check of the correct location of the parts using a level.
Sheathing
The finished frame needs to be sheathed with plasterboard. They do the job like this:
- cut blanks corresponding to the profile dimensions;
- The upper blank is placed in place and the outline of the shell is drawn on it according to the template. This is a very crucial moment of work, since if you cut the hole incorrectly, then after installing the sink there will be unsightly gaps;
- then the cut parts are hemmed to the frame, screwing in self-tapping screws every 15 cm;
- GKLV sheathes the top and side parts of the structure, according to the sketch. At the last stage, narrow strips covering the ends are attached;
- cut a hole for the sink and install it;
- Next, all seams are grouted and finishing begins. Tiles or mosaics are used as finishing.
So, if you want to make a countertop in the bathroom, it is convenient to use moisture-resistant plasterboard. Working with this material is not difficult, but you need to be extremely careful when marking. It is best to decorate the countertop with ceramic tiles. The mosaic finish will look elegant.
What does a countertop sink look like?
The sink, which is installed on the countertop, has become popular not so long ago. In this case, any horizontal surface can be used as a tabletop.
The bowl itself is simply attached to it. You can also buy a ready-made design, in which the stand differs in that it has a special recess for the container.
Countertop sinks can be placed on different types of countertops. In this case, the bowls themselves can stand on the surface, be half immersed or completely recessed in the stand
The popularity of this design is simply explained. Free space is created under the tabletop, which can be used at the owner’s discretion. The sink is convenient to use because you can approach it from different sides.
If the container rises above the surface on which it is installed, and its shape is narrowed downwards, then a place is formed around it for cosmetic or hygiene products. Countertop sinks can look very impressive if they are not complemented by bulky cabinets. You can choose or make your own stand with an inconspicuous drain so that the container looks like it is floating in the air.
If there is a shortage of space in your bathroom, then this option will be the most successful. A floating bowl will take up little space and highlight the dignity of the room.
The sink looks very impressive, as if it floats above the surface of the countertop. Repeating this design technique is not so easy
Best answers
Nikolay Todorov:
It depends on what shape you want the base of the sink. If it’s not very massive, then it can be made from metal profiles and gypsum fiber sheets, and there is also an option from foam blocks, and then you can finish it with tiles and stone and mosaics
Sergey Gudovsky:
Artificial stone, I heard it happens. Lightweight and no tiles needed.
Luke' :
If the wall is thin, it won’t come off, but your movements will crack the entire tile. Strengthen it and frame it with mosaics - it looks amazing when the master does it.
Teamen:
I have just such a tabletop. Made by a good master. The frame of the countertop is made of profiles (aluminum profiles are light and durable) and is attached to the wall and there are two more stands made of the same profiles, plus the sink itself is attached to the wall on brackets. The frame is covered with plasterboard and covered with tiles. Everything is holding up very well. But if the wall is so fragile, then you can make four or more supports on which everything will rest. Is the wall between the bathroom and toilet that fragile? It is probably made of foam blocks, it must support the weight of the sink, and the weight of the countertop is distributed on the supports. But in Lute everything is as it should be. In any case, it weighs 5 kg. it won't. The weight of the tiles + the weight of the glue + the weight of the drywall is no longer a small weight. The wall can still be strengthened. Or make supports from metal corners and distribute all the weight on them.
Kinds
Bathroom countertops can be:
- hanging (hanged on the wall);
- linear (they are placed along the walls and their length can be equal to the length of the wall);
- corner. They are placed in corners, resulting in significant space savings.
Also available are countertops with:
- rounded edges;
- hard edges.
Finishing a plasterboard tabletop
After the plasterboard structure is ready, it should be brought to its ideal appearance using decorative finishing. Most often this is done using ceramic tiles. The tiles should be the same tone as the room. You can make it the same color, but the difference is literally 1 tone lighter or darker. Drywall tiles can be broken into different pieces to create different shapes and chaotic abstractions.
Regular ceramic tiles should be laid using special crosses that keep each tile in the correct position and identically spaced from each other. The tiles must be laid with a special adhesive applied to the drywall with a notched trowel. The glue must be moisture resistant.
An example of finishing a countertop with special tiles
In order to cut the tiles along the edges of the sink, you should use a template made and used previously from cardboard. The tiles should be cut carefully and so that they exactly follow the contours of the washbasin. The seam between the countertop and the washbasin should be treated with silicone or another sealant. In order for the tiles to replicate a perfectly flat surface, after laying, a flat board must be placed on top, which will press down the tiles.
After the glue has dried, the seams should be sealed with cement mortar or the same glue. Again, after drying, the seams are rubbed with a special solution with paint that matches the general background of the bathroom.
The process of grouting joints with cement mortar
Mosaics usually come in smaller sizes and often form part of drawings. It is laid according to the principle of laying tiles, only it requires more patience and time. The drawing is laid out in a separate place, and then each individual mosaic is taken from the drawing and laid on a surface prepared with glue. Excess glue can be removed with a wet cloth or sponge. The seams are sealed using colored grout, which is matched to the color of the tile.
Construction and design of a simple plasterboard countertop
Important tips.
- For a long service life of a plasterboard bathroom countertop, you need to buy high-quality materials, fasteners and dowels.
- Tiles or mosaics should be laid with waterproof adhesive.
- The primer must also be of high quality moisture resistant.
It’s not difficult to make a plasterboard countertop in the bathroom with your own hands. You should not skimp on materials. Because metal is susceptible to corrosion (galvanized profiles are required), and ordinary drywall can swell and deform from moisture.
Made from natural stone
Many of our wealthier fellow citizens install a stone countertop in their bathroom.
Such furniture is made from a solid stone slab, in which a hole is made for the sink, then it is carefully polished. It is distinguished by ideal qualities for bath furniture - durability and moisture resistance.
But it is important to remember that marble countertops cannot be cleaned with bleach or acids. They corrode the marble surface and can cause great damage to furniture.
Frame assembly
It is carried out in the following sequence:
- In order not to confuse the blanks, it is better to number them. Holes of 6 mm are made in each.
- Each profile is applied along the marking lines and through the holes it is marked where the dowels will be located.
- Drill holes for hardware in the wall. If the surface is tiled, scratch the enamel at the designated point.
- Using a puncher, which is inserted into the holes in the frame blanks, holes are drilled again to the length of the dowel in the walls. and on the floor.
- They take the profiles and put them in place, insert the hardware and fix the guides. The evenness of their location is checked using a level.
- The protruding stand is formed from two guide profiles, inserted one into the other and secured with self-tapping screws along the joint line.
- Along the upper markings, horizontal jumpers are fixed, which are also made double. Fastening is carried out with a bracket made from profile scraps and screws.
- Strengthen the frame with spacers. Two are placed on the sides, and two more are placed under the base of the tabletop.
Check the evenness of all guides and the quality of the connection, as well as the absence of gaps and backlash.
Advantages and disadvantages of the design
Like any other option, installing an overhead sink on a horizontal surface also has its undeniable advantages and disadvantages.
A small bathroom is not a problem. Having thought carefully, you can always invent a way in which everything that is needed in this room will be there.
Let's talk about the advantages first:
- The sink retains its original appearance for a long time. In general, such models have a long service life.
- For the manufacture of such structures, modern high-quality materials are used.
- By purchasing this sink model, you can save on transportation and installation costs. You can use any passenger car to transport the stand, brackets and bowl. Installation is also not too difficult.
- Since this design is compact, precious space in your bathroom will remain intact. The standard width of such models is 40 cm and length is 60 cm.
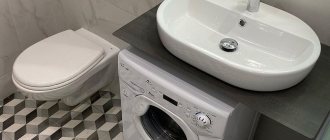
- An overmount sink placed on a bathroom countertop is a way to implement interesting design solutions. For example, the space under the structure can be used to place a washing machine under the sink. However, the upper plane of the bedside table can also be used as a tabletop. The presence of a bedside table with shelves and drawers in the bathroom is always justified.
- There are ready-made models that provide overflow protection. It is very comfortable. No one is immune from all sorts of misunderstandings that can lead to flooding of neighbors below. Therefore, a system that sends excess water to the sewer system will definitely not hurt.
- Bowls on the countertop are also attractive due to their price. They are usually not expensive, which is why this compact and convenient model is in demand.
In fact, this design has only one disadvantage: There is no specific place to install the mixer.
If you choose this plumbing fixture, you will need to decide where exactly to place the faucet: in the wall or under the sink.
Execution Process
In order for the tabletop to turn out beautiful and functional, you need to know the stages of its creation, follow the recommendations and correctly use all the necessary tools.
Tools you will need:
Installation diagram of aluminum strips for countertops.
- drywall;
- self-tapping screws;
- screwdriver;
- pencil;
- sandpaper;
- dowels;
- metal profiles;
- moisture-resistant glue;
- sealant;
- primer;
- decorative slats;
- jigsaw;
- putty knife;
- brush;
Treatment of gypsum plasterboard for waterproofing
Despite the fact that drywall is moisture resistant , it is necessary to take care of its additional waterproofing. Its moisture resistance is ensured by the coating, and it does not require additional processing on top and bottom. Sections are at risk; slats and moisture-resistant glue are useful for them.
The exposed edges of the drywall need to be sanded using sandpaper. After sanding, it's all a matter of primer. It is best to choose one that is waterproof too.
Installation and Installation
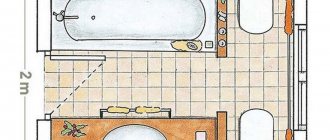
Bath countertop dimensions.
The creation of a unique interior object begins with the construction of a frame; a metal profile, which is usually used for working with plasterboard structures, is suitable for this stage. To create the correct frame, you need to decide on the general parameters (length, width), at what height the countertop will be, measure the sink and cut a suitable hole. It should be remembered that drywall can break if handled carelessly. To avoid unpleasant surprises, process it on a flat surface so that the sheet does not hang over the edges of the workspace. The ideal option would be a pre-prepared table surface. To accurately outline the hole for the sink, outline it directly on a sheet of drywall, this way you will get accurate measurements and you will not have to finish or add anything during the installation process.
A simple tabletop without additional sections or sophistications is easy to install. To do this, you will need corners with which you can connect the structure to the wall; for fastening you will need screwdrivers and self-tapping screws. Install the sink and treat the joint between the gypsum board and it with sealant, this way you will protect your structure from moisture.
Popular tile colors
The most relevant are the following color scheme.
White
Due to the snow-white tiled surfaces, it is possible to visually expand the space, fill it with light and give a more aesthetic image.
The photo shows a kitchen set with a white square tile base.
Brown
It is a natural, relaxed design that allows you to endow the environment with warmth, comfort and a certain nobility.
Beige
A soft and calm beige shade will undoubtedly create a very gentle and sophisticated atmosphere.
The photo shows an island with a sink with a base tiled in beige in the kitchen interior.
Blue
Thanks to the beautiful and multifaceted tile finish, the interior is filled with special coolness and peace.
The photo shows the interior of the bathroom and the countertop with washbasin, decorated with blue mosaics.
Green
It will add natural energy to the room, refresh the atmosphere and create a feeling of naturalness.
Multicolored
Thanks to the huge variety of different colors, you can easily dilute and transform even the most boring and monotonous design. For example, a rather interesting option would be a catchy and original cladding with multi-colored stripes of different widths.
Multi-level tabletop
A more complex version of the tabletop is a multi-level tabletop. Before you begin, you need to determine all the components, the number of levels and shelves.
The more elements there are in your design, the more carefully you need to take measurements. First, determine for yourself all the components, the number of levels, shelves, etc. Measure and cut out all load-bearing and decorative structural elements. At this stage, do not forget about proportions and the laws of physics. Cut the hole for the sink according to the already familiar principle. All sections exposed to moisture should be treated with moisture-resistant putty.
From the profiles we assemble the outline of the future tabletop. We cover the profiles with plasterboard. The bottom sheet is attached first; immediately after installing it, we move on to the supports so that the tabletop is stable and does not move around. After installing the sink in the prepared hole, the seams must be treated with sealant.
From chipboard
This material has long been traditional for furniture production. Furniture made from this board is distinguished by its aesthetics, relative lightness and low cost. But that's where the advantages end.
The disadvantages of such countertops are also very significant:
- relatively short service life compared to furniture made from other materials;
- Chipboard is very afraid of moisture and if it swells excessively, it can rot and collapse.
Therefore, if the owner nevertheless decided to pursue cheapness and chose a countertop made of chipboard, he must remember that its service life may be short-lived.
Note!
IKEA bathroom: TOP-140 photos and videos of IKEA bathroom design options. Manufacturer's advantages. Features of the collectionsPVC panels for the bathroom: TOP-180 photos and video reviews. Advantages and disadvantages of the material. Varieties of PVC panel models. Mounting methods
Bathroom faucet: types of faucets and coating materials. Shower switch mechanism. Built-in and external mixers (photo + video)
Special connoisseurs of furniture made from particle boards should take a closer look at laminated chipboard (laminated chipboard).
Installing a countertop in a bathroom
Installation of the countertop can be done in the following ways:
Floor-standing - when the tabletop is installed on legs or on a cabinet with pull-out shelves or doors.
This is the easiest installation method, as it only requires you to place the furniture where it is most convenient for you, adjust its height and install the sink on the countertop in the bathroom.
For the greatest convenience when cleaning the room, you should use cabinets under the countertop in the bathroom with legs, as this will allow the space to be ventilated and provide access for cleaning.
Countertops are installed using the wall method, leaving the space underneath unoccupied. Such tabletops are fastened with special corners or fasteners.
The product that will be wall-mounted should not be wider than 60 centimeters.
Today, there are a number of models equipped with drawers, shelves and compartments for storing various small items that are often needed at hand.
However, such products should be fastened quite securely, since they are massive and heavy.
Models are attached using a combined method - combining elements of a floor and wall countertop.
In this case, one part rests on the legs, and the other is attached to the wall.
Pros and cons of tiling
This finish has its advantages and disadvantages.
| pros | Minuses |
| Strength, practicality, durability and wear resistance. | The seams between the tiles accumulate dirt. |
| High hygroscopicity, steam and moisture resistance. | Over time, the grout may lose its original appearance. |
| Resistance to various mechanical influences and temperature changes. | During use, chips may appear on the edges of the tabletop. |
| Easy and simple care. |
Our next steps
- We attach slats to the bottom of the tabletop, which we used as beacons. They will serve as a support for covering the ends of the tabletop. We attach the corner outer profile to the end part of the tabletop with self-tapping screws. We carefully prime the cement layer and wait for the primer to dry.
- We dilute the glue according to the instructions. To ensure strength, you can add a primer to the mixing water (1 part primer to 3 parts water).
- We carry out the cladding from the “red corner”, i.e. from those sides that will be visible. We will start from the outer sides of the tabletop, which we will cover with full-size tiles. Using a notched trowel, apply a layer of glue to the cement layer.
- We lay the first tile on the corner of the countertop. Next, we lay out the first rows, maintaining an angle of 90°, checking the outer line using a level. Also, do not forget to check the horizontal plane in all rows using a level. The inner sides of the tile should be at the same distance from the lines we cut off.
A small nuance that we should think about before we start laying out the first rows: how will we veneer the end parts of our tabletop? There are several options to solve this problem. Let's consider one of them. The tile extends approximately one centimeter. The trimmed end tile or decorative border is glued at a right angle, with the factory side up. The size of the seam is adjusted with crosses and subsequently filled with grout. The underside of the undercut is hidden in profile. This is the easiest way to cover the end of a tabletop. To simplify the work, when laying the first row, we immediately set the end tiles. We observe the seams in the same way as on the main masonry. You can replace the end trim with a border. You can move the end tile up and attach the main masonry to it. It's just the way you like it.
- You can mount an external corner using an external corner tile profile. In this case, I advise you to place it under the top tile.
- Another option is to cut the tiles at a 45° angle. Please note that this is quite a complex job and, without special skills and additional equipment, it is better to do it using the two methods described above. If you decide to file, do not forget to sand the edges so that they are not sharp. It is possible to cover the end of the tabletop with shaped tiles or ceramic plinths. I’m not afraid to repeat myself: everyone here is their own creator and artist.
- Further installation should not cause any particular difficulties. We lay the tiles in rows - it is best to keep “long” rows. Don’t forget to insert crosses into the seams and remove excess mortar. We control the plane: when applying a level, there should be no gaps between it and the tile.
- When cutting tiles under the sink, you can allow an error of within 0.5 cm. The most important thing is that the sink must rest on the tiled surface along the entire plane. Note that porcelain stoneware is quite easy to cut with a lever tile cutter and very difficult to cut with an angle grinder with a diamond blade. In the case of sawing tiles under the hole for the sink, it is possible to make a template from cardboard and further mark it according to it. More details on how to lay tiles are described in the article “Tiles. DIY apron in the kitchen.”
So, we place the cut tiles against the walls and at the junction of the countertop with the refrigerator, cabinets, stove, etc. In the future, these joints can be closed using a plinth, having previously coated the seams with silicone sealant.
Types of countertops and their features
The countertop and sink are one piece (solid)
This is the best option as it is as hygienic as possible. The countertop and sink do not form seams (joints) into which dirt and bacteria can penetrate. After a breakdown, it cannot be repaired; the tabletop is replaced.
Most often, such a model is made of natural stone (possibly artificial stone) and glass. The only negative is the price. Under the countertop you can install a washing machine, shelves or a bedside table.
The sink is built into the countertop
This is a fairly common option and not the best. For the reason that a seam is formed between the sink and the countertop, in which dirt accumulates, moisture collects, and as a result, bacteria and fungi multiply.
Another disadvantage is that this dirt is difficult, almost impossible to wash off, since the gap is too small for this. This model is quite economical and convenient. Makes it possible to combine cabinets, shelves, and install a washing machine.
The sink bowl is placed on the countertop
This option, like the previous one, is less successful because it is not hygienic enough. A joint forms between the sink and the countertop, where dirt accumulates and, as a result, bacteria multiply.
This method of combining a sink and countertop is budget-friendly and easy to install. Under the tabletop you can place a bedside table, shelves, drawers.
Making the base of a future bathroom countertop with your own hands
3 sections of cabinet furniture are taken as a basis:
- cabinet under the sink, size 500x560x820;
- cabinet with retractable shelves 500Х560Х820;
- two-door cabinet, size 600x560x820.
In the future, the cabinets will be lined up along the bathroom wall. The section will be 1600 mm long and 560 mm wide.
To work you will need
Diagram of the grinder device.
Tools:
- Angle grinder (grinder) and disc on tiles;
- rasp (for processing the edges of cut tiles);
- putty knife;
- notched spatula;
- rags;
- jigsaw;
- stainless steel screws (3.5-3.8 cm) 200-400 pieces;
- felt-tip pen;
- pencil;
- electric drill;
- mixer;
- wood drill (5-6 mm);
- bucket for solution.
Materials:
- tile adhesive;
- crosses for tiles 2.5-3 mm;
- silicone sealant;
- protective composition for wood processing;
- primer;
- wood glue;
- waterproofing compound or quartz sand + liquid glass.
Scheme for installing overlays on the tabletop.
The base of the table top should be made of two sheets of softwood plywood, dimensions 1500 X 1500 X 20 grade FB or FSF.
FB is bakelized waterproof plywood (impregnated with bakelite varnish). This moisture-resistant plywood can be used in seawater and hot, humid climates.
FSF is a waterproof plywood glued with phenolic resin. Moisture-resistant plywood can be used outdoors.
Fastening the plywood must be done in at least 2 layers, overlapping. Before starting work, the plywood must be properly treated with bitumen mastic or a waterproofing compound for wood and impregnation.
Plywood should be cut taking into account that the fibers in all layers should run along the section. The plywood should protrude from the walls of the section on all sides by 3-5 cm. The joints of the plywood strips should not overlap the hole that needs to be cut for the sink. Plywood should be cut using a jigsaw.
The design will be quite heavy, so there is no need to skimp on the legs for the body.
The first layer of plywood must be fastened especially securely. The structure should be motionless. You need to attach the first layer of plywood to the side ties of the housings from below with your own hands (3-4 self-tapping screws on each side). The side walls must be tightened with self-tapping screws (1.5-1.8 cm) to the first layer of the future tabletop using metal corners.
Then you need to apply wood glue (wood glue, moisture-resistant PVA) to the top layer of plywood. The glue must be moisture resistant. It should be applied to the surface in a zigzag manner, and then the second layer of plywood should be pressed and tightened with self-tapping screws. To prevent the caps from sticking out, you need to first countersink the places where the screws will be attached with a drill. It is necessary to place screws in 15 cm increments both around the perimeter and deep into the sheets.
Using a stapler, you need to attach a painting mesh with a mesh size of 0.5-2 cm to the top of the second layer of plywood. It needs to be placed on the side edges of the plywood sheet and fastened with tension.
How to make a contact layer for tiles?
Tools used for tiling work: 1 – plastic tank; 2 – grater with sponge; 3, 4 – metal grater; 5, 6 – notched spatula; 7 – rubber grater; 8 – brush.
The cut DSP sheet should be impregnated with a primer inside. A layer of glue, which is intended for tile work, is applied to the top of the plywood with a notched trowel. The DSP sheet is installed and secured with self-tapping screws to the plywood in the upper part. The joints between the wall and the contact layer must be filled with silicone-based sealant. A strip of DSP sheet is secured to the outer side edges with self-tapping screws. The joints between the side edge and the strip must be treated with the same silicone sealant or tile adhesive. After this, the joints are coated with liquid glass.
A painting mesh should be installed on the manufactured surface and treated with a waterproofing compound. Next, all layers of table tops and edges that are located on the sides are processed.
When the surface is dry, you can begin cladding.
There is another manufacturing technology that has gained recognition in the West.
Stages of laying tiles.
- Two layers of plywood are fastened together.
- The side edges are treated with a waterproofing compound.
- A painting mesh is fixed to the surface.
- All this is treated with a waterproofing compound.
- Beacons are displayed. For beacons, 2x3 cm slats, gypsum profiles or racks should be used. The beacon installation diagram is shown in Fig. 1.
- You will need to make a cement cushion 1-2 cm high.
- The first rail is installed and secured to the side edge of the tabletop so that it is located 2 cm above the plywood sheet. The rail is fixed strictly level, and it must be maintained horizontally. In the future, the slats will need to be removed, so you should not secure them with a large number of screws. You will need to use 2-3 pcs.
- The second rail is attached flat along the base. Using a level, you will need to check the horizontal line between the 1st and 2nd beacon slats.
- Then the beacon slats are placed on the sides of the tabletop, then they are secured with self-tapping screws.
- In the place where the hole was cut under the sink, you will need to screw two slats to the piece of plywood that was left as a result. The piece is installed in the hole under the washbasin and secured with self-tapping screws, which are screwed through the slats into the plywood.
- Next, the solution is prepared. As a cement cushion for the countertop being made, you can choose tile adhesive, a mixture of sand and cement, or a sand-cement mixture with the addition of glue. When preparing the solution, you will need to add 1 part latex to 2-3 parts water. This is necessary in order to obtain a durable coating that will not absorb water.
- The solution that has been prepared must be applied with a trowel and leveled over the beacons with a large spatula. After the solution has set, you will need to unscrew the slats, first making contours along the hole for the washbasin with a spatula. A piece of plywood is removed along with part of the applied mixture.
- After this, the edges are trimmed. The surface is smoothed with a metal spatula or trowel. In order to get a smooth surface, you need to lightly moisten it with a spray bottle.
- After the applied solution has completely set, it is necessary to remove the beacon strips. If a mixture of sand and cement was used, then you need to wait 5-6 hours. Tile adhesive requires approximately 12 hours to dry.
- The edge is puttyed with a solution, after which the solution is added to the places where the beacons are located. The entire surface should be leveled with the layer of mortar and then smoothed.
- The countertop should be left for 3-4 days.
Why drywall?
In order for the design to be of high quality, it is necessary to carefully select the material. In this case, it will be drywall, because it is versatile, practical and easy to install. This is an ideal option because it is very easy to work with; you can make the design yourself without inviting help.
To make a tabletop, you will first need to create a frame for it using a metal profile, then cover it with plasterboard sheets and start tiling it (this can be tiles or mosaics). As with other plasterboard structures, the countertop requires markings and a drawing; they will help calculate the amount of materials needed, as well as determine its location.
Installation instructions
Installing an overhead sink is actually similar to installing a regular kitchen sink. The only nuance is the insert into the tabletop.
The slot for the siphon in the countertop should be of such a size that the drain pipe fits into it, no more. There is no need to cut a large hole; the siphon flask is placed lower.
Sealing the countertop sink before installation
There are several ways to install mixers:
- If the sink has a connector for the faucet, then you can install it there, but then the hole in the countertop will have to be cut a little larger than just for the pipe.
- If there is no hole on the washbasin, you can install the faucet by cutting it into the countertop.
- Another installation option is a wall. You can do the same as when installing a bath mixer.
Advice.
When choosing an option for connecting the mixer, it is necessary to take into account that each slot in the countertop must be accompanied by mandatory subsequent sealing. When purchasing, you may be offered a special siphon with an additional clamping nut. You can use that, or you can get by with silicone.
The mixer above the countertop sink can be mounted into the wall
Basically, that's all you need to know about installing an overmount sink. As we can see, it is not much different from the installation of other washbasins.
Installation of a water lily shell
Mounted water lily models are installed on top of the washing machine. Installation is done as follows:
- Mark the locations of household appliances and washbasins. Place the machine without connecting it. Leave a distance of 2-3 cm between the body of the appliance and the sink. Holding the sink, mark the brackets.
- A hole is drilled according to the marks made in advance. If the old equipment had fasteners, the new one can be installed on them.
- The siphon begins to be installed after studying the instructions. Each threaded connection is equipped with a seal. After which the plumbing fittings are installed under the bowl. A rubber gasket is placed on top of the bell and a decorative grille is secured. The washing machine hose is connected to a special outlet of the siphon. The corrugated part of the drain system is discharged into the sewer pipe.
- Fix the bowl. A hook is inserted into the hole on the back wall. It is secured with a dowel and a self-tapping screw. The bracket bolts are screwed in until they stop. The surfaces of the holders are pre-treated with sealant.
- Install the mixer. For this purpose, there is a hole located between it and the body. Place the seal.
After completion of the work, the water supply is resumed and the quality of the connections is checked.
Shape of countertop sink
Since a variety of materials can be used to make overhead containers, the finished products are given different shapes.
The round sink is traditionally good. This one is made of glass and looks more like a glass vase than a sink
On sale you will find bowls of the following shapes:
- Round. This is the most capacious form. In addition, round models are similar to ancient ablution bowls, so they have additional charm and will not go unnoticed.
- Oval. If the room in which you are going to install the sink cannot boast of large dimensions, it is better to choose another model. An oval needs space to show off its full appeal.
- Square or rectangular. But this shape is chosen quite often. Rectangles are well suited for bathrooms in different styles. The only nuance is that a bowl of this shape should be harmoniously combined with other plumbing items located in the same room.
- Triangular. Unexpectedly, this form can be comfortable, despite its apparent instability. It can be placed, for example, in a corner of the room. There it will take up little space and organically complement the interior.
- Non-standard. Today, custom-made models can be given any, most incredible shape. But in the pursuit of originality, it is important not to miss the essence of the product and its functionality.
Today you can bring to life everything that your wild imagination suggests. Sometimes the result is such non-standard design solutions
Material for the production of washbasins
Despite the constant search by designers for new ideas and materials for production, washbasins made of sanitary porcelain and sanitary ware remain the most popular. This material is resistant to scratches and cracks, and does not collapse under the influence of temperature changes.
And although they can split from an impact, this still happens quite rarely. The traditional white color of the material will suit almost any design.
Glass sinks look airy and elegant. The disadvantage of such washbasins becomes obvious after you start using them - every drop of water, when dried, leaves a mark. Since it is unlikely that anyone will wipe it after each use, such a washbasin does not look very neat. From this point of view, frosted glass behaves much better.
Natural or artificial stone sinks can be made from marble, stone chips, sand and a binder. It would seem that this is a very durable material, but even with stone products problems can arise if used incorrectly - small cracks appear, or even completely split.
The manufacturer describes how to properly care for such plumbing fixtures in the product instructions. Most often, there are recommendations to wipe them dry and not to use too hot water.
Like any product made from natural material, a countertop sink made of stone always looks expensive and elegant.
Wood sinks are also produced, using hardwood with a beautiful texture. Washbasins arouse interest simply by the choice of material, and in combination with a successful design they can become a real decoration of the bathroom.
The wood from which plumbing fixtures are made is treated with special oils that prevent water from penetrating into its pores. Caring for such a sink is quite difficult. It cannot be cleaned with detergents containing high acids or alkalis, or with abrasive substances.
To produce sinks from natural wood, oak, teak, and bamboo are used. Some of them require periodic treatment with special oils
They also produce overhead sinks made of acrylic. The material is more familiar in connection with the production of bathtubs, but washbasins made from it are also deservedly popular. Strength, lightness, resistance to temperature changes, ease of maintenance, as well as the ability to create the most incredible design solutions make acrylic attractive to both buyers and manufacturers.