Some refuse to install suspended ceilings because they believe that they become stuffy, they smell unpleasant and the surface stretches in the heat, quickly losing its attractive appearance. Others share lots of beautiful photos ten years after the renovation and explain that the problem is due to improper air exchange. Does properly thought-out ventilation in a suspended ceiling really help to avoid stuffiness and preserve the attractive appearance of the structure for a long time? And, if this is true, how to ensure a constant flow of clean air? Let's figure out whether suspended ceilings allow air to pass through and why ventilation grilles do not help improve the microclimate situation.
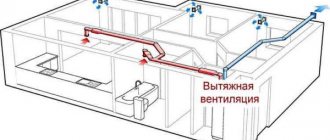
Ceiling ventilation using exhaust fans
Axial fans can be used for both suspended and suspended ceilings. They are mounted both on the wall and on the ceiling. When choosing a device, you must consider the following characteristics:
- noise level;
- performance;
- protection from moisture.
In the latter case, it is important to get splashed while bathing in the bathtub. Ceiling fans may have a check valve installed. It prevents “exhaust air” from entering the room when the device is turned off. Expensive fan models are equipped with the following additional functions:
- on/off timer;
- motion sensors;
- hydrostat.
Such fans forcefully circulate the required amount of supply air in the toilet or bathroom. It is in this room that the humidity level is higher than normal. Natural ventilation cannot provide such a volume, air stagnation occurs, especially in the off-season.
Fan installation
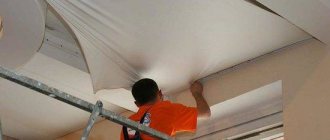
The mechanical device is built into the suspended ceiling. The additional ventilation pipe will be connected at one end to the fan and at the other to the ventilation shaft. The air duct can be corrugated or rigid PVC. First of all, an air duct is installed, and the next step is the installation of a system for a suspended stretch ceiling. When the film is stretched, a hole should be cut in it equal to the diameter of the air duct cross-section. It is equipped with a protective ring and will prevent the stretch ceiling film from spreading. The device is attached to the air duct, and then the decorative housing is secured.
Ceiling ventilation grille
If the ceiling is of a slatted type, then it is necessary to take measurements of the fan and mark the slats in the ceiling. Using available tools, cut a hole in the designated places. Next, you should connect the air duct to the fan and secure the device.
Where needed
The bathroom is the first place where you should focus your attention. A large amount of moisture regularly accumulates in this area. In this case, you should use larger vents than in other rooms to supply as much air as possible.
There are not many problems with humidity in the kitchen, but there are others: grease and soot that also get into the air. Like water, they can settle on all surfaces. It is worth paying attention to this and calming down in advance, because it will be almost impossible to clear the building.
When is ventilation required in a suspended ceiling?
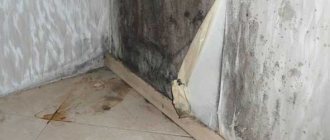
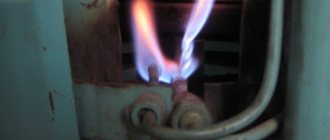
This is what improper ventilation of a stretch ceiling can lead to
There may be several reasons for installing a ventilation system in a suspended ceiling. And if there is a question about installation, it is best to decide in favor of a ventilation system.
Ceiling ventilation is recommended in the following cases:
- Use of materials with poor throughput.
- Formation of condensation on the ceiling. The stretch ceiling fabric is a thermal barrier that divides the room into two parts and maintains temperature on both sides. Accordingly, the difference between these temperatures entails the formation of condensation in the interceiling space. High humidity can cause problems with the wiring located there.
- The appearance of mold, fungus formation. Humidity in an empty space, darkness and heat can also encourage mold and mildew to grow. In most cases, ceiling manufacturers treat the material from which it is made with a special antibacterial solution, but over time it loses its strength, and sooner or later humidity causes the development of microorganisms.
- Sagging of the canvas. This phenomenon can have many reasons, with seasonal increases in air temperature having a particularly strong effect. If this is not a consequence of technical problems and design problems, then it is best to install a ventilation system to equalize the temperature in the spaces of the room.
- Vibrations of the canvas. This happens due to the difference in pressure in the room and in the interceiling space when opening doors or windows.
Thus, installing ventilation can greatly improve living and working indoors. It protects against condensation, high humidity, and dampness.
In addition, ventilation prevents the formation of mold and fungi, which negatively affect human health.
If the ceiling covering is made of textile fabric, ventilation will help prevent negative changes in its appearance.
Requirements
The requirements for ventilation systems are based on safety and efficient operation, so it is not recommended for homeowners to neglect them. Let's list the basic rules:
- The noise level of ventilation equipment installed in a residential building should not exceed 30 dB. Use only quiet appliances in the bathroom.
- To maximize duct exhaust, a ceiling exhaust fan is positioned opposite the front door, from which it draws fresh air.
- The unit should be installed as far as possible from electrical heating mechanisms, as it can withstand temperatures up to 50 degrees. If the temperature rises to a critical level, the fan will fail.
- The power, performance and energy consumption of the device depend on the size of the room and frequency of use.
- The air duct ventilation shaft must be clean. Standards for installation and indicators of ventilation systems are given in SNiP 41-01-2003. This document describes the maximum permissible dust content in the ventilation duct and the air exchange rate.
Why do you need a diffuser?
For ventilation to work effectively, air flow distribution is necessary. If additional devices are not used, air will be supplied in a continuous stream, which will significantly reduce the efficiency of the system. In this case, the air circulation will affect only a small part of the room, and the direct flow will provoke a draft.
Classification
Diffusers for ventilation differ in the following parameters:
- Installation method - ceiling, floor, or wall units.
- Purpose – supply, universal, nozzle and exhaust.
- Installation – internal and external.
- Material: plastic, metal.
Most often in modern interiors you can find ceiling and slot diffusers. Slotted elements are designed for use in rooms with ceiling heights up to 4 m. They are universal and work both for air removal and air supply. The design of these elements consists of a metal body with slotted holes. A cylindrical roller installed in the housing controls the direction of the air stream. As a rule, these elements are equipped with an air flow control system.
The height of the holes can vary from 8 to 25 mm, and the length up to 3 m. Thanks to this design, diffusers can be mounted in a continuous line. These models are installed in wall structures and suspended ceilings. The installation height must be at least 2.5 m.
Ceiling diffusers can be exhaust or supply. The shape of a ceiling diffuser can be round or square. The size of round elements in diameter can vary from 10 cm to 60 cm. Square ones can have a side size from 15 to 90 cm.
Ceiling air distributors are mounted in suspended ceilings, plasterboard structures and suspended ceilings. The distribution of air flow in ceiling elements can be turbulent, fan, conical, vortex and nozzle.
Regardless of the shape and installation method, the following requirements apply to air distributors:
- Low noise during operation.
- No drafts.
- Stylish design.
It is by these three criteria that professional designers make their choice. Today there is a large selection of different models on the market. The most popular are round and slotted instruments.
General information
Tips for choosing cornices
Helpful advice! If you hang a ceiling rail across the entire room width, the curtain can be extended on both sides of the window. This will allow as much light as possible into the room.
Dimensions and depth of recess for curtains
Initially, the dimensions will depend on the selected cornice and its placement in the room. For a lightweight one, which is designed for thin curtains and tulle, a width of a couple of centimeters is sufficient. For a wider one, on which 2-3 types of fabric with different weights will be hung, at least 10 cm will be required. Other factors will influence the niche parameters for a curtain in a stretch fabric ceiling:
When determining the width, it is necessary to take into account the dimensions of the window sill and the location of the battery. In order for the curtains to hang perfectly evenly, they should never touch the radiator. But a very large indentation reduces the usable room area, and usually the ideal width is 0.2-0.25 meters. The length usually coincides with the wall length. But it can be reduced depending on the layout of the room, for example, when the window is located in the corner of the room. The minimum size may be slightly wider than the window frame, at least 0.1-0.15 meters from each side, and then the curtains should cover the edges of the window sill. The depth of the cornice niche will depend on the installation method and frame parameters. The minimum distance from the rough-type ceiling is 5-7 cm
It is also important to take into account the size of the curtain rod, hooks and tape; they must be completely hidden behind the canvas. Moreover, it is necessary to add approximately 8 cm for angular vision compensation, because we are looking at the recess from bottom to top
It turns out that the ideal depth is from 15 to 20 cm. You also need to provide additional space if you are planning to install a hidden light system.
Please note that in a very deep niche (for example, in two-level structures, the indentation reaches 0.4-0.5 meters) it is inconvenient to attach the crossbar and hang curtains. https://www.youtube.com/embed/dOOxJL4Y-MU
Recommendations for installing a diffuser
Diffuser installation
- The fastening element should be selected depending on the shape of the membrane and the structure of the ceiling, walls or floor.
- This element must be installed at the construction stage of the building structure, in accordance with the design plan.
- Make a mark on the placement of the fastener on the surface where you plan to install it.
- Mark the place where the ceiling and its frame are attached (when embedded in plasterboard, or mounted in a suspended ceiling).
- Mark the dimensions of the structure on the wall (to determine the occupied space).
- Using a grinder, make a reduction in the wall (the gap should be approximately 5 mm).
- Next, you need to insert the air distributor housing and put a mark on the wall to indicate the mounting points.
- Using a hammer drill, make holes of the required diameter.
- Apply sealant to the joints with the wall and fasten the element.
- Attach the nozzle using bolts and self-tapping screws.
- The front panel is dismantled and air distribution parameters are set.
- After installation of the membrane is completed, the configuration stage is performed. It includes the connection and connection of the measuring nipple and micronanometer.
- The device should be washed when it becomes dirty using warm water and detergent.
Thus, the process of using air distributors when designing ventilation is not a very complicated action. Installation, dismantling and maintenance of the air flow distributor can be done with your own hands using special tools and without special costs. Perhaps the most important point is the calculation of maintenance, the efficiency of the distributor and oxygen circulation, and proper and careful placement on the surface of the wall or ceiling for harmonious use in the interior.
Complex design options
For more complex ceiling design options, various options are used for installing the cornice in a niche, which can have a curved shape. For example, a niche for cornices with a bend.
In this case, instead of wooden blocks, a U-shaped metal profile or a stacked structure with metal corners and a bumper is used. With this design, you can do without attaching a baguette. The recess for the harpoon is created in advance.
Using hidden metal profiles, you can create niches with a bend for complex multi-row hidden cornices. Curved areas are of some interest in terms of design excellence. Another complex option is a niche in a suspended ceiling, which is mainly designed for installing hidden lighting. Here, another element is added to the niche design - a baguette with a recess, especially for laying the LED strip.
Everything else is done using the same technology that was described above, in a traditional, standard or budget version.
How to make a hood under a suspended ceiling
Installing an exhaust structure is quite a difficult task. However, you can cope with it yourself, having certain knowledge and skills. To prevent possible problems, it is necessary to involve experienced specialists who know what is needed to install a hood.
Before installing PVC, you must perform a number of mandatory operations:
- thermal insulation of the concrete base of the ceiling, which will significantly reduce the amount of condensation;
- sealing all seams and joints of ceiling and wall structures;
- strengthening the surface of the ceiling base using special building compounds. This will prevent the plaster and concrete particles from falling off;
- all wooden ceiling surfaces must be treated with antiseptics and fire retardants;
- The inter-ceiling coating is treated with special substances to prevent the penetration of rodents and insects.
After the base of the ceiling is prepared, you can begin laying ventilation ducts, after which PVC will be installed
Particular attention should be paid to the installation of ventilation grilles that will be responsible for air exchange
Installation of this structure is carried out according to the following scheme:
- before installing the PVC sheet, it is necessary to secure the air ducts, stretch the wiring, fix the exhaust duct under the suspended ceiling, and check the tightness of all joints;
- after this, a PVC sheet is installed, in which holes are carefully cut according to the size of the ventilation grilles;
- To ensure that the holes for the hood in the suspended ceiling do not lead to deformation, protector rings are put on them, after which a ventilation grill is mounted and secured in the resulting opening.
How to make a hood in a suspended ceiling in a bathroom
If the bathroom has functioning ventilation, there will be no problems with installation. For it to work well, it will be enough to install ventilation grilles on opposite sides of the PVC structure. They need to be fixed using adhesive. The grille will be attached to the outer surface, after which you need to cut out part of the film from the inside.
If the bathroom does not have an exhaust structure, you will need to install it yourself. To ensure air exchange, you need to install an artificial ventilation system. To do this, prepare all elements of the system, including the heater, fan and air filters. Before installing PVC, it is worth laying cable channels for laying electrical wiring and ensuring the installation of a hood.
The specificity of installing a hood in a bathroom is that air masses must change constantly. Foreign odors may accumulate in this room, so the task of ventilation will be to remove them in a timely manner.
- determining locations for installing exhaust pipes;
- laying pipes for exhaust hood under a suspended ceiling, electrical wiring;
- fixing all hood elements to the concrete base of the ceiling;
- installation of a stretch ceiling, including installation of fastening baguettes and tensioning of the canvas;
- fastening of decorative grilles that will mask the ventilation ducts.
How to make a hood in a suspended ceiling in the kitchen
The installation of a hood in a suspended ceiling in the kitchen follows strict regulations, consisting of a number of mandatory actions:
- Electrical power is supplied to the location of the fume hood. All switches and sockets must be grounded.
- Using a simple pencil, you need to mark the place where the structure will be fixed in the suspended ceiling. If it is located at a considerable distance from the ventilation shaft, it is necessary to use flat pipes for air circulation, which will be hidden behind the suspended ceiling.
- After marking, fasteners are applied to the ceiling base and places for self-tapping screws are marked. It is recommended to use anchor bolts as fastening elements.
- Prepare the air duct assembly for exhaust under the suspended ceiling. If it consists of several parts, they must be fixed together with sealant.
- The ventilation duct is attached to the shaft. It is necessary that the position of all parts of the structure be correct. You can verify this using a building level.
- After everything is securely fixed, you can proceed to the installation of PVC. First you need to make holes on it and attach tread rings to them. Pipes responsible for air exchange are discharged through them.
Expert advice
Let's look at some of the nuances of masking the exhaust pipe.
When choosing a plastic air duct, it is important to ensure that its diameter is no less than the diameter of the ventilation shaft opening. A plastic sleeve over 3 meters long is not the best solution
A plastic sleeve over 3 meters long is not the best solution.
Additional LED lighting will really transform the kitchen space. It will help make the projection of the box invisible, or, conversely, highlight it in the kitchen facade.
If the ventilation shaft opening is located away from the hood, the sleeve can be rotated and laid through the side wall of the next wall cabinet.
How to mask heating risers
Heating risers are masked in several ways.
Seal the pipes into the wall or floor. The method is labor-intensive, but its main drawback is that if the pipe is damaged or leaks, the wall or floor will have to be dismantled.
The pipes are hidden with a decorative plasterboard box. Mark the place for attaching the metal frame, taking into account that there must be at least 3 cm of space between the pipe and the box. The frame is secured with horizontal jumpers. Then it is sheathed with gypsum board sheets. The joints are covered with sickle tape, putty, and rubbed. Next, the box is decorated with decorative materials or painted to match the color of the room.
In a similar way, you can disguise sewer pipes, water pipes, and, subject to safety precautions, gas pipelines.
It is better to camouflage such communications during the period of their installation, which will allow the boxes to be installed as discreetly as possible.
What is better: plasterboard box or suspended ceiling?
The ceiling will completely hide the sleeve, it will not be visible. But if you have a ceiling below 2.60 in the kitchen, then the option of placing the air duct above the suspended ceiling is excluded.
The plasterboard box will only disguise the exhaust pipe, leaving a protrusion. But if the device fits into the interior, that will be enough.
A suspended ceiling made of panels or ceiling tiles can be easily disassembled if necessary. Sometimes it is necessary to dismantle only the part of the structure located under the air duct.
How to install corrugation on a hood
Corrugated air ducts are soft, weightless aluminum products. Easy to install, bend well at any angle.
During installation, it is better to stretch the corrugation so that subsequently dirt does not accumulate in its ribbed surface.
The diameter of the sleeve should either match or slightly exceed the size of the outlet of the hood. A plastic cylinder with a check valve is installed in this hole.
The end of the corrugation is put on this cylinder and secured with a clamp. The other end of the corrugation is connected in the same way to the ventilation hole through a special air duct. Turn on the hood and apply a sheet of paper to it. If the paper holds, then there is traction.
Ceiling diffuser: installation
There are two ways to connect diffusers to ventilation ducts: directly or through an adapter (static pressure chamber). The second option is more correct, but it requires a larger gap between the base and decorative ceilings.
If the shape and dimensions of the ceiling diffusers and ventilation pipes match
To connect the ceiling diffuser directly to the ventilation pipes (branches), a tee/splitter is placed in the ventilation pipe at the installation site. The device is placed in the free third exit.
Cutting a hole directly in the pipe for its installation is the wrong decision. The housing protrudes beyond the pipe, impeding the movement of air, the performance of the system drops, and over time a dust plug forms, which can completely block the clearance. In general, this should be avoided.
The outlets from the main pipe must be selected so that they can be conveniently connected to the diffusers. It is not difficult to connect a round diffuser to a round outlet from the air duct, and a rectangular diffuser to a rectangular one
It is also important that their sizes match. This simple truth must be remembered when creating a system, choosing tees or making bends with the appropriate parameters
If the shape and size match, installing a ceiling diffuser is not a problem
Diffusers of matching sizes are installed in ventilation ducts simply by inserting them. Models that are small in size and weight can be fixed to the box using sealant (neutral silicone). This is how models with a round base are usually attached.
For suspended ceilings of various types (plasterboard, plastic, Armstrong), a special fixation system has been developed - Clip in. It consists of spacers like those you see on recessed ceiling lights.
More massive square/rectangular models are attached to the walls of the box using self-tapping screws or on hangers from the ceiling. The first option is simpler, but it is better not to use it, since dust collects on the protruding self-tapping screw. Unless the design provides special protrusions for fasteners. Otherwise, over time, a solid plug will form in the place where the self-tapping screw sticks out, preventing the passage of air.
An example of using an adapter - a round ceiling diffuser is connected to a rectangular ventilation duct
If the outlet is made of corrugated material or there is a desire to do everything “right,” heavy cases are suspended from the ceiling on studs or hangers.
Using adapters
Adapters or static pressure chambers help to avoid such unpleasant phenomena as drafts. In this tank there is a uniform redistribution of air, which flows in an even flow over the entire surface of the grille. But these devices have a significant drawback - they “steal” the ceiling height. Models with side connections are smaller in size, but still take up enough space.
Types of adapters for ventilation ceiling diffusers
Most often, the static pressure chamber is a parallelepiped, to the bottom of which a diffuser is attached. On the top or side there is an outlet for connecting a ventilation duct. It can be of any required shape: circle, square, rectangle, oval.
Adapters available:
- With built-in rotary valve. If the diffuser model does not provide for adjustment, this can be done using an adapter.
- With removable filter. They also allow you to clean the incoming air.
- With air flow divider. This is a sheet of metal with a small cell. Placed on powerful supply systems, it allows you to evenly distribute the air flow over the entire surface of the grille. .
Static pressure chambers for ventilation diffusers are most often made from galvanized steel. Sheet thickness - 0.5-0.8 mm. There are companies that will make a device according to your parameters. There are also standard adapters on sale for standard solutions. They can be made of steel (galvanized, stainless) or plastic.
Plastic adapters fit into corrugated or plastic air ducts
If necessary, the static pressure chamber is lined with insulation. This is necessary so that when the warm surface of the adapter interacts with cold air, condensation does not form on it.
One way to install an adapter for a ventilation diffuser
If the diffuser is connected via an adapter, the main task is to secure this device. If it is a suspended ceiling, you can attach the camera to profiles. In the case of a suspended ceiling, you will have to hang it from the main ceiling. The methods are known: studs or perforated hangers.
Drywall - accessibility and creativity
The popularity of drywall can be explained simply: the inexpensive material allows you to create a perfectly even coating and gives scope to your designer’s imagination to create a room of high aesthetics. From it you can cut out parts of a composition of various shapes and sizes, create ceilings of various levels, and easily drill holes for lighting or decoration.
Dimensions and weight of sheets
The design of plasterboard blocks is simple: at the top and bottom they consist of 2 sheets of thick cardboard; between them is a layer of gypsum 12.5 mm thick for standard models and 6 mm for flexible sheets, which are used to create wave-like structures.
Structure of plasterboard sheet
The width of all sheet models is standard - 120 cm, the length can vary from 250 cm to 330 cm, and the area - from 3 to 3.96 m2. The weight of the sheets depends on the brand of drywall:
- GKL - standard sheets of material without additional functions.
- GKLV – moisture-resistant material; used in kitchens, bathrooms, laundries.
- GKLO is a fire-resistant material for rooms with increased fire hazard.
The heaviest, as can be seen from the table above, are fire-resistant sheets: with an area of 3 m2, they weigh over 31 kg.
Dimensions and weight of drywall
Installation
The disadvantages of ceiling upholstery using plasterboard include the difficulty of installing the structure.
- First, a profile frame is attached to the ceiling on hangers, taking into account the height of the lamps that will be built into the ceiling.
- Plasterboard sheets are mounted on the frame. It is difficult to fasten sheets alone - they are heavy and brittle.
- Plasterboard coating involves all types of ceiling finishing: putty, primer, painting. Each stage is additional time for complete drying.
- Multi-level and combined compositions require the creation of preliminary design sketches and calculations.
Installation of a single-level ceilingScheme of a two-level ceiling
Types of structures
The profile frame and sheets of plasterboard reduce the height of the room by 30-40 cm - if the height of the room does not exceed 2.5-2.6 m, you should abandon this option as plasterboard.
Single-level design
With a room height of 2.7 m, you can make a single-level ceiling from plasterboard. Its advantage is reliability and durability. The structure, installed once, will provide a smooth surface for many years. It can be decorated with painting, wallpaper, painting, and experimenting with lighting. Light chandeliers, LEDs, and spotlights are placed on the drywall.
Single-level ceiling: simplicity and originality
Multi-level
The height of the rooms from 3 m allows you to create a two-level structure, and high ceilings from 3.3 m allow you to create three levels. Multi-tiered ceilings are an element of decoration for festive halls, galleries, theaters, and restaurants. They allow you to create luxurious compositions from lighting elements in the rooms of spacious apartments.
Two-level figured ceiling with LEDs
Curly
Designing figured plasterboard ceilings requires a lot of taste, aesthetic sense, and design skills.
It is important that all elements are proportional and in the same style, in harmony with the walls and furniture. A preliminary sketch is required to complete the work.
Figured ceiling in the hall with a chandelier and spotlights
Pros and cons of drywall
The advantages of drywall include:
Disadvantages of plasterboard finishing:
- installation difficulties, duration and high cost;
- finishing work is accompanied by noise and a large amount of fine dust;
Table: Cost of installation of plasterboard ceilings (RUB/m2)
| Installation | Price |
| One level | From 450 |
| Two levels with rectilinear elements | 600 |
| Two levels with curved elements | 840 |
| Figured level transition | 900 |
One sheet of plasterboard costs from 420 rubles, the price of a plasterboard ceiling with installation will be from 900 rubles/m2 (without painting and decorating work), and more than half of the cost is for installation work.
Criterias of choice
Even if you have decided which type of device from the list is suitable for your kitchen, you still need to arm yourself with additional technical knowledge.
Performance
According to construction and sanitary standards, a coefficient has been calculated for each room, with which you can determine how much air should be replaced with fresh air in one unit of time.
To calculate the power of a ventilation device, a hood built into the ceiling or a wall-mounted one, the volume of the kitchen is multiplied by the air replacement factor. To the result obtained, add 15% - the resistance of the filters and the loss of power at the bends of the air duct.
Noise level
The exhaust fan, which is an indispensable part of the kitchen hood, should not produce noise above 40-50 dB. Some devices, in order to increase power, are equipped with several such fans at once. If your kitchen boasts a large area or high ceilings, be prepared for increased noise levels from the operating ventilation unit.
Filters. Let's start with the fact that a grease filter comes complete with all types of hoods. But it can be reusable (steel, aluminum) and disposable (plastic, padding polyester and non-woven fabric). Coal ones, as already mentioned, are installed on recirculating hoods to trap extraneous odors. The latest filters are disposable. That is, their service life is quite short.
Control Panel
Slide switches are economical from a financial point of view, but are not durable and quickly become overgrown with grease. A keypad is the best and not too expensive option. On “advanced” hoods a touch panel is installed.
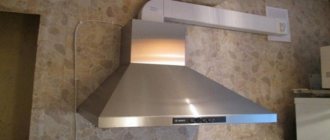
Construction and appearance. A hanging hood is the cheapest and most convenient option for a kitchen where it is not possible to connect it to the ventilation duct. The built-in model is suitable for compact kitchens: small dimensions, pull-out metal filter. The dome hood resembles an open umbrella in shape and is mounted on the wall or ceiling.
A hood with built-in lighting is a popular option among consumers
Best Fan Models for Bathrooms
| Brand | Manufacturer | Power | Performance | Price |
| CATA E100GTH D100 | Spain | 8 W | 95 m3/h | 6630 rub. |
| Blauberg 100 Aero | Germany | 14 W | 102 m3/h | 1900 rub. |
| VENTS 100 D | Ukraine | 14 W | 95 m3/h | 670 rub. |
| Equation D100 29dB(A) | Spain | 15 W | 95 m3/h | 1320 rub. |
| ERA 4S | Russia | 14 W | 80 m3/h | 424 rub. |
Why is ventilation needed?
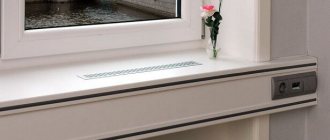
Natural ventilation of the bathroom through special channels in the walls is available in any room, but when installing a stretch ceiling in this room, it may be necessary to install ventilation grilles and fans in the stretch ceiling itself.
To understand why this is necessary, let's look at several common disadvantages of PVC stretch ceiling coverings:
- Very often, after installing a polyvinyl chloride stretch ceiling, an unpleasant smell of mold appears in the bathroom. This problem arises due to the fact that the tension covering does not allow air to pass through itself and the space behind the PVC film is not ventilated. All this leads to condensation collecting between the suspended and base ceilings and creating constant high humidity. This environment is favorable for the development of mold and fungi.
- Another problem with film ceilings is the film being pulled into the ceiling space when the doors to the bathroom are opened. As a result, the tension surface is so pressed against the concrete ceiling that the silhouettes of all communications, wires, ducts and protruding structures become visible. This is not only unsightly, but can also cause the tension material to be damaged by sharp corners and edges of communications.
Fans and ventilation grilles in suspended ceilings will help to cope with all these problems. They will help to effectively ventilate the space behind the tension film, which will prevent the accumulation of condensation there, and therefore will not create a favorable environment for microorganisms. The ventilation grill will help equalize the pressure in the room and in the space behind the PVC film. This will forever save you from the problem of the ceiling retracting.
However, for effective ventilation of the ceiling space, it is not enough to install one grille or one fan, since we need to create not only an inflow, but also an outflow of air. The best option would be to install two ventilation grilles or one grille and one fan diagonally across a solid PVC ceiling.
It is important to know: ventilation grilles will help solve all problems only if the natural ventilation in the room is working properly. That is, the influx of fresh air and the outflow of warm, humid air from the room should be carried out through channels in the walls of the house
Bathroom features
The bathroom is a room with a separate microenvironment. The humidity here is constantly increased, mainly warmer, sedentary air. All together, this contributes to the emergence of mold, mildew, and other microorganisms in hidden places.
The listed factors determine the requirements for furniture, finishing materials, and electrical equipment that are installed or will be used in the bathroom:
- resistance to high humidity;
- protection from direct and possibly long-term exposure to water;
- waterproof or, conversely, hygroscopic;
- resistance to mold;
- antiseptic properties.
Types of diffusers
In a store or company that sells ventilation equipment, you will be offered a large number of diffusers of different appearance and materials to choose from. Deciding on materials is more or less simple - choose what you like best or what is best suited for the operating conditions. If the ventilation ducts are made of metal, it is logical (although not necessary) to use metal grilles. They are galvanized, made of stainless steel, or made of ordinary steel, but painted with powder paint.
If the ventilation ducts are made of plastic pipes, they are better connected to plastic diffusers. Everything seems to be clear here. The rest of the parameters are a little more complicated, let's figure it out.
All these are diffusers
Place of use
According to their purpose, diffusers are divided into:
- inlet;
- exhaust;
- universal (supply and exhaust);
- combined.
The names speak for themselves: they are used in different parts of the ventilation system. Supply and exhaust differ in the direction and position of the lamellas and partitions. There is not too much of a difference, it’s just that some work better for air output, others for air input. In principle, you can put the supply air on the hood or vice versa. A disaster will not happen, but the performance of the ventilation system may drop slightly. In private houses and apartments, the difference, due to low productivity, is impossible to notice. Noticeable changes can only occur in high-capacity ventilation.
Universal diffusers allow air to flow equally in both directions. So you can install them without hesitation. But, as usual, “station wagons” perform a little worse than specially designed models.
This is how an adjustable supply diffuser works - it changes the direction and shape of the air flow
Explanations are needed only, perhaps, with combined models. They differ in that part of the device works for inflow, and part for outflow. Accordingly, they are connected to different parts of the ventilation system. That is, you can install only one universal diffuser on the ceiling, and it will need to be connected to two branches - supply and exhaust. The connection method is described in each specific model; in general there is no point in talking about it.
Materials
Diffusers are made from:
- plastics;
- aluminum;
- steel (regular or stainless).
In private houses and apartments, plastic ones are most often used. For this situation this is the best option. At a relatively low price, they have excellent performance characteristics, a long service life, are easy to maintain, and are not subject to corrosion. They easily fit into plastic air ducts, which are increasingly used in private homes.
Ceiling diffuser can be made of plastic, metal, with wooden elements
Metal diffusers are used in industrial premises where only non-combustible materials can be used. They cost significantly more, weigh more, which complicates installation.
There are also diffusers whose outer part (grille) is made of wood. Such devices will fit perfectly into the interior of a wooden house.
Location
Depending on their location, diffusers are:
- ceiling;
- wall-mounted;
- floor-mounted
Depending on the installation method, diffusers can be ceiling (most), wall and floor
The most commonly seen type is a ceiling diffuser. They are used in 95% of ventilation systems, both in supply and exhaust systems. Mainly because the air is mixed in the upper part of the room, without causing much discomfort to the person. And also because with the installation of false ceilings it is easier to create a ventilation system if it simply did not exist before. Most often, the devices are attached to the main ceiling, and a hole is cut out in the suspended/suspended ceiling, which is covered by a grille.
Sometimes supply ventilation is done through the basement. Then they install floor diffusers. This phenomenon is very rare.
Wall diffusers are used even less frequently. There are not many situations. For example, in apartments after replacing windows with plastic ones. In this case, an influx of fresh air is needed and this can only be provided by making a hole in the wall and installing a diffuser. Or if there is a lack of fresh air and there is no desire to build/reconstruct the supply system.
Next we will talk about ceiling diffusers, since they are the majority, and all the others still need to be looked for - they are usually delivered to order.
Types of diffusers
What kind of ceiling diffuser can it be?
Material
- Plastic, of course, is the most popular. Polyethylene and polyvinyl chloride are cheap; their strength is abundantly sufficient for pumping and pumping air, and the joining of air duct elements is extremely simple due to the plasticity of the material.
- Diffusers made of aluminum or galvanized steel are most often used in production along with air ducts made of the same galvanized steel.
Powerful and sometimes misaligned fans with steel impellers can damage less durable ducts; In addition, sometimes supply and exhaust ventilation must operate in conditions of a polluted atmosphere, acidic fumes or heavy dust.
Kitchen-dining room. Air ducts and diffusers are made of galvanized steel.
- Finally, diffusers (or rather, the visible part of them) can have a decorative design. The popular material here is various types of wood.
- Slot diffusers, as a rule, allow you to change the exit angle of the air flow. They will fit perfectly into the decor of any ceiling, including suspended ceilings; a narrow gap in the ceiling does not attract attention and is undemanding in terms of room design.
Form
The narrow gap in the ceiling is not noticeable. That does not prevent it from fulfilling its function.
- Round ceiling diffusers provide effective air mixing by creating turbulence. This purpose is served by the complex shape of the grate or blade behind it.
- Square ceiling diffusers work in the same way as round ones; in the same way, only the decorative grille is visible to the viewer, while the static pressure chamber is hidden behind it.
Installation
How are diffusers installed? The installation method depends on the type of ceiling. Actually, like the choice of the shape of the diffuser itself.
Round ceiling diffusers can be embedded in plasterboard or mounted in a suspended ceiling (of course, at the installation stage).
The slot diffuser can also be attached to a reinforced concrete floor: as already mentioned, in terms of the ability to organically fit into the design of the room, it is unrivaled. In its simplest form, it consists of a slot in the air duct covered with a grille.
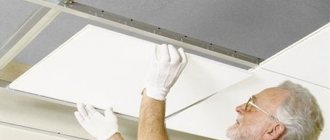
A square diffuser of standard sizes is often installed in a cassette ceiling instead of decorative tiles. The removable ceiling design allows easy access to the air duct for cleaning and maintenance.
Diffusers, along with raster lamps, are placed in the cassette ceiling frame.
Ventilation methods
Ventilation of the space behind the tension covering can be forced or natural. The operating principle and set of elements for each type of ventilation system are different.
Natural ventilation
The natural circulation of air masses is based on the physical properties of air. Warm air is always lighter than cold air, so it rises on its own. That is why no equipment is needed to install a ventilation system with natural circulation. It is enough to have ventilation ducts in the walls of the house, ventilation ducts and grilles.
It is necessary to think in advance about the installation locations of the gratings in the tension covering, because at the stage of installing baguettes on the base ceiling, platforms are built for the lattice elements. The platform can be made from a piece of plywood or drywall. It should be slightly larger than the base of the grill. The base is fixed to the main ceiling using perforated or adjustable hangers. In this case, the platform itself must be at the same level as the future tension covering.
Plastic grilles of rectangular or square configuration are usually installed in housing. As a rule, you can find white elements on sale, but if necessary they can be painted to match the color of the tension covering.
The gratings are installed in the following order:
- Before installing the covering, air ducts are laid under the ceiling (if required);
- baguettes are fixed on the walls to fix the stretch ceiling;
- a platform under the grille is attached to the base ceiling (a hole is cut in advance according to the dimensions of the grille in the base);
- install a suspended ceiling;
- the base is probed through the film and a tread ring is glued in this place;
- the panel inside the ring is cut out with scissors;
- The ventilation grille is screwed with self-tapping screws to the base through PVC film.
Forced ventilation of stretch ceiling
In forced ventilation, various devices that are connected to the electrical network are used to create a directed air flow. It is the fans (diffusers) that are responsible for generating draft in the ventilation system.
The work efficiency is much higher because the traction is stronger. However, the tightness of the ventilation ducts is important, since when they depressurize, air will be pumped into the ceiling space, causing the panel to bulge.
What is a rack and pinion system
A suspended structure is constructed from long panels called slats and a frame to hold them in place. Holes are cut along the surface of the strips in a chaotic order or with a hint of a pattern. With a hint because it is impossible to consider something uniform on one panel. But, if you put several slats side by side in a certain order, you get a beautiful ornament. They are made from various materials:
- aluminum;
- become;
- drywall;
- plastics.
Based on the variety of materials used for the manufacture of perforated slats, it can be understood that the industry produces them in a wide range. Panels come in a variety of colors, patterns and textures. This means that the ceiling can be made to suit any style and with different ceiling lighting scenarios. Perforation will only help this, since through the slits and holes the light can be scattered with very beautiful effects.
Types of ventilation in suspended ceilings
Different types of ventilation outlets
Ventilation may differ in design and type of operation. You can use any of the existing types of ventilation.
Each of them has its own advantages and disadvantages. Types of ventilation systems:
- natural;
- artificial;
- combined.
Only by choosing a suitable system can you calculate how to make ventilation in a suspended ceiling.
Scheme and principle of operation of natural ventilation
Natural ventilation is based on the physical laws of air movement. The principle of operation is that warm air is lighter, so it rises, and cold air is heavier, so it sinks.
Thus, there is no need to install special devices to organize the movement of air flows. To create natural ventilation for suspended ceilings, you only need to install air ducts and ventilation grilles.
It is important to think in advance about how and where to install the gratings, since you need to prepare a plywood platform for the grating before installing the canvas. This platform must match the size and features of the hood
It must be mounted at the same level as the coating.
This platform must match the size and features of the hood. It must be mounted at the same level as the coating.
Ventilation holes are used to ventilate the room and the inter-ceiling space. They bring in fresh air, remove stale air and help regulate the temperature in the room.
Also, ventilation grilles can be used not only to ventilate the space above the ceiling, but also to regulate the difference in air pressure. This will prevent the canvas from wobbling and sagging.