A perfect connection of the kitchen hood to the ventilation will ensure complete removal of volatile substances formed during cooking. Not all of them are pleasant and healthy; many are toxic and negatively affect the sense of smell. Believe me, nothing and no one can do a better job of removing them than an exhaust device.
For those wishing to install and connect the hood themselves, we suggest that you read this very useful article. The information presented in it will help you ideally select the required type of device and carry out installation work flawlessly. Our information will be useful not only to independent craftsmen, but also to those who want to control hired workers.
The author of the article describes in detail the types of kitchen hoods and installation options for various designs. The process of connecting the exhaust device to ventilation is thoroughly analyzed. Photo selections and video instructions are used as an excellent informative addition to the text.
Natural ventilation of the apartment
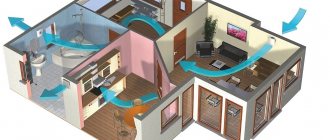
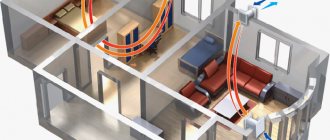
The very concept of ventilation implies the presence of two air flows, one supply, the other exhaust. In the house for rent, natural ventilation of the apartment is provided, without the use of electrical devices.
Natural ventilation of the apartment works as follows:
- the flow of air into the apartment is carried out through the window opening (window windows, natural cracks, special ventilation holes of plastic windows),
- exhaust or outflow of air occurs through the ventilation shaft channel. The ventilation shaft ducts are included in the house design and are an inseparable structure of the house. It is worth noting once again that blocking or disrupting the operation of the ventilation shaft of a house is prohibited by law and punishable.
The diagram shows the movement of air in the ventilation system of an apartment building.
Related article: Calculation of kitchen hood by room area
Each apartment has its own ventilation channel and each channel has two “trunks” for ventilation in the kitchen and for the bathroom and toilet, in order to prevent the exhaust air from getting from the toilet into the kitchen and back. The ventilation shaft itself passes through the apartments themselves or between apartments.
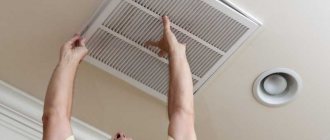
Unfortunately, there is often not enough natural ventilation in the apartment. Therefore, to improve the quality of air ventilation, natural air ventilation needs to be strengthened. In toilets and bathrooms this is done using small fans. In the kitchen, natural ventilation is enhanced by installing a hood above the stove.
Types of ventilation ducts
The distinctive characteristics of the boxes are the material of manufacture, shape, and diameter. Placed at the entrance, in a corner location. Regarding the configuration, there are products:
- rectangular models;
- round boxes;
- square configuration.
It often becomes a problem when developing a design.
If we consider round boxes, they have a number of advantages:
- due to the smooth structure of the internal walls, free air circulation is created;
- Dirt does not accumulate and can be quickly cleaned;
- create almost no noise;
- It is allowed to use fans with low power.
It is important to take into account all the nuances in order to beat this circumstance profitably.
The only drawback of such boxes is the difficulty of hiding them in the interior.
The design of a kitchen with a ventilation duct involves many features.
The throughput of a round box is on average 10% less than a rectangular projection.
To create powerful ventilation structures, rectangular models made of steel are used.
In almost all apartments, the kitchen is a small room, so every meter counts.
Using flat rectangular or square boxes, you can rationally arrange the space, creating minimalism.
Negative sides of rectangular boxes:
- angular interior obstructs airflow;
- to cover the achieved pressure losses, it is necessary to install equipment with high energy costs;
- creating a loud aerodynamic sound.
In many apartments, part of the usable area where food should be prepared is occupied by a ventilation duct.
With minor shortcomings, rectangular boxes are in demand when constructing cottages. It is easier to hide such a structure behind a suspended ceiling system.
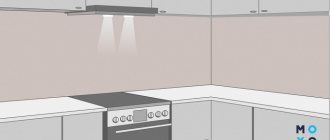
A hood above the stove enhances kitchen ventilation
The modern household appliances market offers a huge selection of kitchen hoods. You can always choose the right model of hood for your kitchen. As a rule, the stove is located in the kitchen at a distance from the natural ventilation opening of the shaft. Air ducts are used to connect the hood and ventilation outlet. The choice of air ducts is also varied. There are three options for air ducts:
- Corrugated air duct;
- Plastic rectangular duct;
- Plastic round air duct.
Masking the box using simple materials
The ventilation ledge is not always hidden under pieces of furniture. Often it is simply decorated using the most available materials. In this case, you need to build on the style that is chosen for interior decoration.
Here are a few options for how to decorate the box:
- Slate
If the kitchen is decorated in a modern style, then the box can be highlighted and made a highlight of the interior. To do this, you can cover the protruding part of the structure with slate paint.
You will get a small board, like in a cafe, on which you can write menus or funny messages for family members. To maintain harmony, you can decorate part of any kitchen wall in the same style.
- Mirrors
Another option is to cover the box with mirror panels or other reflective elements. This option is suitable for small kitchens where there is a large structure. Reflective surfaces will create the effect of visual expansion of space.
- Mosaic
Not everyone will be able to put a picture on the box. But the mosaic will make the structure the main decoration of the room. This method of finishing the box is suitable only for some styles, for example, Provence or country.
Although, if the mosaic is made of metal parts, it will fit into the loft or high-tech style. Geometric shapes and ornaments in the interior are considered a fashionable trend, so you can assemble a mosaic with these elements.
- Brick, stone and cement
It is, of course, impossible to lay brickwork on a frame. But you can cover it with tiles that imitate brick or natural stone. This is done using special glue or liquid nails.
You can lay tiles only on the box, or on the entire wall. If the kitchen is designed in a loft style, then you can simply cover the ledge with cement, thereby creating the effect of an uneven surface.
- Tile
It is the tiles that decorate the kitchen backsplash, and if the box is located at this level, it can be sealed with the same tiles, or highlighted with tiles of a contrasting color. It’s interesting to play with white and black squares. You can also use tiles in the same style, but with different patterns.
- Drywall
Using this material you can make niches into which small objects can be inserted. Drywall will also allow you to create a structure in which it will be convenient to install a decorative fireplace in the box.
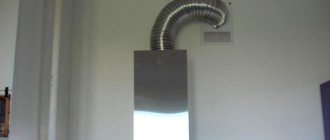
Ventilation in the kitchen in a round corrugated duct
Additional ventilation in the kitchen can be achieved using a hood. The ventilation outlet from the hood to the kitchen ventilation window can be connected using a round corrugated duct. The diameter of the air duct is selected 120 mm or 150 mm, depending on the model of the hood.
kitchen hood diagram
In the photo we show what an unclosed corrugated hood looks like in the kitchen.
Related article: Features of plastic windows for the kitchen
Operation, care
The instructions say: change the aluminum grease filter every two months. We would venture to guess that the instructions in the original language contain something like renew, which is translated as updating. Rather, the grease filter should be washed once every two months, avoiding buying a new one. Otherwise, the device will become an expensive purchase; in a year, maintenance will consume three times more money than the cost of the unit. Check with the manufacturer. You can do it yourself after purchasing. Just try to wash the grease filter, if the accessory returns to its previous condition and becomes as good as new, quickly continue using it.
The carbon filter will have to be changed. The large size is not so alarming as the renewal period - 2 months. The manufacturer is not so cruel, he specifies a period of six months, since the carbon filter costs money. The instructions say: regenerating or washing components is unacceptable. More like the truth. The carbon filter is located above the grease filter and is used in the recirculation mode, when the air simply circulates around. Not the best option for a gas stove; for an electric one, nothing more is needed.
Annoying: the name and type of carbon filter are not indicated. A direct search engine query regarding the type of kitchen hood in question is powerless to give a positive result. Cunning dealers are annoying when they write: the Hansa FWU 60 carbon filter is not available, but can be ordered. The price is kept silent. We find it difficult to calculate the cost of operating the product and have no desire to call to make inquiries. The reader will have to take the steering wheel. In this review we consider the installation of a kitchen hood, not the problems of stubbornness.
The components cost 250-800 rubles. Manufacturers identified. Avoid buying something for free and take a kitchen hood. Expensive carbon filters can last six months, cheap ones - two months. A simple calculation shows: we exchange the awl for soap. After a year, the cost of the product will be covered. An expensive kitchen hood, of high quality, requires similar operating costs.
Installation of a kitchen hood is carried out according to the instructions. Manufacturers' settings are specific, so don't think that kitchen hoods are alike, like twin brothers. All that remains is to say goodbye.
Ventilation in a rectangular plastic duct
Ventilation in the kitchen is carried out using a rectangular plastic air duct. The dimensions of the air duct are also quite varied.
plastic air duct in the kitchen, fittings Plastic air duct hidden on the kitchen cabinets
Connecting elements of plastic air duct
Related article: How to install a gas panel in a countertop with your own hands
Summarizing
Anyone can create an original kitchen interior with a ventilation housing. There are many ideas, interesting developments that transform a disturbing box into a functional element.
If you want to disguise a small box, use a furniture set where the cabinet doors are the same shade.
The design of a kitchen with a ventilation duct requires taking into account the layout of the room.
Creating false windows will add a Scandinavian-style feel. An exclusive stained glass window is being created and glass with paintings is installed. By securing a pot with plants on top, you get the illusion of reality.
In many apartments there is a kitchen with a ledge in the corner. To hide it, place a hob here equipped with a powerful hood.
How to close the air duct in the kitchen
When planning a kitchen renovation, you can decide in advance on the air duct for air ventilation and hide it in plasterboard boxes.
The ventilation duct in the kitchen is covered with a plasterboard box
If the stove is located at a considerable distance from the ventilation hole, you can use a Turbo Fan. Mounted with pipes 100mm,125mm,150mm.
According to SNiP 2.08.01-89 “Residential buildings”, the air exchange of an apartment should be the total exhaust rate from toilets, bathrooms and kitchens, which, depending on the type of stove, is 110 - 140 m3/h, or the inflow rate is 3 m3/h for every m2 of living space. The Moscow regional standards MGSN 3.01-96 “Residential buildings” provide for air exchange in living rooms with a flow rate of 30 m3/h per person. In most cases, design organizations interpret this norm as 30 m3/h per room. As a result, in large municipal (not luxury) apartments, air exchange may be reduced.
Surface preparation
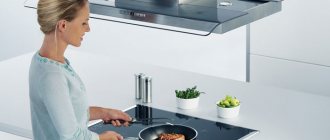
The hood helps eliminate unpleasant problems that usually arise during the cooking process: fat settling, evaporation, unpleasant persistent odors. She draws all the dirt into herself and removes it. But the full functioning of the device depends on its correct installation.
Before installing the hood, it is worth considering its location in advance. Of course, it should be installed above a gas stove, but you should also not forget to pay attention to the quality of the wall surface. For this reason, in order to choose the right area for installing this product, it is worth studying the important features:
- First of all, it is recommended to check the quality of the walls. To install this system, you should choose a strong and durable wall that is made of a high-quality base;
- the most suitable option for installing a hood is a wall surface made of concrete or brick;
- It is imperative to prepare fasteners; they must fully fit the selected base;
- When installing a hood, it is worth considering that it must be located above the stove at the correct height.
A wall made of concrete or brick is suitable for installation.
Particular importance is given to height; the correct functioning of this device depends on it. So, in order to correctly determine the required height level, you should follow the following recommendations:
- the permissible height above the surface of the electric stove is 65 cm;
- the maximum height above the surface of the gas height should be 75 cm;
- It is imperative that the lower limits be strictly observed, otherwise the device may fail during heating and melt;
- the upper boundaries of the product must be adjusted to the growth of the owner;
- You definitely need to know the correct width parameters, they should be the same as for a gas stove - 50-60 centimeters.
Once the surface for installation has been selected and a suitable hood model has been purchased, you can begin installation. The structure, which will be installed and connected in accordance with all rules and recommendations, will be able to last for a long time.
Wall device design
A typical exhaust valve consists of three main parts:
- flange;
- dampers;
- decorative lattice.
A round flange is a connecting element that allows you to connect the valve to the ventilation duct. The grille is a decorative element that simply masks a hole in the wall and also prevents large debris from accidentally getting inside. The basis of the design is the damper.
This is a movable petal, round or square, mounted on an axis. It can only open in one direction, ensuring proper air flow. The design may also include a plumb bob that allows the valve to remain closed if the fan is turned off.
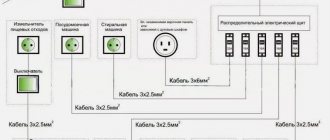
An axial exhaust fan consists of the following elements: power cable (1), air intake grille (2), switch (3), switch cable (4), impeller (5), blinds (6)
For industrial applications it is usually recommended to select a valve with good explosion protection characteristics, but for residential applications other features are important. For example, it would be useful to have a rubber gasket that can reduce the amount of noise.
One common exhaust valve option is the butterfly design. It consists of two blades mounted on a central axis. Another popular design for such devices is called a petal design, which includes a series of parallel blades that move like a blind.
Installation of an axial fan for exhaust type ventilation is carried out according to the same scheme for all systems:
This type of fan is often installed in bathrooms and bathrooms.