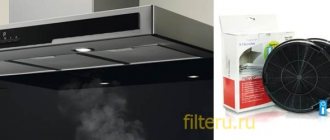
As you know, kitchen hoods come in classic and recirculating types.
The first discharges air into the ventilation shaft or directly to the street. The recirculation system simply pushes it through itself, trapping fat. It is designed with filters to remove odors from the air.
The main questions and problems arise when installing and connecting the classic version. We will consider it in as much detail as possible.
To begin with, we will briefly list the main mistakes that await you along this path. Below we present ways to solve them and the most popular installation methods.
Mistakes when installing a kitchen hood
1 Blind connection of the air duct to natural ventilation is the most common mistake.
Some people, of course, leave a grille for natural air movement, but still manage to block it with the air duct itself.
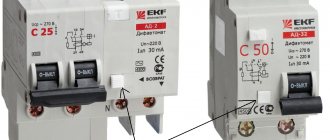
2 Connecting an air duct of too small a diameter through an adapter to a powerful hood with a large outlet flange.
Recommended dimensions for round air ducts are d=125mm. For rectangular ones - 204*60mm.
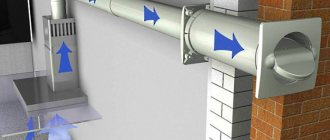
3 Exit the air duct to the street through a homemade hole in the wall.
In most cases, this is prohibited by the rules. Specific points will be given below in the text.
You can, of course, lay a separate box along the facade straight to the roof. But is it worth it? Although in restaurants and cafes located on the ground floors of high-rise buildings, this solution is widely used.
By the way, the ban on venting air to the street through a wall does not apply to private houses, but only to high-rise buildings.
4 Complex route geometry with a large number of transitions and curvatures.
First of all, this will affect the noise. Although, of course, the turns themselves are not the greatest evil. And sometimes you can’t do without them.
It is the turns that follow one after another, without acceleration sections, that are dangerous.
5 Connecting an overly powerful hood (for example, 1000 m3/h) to a standard ventilation duct, which is capable of passing about 300 m3/h.
Remember that a productivity of 200-300 m3/h is quite enough to effectively remove all odors, with minimal load on the ventilation of the house.
6 Installing the hood at the wrong height.
The installation height directly depends on what kind of stove you have - gas or induction hob.
7 Assembling a plastic ventilation duct without a good seal, or joining parts with superglue.
Believe me, sometimes this structure has to be disassembled.
8 Upper, rather than lower, location of the slots in the decorative grille in the same frame as the air duct.
Why this is a mistake, and when it is still possible to do this, is discussed below.
9 Lack of a separate outlet in the upper part of the wall for the hood.
As a result, connecting it haphazardly, through carriers and extension cords. Do not forget that in the end this is not a portable device, such as a fan, heater or mobile air conditioner.
This means that the wiring for it needs to be done stationary and wisely.
10 Incorrect installation of check valve.
It must be embedded and installed in compliance with the appropriate angles and inclinations. Otherwise it will work every other time.
In general, installation of a hood can be divided into two main stages. The first is its connection to electricity. The second is the air duct structure and everything connected with it.
Let's look at each of them separately.
Surface preparation
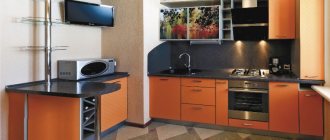
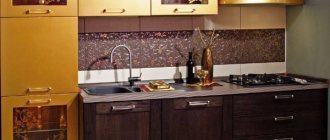
The hood helps eliminate unpleasant problems that usually arise during the cooking process: fat settling, evaporation, unpleasant persistent odors. She draws all the dirt into herself and removes it. But the full functioning of the device depends on its correct installation.
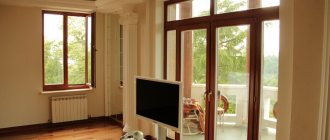
Before installing the hood, it is worth considering its location in advance. Of course, it should be installed above a gas stove, but you should also not forget to pay attention to the quality of the wall surface. For this reason, in order to choose the right area for installing this product, it is worth studying the important features:
- First of all, it is recommended to check the quality of the walls. To install this system, you should choose a strong and durable wall that is made of a high-quality base;
- the most suitable option for installing a hood is a wall surface made of concrete or brick;
- It is imperative to prepare fasteners; they must fully fit the selected base;
- When installing a hood, it is worth considering that it must be located above the stove at the correct height.
A wall made of concrete or brick is suitable for installation.
Particular importance is given to height; the correct functioning of this device depends on it. So, in order to correctly determine the required height level, you should follow the following recommendations:
- the permissible height above the surface of the electric stove is 65 cm;
- the maximum height above the surface of the gas height should be 75 cm;
- It is imperative that the lower limits be strictly observed, otherwise the device may fail during heating and melt;
- the upper boundaries of the product must be adjusted to the growth of the owner;
- You definitely need to know the correct width parameters, they should be the same as for a gas stove - 50-60 centimeters.
Once the surface for installation has been selected and a suitable hood model has been purchased, you can begin installation. The structure, which will be installed and connected in accordance with all rules and recommendations, will be able to last for a long time.
Connecting the hood to electricity
This stage is the simplest. It’s very good when initially planning your kitchen, you carefully planned the location of all sockets and electrical points.
You can find out how to avoid making a bunch of basic mistakes and maintain all distances in a separate article.
If you do not have a free socket for the hood, you will have to install it. To do this you will need the following materials:
- three-core cable VVGngLs 3*2.5mm2
For home wiring, use a cable of this particular brand (with the index Ls).
- regular 16A socket with grounding contacts
The hood itself, unlike other kitchen appliances, is a low-power device. Accordingly, it is not at all necessary to pull separate wiring under it directly from the switchboard.
The same cannot be said about the hob or dishwasher.
It turns out that this unit can be connected from a common socket group from the nearest distribution box.
Pull a groove or cable channel from the distribution box to the location of the future outlet and mount the socket box.
This outlet is located on top, almost under the ceiling, slightly above or to the side of the hood itself. The choice of a specific location will depend on the length of the cord and the requirement for the minimum installation height of the exhaust unit above the stove.
Often you have to cut a hole in the nearest kitchen cabinet for this purpose.
Next, remove the insulation from the cable, mark the cores and connect them together in the junction box.
All that remains is to connect the outlet correctly.
The wiring for the kitchen unit is ready. Let's move on to the air duct.
How to install a dome hood
In the modern market of household appliances, hoods with dome shapes are especially popular. They fit harmoniously into the kitchen space and cope with their functions perfectly. These products, in turn, are divided into several subtypes:
- fireplace (wall-mounted). These devices are fastened to the wall surface. The design of products of this type is similar to ventilation systems for fireplaces;
- corner. Hoods with this configuration are rare in kitchens. They are installed only in cases where the stove is in a corner;
- island. These options are installed only in large rooms, for example, in dining rooms. They are suitable when the gas stove is installed in the center of the room. The devices are fastened to the ceiling surface.
Types of hoods
In order to correctly install a dome hood, you need to know the main features of this process. It is advisable to entrust this work to professionals; they will be able to do everything correctly and efficiently.
Dome hood installation option
If you decide to install the hood yourself, be sure to remember a few important recommendations:
- To perform the installation, you need to connect the hood to the ventilation system and connect the device to the electrical network;
- It is advisable to furnish the kitchen area with furniture in advance, and only after that mark the location of the hood. In this case, it is necessary to take into account the height of this device;
- Next you need to drill holes for the dowels. Using bolts, we mount supports onto which the base of the exhaust device is placed;
- after this, a special outlet of the exhaust device is connected to the corrugated air duct, and the tightness must be maintained;
- At the end, the operation of the hood is checked and the upper casing of the device is put on.
Connection requirements
The hood must be installed correctly, taking into account all important requirements. A prerequisite for installing this device is to ensure that the existing electrical outlet is grounded. If you do not know how this process is performed, then it is better to seek professional help.
Incorrect connection of the exhaust duct to the ventilation
The main problem during installation is to correctly connect the air duct without disturbing the natural ventilation in the apartment.
Some of the craftsmen generally advise taking the whole thing out into the street, through the nearest wall. However, according to SNiP it is prohibited to do this.
It clearly states that such a hole cannot be placed closer than 8m from the adjacent window. Since this window is considered a device for supplying outside air.
Here, read the paragraphs of the set of rules SP54 and SP60.
That is, drill a healthy hole in the wall, spend a lot of nerves and money, and the neighbor will complain about you, and you will be obligated to repair it all.
How do most consumers connect? An ordinary corrugation is taken, placed on the outlet, stretched and attached to a flange, which is screwed to the ventilation hole.
That's all. Simple, cheap and wrong. What are the disadvantages of this method? First of all, the noise.
When air passes through such a ribbed corrugation, it makes extremely unpleasant sounds.
But most importantly, when your device is turned off and not working, natural ventilation is forced to draw air from the apartment through the hood. Not only can your box be clogged, but in the summer there is sometimes no traction at all (due to the same temperature at home and outside).
Moreover, you are actually putting an oily mesh, motor, turbine, etc. in the path of the air. Also, air suction will not occur at the ceiling level, but at the level of the middle of the kitchen.
Although the collection of all odors of waste products should be carried out from the maximum height.
It is quite clear that in this case there will be no traction. That is, with your own hands you are depriving yourself of natural ventilation.
This threatens the occurrence of fungus and increased humidity. In the off-season, your doors will simply begin to swell and close poorly.
There will also be a lack of oxygen and constant poor health. At the same time, someone falls into mysticism and begins to think that they have been damaged or the apartment has bad energy, but in fact, there it is - improper ventilation!
Initially, in Soviet times, when designing our multi-story buildings, engineers expected that air would flow into the apartment due to leaks in wooden windows.
However, with the installation of plastic windows and sealed doors, we thereby blocked this channel of fresh air in the house. You will also close the ventilation and you will live like in a submarine.
To correct the situation in such cases, it is recommended to install a supply valve on a plastic window.
Instead of clogging, you can do everything more intelligently. What alternative options are used for this?
Operating standards and care rules
Conditions of use and timely service are the key to the longevity of kitchen appliances. It is not surprising that devices with a warranty period of 1-3 years, if certain rules are followed, will easily work for 8-10 years without requiring expensive repairs.
Safe use of the device
In order for the hood in the kitchen to function without problems, you must initially install it correctly and connect it to communications - power supply and ventilation. There shouldn't be any distortions.
When tested, the device will operate quietly, producing an acceptable noise level. Creaking, crackling and other extraneous sounds are evidence of errors made during installation.
Immediately after installation of the equipment, you should check the functionality and noise level. You can use a real noise level meter, if available, or an app of the same name by downloading it to your smartphone
It is strictly forbidden to use a household exhaust device in production - only for its intended purpose. Otherwise, the owner will lose the warranty.
In addition, the following actions are prohibited:
- close or plug the openings on the product body;
- limit or completely block the free flow of air during operation of the device;
- connect the air duct to the duct to remove smoke and other hot emissions;
- carry out repair or maintenance operations without disconnecting the hood from the electrical network.
Such prohibitions are related to the safety of users and the equipment itself - violation of the rules will result in failure of the fan, without which the device will not be able to function.
When the final stage of preparing a dish is a flambé, for example, a delicious steak is about to convey subtle notes of aged cognac, you should carry out the process extremely carefully to avoid burning the fat filters
Do-it-yourself equipment maintenance
Carrying out maintenance work depends on the frequency of use of the hood, the nature of the dishes being constructed and the mode selected for its operation. It is important to remember that maintenance is carried out when the device is completely disconnected from the electrical network.
Caring for the product consists of monthly washing of the grease filters - you need to remove them and remove traces of soot and dust with a soap solution and a soft sponge. Leave to dry at room temperature.
Ignoring the rules for cleaning grease traps can lead to accidental fire and damage to the exhaust equipment. Moreover, dirty filters can cause poor filter performance.
If you have and use the recirculation mode, you will have to change the carbon filters. This is done on average every 4-6 months. The frequency depends entirely on the device model and its manufacturer's recommendations.
If the installed equipment is only capable of evacuating exhaust air from the room, then there will be no need for additional expenses on the purchase of filtering devices.
In addition, the device needs to regularly remove dirt from the surface of the case - with a soft rag soaked in a soap solution, you will have to wipe off stains formed during operation.
The same procedure should be repeated on all parts of the device that are inside the device and that can be reached. Particular attention should be paid to cleaning the fan blades - an excessive amount of waste accumulated on them leads to a decrease in hood power.
You can remove stains with any dishwashing detergent. The main thing is that it does not contain coarse inclusions that can scratch the surface of the filter or the housing of kitchen appliances
If the light bulbs burn out, you will have to replace them with new ones, choosing the same power and size. If any mechanism breaks down, it is better to contact a service center for help without trying to fix the problem on your own.
Hood duct and grille with non-return valve
The first is that instead of corrugation, a plastic pipe is taken (for example, d-125mm), and through one or several bends it is led into the hole in the ventilation duct. In this case, a certain division is made in the hole itself under the ceiling.
An entrance to the pipe is mounted on top, and a small rectangle is left below through a grate with a valve for natural inflow.
Moreover, the grille should be at the bottom, and not at the top. Otherwise, the air flow from the hood will blow upward and lift the so-called non-return valve.
Although, of course, if you have a more advanced valve design - a circle or rectangle with an offset axis, and not simple strips of polyethylene, or there is a solid partition, then you can safely install it as you want - on top, side, bottom.
However, in fact, this whole structure often does not work as intended. When you turn on the exhaust unit and create pressure, a small part of the dust still seeps through the cracks and micro-holes, after which it safely ends up in your kitchen on the dining table.
No check valves are 100% effective. The bulk of the air, of course, goes outside, but the gradual formation of dust inside the apartment is a fact.
And even when the hood is turned off due to the reduction in the diameter of the original hole, natural ventilation through narrow grilles will be much worse.
Everything can be done much better.
What power should the hood have?
The required operational capabilities of the air purification device can be calculated using the formula:
Q =S*h*12*1.3
Where:
Q - optimal extraction power
S – room area,
h – kitchen ceiling height,
Note! According to the requirements, the air in the kitchen must be changed 12 times per hour (a requirement of sanitary standards) - that is why the indicator 12 is present in the formula. The number 1.3 is the minimum reserve ratio. It involves taking into account the number of floors of the building, the length and contamination of the ventilation shaft, the length and bend of the ventilation duct.
You can also use a special calculator on our website for calculations.
Correct connection of the air duct to the ventilation system
For this you will need:
- plastic air duct
- offset check valve
- tee splitter
In the end, you should end up with something like this.
How does it all work? When the hood is turned off, the valve will be open and warm air from the kitchen will quietly flow by gravity into the ventilation duct. As soon as you turn on the exhaust hood, the valve immediately closes automatically, blocking the air flow into the room.
In this case, all odors from the stove will easily go outside. When switched off, the pressure in the box drops and the valve automatically opens, connecting the ventilation shaft to the apartment.
Diaphragm valves
Diaphragm valve to be replaced
Under the influence of a gust of “exhaust air”, the membrane in the diaphragm valves moves away. After air passes through, it falls into place. When the air purifier is turned off, natural ventilation is not disturbed, since this is facilitated by the “clacker.” This installation is mounted at the entrance to the air duct. In the first position of the valve, the hood does not work and the curtain blocks the ventilation pipe.
However, the ventilation hole in the ventilation shaft remains open. If the hood is turned on, then the gust of passing air moves the curtain and blocks the ventilation holes, so there is no reverse draft effect. Modern hoods may contain check valves. Therefore, you don’t have to spend money on buying them.
Assembly instructions - all numbers and performance
How does this all come together in practice? For capacities up to 300 m3/h (low speeds of most hoods), a d-125mm pipe is sufficient. On the device itself, the outlet hole may be larger.
For example, for 650 m3/h you will need a d-150mm pipe. However, you are unlikely to find such plastic pipes, and if you use the next standard size d-160mm, it will turn out to be a huge and awkward structure that spoils the entire interior and design of the kitchen.
Moreover, you will have to drill a factory hole for the ventilation duct in the wall, expanding it.
Therefore, in most cases, the optimal diameter of 125 mm is chosen. And you don’t need more.
The forced throughput capacity of standard channels and shafts with dimensions of 100*150mm is 400 m3/h.
An air flow of more than 450 m3/h simply will not fit there (it was tested in practice), even if it says 1200 m3/h on your hood!
Remember also that you cannot underestimate the diameter of the air duct too much compared to the outlet pipe on the hood. Otherwise, the vibration and noise will be so strong that the structure will have to be re-glued every month.
The connection of different diameters is made using special adapters.
Let's start assembling. First, install the adapter on the hood and connect the vertical section to it.
To improve its sound insulation, it makes sense to go crazy and stick a 5mm thick heat-sound-insulating material on top.
It wouldn’t hurt for them to cover the inside of the decorative casing and the noisiest part - the adapter. This is where the greatest turbulence occurs.
Next, add 90-degree elbows and other straight sections of duct as necessary to ultimately exit toward the hole in the wall.
All this is glued together with silicone, no superglues. There should be no gaps anywhere.
We reach the tee. A valve is installed in it from the side of the room.
Keep in mind that this is a gravity valve! It opens not due to air flow, but due to its weight.
One half of it is heavier than the other and at the same time it is installed at a slight angle of 2 degrees.
Built-in hood dimensions
Scheme of a hood with a retractable unit with detailed dimensions
In order to correctly install a built-in hood, measurements are taken of the slab and the existing cabinet into which the equipment will be built. If you do not pay attention to this, it may turn out that the size of the device will exceed the dimensions of the cabinet.
Parameters for installing the hood height
Then you will need to carry out additional manipulations with it - changing the walls of neighboring cabinets or making a new box to fit the size of the hood. Having chosen the right model for a kitchen that fits inside, you can complete the installation yourself, without the help of specialists.
The most common option is a hood built into a 60 cm cabinet
The body of most built-in hoods has a rectangular shape, which greatly facilitates installation. The width of the devices varies. There are compact options, from 45 to 50 cm, which fit into standard kitchen units.
Another important point to consider: the distance from the stove to the hood. It should be such that parts of the appliance are at a safe distance from the heat of the stove. It is not advisable to place it high from the hob; performance will be significantly reduced. Steam with the smell of cooked food is poorly drawn in by the device, and the required efficiency will not be achieved.
In the instructions for the device you will always find recommended centimeters; the average values for all devices are as follows:
- for an electric stove - from 65 cm to 70 cm will be optimal;
- for gas - from 70 cm to 80 cm, since there is an open fire.
Distance from gas stove and electric stove to hood
The size of the slab also matters. The width of the equipment should ideally match or be 1-2 cm wider than the hob. This will ensure that the unit is as efficient as possible and if it is smaller than the slab, some of the air will not be entrained and this will reduce performance.
Recommended distance from the stove to various types of hoods
Preparing the ventilation shaft hole
Before all installation work, it is advisable to plaster the entry into the ventilation shaft itself and remove all sharp corners. This will give the entrance maximum aerodynamic qualities.
You should end up with approximately the same surface as a standard 90 degree round elbow.
It is recommended to add ceresit liquid (ceresit CT99) to the plaster solution.
This hole will be exposed to fat and moisture. And ceresite contains components that prevent the formation of mold.
However, do not use gypsum plaster under any circumstances. Its use in ventilation shafts is a direct path to the appearance of mold and fungi.
Attach sections of a standard air duct to the tee on both sides. From the side of the wall, 5-7 cm, wall it up in the ventilation duct. The exit itself is decorated with a square frame.
Working with the bottom shelf of the cabinet
Preparing a kitchen cabinet for installation of a built-in hood
When installing a built-in hood in a closet, you can go in several ways.
- Order a kitchen cabinet without a bottom. To bring out the air duct, you will need to make appropriate holes for it in the middle shelf and the top.
- Make a cabinet for the hood with your own hands, based on the dimensions.
- Remodel an existing piece of furniture, first remove the bottom or cut a hole according to the existing dimensions.
There is no need to disassemble the cabinet. You need to remove it from the wall and disconnect the doors. It will be more convenient to perform your actions on the floor. “Unstitch” the back wall, unscrew the side fastenings, then the bottom shelf will easily come off on its own.
When you cut out a place for a hood, you need to do it so that the body of the device fits tightly to the front wall, and not vice versa. Mark the place where you will cut with a marker, drill holes in the corners of the mark, and then cut.
Why does the check valve sometimes not work and close?
On the kitchen side, a check valve is mounted on the tee. In the factory version it will be quite long. In this case, it is better to shorten it so that this “gun” does not stick out too much.
The valve is inserted inside a section of a standard air duct d-125mm, and this air duct is put on and siliconized onto the tee.
If this whole structure seems too cumbersome to you, and the protruding pipe with the valve is not very aesthetically pleasing, you can do it a little differently. You make the air duct not with a round pipe, but with rectangular channels.
In this case, you install the above check valve on a straight section, as close as possible to the turn.
You can't achieve a factory connection here, so you'll have to farm collectively. Buy a rectangular tee with a round outlet on one side. Next, this round timber is cut off and a check valve is glued in its place.
The valve is placed strictly at an angle (2 degrees). Otherwise, it will open every once in a while or not open at all.
Many people have encountered this problem and easily solved it this way.
The damper itself is also mounted with a vertical deviation. The upper turning point, based on the hour dial, is at 13.00 (1 o'clock), and the lower one is at 17.00 (5 o'clock). This is if your flow direction is from right to left.
Otherwise, the circle is placed at the 11 o'clock - 7 o'clock position.
For more reliable operation and stable opening of the damper, you can stick some kind of weighting material (no more than 2 grams) on one side. Glue it close to the edge.
By the way, do not throw away the previously cut round pipe. It is tightly inserted onto the valve from above, after which a decorative grille diffuser is mounted on it.
What nuances might there be with this method? If your hood stands exactly above the entrance to the ventilation shaft, and the duct pipe goes straight, without any turns in the horizontal plane, then the valve installed on such a straight section does not work normally, at least at 1st speed.
You will simply have nowhere to get the increased pressure to close it. The air will fly through this “turn” in a straight line. You definitely need an angle.
The valve cover and its rotating mechanisms are easy to clean and do not be afraid of them becoming overgrown with grease. For this to happen, you will have to fry huge wild boars on the stove and stew them in your oven for several hours a day, no less.
If you don’t want to see a protruding “hollow” under the ceiling at all, then, as an option, you can install a tee so that the middle elbow rests against the wall, otherwise, where the valve is located, it would look to the side. In this case, also close the hole with a decorative cover.
Everything will look much nicer. However, due to the additional rotation, the performance of natural ventilation will deteriorate slightly. And the grill will reduce it by another twenty percent.
In addition, it will no longer be possible to clean the channel by hand or with a vacuum cleaner. But many do this deliberately and even hide the entire structure in a wooden or plastic box.
As they say, beauty requires sacrifice.
Advantages of modern hoods
Why are hoods so popular among consumers?
- Great designer look. Hoods not only do not degrade the appearance of the kitchen furniture set, but sometimes become the highlight of the interior.
- Versatility. The hood can be used over any cooking surface; a wide range of technical parameters makes it possible to select the best option for each individual case.
- Economical. This does not mean saving electrical energy, but a significant reduction in heat losses. Conventional natural ventilation systems removed air from the room around the clock, which caused the walls to cool. As a result, the temperature dropped noticeably; heating required a large amount of energy. Electric hoods provide the required air exchange rate in just a few minutes, making it clean and free of unpleasant odors. In such a short time, the walls do not have time to cool, and heat losses are minimized.
Built-in hoods fit perfectly into the kitchen interior
These are the main advantages, there are also quite a few additional ones, but they relate to individual models, and there is no point in dwelling on them in detail.
Important. All hoods have one problem - the technical parameters do not meet the safety requirements for the operation of gas appliances.
What is meant? Gas is much lighter than air; if there is a leak, it will rise up and accumulate under the ceiling of the room, and as it fills, it will fall down. Previously, the ventilation holes were located near the ceiling and were constantly open. The gas that entered the room was removed outside, which significantly reduced the risk of explosions.
Through such ventilation holes, gas was easily ventilated from the kitchen
Now there are no such open holes, and hoods are turned on for a short period of time only when cooking. Another problem is that the entrance is located above the hob, which is much lower than the lighting fixtures. If a gas leak occurs at night, then after a few hours it is already located above the chandeliers and lamps. When they are turned on, a spark jumps and the gas-air mixture explodes with enormous force. This explains the frequent destruction of houses.
Combination of hood and ventilation in the kitchen
There is only one way out. For an electric hood, a separate vertical ventilation duct must be provided, and existing natural ventilation systems must not be touched, no pipes connected to them, etc. Unfortunately, very few users agree with such requirements and grossly violate safety regulations.
Why does the air from the kitchen get to the neighbors - is the hood to blame?
Despite all the advantages, such a hood connection system has many critics. They believe that in this way you are rudely interfering with the overall ventilation system of the entire house.
For example, everything will be fine with you, but have you thought about your neighbors? Allegedly, due to this connection of the hood to the ventilation, all odors from your kitchen will automatically penetrate into the apartments through the riser above.
They started frying pies, and all the neighbors already knew about it. However, all critics are mistaken based on misconceptions about the ventilation system in apartment buildings.
They think that from bottom to top there is one common channel 110*150mm with “holes” for each apartment.
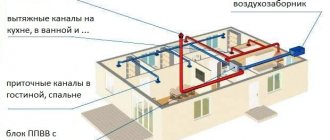
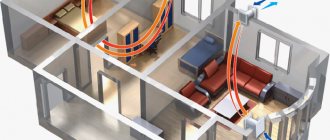
In fact, in 5 floors, all the channels are individual and you are unlikely to be able to blow out extraneous odors from your neighbors. In houses of 6 floors and above, there is already a ventilation system with air removal through satellite channels, connecting to a common collection channel through one floor.
This common channel has a cross-sectional area 6-8 times larger than individual shafts in apartments with dimensions of 110 * 150 mm.
Schematically, such a ventilation system for a multi-story building can be represented like this.
Yes, in such buildings, if several hoods are turned on at the same time to the maximum, reverse draft may occur. But this is an extremely rare case.
Look - the natural draft from apartments, at best, ranges from 100 to 150 m3/h. You have a nine-story house. The first seven floors are embedded in a common channel measuring 510*270mm, or even more. The total natural flow in it is about 1000 m3/h.
And then, instead of the usual draft of 150, you turn on your hood at 300 m3/h. Do you think it is capable of creating reverse draft in this case and starting to expel air to the neighbors?
To do this, it is necessary that all 6 floors do the same thing, and at maximum speed.
Then one apartment will be unlucky and its inhabitants will have to smell all the aromas of their neighbors’ cooking. But this option is unlikely.
Despite all this, sometimes the air from your kitchen actually gets into other apartments in the house. Or, on the contrary, you have a great feeling that your neighbors are grilling you for lunch today. Why does this happen and where to look for the reason?
This happens for several reasons. For which ones, read in more detail under the spoiler.
Why does the smell from your apartment penetrate to your neighbors?
Transforming the middle part of the cabinet
You will have to cut holes in the cabinet shelves to allow the air duct to pass through.
Most often, the hood is attached to the middle shelf. Therefore, you also need to make a cutout for the air duct. We mark the cut location with a pencil; if it is round, we drill a hole with a diameter of 10 mm for the saw to enter and cut along the mark.
Then you need to mark the places where the device is attached to the middle part. Attach the shelf to the body of the device, make a notch with a sharp object in the location of the future location of the screws.
Example of mounting a hood to a wall
To secure the shelf to the sides, use plastic corners. First, we attach the four corners to the shelf, adjust its position by placing the box on the floor.
Exiting the power cord above the hood, as well as organizing a hole for a corrugated pipe
Principle of operation
The main and only purpose of a kitchen hood is to clean the atmosphere of the room from harmful fumes from the hob. The design of any model contains a fan and is based on two operating principles:
- Recirculation.
- Flow-through.
Recirculating
Exhaust equipment is designed to operate without installing an air duct. It operates without connection to the ventilation duct. Polluted air is purified by passing it through a filter system without being vented into ventilation, and it does not go outside, remaining inside the kitchen.
Thanks to the autonomous cleaning system, the installation of the stove and hood is not tied to the location of the ventilation shaft. The disadvantage of the recirculation method is the lack of freshness of the purified air.
Flow-through
Flow-through air cleaners discharge the contaminated stream into an outlet pipe connected to the ventilation shaft. The outflow of air masses is replenished by ventilating the room. The pressure difference creates a fresh influx from the street.
The insert into the shaft may have, in addition to the mounting hole for the outlet pipe, narrow grooves. Air is drawn in from the lower floors through the cracks. Its quality may not be very good. In this case, it is better to plug the grooves or install a blind shield with only one passage hole.
How to make a drawer for a hood in the kitchen with your own hands
If the kitchen set does not have a wall cabinet for an exhaust hood, it is easy to make one at home yourself.
- We make a drawing of the cabinet parts and a diagram of its assembly.
- We prepare the starting material - a sheet of laminated chipboard or MDF. For a small cabinet you will need no more than 2 m2 of material.
- You don’t have to make a bottom, but instead install a frame of metal corners. Drill holes in them according to the location of the mounting openings in the base of the hood.
- Openings are cut out in the shelves for the air duct (see previous chapter).
- Using a screwdriver and hardware, we assemble the box body
- We install the hood in the finished cabinet. We secure the device to the metal frame with screws. You can embed the device into the bottom of the box (see previous chapter).
- It is best to secure the cabinet door with gas lifts. The vertically rising plane will not interfere with adjacent wall cabinets. Don't forget to read how to install a gas lift in a kitchen cabinet.
- We hang a furniture box with exhaust equipment on the wall above the hob. If the wall is made of plasterboard, see the article about hanging cabinets on plasterboard.
Expert opinion
Alexander Didenko
Furniture assembler at Mabaks
Advice. Use the services of a specialized workshop or department of a construction supermarket that sells chipboard or MDF to make a cabinet. Craftsmen will find for you parts of the required sizes from warehouse scraps. Order trimming of the drawer body elements there.
Where to start installing a hood
A very important question, you need to pay close attention to it, otherwise instead of a positive effect you will get a negative one.
| Action | Short description |
Checking the technical condition of the existing ventilation duct | Remove the decorative grille and carefully inspect the channel surfaces. To make inspection easier, use a flashlight. The channel must be clean, the smoke from the burning paper must be completely drawn into it. If there are cobwebs, black soot and other foreign deposits, then this indicates poor natural ventilation; representatives of the management company must be called to correct the problems. Further re-equipment is done independently, we will tell you exactly how below. |
Determining the type of hood | It can be flow-through or circulating. The first is connected to the channel and exhausts the exhaust air outside. As we mentioned above, it has several important installation restrictions; the requirements must be met. The second type of hoods is not connected to ducts; the unit purifies the air and returns it back to the room. This is a completely autonomous and safe system, but it has one significant drawback - it requires frequent filter changes. |
Technical parameters of the hood | The main thing is to select devices taking into account the volume of the room and the minimum air exchange rate. The fan performance should be at least 20% higher than the required volume of air exchange; operating the electric motor at its maximum capabilities significantly reduces its operating time. If the main factor is determined, then you can select ventilation according to size, noise level, availability of additional functions, design, type of control, etc. These indicators do not affect the cleanliness of the air in the kitchen, they only increase the comfort of using the device. |
How to choose a kitchen hood
TOP 7 best hoods.
| Model | Advantages | Capacity (m³/h) | Installation width, cm |
Hansa OSC 6111 WH | Budget hanging model Hansa OSC 6111 WH with comfortable slider control. Housing - stainless steel steel. Noise level is low. | 335 | 60 |
Indesit H 151.2WH | The hanging hood Indesit H 151.2 WH has a flat design that is installed on the wall above the stove. The Indesit H 151.2 WH hood operates quietly, producing a maximum noise of 60 dB. Cleaning is done with a grease filter. An additional carbon purifier can also be installed. The kitchen work surface will be illuminated by two light bulbs built into the hood. | 230 | 50 |
Akpo WK-4 Vario eco | An elegant fireplace hood with a powerful motor will not take up much space in your kitchen. Three operating speeds will allow you to adjust the device to any level of air pollution, and thanks to its high performance, the device will perfectly cope with a combined kitchen-dining room or kitchen-living room. | 650 | 50, 60 and 90 |
Hansa OKC 653 SWH | The hood is made in white and has an inclined position. The intensive mode allows you to instantly purify the air, and control is carried out thanks to the touch display. | 620 | 60 |
Elica MEMPHIS WH/A/90 T.GREZZO | Two operating modes can draw polluted air into the ventilation or purify it and release it back into the room. The aluminum filter is easy to clean from grease in the dishwasher. | 650 | 90 |
Once all the above points have been agreed upon, you can proceed with the actual installation of the hood.
How to spell correctly, emphasis on the word “at attention”
Making the Word Map better together
Hello!
My name is Lampobot, I am a computer program that helps you make Word Maps. I can count perfectly, but I still don’t understand very well how your world works. Help me figure it out! Thank you!
I will definitely learn to distinguish widely used words from highly specialized ones.
How clear is the meaning of the word robber
(noun):
Synonyms for the word "at attention"
Sentences containing the word "at attention"
- The soldiers stand at attention
like idols, they don’t even dare scratch their noses, no matter how much the rain tickles their faces.
Quotes from Russian classics with the word “at attention”
- Despite the number of people waiting, deep silence reigned in the hall, broken only occasionally by the impulsive whispers of senior officials.
An officer in full dress uniform at attention at one of the locked doors
The meaning of the word "at attention"
AT Stretch, adv.
(Small Academic Dictionary, MAS)
Submit Comment
Additionally
The meaning of the word "at attention"
Sentences containing the word "at attention"
The soldiers stand at attention
like idols, they don’t even dare scratch their noses, no matter how much the rain tickles their faces.
The boy took several firm steps according to the regulations and stood at attention
.
“Have a seat, captain,” the general suggested to the man standing at attention
officer.
Synonyms for the word "at attention"
Morphology
Map of words and expressions of the Russian language
An online thesaurus with the ability to search for associations, synonyms, contextual connections and example sentences for words and expressions in the Russian language.
Reference information on the declension of nouns and adjectives, verb conjugation, as well as the morphemic structure of words.
The site is equipped with a powerful search system with support for Russian morphology.
Source of the article: https://kartaslov.ru/%D0%BA%D0%B0%D0%BA-%D0%BF%D1%80%D0%B0%D0%B2%D0%B8%D0%BB%D1 %8C%D0%BD%D0%BE-%D0%BF%D0%B8%D1%88%D0%B5%D1%82%D1%81%D1%8F-%D1%81%D0%BB%D0 %BE%D0%B2%D0%BE/%D0%BD%D0%B0%D0%B2%D1%8B%D1%82%D1%8F%D0%B6%D0%BA%D1%83
Types of exhaust modules
Air-purifying modules are distinguished by shape and method of fastening. These are dome, wall-mounted, island and fully built-in hoods.
Dome
Dome-type devices are a tent structure separate from the kitchen unit, which hangs over the stove. The dome opening can be much larger than the area of the hob. It is advisable to install such hoods in large kitchens, studio apartments or in rooms combining cooking equipment and dining room furniture. In shape they resemble a truncated pyramid or hemisphere, smoothly turning into an air duct at the top.
The Swedish holding Ikea supplies kitchen hoods from “economy” to “premium” class to the Russian market. Dome systems for air purification in kitchens are distinguished by high-quality design, ease of operation and maintenance.
Ikea dome module
Wall mounted
The devices are attached directly to the wall above the stove. They do not protrude forward, but have a flatter configuration. Wall-mounted modules have powerful supply ventilation. Due to their simple design, such hoods are available in different styles - you can choose a model to suit any design.
AT TRAFFIC
Ushakov's Explanatory Dictionary. D.N. Ushakov. 1935-1940.
See what “NAVYYAZHKA” is in other dictionaries:
at attention - See... Dictionary of synonyms
at attention - (stand at attention) ... Spelling dictionary-reference book
PULL-OUT - PULL-OUT, adv. About the pose: standing straight and arms extended at your sides. Ozhegov's explanatory dictionary. S.I. Ozhegov, N.Yu. Shvedova. 1949 1992 ... Ozhegov's Explanatory Dictionary
at attention - forcefully/heavily, adv. Stand at attention... Together. Apart. Hyphenated.
at attention - navy/heavy The military stood at attention... Spelling difficult adverbs
At attention - adv. qualities circumstances decomposition 1. In a military style, straight, with your arms extended at your sides (stand). 2. Used as an inconsistent definition. Ephraim's explanatory dictionary. T. F. Efremova. 2000 ... Modern explanatory dictionary of the Russian language by Efremova
at attention - nav vytyazhku, adv... Russian spelling dictionary
standing at attention - standing up/heavily... Spelling dictionary of the Russian language
at attention - adv. Straightening up and stretching out your arms at your sides. Stand up n. stand n. before whom l ... Encyclopedic Dictionary
at attention - adv. Straightening up and stretching out your arms at your sides. Get up on your feet/heavy. To stand hard/hard in front of someone... Dictionary of many expressions
Source of the article: https://dic.academic.ru/dic.nsf/ushakov/867414