The review of Ikea hoods that we offer below will allow you to decide which model to choose. The hood is a long-standing attribute of any kitchen space or production. In plants and factories, the use of hoods is determined by technological conditions: dust, particles of materials in the air. All this needs to be recycled and removed so as not to jeopardize the health of workers. In kitchens, a hood is also important: to remove strong odors or fumes after frying oil, meat, and fish. After each cleaning, turning on the hood for a few minutes will add freshness to the kitchen space. So, what models of kitchen hoods does IKEA offer?
The proposed models are divided into categories: with ceiling mounting, wall-mounted and built-in. The Ikea Omneid ceiling hood is attached to the ceiling with special clamps. It belongs to category A++ and is adjustable in height (from 96.8 to 131.5 cm).
Ikea has a much larger selection of wall-mounted hoods. Separately, it is worth mentioning the models Mattradition, Matelscare, Balanserad, Focusera, Folyende, Fullstandig.
Balancerad
Mattradition
Focuser
Matelskar
Folyende
Fullstandig
Ikea built-in hoods are popular among all lovers of minimalism. They are great space savers, and due to insulation during installation, they do not make loud noise during operation. Models of built-in hoods: Lagan, Utdrag, Underwerk and Windrum. According to reviews, the Lagan hood from Ikea works perfectly, does not make loud noise and matches the white color scheme in the interior, for example, Scandinavian or minimal style.
Kitchen hood IKEA LAGAN
Kitchen hood Windrum
Kitchen hood Utdrag
Underwerk hood
The color range of the hoods is quite modest, but it is thanks to this choice of colors that they look organic in any kitchen. Available in metallic, white and black colours.
Installation and connection of a kitchen hood
In order to have fresh and clean air in an apartment or house, the kitchen must have very good ventilation. Natural ventilation cannot cope with the task of timely removal of odors during cooking, so a special forced ventilation device is hung above the stove - a kitchen hood. How to install the hood correctly, how to secure it and connect it to the ventilation system - more on that later.
Installing a hood in the kitchen is a wise decision
With the correct size, it is equal in width to or even slightly larger than the width of the slab. To install the hood correctly, you need to place it correctly and secure it. The electric hood is located exactly above the stove. The installation height depends on the type of hob:
Minimum height for installing hoods above gas and electric stoves
The hood is attached depending on the type. Built-in - to a specially ordered cabinet size. Wall hung (flat) and dome (fireplace) - to the wall. The fireplace hoods themselves can consist of two parts - a unit with a motor and filters and a dome. Both parts are attached independently of each other, but so that their outputs coincide.
It is worth mentioning separately about island hoods. They are attached to the ceiling. The kit includes a suspension system and clear instructions on what to do and how to do it.
Choosing an air duct: features, classification
Hoods can be located in two positions:
- Horizontal arrangement. The main advantage of this type is the simplified cassette replacement scheme. This hood is not inferior in performance and energy consumption to modern devices.
- Vertical arrangement - installation in the kitchen is done in an open way. A popular method due to the simple replacement of filter elements.
You can choose another installation option that does not require special regulations and government standards. But when performing it, it is worth following all the rules and recommendations for attaching kitchen appliances.
A flexible connection must be made. It is produced using high-strength polymer materials:
- polypropylene glycol;
- polypropylene;
- polypropylene carbon;
- polypropenelation chemical elements of the second group.
Types of air ducts
Ventilation must correspond to the volume (at least ½) of the fume hood. To insert an air duct, it is necessary to obtain approval from the concerned services.
When choosing an air duct for ventilation, it is worth considering angles larger or smaller than 90 degrees. If this condition is not met, air will not be supplied. Thermoregulation must be carried out in such a way that the check valve can shut off the air supply to the filter.
The hole for the air duct should be made in advance.
Attaching a wall or dome model to a wall
Although these two models differ in appearance, they are attached to the wall. They have four holes on the back wall of the case - two on the left, two on the right. Many manufacturers provide their products with a mounting template on which the locations of the fasteners are marked. All you need to do is lean the template against the wall and move the marks. If there is no template, measure the distance between the holes and transfer it to the wall. If you have an assistant, you can ask them to hold it at the selected height and make the marks yourself.
The hood must be attached to the wall through the standard holes in the housing.
Then everything is simple: use a drill to make holes of the appropriate size, insert plastic plugs for the dowels, then hang the hood on the dowel-nails. Naturally, we check that the installed equipment is horizontal.
This method is good if the wall is smooth and nothing interferes. Often there is a gas pipe running next to the stove, which makes it impossible to hang the hood close to the wall. In this case, you can nail wooden blocks to the wall, and attach the hood to the bars. This is a simple option, but not a very good one - the bars become covered with soot and are difficult to wash.
The second option to install the hood behind the pipes is to use a hairpin screw (the second name is a plumbing pin). They have a thread for screwing into the wall, a smooth part, which makes it possible to carry the hood some distance from the wall, and a smaller thread with two nuts, which will be used to secure the body. There are these studs in different sizes, choose which one you need, but all the nuts are made for a bit or an octagonal wrench.
How to install a hood on a wall if a gas pipe is in the way or the wall is uneven
This option for mounting the hood is universal, simple to implement, and reliable. It is also more convenient to clean - the metal is usually stainless, and it is easy to clean it from deposits.
Installing a built-in hood in a cabinet
The built-in hood is almost completely hidden in the cabinet made for it. It is attached in exactly the same way as described above - with screws, only they are screwed into the walls. Only in advance it is necessary to make holes for the air duct in the shelves located above. This is done after the hood has been purchased, since the location of the air outlet depends on the company and model.
Example of installing a built-in hood
If the cabinet is hanging, it is better to remove it. In the removed cabinet, install the hood in place, mark the location of the air outlet on the bottom shelf, and cut it out. To do this, it is easier to use a jigsaw and a file with fine teeth. The laminate file leaves almost no chips. If desired, you can seal the cut area with a plastic C-shaped furniture profile. They are rigid and flexible. The flexible one is easy to use - it bends at any angle; the rigid ones will have to be heated with a hair dryer before installation. These profiles are “set” with glue; most often “liquid nails” are used. After installation in place, remove the remaining glue (with a damp, clean rag) and secure it to the shelf with masking tape. We cut off the excess profile with a fine-tooth file, and clean the cut with fine-grain sandpaper.
The process of preparing a cabinet for installing a hood
We make holes in the other shelves in the same way. By the way, they may no longer be round, but rectangular - it depends on the cross-section of the air duct you have chosen.
After this, all the shelves are installed in place, the cabinet is hung and secured. A built-in hood is attached to it with screws through holes in the body. Next is the process of connecting the air duct.
Deciding on the size
The larger the area of the fume hood, the higher its performance, and accordingly, the more air it can purify. When choosing the size of the hood, it is necessary to take into account the area of the kitchen; the larger it is, the more powerful it is, the larger the design should be.
In small rooms, as a rule, a hood that matches the size of the kitchen stove is sufficient. Usually this size is 60 cm. In general, the parameters of hoods vary from 45 cm to 90 cm.
The smallest ones, 45-50 cm, are the least productive. Powerful 90 cm, as a rule, are equipped with a retractable panel and cover the maximum working space of the kitchen. Such hoods require more space for location, but will provide maximum protection from food splashes, grease, dust, and kitchen odors.
However, usually the dimensions of the hood coincide with the dimensions of the stove. Kitchen cabinets are made in the same size. The kitchen cabinet, located above the stove, is 60 cm long and leaves free space for the subsequent arrangement of the hood. The choice of size also depends on whether the kitchen is already equipped or planned from scratch. When the stove and kitchen unit are installed, in any case you will have to adjust the hood to the existing dimensions. That is, install it in a 60 cm cabinet.
When planning a kitchen from scratch, you can calculate in advance all the dimensions of furniture, household appliances, including hoods. In this case, they can be absolutely anything - at least 80 cm, at least 50. The main principle that should be followed: the ideal size is one when the exhaust surface covers the area of the hob, and not vice versa.
How to connect the hood to electricity
Since the power consumption of kitchen hoods rarely exceeds 1 kW, they can be connected to regular sockets. It is desirable that they be grounded. This requirement must be met if you want the warranty to be valid.
If the wiring in the apartment is old, you can install the grounding or grounding wire yourself. Just don’t attach it to water supply or heating pipes. This threatens the possibility of electrical injury or even death for you, members of your group or neighbors.
To reach the ground wire, on the shield, find a busbar with wires attached to it or a pipe to which a stranded wire is welded/screwed. You can also connect your own stranded wire to these devices (without discarding those that are already there). For it to work properly, the cross-section must be 2.5 mm, the conductor must be stranded copper, and a non-flammable sheath is desirable.
Connect the hood via Vago terminal blocks
Some hoods come with a plug at the end. There are no problems with connecting such models - just plug into the outlet and that’s it. But there are models in which the cord ends with wires. This is not because of the greed of the manufacturer, but so that the consumer himself can decide how best to connect the equipment. If you want, you can connect a plug. This option is not suitable - take the terminal block and connect through it. Another option is Wago terminal blocks. You need to take three of them - according to the number of wires. In one terminal block, identical wires from the hood and from the panel are connected - phase to phase (the colors may be different here), zero (blue or dark blue) to zero, ground (yellow-green) to ground.
Air duct for kitchen hood
One of the stages of installing a hood is the selection and installation of air ducts. Air at room temperature is removed from the kitchen, so there are no special requirements for air ducts and any can be used. Three types are usually used:
Types of air ducts for kitchen hoods
There is also a difference between plastic and corrugated air duct - price. Polymer ones are more expensive. Despite this, if you have the opportunity to install a hood using PVC, install them. With an equal cross-section, they provide more efficient air removal and are also less noisy.
The cross-section of the pipes for the air duct is determined by the size of the outlet opening on the hood. In the case of rectangular pipes, an adapter is used.
Air duct sizes for hoods
Round ducts are available in three sizes: 100 mm, 125 mm and 150 mm. This is the diameter of plastic pipes and corrugated hoses. There are more sections of flat air ducts and they are presented in the table.
Dimensions of flat PVC air ducts for hoods
How to choose the size? In the case of round pipes, their diameter must match the diameter of the hood outlet. It is very undesirable to install an adapter at the outlet and then use an air duct of a smaller diameter - this will reduce the speed of air purification. And even if the hood is very powerful, it will not cope with air purification.
When choosing the cross-section of a rectangular air duct, its cross-sectional area should not be less than the cross-sectional area of the outlet pipe. And the connection occurs through a suitable adapter.
How to attach corrugation to the hood and ventilation
If you decide to install a hood and use aluminum corrugation for the air duct, you will need to think about how to attach it to the body and to the ventilation. To do this, you will need clamps of the appropriate size. They can be metal or plastic.
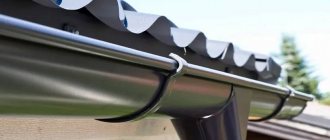
To connect the hood to the ventilation system, you will also need a special ventilation grille. It has a hole in the upper part for connecting the air duct pipe. There are holes in the lower part to remove air from the kitchen using natural circulation when the hood is not working.
Attaching the corrugation to the grid on the wall
A grate with a protrusion is suitable for attaching the corrugation - around the hole there is a side of several centimeters, onto which the corrugation is placed, after which it is secured using a clamp of a suitable size.
The corrugated air duct is attached to the hood using the same principle. It has a protrusion on which the corrugation is put. The connection is tightened using a clamp.
How to attach an air duct to walls
For plastic air ducts there are special fastenings in the form of latches. They are first mounted on the wall using dowels. The installation step depends on the curvature of the route, but on average, 1 fastening per 50-60 cm is sufficient. Pipes are inserted into these latches during installation with little effort.
If the air duct needs to be fixed to the ceiling, you can use the same fasteners. But if you need to maintain a certain distance from the ceiling, this type of installation will not work. In such cases, take perforated plasterboard hangers, attach them to the ceiling, and then use small PVC screws to attach an exhaust duct to them.
Methods for attaching corrugations
Corrugated air ducts are attached to the walls using clamps or large plastic ties. If necessary, they are also mounted to the ceiling using perforated aluminum hangers.
Review of models from catalogs
Ikea is famous for its appliances with a simple design and compact shape, so it is not surprising that the built-in models of hoods from this brand are gaining the greatest popularity.
Small-sized appliances cannot always provide ventilation for large rooms, but in a small kitchen they can easily clean the air of any contaminants.
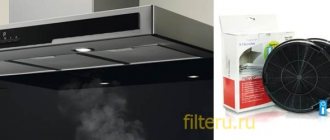
Several flat-type hood models from Ikea are suitable for attaching to the base of hanging cabinets. For example, there is a commercially available hood with a capacity of about 265 cubic meters per hour with a maximum noise level of 70 dB. This model can be installed either with a ventilation pipe to remove polluted air from the room, or without additional elements: in this case, it is enough to use a carbon filter.
An external grease-absorbing filter is included in the kit and does not require replacement: it is enough to periodically wash difficult stains in the dishwasher. The speed switches are located on the front panel of the hood body. The cost of this model is about 2.5 thousand rubles.
The next option for a built-in hood is a model with a metal design, which helps clean the room at a power of up to 322 cubic meters per hour. This hood can also work simultaneously due to air exhaust and circulation, but carbon filters are not included in the kit. The control panel is electronic. A hood of this type will cost from 4 thousand.
If you need to increase the operating area of your range hoods, but the lack of free space in the kitchen does not allow you to purchase a large model, slider telescopic hoods from Ikea are suitable for you. Such hoods are more expensive than other built-in models, but take up less space, since they are almost completely hidden in wall-mounted furniture. Outside the cabinet walls there will only be a sliding panel with a filter.
A hood of this type with a capacity of up to 323 cubic meters will cost from 6 thousand rubles.
An even better option for a cramped kitchen would be hoods that are completely built into the base of wall cabinets and hidden behind their doors. Such equipment is also presented in Ikea catalogs: a hood with a maximum capacity of up to 617 cubic meters and a noise level of about 66 dB will cost buyers 30 thousand rubles.
Wall-mounted hoods from Ikea are no less diverse in design and performance characteristics. A classic dome hood with a steel body with a maximum power of 400 m3/h costs about 7.5 thousand rubles.
A hood of similar shape and size with a capacity of 636 cubic meters with a ventilation air vent included costs 13 thousand and more.
A small cylindrical hood for installation against a wall, with performance characteristics of up to 320 cubic meters, will cost about 10 thousand.
Among the hoods of non-standard shapes for installation above a wall-mounted kitchen unit, pay attention to the model with a trapezoidal body, operating in exhaust and circulation mode with a maximum power of up to 626 cubic meters. This model is estimated at approximately 35 thousand rubles.
Hanging T-shaped hoods are also widely available. Modern models are complemented by elements made of black glass: a stylish hood of this type with a power of up to 630 m3/h and an electronic control panel on the front side of the body costs about 40 thousand rubles.
Among the less expensive options, pay attention to the hood without a ventilation pipe included, which is noisier, but purifies the air at almost the same power (up to 602 m3/h). Such a hood costs from 15 thousand rubles.
Ikea ceiling-type hoods are suitable for both island and standard kitchens. For example, a suspended square-shaped model with a capacity of up to 320 cubic meters per hour with two built-in filters.
Cylindrical island hoods are also popular in modern kitchens, so Ikea offers customers a wall-hung model with a capacity of 596 m3/h and elegant LED lighting. The cost of these models will be 25 and 40 thousand rubles, respectively.
Where and how to remove the air duct
Most often, the air duct from the kitchen hood is connected to a ventilation hole through which natural ventilation occurs (due to draft). This is incorrect, since in this case most of the grille is closed by the air duct, and air exchange through the remaining accessible holes will be clearly insufficient.
A significant part of the ventilation grille is closed and ventilation in the apartment will be insufficient
Correctly connect the air duct to a separate ventilation duct. In this case, the same grille as in the photo above is installed on the hole.
If there is no separate ventilation duct, but there is an external wall nearby, you can take the pipe to the street by placing a grille outside. These are two ways to have normal ventilation and ensure normal operation of the hood.
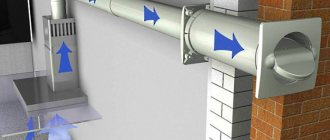
How to take it outside
To install the hood and lead the air duct into the wall, you need to make a hole in it. And this is the only difficulty. Next, an air duct is inserted into this hole and sealed with mortar. From the outside, the hole is covered with a grill to prevent debris from getting in and birds and small animals from settling in.
One example of installing a hood in a kitchen with air exhaust through the wall
To prevent outside air from blowing into the room, install a check valve (in the figure above it is indicated by an oblique line). By the way, it is advisable to install it when connecting the air duct to the ventilation system - so that odors from the pipes do not enter the room.
This is what a non-return or anti-return valve for air ducts looks like
The check or anti-return air valve is a lightweight plastic or metal plate. It is movably attached in two places to the pipe - at the top and bottom, the petals are supported by a weak spring. While the hood is not working, the valve blocks access to air from outside. When the hood is turned on, the air flow bends the plate forward, pressing the spring. As soon as the hood is turned off, the plate returns to its place using springs. If you install a hood without this valve, it may be too cold in the kitchen in winter - outside air will enter the room without problems.
So that the hood does not interfere with natural ventilation in the kitchen
Using a tee and a check valve, by the way, you can install the hood so that it does not interfere with natural ventilation in the kitchen. You will need a special ventilation grille for connecting hoods, a check valve and a tee. A tee is attached to the ventilation grille, an air duct from the hood is connected to its lower entrance, and a check valve is installed on the free outlet, only so that the petals are locked when air passes from the pipe (pictured below).
Anti-return valve for normal natural ventilation in the kitchen
How does such a system work? When the hood is turned off, the petals of the check valve are bent, air from the kitchen enters the ventilation duct through the grille and the open outlet of the tee. When the hood is turned on, the air flow from it unfolds the valve plate, and the air flows into the ventilation system. When the hood is turned off, the springs again open air access through the tee.
Externally, such a system does not look very attractive and will have to be disguised in some way. But this is the only way to connect the hood to the only existing ventilation outlet and not reduce air exchange.
Source
Advantages of exhaust hood equipment from Ikea
Ikea is a Dutch brand, and, like many other foreign brands, this manufacturer has an individual approach to the design and equipment of technical products . Therefore, Ikea exhaust equipment, presented on the domestic consumer market, surprises with its diversity. Attention! An additional incentive to purchase Ikea brand hoods will be the possibility of simultaneously ordering a kitchen set with suitable parameters.
This way you will save both your own time and money on updating the kitchen interior. The high quality of hoods of this brand is explained by fruitful cooperation with companies such as Electrolux and Whirlpool. Therefore, Ikea guarantees the durability and high performance of each range hood model .
Having set itself the goal of maximizing consumer satisfaction, Ikea is developing equipment that can even save energy in your home.
If you purchase exhaust hoods, you can achieve significant savings in energy costs by promptly cleaning dirty filters (cleaning can be done in a dishwasher).
You can also plan energy costs by choosing the optimal type of exhaust device . Ikea kitchen hoods can operate either through an air outlet pipe or independently, without additional equipment.
In the first case, polluted air will be removed from the kitchen, as well as all the unpleasant odors accumulated during the cooking process. An external filter located on the hood body will absorb grease and prevent the air vent from becoming clogged when the hood is turned on at high power.
In the second case, air purification will occur according to the principle of recirculation. Steam or contaminated air will pass not only through the external protective filter, but also through the internal carbon filtration system and will be cleaned as much as possible from unpleasant odors. Such models will be especially useful in kitchens where there is no possibility of providing natural ventilation and there are no systems for exhausting air outside the room.
Attention! If you need the most effective cleaning, you can choose mixed types of hoods. Moreover, the cost of purchasing such models will also not hit your pocket too much, since favorable pricing policy is one of the main features of the Dutch manufacturer.
All hoods present in modern Ikea catalogs are characterized by the following features:
- have a low noise level , practically independent of the number of motors or the maximum performance of the device;
- convenient for installation in kitchen furniture and do not require professional skills for proper installation;
- light, compact and laconic in appearance , Ikea range hood models are suitable for kitchens with absolutely any layout;
- catalogs include both fireplace and island hoods, so you can choose appliances to suit every taste >;
- Ikea hoods are easy to care for , and over time they do not lose their original appearance;
- Each model of exhaust equipment from this brand has a quality guarantee for up to 5 years .
You can verify these and other advantages of Ikea kitchen hoods after the purchase, but for now let’s figure out whether the model range presented in the catalogs of this manufacturer is really so diverse.
Installing a hood in the kitchen with your own hands
In modern houses and apartments, the presence of a spectacular hood above the hob has long become commonplace. And this is no coincidence: in addition to its purely design function, the hood also plays the role of a “cleaner”. Installing a modern kitchen hood gives you the opportunity to breathe air devoid of the tart taste of borscht, cutlets, fried potatoes and other dishes. To the question: “Is it possible to do without a hood?”, we will answer by asking you to imagine a small apartment - a studio in which the kitchen area and living room are combined. If you don’t install a hood in such a studio, then it’s easy to guess what kind of gastronomic air will permeate everything around you. Not to mention your neighbors, who will always be aware of what you are preparing for breakfast, lunch and dinner. To avoid this, we will tell you in detail how and how you can install a hood in the kitchen exclusively with your own hands.
Necessary tool
Before proceeding directly to the process called “Installing a hood,” you need to prepare everything that may be useful for this: additional materials and a tool kit. To comfortably install a hood in the kitchen with your own hands, you must have:
Note! Before you begin installing a modern kitchen hood with your own hands, before drilling, it is convenient and practical to build small “pockets” of adhesive tape to prevent crumbs and dust from getting inside the hood.
If the hood is selected correctly, then its width should be either equal to the slab or slightly wider than it. In order to install the exhaust system, it should not only be correctly placed, but also secured. It should be located exactly above the surface of the slab.
When deciding how to install a hood, before installation, you need to decide on the height, based on the housewife’s height. If a woman stands up straight, the bottom edge of the exhaust system should be slightly higher than her head. We do not recommend setting below this figure. If you set it higher, it won’t be critical.
Good to know! When answering the question of how to properly install a hood above your gas stove, you need to understand the following nuance: if there is a need to install the system higher than 90 cm from the hob, then you need to purchase a hood with increased power.
Let's talk about the topic: “Mounting for a modern hood.” The mounting of the exhaust system depends on its type:
Advantages and disadvantages
There are different types of kitchen hoods:
- dome;
- hanging;
- built-in (fume hood).
The most cumbersome of them is the domed one; this option is definitely suitable only for large rooms. The built-in one takes up the least amount of space, but fits organically into the interior, making it stylish and modern.
The advantages of a built-in cabinet design:
- versatility, allowing you to merge with the interior, become part of it, and also not be conspicuous;
- compactness, small size, not taking up useful space;
- low volume of electricity consumption;
- minimum noise produced;
- variety of variations and models;
- wide range of colors;
- ease of installation, including do-it-yourself;
- good performance.
The good thing about a built-in hood is that it can be matched to any interior and placed in any kitchen, even the smallest one. This design has disadvantages, especially in comparison with other types of hoods:
- less power than a dome structure;
- lower productivity;
- the need to regularly replace the adsorbent filter;
- the need to regularly clean the grease filter.
But it is logical that a small built-in one will be less powerful and productive than a dome one. Performance is the volume of air that the hood passes through itself over a certain period of time. Therefore, for a smaller area, an appliance with a lower value will be enough, which means that a built-in hood will be just right for a small kitchen. And the variety of designs implies hoods with both a minimum working area and the possibility of expanding it.
Built-in
Hanging
Dome
Hood installation
When discussing how to install a hood over a gas stove, you should take into account the characteristics of the existing general ventilation.
There are only two ways to remove exhaust air:
It should be recognized that method No. 2 has many disadvantages. This hood requires the installation of a check valve. At the same time, it happens that the supposedly removed air returns to the apartment.
It is much more rational to use an additionally made window for the hood. In order to combat condensate formed inside the system, it is necessary to install a specialized aluminum damper.
Remember! The size of the window under the air duct should have a size corresponding to ¾ of the diameter of the air duct. To tighten the damper, you need to use a special spring that helps it open as air flows through it. This is how the process of self-regulation occurs.
Installing a hood in your kitchen requires taking into account one of the most important functional elements - an odor neutralizer . Today it is presented in three types:
Installing a built-in hood in a cabinet
Let's talk about how to install a hood in a kitchen cabinet on your own. For convenience and clarity, we will divide the process of installing a hood into a cabinet into a sequential algorithm of actions:
Tools required for this : jigsaw, drill and foam, sealant, screws and dowels.
To install a plastic air duct, we recommend using the same diagram. There is only one “but”: to ensure angles, it will be necessary to use special adapters, and place the pipes with a minimum number of bends (each turn is a loss of 10% of power).
Do not forget! Due to the fact that the kitchen is a place of high humidity, a cabinet made of wood quickly becomes unusable. In this case, the hood should be installed on the wall, without using a cabinet. To do this, you will need U -shaped frame: to make it you need a metal corner.
Having completed all installation work, you should connect the exhaust system to electricity, with the obligatory condition of grounding, and test its operation.
Attaching a wall or dome model to a wall
In appearance, the hoods above the stove of the wall-mounted and dome models are very different from each other, but at the same time, they both must be attached to the wall surface. To do this, their rear housing has four holes: two on each side. In addition, manufacturers supply their products with installation diagrams, installation instructions and templates, with marks for fastening locations.
All you need is to place the industrial template against the wall and make marks (if there is no template, you need to measure the distance between the holes and then transfer it to the wall).
Then everything is much simpler: you need to take a drill and make holes. Insert plastic plugs into them and hang the hood on the dowel - nails, checking the horizontal level of the installed system.
Take note! If this happens, then nail wooden blocks to the wall. Then attach the exhaust system to them. But, do not forget that over time these bars will become covered with a layer of soot and fat.
There is also a second way to install a hood in the kitchen with your own hands behind the pipes. To do this, you need to use screws - studs (or plumbing studs).
How are these studs attached? They have a thread for screwing into the wall. Their use will allow you to secure the kitchen hood, moving it away from the wall (at the same time, the studs are available in various sizes, and all the nuts are made for a bit or an octagonal wrench).
How to connect the hood to electricity
Due to the fact that the power consumption of hoods is rarely more than 1 kW , it is possible to connect them using standard sockets (preferably with grounding).
With old and dilapidated wiring, you need to ground the wire yourself. You cannot attach it to the surface of water or heating pipes: you can get an electrical injury, not only to your family members, but also to your neighbors (with fatal consequences).
Take note! To pull the grounding wire, you need to go to the panel and find a busbar with wires attached to it, or a pipe to which a stranded wire is screwed. You can also connect your own stranded wire to them (but without touching those that are already installed). For normal operation, the cross-section should be 2.5 mm. The conductor must be stranded copper with a non-flammable sheath.
For ease of installation, many kitchen hoods are equipped with a plug at the end of the wire. They are very easy to connect: you only need an outlet.
But, there are also models whose cord has wires at the end rather than a plug. This is done so that the consumer himself makes the decision on how to connect the system: either using a plug or using a terminal block (by the way, Wago terminal blocks are perfect).
Features of operation
The operating rules for both fully built-in and canopy, retractable hoods are not much different from the use of any other household appliances. It is important to avoid overheating of the equipment (to do this, install it correctly), ingress of water, promptly wipe off dust and other contaminants, do not drop or hit, avoid twisting the wire or its contact with hot surfaces.
Regarding the hood, which is built into the cabinet, the following rules should also be observed:
- The grease filter protects the internal system of the structure, trapping droplets of fat and splashes of cooking food. The performance of the hood depends on its cleanliness. Therefore, it is necessary to regularly remove it when it becomes dirty and wash it with detergent. It can be easily removed and put back;
- The carbon filter of a recirculation hood is one of its most important elements. Over time, it loses its cleansing abilities. Therefore, it is necessary to replace it with a new one at least once every six months. There are different brands of carbon filters;
- It is necessary to ensure that the sliding panel slides out and slides back easily. To do this, it also needs to be regularly cleaned of dust, dirt and grease particles;
- If the hood has touch control, then in the kitchen it is especially susceptible to contamination. There are fingerprints on it, food splashes, and dust sticks to it all. The ease of operation of the device depends on its cleanliness, and a strong degree of contamination can lead to breakdown. Therefore, it is necessary to especially carefully monitor the cleanliness of the touch panel, wiping it with special wet wipes;
- The push-button control system can also be damaged by grease particles and kitchen fumes. When dirt gets stuck between the buttons, it can impair their performance. Therefore, the cleanliness of the control panel must be as carefully monitored as a grease filter.
If the equipment breaks down or its performance deteriorates, you must contact the service center. Timely handling can save equipment and extend its service life.
Air duct for kitchen hood
The palette of air ducts used for kitchen exhaust systems differs greatly in three parameters:
Products used to install kitchen hoods are flexible (corrugated) or made of solid, smooth and hard plastic.
Exhaust pipes are made of several types of plastic:
To connect to the hood, the first three types of plastics listed above are used: they are resistant to high temperatures and have decent rigidity.
Air ducts, in turn, have two types of sections:
Summary
Having chosen a hood by carefully selecting it to match the color and design of the kitchen unit, you are faced with a choice: turn to professionals for help in installation, paying a substantial fee for installing a kitchen hood; or hang it yourself, after reading our article.
The most important thing when installing a kitchen hood is: objectively assess your strengths and the possibility of receiving help from household members; evaluate the instrumentation before starting work; understand the instructions included with the hood and believe in yourself.
Source