- home
- Construction and renovation
- Bathroom and toilet
>
>
⬎
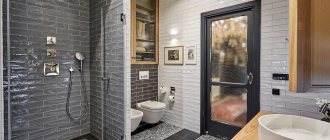
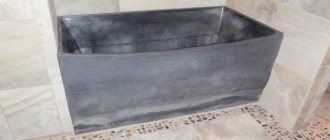
In this publication we will look at making a shower tray for tiling.
Sometimes this idea is found in a different formulation: “pallet in construction design.” Let’s not talk about how relevant or convenient this is - there is no desire to pour useless water into reasoning, because there is plenty of similar information on other sites, the content for which is written by armchair theorists. Let's get straight to the point.
Determining the height of the future pallet
The very first question that should be asked is the height of the horizontal outlet from the sewer riser. Since this height directly affects the height of the future pallet, you should estimate this very level at the ladder.
About pipe slopes: in the article on sewerage I mentioned SP 30.13330.2016, where for pipes with a diameter of 50 and 40 mm. a slope of 2-2.5 centimeters per meter of pipe is prescribed. In practice, this is a big bias and often cannot be implemented. Therefore, I completely allow this standard to be neglected, and I make a slope (when it is really necessary) of 1-1.5 cm per meter of pipe.
It may turn out that while observing all the slopes of the drain pipes, you will have to make the pan very high and this will be inconvenient for use. In short, in the process of assessing all the slopes of sewer pipes, the idea may clearly arise that it is necessary to interfere with the design of the riser and lower the horizontal outlet below the existing one.
As for the weight of a structure that is too thick, this issue can be completely resolved by using expanded clay concrete or other techniques. In my practice, there were showers that were 30 centimeters higher than the main floor.
Areas of special attention
The shower room is completely exposed to regular moisture. However, there are areas that take on the greatest load, the so-called high-risk areas. This is, as a rule, the lower part of the walls, the location of the washbasin, the floor, the shower (without a tray or with it). As well as the places where communications enter and the pipes themselves, if we are talking about metal elements susceptible to corrosion. These vulnerable areas and elements of the shower require special attention when installing waterproofing.
Side and fencing: to be or not to be?
The next point that needs to be considered is whether there will be a shower with a glass enclosure or just covering it with a curtain. Why is it important:
1.
When using a fence, there is no urgent need for sides of the tray; the glass partition will prevent water from overflowing outside the shower. At least most guards prevent water from overflowing over a pan without sides.
2.
The presence of a glass partition will allow you to use the area of the pallet to the maximum, because the fence can be placed along the outer edge of the pallet. When using a curtain, it should be located behind the sides inside the structure to prevent water from flowing down it onto the main floor of the bathroom. In addition, the presence of a curtain requires more internal space, since in cramped conditions this curtain will tend to jump overboard and pour water on the floor.
3.
Glass shower doors are quite expensive.
4.
Also, the disadvantages of the fence include the difficulty of cleaning: if the glass itself can be washed well with special cleaning agents, then perfectly washing all the connections and rubber bands is an unrealistic task.
5.
To use a curtain, you need a side of at least 4-5 centimeters in height. If, according to the results of the sewer drain assessment, the pan is too high, then the side will make the entire structure even higher.
The width of the side is chosen arbitrarily, if it is planned. You can make it at least 5 cm in its finished form (this is less than 3 cm without tiles), here you should focus on the space occupied and convenience. If space allows, it is better to make the side wider. For example, a 12.5 cm board (finished) is very comfortable and you can confidently stand on it with your feet. Standing on a narrow side of 5-6 cm is very inconvenient, so you will have to step over it all the time.
Therefore, when designing a pallet, you should weigh the pros and cons of the presence/absence of a fence. I’ll tell you my opinion: if it’s possible to make a larger shower, it’s better to opt for a curtain - it will be a better option. If there is a shortage of space, fencing is more acceptable.
Deciding on the tiles for the bottom of the pallet and the geometry of the slopes
It is necessary to decide on the tiles for the bottom before pouring the pallet, and this also applies to the drain. In other words, the chosen ladder and tiles will give an understanding of the shape of the slopes.
A few words about the slope itself: it should be 1-2 centimeters per meter of one plane. Some experts recommend slopes of less than a centimeter - the master is the boss here. If we focus on the standards, then the figure is stated in the same SP 30.13330.2016:
8.5.4 The slope of the floor in public shower rooms should be 0.01-0.02 towards the tray or drain.
When forming slopes, there will inevitably be fractures of the planes - the actual task is to determine the location of the fractures, and this greatly depends on the ladder and the shape of the tiles.
The simplest thing in this task will be to line the bottom with mosaics: no matter what shape the ladder is and no matter where on the pallet it is located, the fractures can be formed in any way you like, the main thing is that all slopes are reduced to the ladder. Moreover, it is not even necessary to form clear planes with clear edges for the mosaic.
When facing with mosaics, the location of the planes and fractures does not play a special role, as does the location of the ladder. On the left side of the photo you can see that the edges converging to the ladder have a rather unattractive shape, if they were noticeable in the finished version. On the right side we see that the fractures are invisible.
But if you plan to lay tiles of regular or large sizes, then the role of planes and fractures is significant. As a standard, all four fractures are brought together at the corners of a square or rectangular ladder. It follows from this that the tiles will have to be cut at the fracture edges, with the exception of the square bottom of the pallet with a square drain clearly in the middle.
This example can be considered ideal: the planes are suitable for tiling with square and rectangular tiles, as well as mosaics. There is no need to trim the tiles along the edges of the planes.
If we move the ladder to any side from the center or make the pallet in a shape other than square, then the tiles will have to be cut along the edges of the planes. The same applies to a rectangular ladder, even if it is clearly in the center of a perfect square. A different orientation of the tiles, be it diagonally or straight, will not correct the situation. But the mosaic will fit well on any of the schemes.
High-quality trimming at fracture sites is possible, but it requires great care from the tiler.
And this option with a rectangular tray the entire width of the pallet allows you to do without any fractures at all!
In general, with an understanding of the geometry, various variations in ladder positions and slopes are possible. The examples above only show the most typical situations.
Square or rectangular showers are common. However, in our realities of cramped bathrooms, there is often a need for a semicircular or beveled shape. In this case, it is best to opt for a mosaic. Whatever shape the pallet has, you need to bring four (or more) beacons from one level from the corners to the side of the ladder (as in the photo above with the mosaic). This is a fairly universal rule. A slope of 1-2 centimeters per meter is created along the longest beacon; for shorter beacons the slope will be greater, but the entire perimeter will be of the same level.
But if you really want to, then you can get smart with ordinary tiles, but you need to understand that this will be more difficult to implement. The point is to “catch” the correct square in a complex form.
The planes on the left and below extend from an imaginary square, so they will be higher near the border of the pallet than the “correct” planes on the top and right. Also, these planes will require additional beacons when pouring. Not a very good option, in my opinion.
Selecting materials
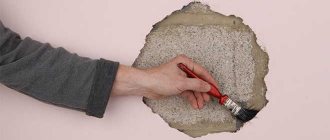
Bitumen coating waterproofing
Determining the material for waterproofing a shower stall without a tray depends on what the surfaces of the walls and floors in the room are made of. The design is also important. Most often, one type of material is suitable for providing waterproofing; only occasionally do they resort to using a complex.
There are several groups of waterproofing materials:
- Coatings. One of the modern options is using bitumen mastics. Sometimes this type is called liquid rubber and the main advantage is elasticity, which will allow the material to be laid without any unevenness. In addition, bitumen mastic has good adhesion, due to which a long service life is achieved. Many workers, when performing moisture insulation with coating materials, place a cement screed on top of the mastic.
- Penetrating type. Most often they are made from various polymers. Thanks to their composition, they provide good protection. The effect is also achieved due to the deep penetration of elements into the structure of the shower stall, thereby increasing the water resistance.
- Rolled. The process is carried out through the combined use of reinforced polyester and polymers. Sometimes the first material is replaced with fiberglass bitumen. The final version can be self-adhesive or weld-on. In the first case, there is no need to use any tools or devices to ensure fastening and operation of the material. The second involves the use of a burner. Roll materials require responsible use and set certain requirements. For example, unevenness in roll laying should not be more than 2 mm when waterproofing a shower stall without a tray.
- Polymer-cement compositions. Sold in dry powder form. To use it must be diluted with water. Only walls or floors can be insulated with this mixture. There is no need to make a screed, since the material has a high degree of elasticity.
Sometimes elastic waterproofing materials are classified as a separate group.
Installation of a drain ladder
Whatever the design of the drain and pan, the best option would be to “rigidly” install the drain before pouring the pan/screed. Rigid installation is when the drain, tray or channel is securely fixed with a solution. Trays and channels usually have special fasteners included, but they do not fix the structure rigidly enough and the design position can easily be disturbed when pouring the screed.
Therefore, it is best to first install the drain on the kit (if available) or homemade fasteners, and then fill the entire space under the drain with cement mortar or tile adhesive. This will not only allow us to securely fasten the structure, but we will also have a clear idea of the lowest point of the pallet.
As a last resort, rigid fasteners can be made before forming the finishing layer of the screed, if the pouring is carried out in two layers.
In this photo, the shower tray, in addition to the complete fasteners in the form of legs, is additionally secured with cement mortar. This was done while pouring the first rough layer of screed.
I want to say right away that drain designs without a flange are not even considered. If you need high-quality waterproofing of the shower, and in most cases it is necessary, then the presence of a flange in the design of the drain is a must!
A flange is a border of several centimeters around the drain, specially designed for reliable connection with waterproofing.
To set the ladder to the desired level, four studs are used, screwed into suitable dowels. The studs support the structure by the flange, and the height of each stud is adjusted by tightening and unscrewing it using two locknuts.
The drain design in the photo above is made in such a way that the level of the flange will inevitably be lower than the finishing screed. Therefore, in the future it is necessary to form the screed only up to the flange, leaving a recess around the drain. An example in the photo below.
The recess around the drain is sealed with tile adhesive after applying the coating waterproofing (of course, after the latter has dried).
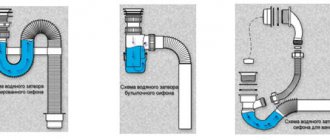
The drain itself is connected to the sewer with a 40 or 50 mm pipe. I prefer to use the 50th pipe, although I think that this is not essential and the 40th will also do its job perfectly. If the drain outlet is 40 mm, which is often the case, then when installing the 50th pipe, an adapter is used immediately behind the drain.
As with any sewer installation, it is best to avoid 90-degree angles and use two 45-degree angles. I do not recommend using corrugated sewer pipes - as practice has shown, they are quite unreliable.
Good to know: if the sewer riser is poorly ventilated, then there is a high probability that the drain water seal will often break. In general, “grunting” sounds will often be heard from the pan. Therefore, for such cases, it is better to choose a ladder with a high-quality combined shutter. For example, a “dry” shutter mechanism should not contain springs - this is an a priori unreliable technical solution.
Also, in the absence of ventilation of the riser (this occurs in old houses), an aerator (a valve that allows air into the sewer, but restrains odors) will help solve the problem. However, you should not rely entirely on the valve, because it will serve the entire riser (all apartments) with its work. If only we could agree with most of our neighbors to install the same ones for ourselves...
Base
In most cases, a reasonable solution would be to pour in two stages: forming a main layer with the installation of a drain and communications, and pouring a thinner one, with slopes towards the drain. In this description, the base refers to the base layer without slopes. Let's look at practical examples:
Shower tray.
When making a tiled tray, the height of the drain connection to the sewer plays a decisive role. Often there is a structural need to form a pallet with a height of more than 20 cm from the floor level. Therefore, to lighten such a massive layer, red brick or expanded clay concrete is used to form the base.
Drainage in technical room, garage.
This means pouring a concrete base onto the ground; with ready-made concrete floors, you need to consider expanded clay concrete or the possibility of “burying” the sewer drain. An ordinary concrete slab of 10-20 cm is poured onto the ground, taking into account the addition of layers with slopes. For screeds with slopes, it is necessary to provide 1-2 cm near the drain, and then add a centimeter with each meter of distance from the drain.
As a result, it is necessary to achieve a relatively flat base (differences of 0.5-1 cm are quite acceptable) with an already installed ladder.
Filling the pan
Since in most cases the thickness of the pallet screed exceeds 10 centimeters, it is preferable to divide it into two layers. Make the first, rough layer as thick as possible, and the finishing layer as minimal as possible.
Although if the height of the bottom of the pan is less than 8 cm, it will be more convenient to fill it in one stage.
Through trial and error, I developed the following sequence for myself: first, a thick rough layer is poured, not reaching the design height of 4-5 cm, and then a finishing layer of screed is formed from the missing 4-5 centimeters.
Why exactly 4-5 cm? This thickness was chosen in case of poor adhesion between layers and to make it possible to safely use ordinary cement-sand mortar for finishing. Even if the top layer does not adhere well to the bottom one, it will have sufficient load-bearing capacity. Moreover, this approach will allow the use of a base layer of expanded clay concrete with a minimum amount of sand.
As you know, ordinary DSP is not recommended for screeds thinner than 3 cm. In fact, thinner layers can be formed with ordinary mortar, but a separate article is needed to cover this topic. Therefore, we will conventionally assume that cement-sand mortar without additives should not be laid in layers less than 3 centimeters.
It is recommended to reinforce both layers: the bottom one is usually very thick and by default requires reinforcement, and the top one has some chance of not sticking well to the top one and therefore must have load-bearing capacity. In fact, if everything is done correctly, the probability of the top screed peeling off is almost zero, but more on that below.
For the bottom layer, construction (masonry mesh) is used, and for the top layer, either the same mesh or fiber is used. When laying red brick as a base layer, naturally it will not be possible to use a mesh.
The metal mesh is laid approximately in the middle of the first layer. The main thing is not to pause and immediately cover the reinforcement with the top layer, then the first layer will be monolithic and reinforced.
Since there is at least a sewer drain pipe in the pan (and quite possibly other communications), it will be difficult to lay the mesh in one piece. Therefore, the mesh can be cut into many small pieces, the main thing is that these scraps overlap each other by 5-10 cm.
If you have a laser level, it is very convenient to control the base layer using a stick with a control mark. The accuracy is of course low, but for a rough layer this is enough.
The density of this particular layer of expanded clay concrete, according to approximate calculations, is 1100 kg/m³ versus the density of 1700 kg/m³ for a conventional CFRP. In this case, this made it possible to reduce the weight of the pallet by 46 kg. with a layer thickness of 8 cm and an area of 1 m² (actual weight is about 90 kg, from the DSP it would be approximately 136 kg).
Regarding the density of expanded clay concrete. I’m not sure of the absolute veracity of the information found, because unfortunately, 99% of the Internet is littered with crap... Expanded clay concrete has a density from 800 kg/m³ to 1800 kg/m³. Particularly lightweight can have a density of 600 kg/m³.
The weight is affected by both the fraction of expanded clay itself and the amount of sand. In practice, the less sand, the more difficult it is to lay the solution without voids. But we are not afraid of small local voids, because the load-bearing finishing layer will lie on top.
The photo above shows an example with expanded clay concrete with a density of approximately 1100 (calculation was carried out by the weight of the components used). I can say with confidence that the amount of sand in the batch can be reduced and the density can be reduced to at least 850-900 kg/m³. In other words, make the base layer twice as light as a regular solution.
I can’t give the exact proportions of the components, because expanded clay can be different, and you need to be guided by the sensations of the finished mixture (is it possible to lay it with a minimum amount of sand). However, I will give an approximate algorithm: cement is mixed in water, equal in weight to the weight of the introduced expanded clay, then expanded clay is mixed with water and cement, and then sand (and water, if necessary) is added in small portions. Sand is added until the mixture has a workable consistency.
As for the side, there seem to be two main options: lay it out of brick or lay it (fill it) together with a finishing layer.
The inner part of the side formwork with its lower part repeats the finishing plane with slopes. Thanks to this approach, the finishing screed and the side will be one monolithic whole.
Long self-tapping screws screwed into the rough screed will additionally strengthen the adhesion of the bead to the bottom layer. This is an additional measure and is not necessary.
For finishing screed, it is best to use the semi-dry method. I’ll explain why: the pallet will dry out faster, at least the upper part, and there’s almost zero chance of shrinkage cracks forming. This approach will allow you to quickly begin waterproofing.
As a last resort, if for some reason a semi-dry screed is not suitable, then the top layer should be poured with a minimum amount of water in the batch.
For beacons, you can use any available method. I prefer the PN profile on the screw heads. After forming the planes from the semi-dry solution, the profiles are removed, the support screws are recessed deeper and the strips are sealed. With the “wet” technology, the profiles are taken out after the screed has set and the locations of the beacons are covered.
I prefer beacons made from a couple of self-tapping screws and a piece of PN profile on top. In this particular case, the second pair of beacons is the tray flange
The extreme support points of the profile are the flange of the ladder
For good adhesion to the previous layer, there is a simple technique. Forget about primer!
If the first layer has had time to dry fairly well (the filling was done more than a few days ago), then it needs to be well moistened. As an adhesive layer, you can use a thin layer of tile adhesive or a 1:1 liquid mixture of cement and sand.
The adhesive layer is spread over the surface with a trowel, and then the mixture for the finishing layer is laid on top. In hard-to-reach places, you can use a brush to apply liquid cement.
When using “slurry” made of cement, the main thing is not to overdo it and apply layers of no more than 2-5 mm, so that the bulk of the screed does not become more liquid. This method is quite simple, but it eliminates detachment. When using a primer, there are many cases where the top layer begins to sag after 2-4 weeks. The method is relevant for the semi-dry method and for the “wet” one.
If you use too thin a mixture for the finishing layer, the adhesive layer may not help! A minimum of water in the batch is the main rule.
If there is formwork, it is better to remove it after 2-3 days.
After pouring, the next and subsequent 2-3 days it is useful to water the screed with water and cover it with plastic wrap.
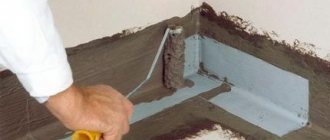
Waterproofing
As I already wrote in the article on waterproofing a shower, it is very advisable to keep the pan flooded for at least a couple of weeks. With the semi-dry finishing screed method, the time can be reduced. This statement is not an axiom, but just logic: often cracks in the screed do not appear in the first days after pouring.
On the other hand, if the waterproofing is sufficiently elastic after drying, then hairline cracks in the base will not damage it.
In any case, you need to choose a coating waterproofing that has the ability to stretch. There are a lot of cheap compounds that have no elasticity at all. Such a layer will crack along with the base - it is better not to use such compounds.
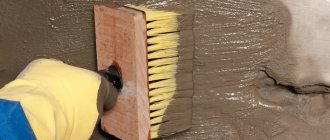
It is mandatory to use reinforcing tape for the corners, and I also highly recommend laying façade fiberglass mesh on the bottom (between layers). The junction of the drain flange with the screed must also be taped with tape - if it is not included with the drain, then use the same tape as for the corners.
If there are sinkholes and recesses on the screed, the pallet can be puttied with tile adhesive. This will reduce the consumption of waterproofing and eliminate untreated areas.
Regarding the question of the height of the waterproofing layer: the main thing is to provide a “bowl” with edges of 10-15 centimeters, and higher - according to desire and finances.
What are we going to do?
From the above it should be clear that many dealers sell goods for which certificates cannot be confirmed. Please note that we are not saying that these are fakes and that the waterproofing will not work. You simply cannot be sure if there is no certificate, and you don’t really want to try, because the composition cannot be called cheap. And so you look at this advertisement for Penetron, which penetrates into all pores, how it hardens inside the concrete and sets, how excellent it is for finishing swimming pools, and you understand that you both want it and are afraid.
No, if you live in Moscow or the Northern capital, then hardly any problems will arise, but the provinces are a completely different matter. So, the first thing that should interest us when choosing a building mixture is its compliance with the requirements. Because you can only notice leaks from the pan when disgruntled neighbors come to complain. But it will be too late. What mixtures can be used?
- In first place in popularity is Penetron and the product line of the holding of the same name. In 2021, the group from Yekaterinburg turned 25 years old.
- Kalmatron produces less expensive mixtures. The first enterprise appeared back in 1992. The Khabarovsk Territory became the birthplace of Kalmatron penetrating waterproofing for concrete.
- Ceresit mixtures take their very name from a concrete additive invented back in 1906. The well-known concern Henkel is currently engaged in development and support.
Application of Ceresit mixture
Using the Internet, you can find many mixtures of both penetrating and surface action that are similar in purpose. Today, any primer can boast that it holds the base together with a polymer matrix. Therefore, it can also be used for waterproofing surfaces. The difference between the listed mixtures is that they are purposefully made in order not to allow moisture to pass through. And the manufacturer guarantees that if used correctly, this is exactly what will happen.
Laying tiles
Whatever the shape of the shower, there will be a lot of trimming. How to make a high-quality cut of tiles or porcelain stoneware is described here.
One of the frequently asked questions: How to join the tiles to the drain
. I will not pretend to be true, but I will say what I think: the tiles should be 2-3 millimeters higher than the grating. The same applies to mosaics.
In fact, this question needs to be asked while pouring the pallet in order to lay the tiles without layers, on a fine comb.
You can control porcelain tiles with a level only across the slope. The plane of the slope can be controlled by a rule.
I would also like to recommend choosing the least slippery porcelain stoneware or mosaic tiles possible, although this is quite difficult...
Any cement-based grout for tiles is suitable, preferably hydrophobic. There is an opinion that epoxy grout is necessary in the shower. Of course, such grout is good, durable and can provide additional waterproofing. However, grouts on cement binders also perform well.
That's all. Later I plan to add higher quality photos, which are not yet available.
What to do when there is a need to break the surface?
We figured out how to lay tiles in a bathhouse or shower with slopes under the drain. But imagine a situation where, for reasons beyond your control, a situation has arisen that requires you to “bend” one of the tiles being laid.
If there is no way not to “lift up” any of the corners, this is quite normal. Unfortunately, the entire aesthetics of the appearance will be greatly spoiled. There is only one solution - to saw the tile material (the required number of elements) diagonally. The cut is carried out carefully, the cut is polished with an abrasive stone, and the chamfer is removed.