Home » Electrical wiring » Sockets » Interesting ideas for masking sockets
Almost every person may need to hide sockets on the wall. In most cases, this may be necessary to protect children from electric shock. Some people hide outlets to improve the decor of their room.
If we study such information in more detail, then we can conclude that today there are simply a huge number of interesting ideas for disguising electrical products. After studying this article, you will learn how to hide sockets in the kitchen, bedroom, nursery or bathroom.
Floor shield
There is a misconception that appeared not so long ago. According to him, when searching for the required toggle switch on the dashboard, you need to follow the logic and “turn off the switch” located in accordance with the apartment on the floor landing.
Warn your neighbors if the machines are not signed!
This recommendation is wrong. By following it, you risk getting into an unpleasant situation by suddenly cutting off the power supply in a neighboring apartment. What if he filled out an important document while working remotely?
Bathroom
The second most important issue is the ability to properly close the water outlet in the bathroom. The only solution here is to install a special type of housing with a lid, as in the photo below:
It is equally important to take into account the requirements for installing electrical products in the bathroom - the housing must be located at least 60 cm from the water. We have listed additional requirements for electrical wiring in the bathroom in a separate article.
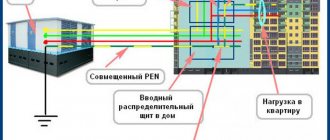
How to safely turn off the electricity on the panel
Many people live in Khrushchev-era apartments, that is, in old-style apartments. The houses in which they are located were built in the first decades of the last century. Many of them still have ceramic stoppers.
They exist in two types: with and without a button. But you shouldn’t be scared - turning them off is easy, just like automatic toggle switches.
Stopper without button (manual)
This type of plug can stand separately: one for zero, the other for phase. Regardless of this, you can turn them off by simply unscrewing them.
Automatic stopper (with buttons)
This type of plug should also not cause misunderstandings. To turn off the power to the apartment, you just need to press the largest button.
How to turn off a circuit breaker in a panel
Everything is simple here too. To de-energize the apartment, move the key to the “Off” position (or a zero is drawn, on the switched one there is a dash, a one).
- To turn on the machine, the toggle switch rises up, that is, you just need to lower it (check that it is not upside down).
- Usually, when switching, the red color indicates that the machine is in operation. And green is a used machine, that is, turned off.
The circuit breaker cuts off the power supply and trips, as a rule, when there is a short circuit or a prolonged excess of the electrical load. Comprehensive protection.
Socket installation
Now we bend the wires and attach the socket.
Installation of the socket. New socket installed
The main thing here is that the socket is ultimately installed level, and that there is a reliable installation; to do this, we fix the socket with self-tapping screws through special holes (more on this in the first part of the article, link at the beginning). Put the lid on and you're done!
4. The new socket is installed, the cover is on
Now the work is up to the finishers. To apply new wallpaper, you will have to remove the cover.
What to do if there is an RCD in the panel
The poor condition of electrical panels in old houses requires reinsurance to avoid fires and casualties. Therefore, in many cases, protection devices (RCDs) are installed to ensure stability in the power supply circuit.
RCD - residual current device
They are designed to automatically turn off power in the event of a sudden electrical leak and do this in milliseconds. If this protective device (RCD) is installed in the panel, then in order to turn off the electricity in the apartment, you can limit yourself to simply turning off the RCD. It’s better to turn off both it and the machine.
Installing a new socket box
We use plaster or alabaster (if you need it quickly). If you don’t have enough experience, but you have time, it’s better to dilute alabaster (construction plaster) with any plaster in a 1:1 ratio. We install the socket so that its edge is flush with the wall, or recessed by 1-2 mm, taking into account the wallpaper. And the fastening screws are perpendicular/parallel to the walls/floor.
The socket box is installed, the alabaster is frozen, the wires are minimally disturbed
You can make a small turn of the socket - 3-4 degrees counterclockwise, if you can’t exactly set the parallel. Although there are mounting holes on the socket flange that require clockwise rotation.
Before installation, you need to decide which socket will be installed - single or double; there are features that will be discussed below.
When not to tamper with the shield
Indeed, not in all cases it is worth touching the electrical panel. There are several cases.
The lights were turned off in the entire house. In this case, interfering with the shield will not bring any effect. It’s clear that this won’t be the case. Therefore, you should first make sure that there is no light in other houses.
If the junction box is faulty, it is also called a junction box. This is a kind of splitter. The wires from the panel come there and are distributed throughout the apartment. Wires can oxidize and fail. In this case, interfering with the shield will not bring any effect.
If the electric meter is faulty. This may mislead you into thinking that electricity has completely stopped and is not being consumed. This is not an indicator at all and you can get a discharge.
Connecting the socket
Now it's time to connect the outlet. Let me remind you that at this stage we bend ONLY the new copper wires, we DO NOT touch the terminals and old wires.
Connecting a double recessed socket
As usual, we screw the wires to the socket terminals, nothing complicated here.
Connecting built-in socket 2
Ceramic tile
A diamond bit is used to cut holes in ceramic tile walls. Before starting work, make a template with holes from plywood. It is glued to the tile with double-sided tape. During drilling, the crown is watered. Otherwise, the tile may overheat and it will crack. It is also not recommended to use an attachment with a central drill. It can cause the ceramic to crack.
The resulting openings in the ceramic tiles and the base of the wall are filled around the perimeter with alabaster or gypsum mortar. The socket boxes are inserted into the seats, having previously pulled the wires through the holes in the boxes.
Drilling holes in ceramic tiles with a diamond coreSource www.1shop.lv
Hollow panels
For a group of block socket boxes, a rectangular opening is cut with a grinder, a block is inserted into it and coated on all sides with alabaster mortar. You can use a trick. If the bottom of the PR reaches the opposite surface of the void, then a hole is drilled in it and a dowel is inserted. The socket box is secured by screwing a self-tapping screw into the dowel through a hole in the bottom. If the depth of the hole is large, then you can place a wooden spacer.
Installation Tools
In order to install sockets without interruption while searching for the missing tool, you need to prepare it in advance. You will need the following:
- tape measure and marker for marking holes;
- a drill and a special cutter (crown) for drilling a hole in drywall. The diameter of the working part of the cutter should be equal to the diameter of the standard socket cup - 6.8 cm. If you don’t have a drill, you can use a screwdriver for this task;
- air bubble level (short enough to 0.3 m);
- a screwdriver with an indicator for the presence of voltage in the wires being tested;
- a screwdriver (Phillips or standard depending on the shape of the slots on the bolts) necessary when attaching the socket box, wires and the socket itself;
- a stationery knife necessary for stripping insulation from wires when connecting them to terminals.
- Preparatory activities
The locations of the sockets are determined before the start of wall covering work.
You also need to lay the wires before you start covering the walls in order to hide them under the drywall.
Installation is carried out in the following sequence:
- First, a frame is assembled for attaching drywall sheets and attached to the wall. Its ends are attached to the floor and ceiling of the room.
- If a partition is being built, one side is sheathed at once. Wiring will be laid along it.
- A wiring diagram is created and the locations of the socket boxes are marked on it.
- In the vertical parts of the frame, holes are drilled with a drill for wiring.
- Wires laid to the locations of the socket boxes should be placed in a corrugated plastic sheath and routed through the holes prepared in the frame.
The cost of the protective shell is low, and it perfectly protects against possible damage and high humidity, so there is no reason to save on its purchase.
- The most optimal would be a cable with 3 cores in double insulation (with a core diameter of 1.5 to 2.5 mm). If you plan to use electrical appliances with high current consumption, the cross-section of the wires must be increased.
- Wires laid under the casing should be securely secured with pieces of wire or plastic clamps.
Once you have finished laying the wires and marking their exit points on the plan, you can begin attaching the gypsum board to the frame.
Drywall crown
To drill holes in drywall (as well as in plywood, wood, chipboard, plastic), I use a metal cutter, or in other words, a stackable hole saw (crown), with a diameter of 67 (mm) from Kraftool.
The hole saw comes complete with a holder, a centering drill and two more bits: 60 (mm) and 74 (mm).
In addition to the cutter, there is also a bimetallic crown (Bi-metal) with a diameter of 68 (mm) with a centering drill.
If you don’t have crowns, then it’s okay. The holes can be carefully drilled or cut using a knife.