No one doubts the importance of arranging grounding in city apartments of old buildings, but only very few imagine the way in which this possibility can be realized. In order to make effective grounding in a Khrushchev-era building, for example, a separate grounding conductor is required, located outside the residential building. Moreover, such a design should be designed for the entire entrance, that is, for those apartments whose residents really want to protect themselves from electric shock.
Why is this necessary?
According to the definition, grounding is the intentional connection of non-current-carrying parts of electrical equipment to the ground (equivalent), which will become energized if the wiring is damaged. In such a situation, conditions are created so that the electric current has the opportunity to go into the ground.
The action of the protective circuit is based on the difference in resistance:
- human body – at least 1000 Ohm;
- ground electrode – no more than 10 Ohms.
Thus, in the event of a current leak, touching the conductive surface of the equipment will be safe.
Fibrillation current (100 µA) is especially dangerous for humans. For a single-phase electrical point, the following option for current flow through the human body is possible: I=U/R=220/1000=0.22 A or 220 µA, which is twice the indicated value.
Conclusions and videos on the topic
Before checking the grounding in a private house to see how it is connected (correctly or not), it is advisable to familiarize yourself with some effects that prove its absence. This may appear as a slight noise in the speakers when listening to music programs or as a slight tingling sensation when touching a metal bathtub or washing machine.
Anyone who wants to learn more about the signs of a lack of grounding and how to check for its presence is advised to watch a video on this topic.
In the final part of the review, we note that you can independently check the grounding in the apartment using any of the methods discussed above. To do this, you will need to prepare all the necessary tools and equipment, and also carefully read the instructions given in the article.
Please click on one of the buttons to find out if the article helped or not.
How to make grounding yourself
When installing (or inspecting) a socket, pay attention to connecting the grounding tongue to the grounding system.
In houses built after 2003, in accordance with the standards, a 5-core main cable is laid, where a grounding wire is provided.
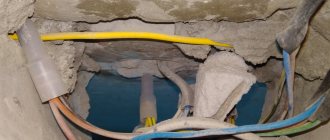
If electricians ignore the requirement to connect the socket to the protective circuit, it is enough to run an additional wire (or connect an existing one) to a special bus on the site with the distribution panel. It is not difficult to recognize such a bus by connecting it to the metal body of the electrical panel.
If you need to read the wiring diagram in the house for the TN-S or TN-CS systems, the following symbols are used:
- L – phase wire;
- N – zero element;
- PE – protective conductor.
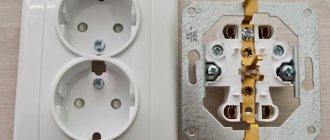
In an old socket
The concept of an old socket is associated with the absence of an attachment point for the grounding conductor in the ceramic core.
In this case, the spring-loaded antennae on the sides of the plug connection socket cannot be detected. There are also no holes for the mustache output through the plastic socket cover. When installing a grounding loop in the house, the corresponding wire is wrapped and hidden in the socket. This method is used when connecting “non-dangerous” consumers - chandeliers, TV.
To correct the situation, it is enough to replace the socket core with a serial connection of the phase and neutral wires, the grounding cable to the spring-loaded contact point.
Without ground wire
In the absence of a standard grounding circuit, work on grounding the sockets will be more complex and require:
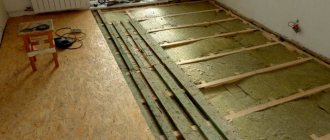
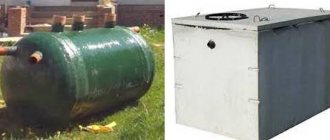
- installation of a ground electrode;
- laying the connecting wire.
When placing the ground electrode, a number of conditions are taken into account:
- The steel element is located in the ground no closer than 1 m to the surface (depending on the soil).
- It is allowed to use natural conductors as a grounding conductor - reinforcement of concrete structures, cable braiding.
- The grounding wire must be in a reliable sheath with a cross-section no less than that for the phase wire. The braid is yellow-green.
Cable installation should be entrusted to specialists from the energy supply organization. It may be necessary to replace the wiring throughout the apartment if it is worn out. After the work, the electricians will also take measurements in the area of possible current spreading over the surface of the earth. The permissible value is no more than 4 ohms.
Grounding connection options
When laying wires in an apartment, do this through a special distribution box with three pairs of contacts:
- for phase wire;
- for the neutral conductor;
- for the ground wire.
If a multipoint socket or switch is connected to the grounding system, then it is mandatory to install jumpers between the central terminals of each socket.
In general, the algorithm for grounding an outlet is as follows:
- Detection of five-wire riser and busbar.
- Determination of phase and neutral wires.
- Power outage.
- Fastening the phase, neutral and ground wires.
- Fixing the socket in the socket.
Upon completion of the work, it would be a good idea to test each of the connection points.
How to assess the condition of the grounding loop in an apartment?
To measure grounding resistance, a tester or a test lamp structure is used. You will also need a screwdriver and an insulated wire with two probes. If you have a multimeter handy, you need to do the following:
Check the voltage at the outlet. Just connect a table lamp or TV to it. If the device works, then everything is in order. Turn off the electricity in the apartment. To do this, you should use an RCD or an automatic machine (if you have an old house).
Carefully remove the outlet cover. Locate the wire connected to the ground pin. If the electrical network in your house operates on the grounding principle, then the wire will go into the wall. If the wire is connected to one of the terminals, then the grounding principle is applied in the house or there is no grounding loop at all.
If a ground pattern is detected, switch the tester to voltage test mode.
It is necessary to measure the voltage between phase and neutral, and then between phase and ground.
Ideally, the voltage between phase and ground should be greater than the voltage between phase and zero. You need to sound the alarm if the tester shows zero during the second measurement. This means that grounding in an apartment or house does not work. Not everyone uses a multimeter in everyday life, so they don’t see the point in buying one. In such situations, you can assemble a test lamp to check the grounding. To do this, you must find a socket, wires, end switches and a lamp. It will not be possible to accurately measure the voltage in this way, but you will find out whether your grounding is working.
First you need to determine, using an indicator screwdriver, where in the socket the phase is and where the zero is. When it comes into contact with a phase, the light in the instrument will light up, but when it interacts with a zero, nothing will happen. Once you have determined the location of the pins, do the following:
Touch one end of the wire to the phase, and the other to zero. The light should light up.
After this, move the end of the wire from zero to the ground antenna. The light should burn brightly. If it blinks or the light is dim, then the circuit is not working well. If there is no current at all, then the ground does not work.
During such a check, RCDs may be triggered in new houses. This also indicates that the grounding is not working well.
Hazardous work practices
When grounding, you should not resort to simplified methods of this type of protection:
- using a grounding wire;
- grounding through heating system pipes.
In the first case, if all electrical appliances are working properly, the neutral conductor is ready to act as a grounding conductor.
It is worth remembering the purpose of the residual current device.
Grounding is a protection system when any current leakage is converted into a short circuit and triggers a differential circuit breaker or RCD.
If the design is in good working order, the owner of the electrical appliance will, at best, receive a tripping of the protective element due to a short circuit. However, if the grounding wire is damaged in any way, the phase voltage (220 V) will appear on the housing.
In the second case, the pipeline system will work until part of the pipe in one of the apartments in an apartment building is replaced with plastic analogues. Due to the fall out of the metal part of the heating system, the supplied current will endanger both you and your immediate neighbors.
Under no circumstances should gas pipes be used to organize a protective grounding system. Because the electrical potential on the surface can lead to destructive consequences.
To ensure electrical safety, outlets in the house must be connected to a grounding circuit. When organizing such a protection system, you should avoid common mistakes, and entrust the installation of the circuit to an experienced electrician.
Typical socket design
Using the socket grounding test technique may be necessary at any time. Especially for those people who will have to work with specific electrical outlets repeatedly.
This part of the electrical network (domestic or industrial) has a simple design.
The electrical outlet does not shine with design difficulties. A simple ceramic or plastic base plus a metal frame with a lid. Still, electrical outlets are improving.
The electrical outlet consists of a round or rectangular plate. The plateau is made from materials that do not conduct electricity.
Typically, the following is used to make socket plates:
- ceramics;
- porcelain;
- plastic.
The back of the plateau has a flat surface, and on the front there are shaped landing pads for electrical contactors. The material of contactors is usually copper. The contactors are fixed to the plateau rigidly - using rivets, plus they are embedded in the body of the plateau.
For connection to electrical wiring, the contactors have mounting screws. This entire structure is closed with a lid that has two passage holes for an electrical plug.
Solving connection problems
Circuit with multiple power supplies and grounding points
If checking the ground loop with a homemade tester, voltmeter or multimeter does not produce results, you will need:
- Plug in the electrical appliance without touching the contact and see if it works.
- Turn off the power to the switchboard and remove the plug from the socket.
- Disassemble the socket and inspect the wires and contact connection points. There is no ground if there is no connection.
Independent work with the electrical network if the algorithm is violated can cause injuries and fires as a result of a break in the “zero”. To prevent this, use the services of electricians.
On the issue of safety
Please note once again: it is better to invite an electrician to check the functionality of grounding in sockets. He will take measurements and give a conclusion based on the results. But if you still decide to try one of the methods of self-checking, you need to be well prepared and take all possible precautions:
Avoid touching exposed wires and metal parts with your hands.
- Place a rubber mat under your feet.
- Handle only isolated parts.
- Don't check alone. So that “if something happens” there is someone to react.
But as we have already said several times above, it is better to call an electrician. You may be able to connect a grounded outlet yourself, but it’s better to entrust the quality of the work to a professional.
Sources
- https://kak-sdelano.ru/elektrica/kak-podklyuchit-rozetku-s-zazemleniem
- https://ichip.ru/sovety/ekspluataciya/nuzhny-li-doma-rozetki-s-zazemleniem-719392
- https://YaElectrik.ru/elektroprovodka/kak-podklyuchit-rozetku-s-zazemleniem
- https://ProFazu.ru/provodka/ustanovochnye/rozetka-s-zazemleniem.html
- https://sovet-ingenera.com/elektrika/rozetk-vykl/kak-podklyuchit-rozetku-s-zazemleniem.html
- https://odinelectric.ru/wiring/rozetki-i-vyklyuchateli/kak-podklyuchit-rozetku-s-zazemleniem
- https://elektroznatok.ru/provodka/podklyuchenie-rozetki-s-zazemleniem
What is the best way to calculate grounding resistance? Technical characteristics of the device
Every self-respecting owner is concerned about safety in his own home, and to ensure it completely, it is also necessary to protect all electrical equipment. For this, as we know, a grounding device is constructed, but it requires regular checks; let’s consider a device that copes well with this task.
The Fluke 1625-2 GEO is a next-generation meter designed for use in residential and industrial environments. The advantage of such a device is its ability to store data and transfer it to a computer. The device is also capable of calculating grounding resistance using only clamps. The advantage is the ability to work without additional installation of electrodes.
The device will work flawlessly if there is a fully equipped grounding system. If your home has a grounding system created from a single circuit, the wireless method will not be suitable for measurement.
Technical features
- The internal memory of the device will allow you to save data up to 15 thousand units.
- It has a liquid crystal display with improved graphics quality.
- There is a rotary mechanism and function control keys.
- Operates in a temperature range from -10 to +50°C.
- The safety features include the possibility of additional insulation.
- The basic package includes 6 1.5 V alkaline batteries.
- The measurement error of the device is ±5%.
- The device performs at least four calculations per second.
- Internal resistance is 1.5 ohms.
- Automatic selection of ranges for computational work.
Resistance measuring device M416
Testing of residual current device
If there is an RCD in the distribution board, before checking the ground loop with a multimeter, it makes sense to make sure that the protection is working. If the home technician does not trust the “test” button, you can conduct your own tests. To do this, the RCD is completely disconnected from the network, and pieces of wire are connected to its input and output contacts (one of two). For example, let's take the upper and lower phase terminals. The flag is turned to the “On” position, after which a regular 1.5 V battery is connected to the free ends. The field created on one coil and its absence on the second creates the appearance of a leak, as a result of which a cutoff should occur. If this does not happen, the device is faulty.
Types of electrical outlets
The industry produces two types of products:
- equipped with a grounding bus;
- not having a grounding bus.
The first type of design is often called a “euro-socket”. This design fully satisfies electrical safety requirements. When changing electrical wiring, it is recommended to install sockets with grounding.
The appearance of the electrical outlet according to the standards established by the European Union countries. A distinctive feature of the design is the presence of contact bimetallic grounding plates
The second type of product is considered an outdated modification, but is still found in practice. Especially many outdated sockets are used in old buildings.
Design option without specific country affiliation. For modern electricians, it is considered an outdated model, which is not recommended for installation due to increased danger due to the lack of a grounding contactor
Both types of products are made for indoor or outdoor installation. According to the new PEB recommendations, modifications of sockets for internal installation must have bimetallic plates with a grounding contactor as part of the design.
For electrical sockets for external installation, the recommendations are the same, but in some cases of their use a two-wire interface is allowed.
Stages of replacing electrics in a panel house
The procedure for replacing electrics in an apartment is performed in the following sequence:
- Blackout. First of all, the power supply to the room is turned off in the panel, then the sockets are checked for voltage.
- Dismantling. Lighting fixtures, sockets, junction boxes, switches are removed, and then worn wires are removed.
- A layout diagram for the new network is being developed separately for each room.
- The surfaces are prepared, the craftsmen lay the wiring into pre-prepared grooves or fixed cable channels. Distribution boxes are installed.
- Checking the functionality of the network, followed by finishing work.
In the process of electrical installation work, craftsmen take into account the safety rules for operating the electrical circuit, the requirements of the GOST standard and regulated fire safety standards.
Service cost
The price of the service in Kemerovo is calculated individually. The cost depends on the following factors:
- Scope of work to be done;
- Complexity;
- Number of installed consumers (sockets, switches, lighting fixtures);
- Urgency of work.
Do you have any questions or want to order the services of masters through the Tandem service? In this case, post a request or call the hotline. Managers will advise on questions and help with placing an order.
Typical device connection diagram
The principle of simultaneous use of a voltmeter-ammeter on the test section of soil works. There are three quantities: resistance, voltage, current. The parameters are calculated according to Ohm's law. We know the initial voltage, and the device maintains the current. Knowing the voltage drop between the test rods, we can calculate the ground loop resistance with high accuracy.
There is an error, but it is insignificant in comparison with the measured values. The contact resistance of the test electrode with the ground is generally taken as zero, provided that the rod is clean and not covered with corrosion.
Most modern devices immediately provide ready-made parameters for protective grounding, but in older (but no less reliable and accurate) designs, you will need to perform a simple division operation. In accordance with Ohm's law.
Checking grounding with a megohmmeter follows the same principle, only the measurement error will be higher. Still, the earth is not a conductor of electricity in the usual sense.
Installation of the overhead option: step-by-step instructions
First, let's look at the process of connecting a surface-mounted socket to a cable hidden hidden in the baseboard box.
Step 1: In order to understand the procedure for installing a grounded socket, let's start with the simplest overhead type. Step 2: Mark on the wall the location of the future outlet, cut a hole in the baseboard for the wiring and route the cable through it. Step 3: Before installation, let's disassemble the socket into its components by unscrewing the fastening screw in the center of the front part. Step 4: Disassemble the socket into its components. In this model, the wiring mechanism is permanently attached to the mounting plate. Step 5: Prepare the wiring for connecting the outlet. We remove the general insulation from the cable, then strip the outermost 0.5 - 0.8 cm of insulation from the three wires. Step 6: Mark through the holes in the mounting plate the points through which the device will be attached to the wall. Step 7: At the marked points we drill holes into which we will install fasteners. We install plastic dowels into the concrete wall. Step 8: We install plastic devices at the drilled points to ensure reliable fixation with self-tapping screws. Socket from Schneider Electric from the Etude collection. Preparing the cable for connecting the device Disassembling electrical installation equipment. Components of the electrical installation device. Preparing the wiring for connecting the outlet. Marking the socket attachment points. Drilling holes in the wall according to the markings. Installing dowels into drilled holes
After completing the preparatory steps, we can safely begin connecting the socket mechanism to the grounded wiring.
Step 9: We fix the socket mechanism together with the mounting platform that is structurally fused with it to the wall with self-tapping screws. Step 10: We insert the edges of the wires, cleared of insulation, into the spring terminals of the socket. Grounding in the center, phase to terminal L, neutral wire to N
Step 11: Before attaching the front part of the case, we prepare it for installation by cutting out a semicircle in the side part necessary for a tight fit to the wall. Step 12: Close the device with the mechanism connected to the wiring with the front part of the case, align it and fix it with a screw. Fastening the mounting platform and mechanism. Connecting the device to the wiring. Preparing the front part for mounting. Fastening the front part of the socket body