All things tend to wear out over time. It is for this reason that every few years we renovate the apartment, re-sticking old wallpaper, changing flooring and baseboards, and rearranging sockets. But all these actions are only cosmetic. In the case of a major renovation or moving from an old apartment to a new one, there is much more work, some of which are recommended to be completed. These include replacing wiring. Today we will talk about how to replace old wiring.
Features of electrical wiring in a panel house
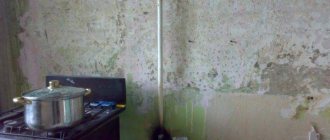
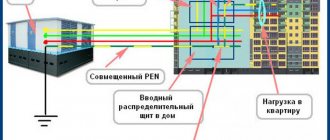
Old electrical wiring in panel houses is usually made of aluminum.
Panel houses are economy-class buildings that were built quickly and using inexpensive materials. The floors, walls and ceilings were made of metal reinforcement with poured concrete. Each wall is load-bearing, so redevelopment is impossible. Nowadays buildings of this type are not erected; preference is given to brick ones.
The electrical wiring in the panel house was laid in special channels. They were made in a factory inside reinforced concrete slabs. It is impossible to move communications to a more convenient location. There is another option for laying wires - between the ceiling and wall slabs. When replacing electrical wiring, you need to pay attention to the way the electrical wires are laid.
Conductors for chandeliers in a panel house are laid through special channels in the ceiling or between the ceiling panel and the wall. It is important to consider that even within the same house on different floors, wiring can be laid differently. It is impossible to rely on full compliance with installation requirements; even simple rules could be violated during construction and repairs.
Installation of circuit breakers
Each individual line is equipped with its own circuit breaker, with a rating depending on the cable cross-section. According to the rules, you cannot insert more than two lines into one machine; if you are trying to power more than three lines from one machine, you must install a special branching bus.
Today there are many ways to protect electrical wiring, even at the household level. The most necessary condition is the installation of circuit breakers for protection against overloads and short-circuit currents (conventional single-pole circuit breakers). It is also recommended to install an additional residual current device - RCD (current leakage protection).
It is best to install RCDs on the lines of high-risk areas: wet rooms, children's rooms. There is no need to install one common RCD for the entire apartment! They install one common RCD only for the purpose of saving. The consequences of such savings are a complex diagnosis of a fault in the event of a leak, + the entire apartment is left without light when it is triggered. On some lines, for example, lighting or street lines, an RCD is not installed.
Installing additional types of protection is already a luxury: thermal relay (protection from cable heating), lightning protection, stabilizer or protection against voltage surges (saves from 380V), fire alarm, etc.
Reasons for replacement
You need to replace the old electrical wiring in the following cases:
- physical wear of aluminum wires;
- end of cable service life;
- inability to withstand the load from modern household appliances;
- with old wiring it is impossible to ground;
- major renovation of the apartment, redevelopment.
Replacing all the wiring in a house will be quite expensive. You can replace not only cables, but also old sockets and switches. But this must be done to make housing safe. You can save money by changing cables yourself. But this must be done with certain skills and abilities in compliance with safety precautions. Otherwise, it is recommended to seek help from a specialist.
Electrical panel installation
The most budget option is to install all the circuit breakers on the staircase in a common panel, where your old circuit breakers and meter are already located. To do this, it is necessary to route all the cables into the access panel. If you want a shield in your apartment, then you need to choose a suitable place for it.
Built-in or overhead shield is up to you. The built-in one looks more aesthetically pleasing, but the overhead one is easier to install. All lines from the apartment go to the panel, and from it one thick cable goes to the entrance panel, the cross-section of such a cable must be at least 6 mm, that is, a three-core cable, for example VVG 3 * 6.
Wiring methods
It is recommended to make new wiring in old channels, since chipping the panels is undesirable.
Before changing the wiring, you need to draw up a new wiring diagram or change the old one in advance. You can perform both partial and complete replacement of electrical wiring in the house. In the diagram it is necessary to note what load will be consumed in each room, how many sockets and switches will be installed, at what height.
In the kitchen you will need to install larger electrical wires and powerful sockets, since the main load is concentrated there. For rooms, two sockets per 5 sq.m. are enough. Particular attention should be paid to the bathroom, which has special climatic conditions. Sockets, if they are provided in the bathroom, must be connected via an RCD or differential circuit breaker. Also, RCD should be carried out on powerful appliances - washing machine, water heater, electric stove, dishwasher.
The cheapest way to install electrical wiring is to place the wires along the surface of the walls. Cables are secured using clips, clamps or brackets. Then a layer of plaster is applied on top. The disadvantage of this method is that an additional budget is required for plastering surfaces.
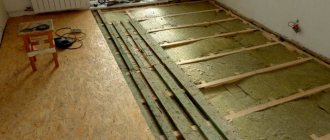
If you make a concrete screed, you can lay the cables on the floor. They are placed in corrugated pipes, placed on the floor and filled with concrete. In a similar way, you can place wiring on the ceiling. The disadvantage is that it is impossible to install the socket on the floor and ceiling, which means that you will have to additionally groove the surface of the walls.
You can make open wiring. Then the cables are placed in plastic channels, PVC pipes or corrugations and installed on the walls. Electrical wiring can be laid openly even after the repair is completed. A prerequisite is a vertical or horizontal arrangement of lines. It is recommended to mark in advance with a pencil on the wall where the lines will be laid. The downside is the unaesthetic appearance.
The cables must pass through the old channels, then additional wall gating will not be required. To carry out repair work, the technician must have a professional tool.
Scoring of slabs
The walls in panel houses are load-bearing, so their integrity cannot be violated. But this prohibition applies to horizontal grooves; vertical ones can be made. But you need to take into account the limitations - the grooves should not be deep (more than 10 mm) and the metal reinforcement should not be damaged. Scoring should be carried out only along straight lines without slopes or zigzags.
The channels must be located at a distance of more than 40 cm from the gas supply and water supply systems. The distance from door and window openings should be more than 15 cm.
The materials you will need are a grinder with a diamond blade or a wall chaser.
Where to start
You need to start work by drawing up a diagram of the future wiring. A diagram or drawing of the location of cables and consumption points is needed for at least three reasons:
- Fixing places for laying wires with dimensions. This information is especially important if you decide to do hidden wiring. If you later want to hang furniture or a TV, you will know exactly where the wires go so as not to accidentally damage them when drilling.
- Calculation of the number of necessary elements - socket boxes, sockets, switches, cables, cable ducts, connectors and other components.
- Determination of the optimal electrical communications scheme. The plan shows where it is best to lay the installation to take into account the location of the equipment, interior elements, and so on.
After drawing up the plan, components are calculated and purchased.
Step-by-step replacement instructions
Before laying the wiring, it is necessary to de-energize the apartment.
After considering the basic methods of laying electrical wiring, you should move on to the replacement rules. Step-by-step instructions on how to change the wiring in a panel house:
- Turn off the electricity supply. You need to make sure with a multimeter that there is no voltage coming into the apartment. You will need one temporary socket for a drill, hammer drill and other tools. It is better if the necessary devices are battery operated. You also need to take care of alternative autonomous light sources in advance.
- Dismantling of fittings. You need to remove all interfering equipment and furniture from the walls and get convenient access to all sockets, distribution boxes, and switches. All sockets and switches must be removed, only electrical wires should remain to connect new products. Then you need to disconnect the wires in the junction box.
- Dismantling the wiring. In some cases, it is impossible to remove the old wires, then they can be left in the wall. Old cables must be disconnected from the panel and their ends must be insulated.
- Drawing up a wiring diagram and choosing a wiring method. You need to immediately purchase all the necessary cables, sockets and other items. According to modern requirements, socket and lighting groups use electrical wires made of copper with a cross-section of 2.5 sq. mm and 1.5 sq. mm, respectively. When purchasing sockets, it is recommended to take the old version with you to the store, otherwise you may buy a model with an unsuitable socket.
- Installation. It is necessary to install distribution boxes, lay lines to powerful household appliances, sockets and switches. The shield should be assembled. Wires can be connected using terminals, crimping with sleeves, soldering, welding spring clamps. Twisting is strictly prohibited.
- Examination. You need to check all connections and wires for short circuits using a tester in ohmmeter mode. The insulation should be carefully inspected for possible integrity problems. If everything is in good condition, you can begin finishing.
You can call an electrician to check the wiring. For a small amount, he will test the assembled system, and then the residents of the house will be confident in the safety of the apartment.
Installation of openings for sockets
If the drawn up diagram involves the installation of new sockets, another step of work will be required - drilling holes in the wall. To do this, you will need a pencil and a ruler, a hammer drill with an 8 mm drill, a crown attachment, and a spatula for removing concrete from the hole.
In the place where the socket will be placed, you need to draw a circle with a pencil with the diameter of the socket. In the center of the circle you need to make a hole 50-60 cm deep. Using a crown, outline the outline of the hole and drill about 14 holes with a drill according to the intended pattern. Now you can drill a hole to the full depth and knock out the remaining concrete into the shovel. Holes for distribution boxes are made in the same way.
About junction boxes
Junction boxes (or distribution boxes) are necessary for switching (connecting) wires in them and branching lines, for example, for a switch.
Today, professional electricians will tell you that there is no need to install junction boxes in existing apartments ! They can play a cruel joke on your wiring. In the event of a short circuit, tearing, flooded neighbors, etc., you will need access to this very junction box. It’s easy to give up junction boxes - do all the switching in the socket boxes! To do this, you need DEEP socket boxes , in which all switching for lighting will take place. Typically, deep socket boxes are made for light switches, but if switching is needed to branch out socket lines, then deep socket boxes are also installed under the sockets.
Side of the law
From the point of view of legislative acts, if the owner of the apartment independently trenched the wall and this caused cracks, deformations and other damage to the supporting structures, he is held responsible for these damages. All repairs carried out by the management or maintenance organization of the house will be carried out at the expense of the culprit.
When cutting grooves in partitions by third-party specialists hired by the owner, damage to the structures will be compensated at the expense of the performers or the employing organization
Standards for wall gating
The main regulatory document regulating the gating process is SNiP 3.05.06-85. According to it, the channels cut into the wall must meet the following requirements:
- Horizontal grooves should have a depth of no more than 25 mm, a width of no more than 20 mm, and a length of no more than 300 mm. In this case, the distance from the channel made in the concrete to the floor slab should not be less than 150 mm.
- Vertical grooves, unlike horizontal ones, can be of any size. A few restrictions for them are compliance with the following distances: 100 mm - to window openings and corners, at least 400 mm to gas pipelines.
It is also not allowed to lay these channels in concrete structures that damage the reinforcement frame or mortgages.
Materials and tools
To replace the wiring, you may need a grinder.
To replace the electrics, you will need the following tools:
- hammer drill, grinder, screwdriver;
- level, tape measure, square;
- hammer;
- tester, indicator;
- wire cutters, pliers;
- Screwdriver Set;
- spatula, paint brush;
- stationery knife;
- soldering iron;
- headlamp.
Calculations of materials and devices are made based on the diagram.
It is necessary to stock up on insulating tape.
To change the internal line in an apartment, you should stock up on the following materials:
- cable with copper conductors with a cross section of 1.0-2.5 mm;
- tin or solder;
- rosin;
- insulating tape;
- socket boxes;
- mounting boxes;
- switches;
- bags;
- connecting blocks;
- putty;
- primer;
- finishing.
For convenience and safety of working at height, you need to purchase a stable stepladder. To protect your skin, vision and respiratory organs, you should work in a construction helmet, protective gloves, goggles and a respirator. You will also need a 1 kW dielectric mat.
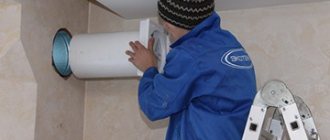
Corrugated sleeves
Nowadays, it’s probably easier to stumble upon such a corrugated tube than to see the electrical wire in its pure form. And not for nothing. The main task of such a sleeve is to provide additional protection for the wire from mechanical damage, and also (this is much more common here) to protect both the wire from the electromagnetic influence of possible surrounding emitters, and to rid the room of the induced electromagnetic field caused by the passage of alternating current through the wire.
Although the corrugated pipe standardizes all wires (thin, thick and multi-colored) into one format, it is not an important design tool. It is completely unsuitable for keeping its shape, and it will be located parallel to the floor in two cases:
- if it is fixed to the ceiling;
- and if it is attached to the floor.
Therefore, cases when a corrugated pipe is used are more likely to have a technological justification: you need to collect the wires into one bundle. Those. in this case there are too many wires that they need such structuring - this is clearly not an apartment format.
The disadvantage of such a pipe is the impossibility of visual inspection of the wiring along its entire length. And in general, it will be extremely difficult to inspect any significant area of it without damaging the corrugation.
You should not display the corrugated pipe, shaping the appearance of the rooms. It should be borne in mind that this is rather an “intermediate” material. Several of these pipes look very impressive, running together and each branching to its own consumer. But this layout should be covered from above by some kind of decorating surface.
Our prices
| Work area | Price | |
| One-room apartment (up to 35 sq.m; 14 electrical points; boxing up to 8 machines) | from 16,000 rub. up to 35,000 rub. | |
| Two-room apartment (up to 45 sq.m; 16 electrical points; boxing up to 10 machines) | from 22,000 rub. up to 40,000 rub. | |
| Three-room apartment (up to 60 sq.m; 22 electrical points; boxing up to 12 machines) | from 30,000 rub. up to 50,000 rub. | |
| House area up to 70 sq.m (22 electrical points; boxing up to 14 machines) | from 38,000 rub. up to 60,000 rub. | |
| House area up to 110 sq.m (45 electrical points; boxing up to 18 machines) | from 60,000 rub. up to 95,000 rub. | |
| House area up to 150 sq.m (60 electrical points; boxing up to 24 machines) | from 90,000 rub. up to 125,000 rub. | |
View full price list
Household repair No. 1
Choose reliable craftsmen without intermediaries and save up to 40%!
- Fill out the application
- Receive offers with prices from masters
- Select performers by price and reviews
Post a task and find out prices
- Minor household repairs
- Renovation of apartments
- Articles
- Electrics
Electricity is an irreplaceable resource that is necessary for the high-quality and durable functioning of various devices. Electricity in an apartment can disappear for various reasons: there was an accident at a power plant, a cable broke, or maintenance work is underway. But sometimes the culprit of problems is electrical wiring.
How to change wiring without gating?
A small short circuit is enough to make it impossible to use basic electrical appliances. Moreover, electrical wiring has its own service life. So how can you change the wiring in an apartment without gating? And which method of wiring the electrical network to choose: open or closed?
What are grooves and grooves?
In any ordinary apartment, electrical wiring is hidden inside the walls. This method of placing wires is called hidden. To carry it out, it is necessary to carry out gating of the walls. Grilling refers to the creation of holes and hollow channels in which electrical wires will be located. Grooving, as a rule, is carried out during the redevelopment of an apartment and is a very long process that begins with the development of a detailed plan. Owners of houses and apartments try to avoid gating for another reason that during it a large amount of dust and dirt is released. And you can’t approach the process without special tools. There are several ways to replace wires without gating:
- installing open wiring
- using old wiring
- using old grooves
Open wiring - what is it?
If the apartment owner does not want to hire plasterers, remove dust after gating and do cosmetic repairs, then it is best to replace the wiring using the open method. Open power lines are installed without grooves - in this case they are laid in the planes of the walls using special skirting boards and other products. Self-extinguishing materials are used for their manufacture: metal, plastic, and other composites. In order to camouflage the electrical network, today a variety of elements are used to decorate the apartment. Products for laying wires also include:
- cable channels
- corrugated sleeves
- boxes
Stages of work
Installation of open electrical wiring in an apartment without gating always begins with marking the walls. The plan must contain marks for the location of sockets, networks and baseboards. At the next stage, the wiring is laid into the baseboards. Be sure to close the cable channels and carefully inspect them again. Next, the insulation resistance is measured. Only then can voltage be applied. This method of replacing electrical wiring may seem more expensive due to the need to purchase fasteners and other consumables.
Is it necessary to remove the old wiring?
The second method of replacing electrical networks is more economical and convenient, since it does not require complete dismantling. It will be enough to disconnect the chandelier, remove the insulation, straighten the old wires and connect them to new ones. Remains of wiring can be removed with wire cutters. This method is used most often in cases where the budget allocated for repairs is minimal. You just need to buy the missing cable footage and prepare the tools.
We change the wiring using old grooves
To replace networks using this method, you need to purchase a new cable , which will then be pulled through the voids of the slabs. For laying you will need a steel broach . The same applies to electrical outlets . At the first stage, you need to remove the socket from the socket box. Using a wire, the cable is placed in the void and pulled to the socket. Here you should pay attention to the terminals. Only after this can the outlet be returned to its rightful place. To implement this replacement method, equipment should be used to monitor the electrical current and its voltage.
It is important to remember that replacing electrical wiring in an apartment requires opening the junction box. It can be recognized by the presence of a plastic surface and electrical points. It is from here that the networks go to switches and sockets. In this place there are, among other things, telephone wires, as well as numerous Internet wires. To check the voltage, you should use a special indicator. This can be done by working directly with the wires. The absence of voltage may indicate that the wiring in the apartment is incorrectly connected or the wire is broken.
To repair a fault in an apartment, you need to turn off the electricity using the distribution panel, which is in every house. The safety circuit breaker will de-energize the electrical wiring and allow you to carry out the necessary repairs on the route. The main thing is to make sure that the power cable is actually disconnected, otherwise an electric shock may occur. Another important point is the presence or absence of a grounding cable. When it is not there, the network has only two cores. This picture can be observed in very old apartments and country houses.
How to repair a broken wire without gating?
Having de-energized the electrical wiring in the apartment, you can begin to repair the deformed section of the network and replace the wire. To do this, you need to remove the socket from the socket box and disconnect all the wires feeding it, cutting them in the right places. These are the places where the network breaks. The next stage is stripping the veins. To replace the wiring, you need to turn the wires into neat, shiny wires, which are then connected to the terminals. A working socket can be returned and used for your own purposes.
It’s very easy to replace the wiring in an apartment yourself without gating – you just need to follow safety precautions. This method is more economical, since you do not need to buy a hammer drill, an angle grinder with a diamond blade, or a wall chaser for gating. Not to mention the fact that using them requires honed skills. Finally, there is no doubt that the curtain of corrosive dust will bypass the apartment.
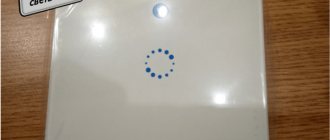
Connection to the panel
Using an indicator screwdriver
It is not advisable to seal the grooves before connecting the line to the panel. If a mistake is made, there will be no need to carry out destructive work. When a package switch is already installed in the panel, the conductors are connected to it when the toggle switch is turned to the “off” position. To install a new device, you will have to involve a company representative who has access to the house panel in order to de-energize the riser during installation.
After installing the packetizer, it is turned on and the functionality of the laid line is checked. If everything is assembled without errors, the power is turned off, the grooves are sealed, and the covers are screwed to the boxes, switches and sockets.
Cable channels
Cable duct boxes are the most common when designing wiring when carrying out repairs according to the so-called European standard. Any hardware store, as a rule, offers a wide selection of such boxes of various profiles, designed for any functionality. So there are no restrictions on the flight of design ideas.
The boxes are made of polycarbonate and cost pennies, so the economic factor will not be a limiting barrier either. The material is non-flammable. It does not support combustion, it does not even really melt when it gets into the fire, however, it loses its shape and curls. Plastic elements are lightweight and can be easily processed with a simple knife. The boxes in question are presented, as a rule, in the widest range of colors and colors. So you will definitely be able to find the option that most suits the wallpaper (for example).
In fact, cable channels are not just plastic boxes, but also the entire line of fittings and accompanying elements:
- crosses;
- plugs;
- adapters.
When used together, they can create the impression of “technological advancement” of the room.
Regarding the shielding effect, it should be noted that such boxes cost on average twice as much. Firstly, due to the presence of an additional beneficial effect. And secondly, thanks to the internal coating of both the base and the lid, made of foil.
The boxes cope perfectly with all the tasks assigned to them:
- they provide access to the entire length of wiring in the apartment without difficult dismantling (just remove the cover with a latch from the base);
- they provide satisfactory fire safety, guaranteeing the non-propagation of fire due to possible powerful sparks as a result of a short circuit;
- they are an excellent room decoration tool.
From the design point of view, the cable channel box in the classic version is recommended to be white and placed either along the baseboard or under the ceiling. Then, regardless of the length of such channels, the room (whether painted or with wallpaper pasted) will have a complete look. And the snow-white boxes will be just the highlighting element that will create and accentuate the elegance of the room.