A full check, as well as the continuity of the electrical wiring, is a mandatory stage in the renovation of any apartment. In addition, it is also necessary to ring the wiring if there are doubts about its serviceability. Naturally, the easiest way to check the serviceability of the electrical wiring of the apartment is to contact a specialist, i.e. to an electrician. But municipal services do not work promptly in this regard, and private specialists charge a lot for such services.
Therefore, today, electrical experts strongly recommend that everyone independently master the most basic and primary skills of working with electrical wiring. Sooner or later, they will absolutely come in handy in your life! First of all, you need to know that during absolutely any manipulations related to electrical wiring, you must strictly observe all the rules and requirements dictated by safety precautions for electrical work.
Initial inspection after purchase
If you just bought a house or apartment, the first thing you need to do is check the condition of the wiring, because... Even the slightest malfunction can subsequently lead to electric shock or fire. In a new and old house, the inspection technology will be different, so we’ll look at both methods separately. We immediately draw your attention to the fact that before checking the electrical wiring, it is necessary to turn off the electricity in the panel. Working under voltage, especially for inexperienced electricians, is strictly prohibited!
Using a hearing aid
Using old hearing aids, such as the AK-1 brand, you can find hidden wiring with fairly high accuracy. You set the device to “telephone” mode - it is needed so that a person who is hard of hearing can freely talk on the phone in a noisy environment. In this case, the device becomes susceptible only to electromagnetic waves , which is what we need.
Bring the sensor to the intended location of the hidden wiring and record the noise.
New building
It is most often necessary to check the electrical wiring in a new building after installation after purchase, before major repairs - finishing the walls and arranging furniture. The importance of this event lies in the fact that if you do not inspect the cable line from the very beginning, in the future it will be much more difficult to check the wiring under a suspended ceiling or behind plasterboard sheets.
First of all, you must calculate the total power of the electrical appliances that you will use, based on which, calculate the cable cross-section by power and compare this value with the cross-section of the conductor already laid in the walls. If the cross-section is insufficient, be sure to replace the electrics, however, as experience shows, such problems do not arise in new buildings.
The next step is to check the condition of the hidden electrical wiring. The insulation must not be damaged, and all wire connections must be made using terminal blocks or other connectors (for example, PPE caps), but not by twisting. Twisting is prohibited; see the list of permitted connection methods in Chapter 2.1. PUE clause 2.1.21. It is also important to determine the cable cross-section and check the ratings of the sockets. The socket group must have copper conductors with a cross-section of at least 2.5 mm2, the rating of the circuit breaker of the socket groups must not be greater than the rated current of the sockets, usually 16A.
If all the above requirements are met, the last thing left to do is to check the wiring in the apartment for load. In other words, you need to check yourself whether the switchboard is assembled correctly. When all equipment is connected and all lamps in the rooms are turned on, the machines should not operate.
If a circuit breaker trips, it means the electrical wiring is not able to withstand the load from the connected electrical appliances, as a result of which it will be necessary to replace the circuit breakers, divide the electrical wiring into groups, etc. If the circuit breakers in the panel do not turn off after turning on the load, then the home wiring is correct. It wouldn’t hurt to additionally check the reliability of the connection of the machines in the panel, as well as checking the ratings with the load that comes to them.
Debugg
Wiring repairs must be carried out observing safety precautions.
Step-by-step instructions for repairing a phase cable:
- Disconnect the conductor with the phase.
- We remove the plaster on the wall from a section of 150-200 mm from the center of the cable break.
- Using a hammer drill, we drill a hole in the wall the size of the branch box in which we will connect the damaged area.
- We separate the ends of the broken conductor.
- We attach the box to the alabaster, insert the wires into it, connect it correctly, and secure it with insulating tape. For detailed answers to the question, watch this video:
If you need to replace the neutral cable, first disconnect the neutral from the bus and connect a phase to it. Then we install the junction box and connect the wiring.
If the cables are in a housing made of tubes, they need to be removed and new ones pulled into the housing using a special tool.
Old housing
It is more difficult to check the condition of the electrical wiring in an old house or apartment, especially if you have just bought a home and have no idea how the electrical wiring is done in the rooms. So, an audit of the electrical network must be performed using the following method.
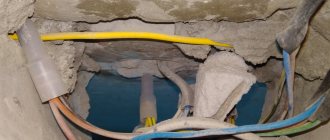
Find all distribution boxes by room
By opening the cover, you can understand which cable is used for the hidden electrical wiring: aluminum or copper, as well as what cross-section of the wires. You should also immediately check the condition of the insulation - if the wiring is old, even the slightest bend in the cable will cause the insulating layer to begin to crumble or crack. Such electrical wiring must be changed without any reservations.
It would be correct to check the insulation resistance with a megger (so to speak, for breakdown and current leakage). Its resistance must be at least 0.5 MOhm. But not everyone has such a device, so “for the sake of decency” you can at least measure the resistance with a multimeter, although this can hardly be called a normal test. If the insulation resistance is poor, leaks will occur and the RCD may trip if you upgrade the electrical panel. It is equally important to immediately inspect all wire connections - there should be no damage or twists, especially aluminum and copper.
If necessary, you should immediately connect the wires with terminal blocks instead of twisting them. We talked in detail about how to find a junction box in the wall of an apartment building in the corresponding article.
Check sockets and light switches
In sockets, it is necessary to inspect the integrity of the wires and insulation, and also determine the rating for which they are designed. If three-wire wiring is connected to the sockets, it is imperative to determine where the phase is, where the zero is and where the ground is. To do this, you will need a multimeter or an indicator screwdriver, and we provided the technology for determining phase and zero in the corresponding article.
The fastest way to detect a fault
The signal will be interrupted above the break area.
If the house has a locator, you can use it to quickly identify the location of the damage.
Sequence of searching for a damaged area:
- We connect the generator of the device to the wire in the following sequence: the negative terminal to the undamaged cable, the positive terminal to the damaged one. We connect the grounding to the distribution board.
- We call the receiver along the cable location; the signal will be interrupted above the break area. To more accurately determine the location of the break, we carry out the same operation, starting from the other end of the damaged wire. For more information about diagnosing ruptures, watch this video:
If the neutral wire breaks, you need to be careful, the socket may give you an electric shock.
Method for checking the condition of electrical wiring
The check is carried out in several cases - after the initial electrical installation, after purchasing the premises, in case of malfunctions. There are several ways to check the electrical wiring in an apartment. Each one helps in certain cases.
Insulation fault check
The insulating layer - its quality and condition - has an impact on the operation of the electrical system. Problems may occur during manufacturing, transportation, or operation. The main ways to check electrical insulation in an apartment:
- periodic, independently or with the help of professional electricians;
- automatic, through special devices throughout the entire technical cycle.
In the first case, a multimeter is used. It is mandatory to assess the external condition of all accessible cables. Insulation is checked through measurement and testing. In stranded wires, the absence of short circuits between them is checked by connecting them alternately.
Checking the integrity of a single piece of wire
Broken wire is one of the most common wiring problems. There can be a lot of reasons; the testing methods depend on which cable needs to be examined:
- Cutting (the wire lies on the table) - touch both ends with probes (parameters for “Ohm” or “Ω”, value 1000 Ohm). If there is a malfunction, the device will show EL or a very large number.
- Hidden wiring - the wires are de-energized, separated from the devices, and the ends are connected with a separate wire to create a whole circuit for testing. Next, each is examined with a multimeter.
When working with a cable (even without power), do not touch it with your hands or other parts of the body. Devices and probes are protected by special plastic attachments by which they should be held.
Determining the presence of a short circuit
Knowing how to use a multimeter and how to check the electrical wiring in an apartment, you can find the location of the short circuit. Sometimes devices turn off for no obvious reason. It is necessary to determine the presence or absence of contact.
A short circuit is a connection between the neutral and phase wires without appropriate resistance. Thus, it is enough to check only these two cables. In addition to de-energizing, switches are removed, lamps and appliances are turned off. Check in a junction box or a non-working outlet.
How to ring a wiring
Testing the socket with a multimeter
The easiest way is to contact a specialist. If you master the rules and techniques, you can cope on your own.
Rules for safe wiring
Operations with electricity require compliance with technical safety standards. In addition to maintaining health, the rules allow you to complete the job quickly and accurately. The main points include:
- de-energizing the circuit;
- the ends of the wires must be secured with lugs - “crocodiles”;
- When checking long wires, it is important not to touch them with your fingers;
- Multi-core cables are separated and stripped.
The last rule is important when working with circuits that are designed for high voltage networks. If the load is small, you can simplify the process.
How to check wiring during installation
Laying the cable in a groove
The wires are laid in special grooves (notches) or along the walls. This is followed by the stage of plastering and finishing. Checking the wiring in an apartment or other premises is carried out up to this point.
Builders and electricians make mistakes. In the first case, it is necessary to carefully monitor and check the work. In the second, use the prepared diagram and promptly check the wiring in the apartment (before plastering and finishing). Checking the electrical wiring begins with the following activities:
- visual inspection;
- short circuit test;
- checking with a megohmmeter;
- ringing
Electrics are one of the most important elements of any renovation. Poor quality wiring cannot withstand stable or high voltage.
How to test wiring with a multimeter
To test the wires in an apartment, the easiest way to understand the operating diagram is to use a multimeter. If we assume that the electrical system was initially installed according to all the rules, the check will not take much time.
When a light bulb goes out in a room, the first thing you need to do is check if it is working properly. De-energizing the room is the initial stage. Testing the wiring with a multimeter is a quick and safe way to check the electrical system in an apartment. If you follow the rules and safety requirements, you can do this yourself.
Timing for replacement of electrical wiring
After the electrical wiring has reached the end of its service life, it needs to be completely replaced without testing or inspection. The timing of inspection, replacement or interval between major repairs is established by VSN 58-88(r) (departmental building codes) and is:
- for hidden indoor networks 40 years;
- for open 25 years;
- for main wiring between apartments and input and distribution devices 20 years;
- for production and technical premises and lighting of public places 10 years.
Checking the electrical wiring in an apartment or private house, despite its apparent complexity, if you have the necessary knowledge and a minimum set of tools, you can do it yourself, without inviting a qualified electrician.
How to identify problems
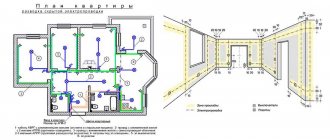
Wiring Diagram
Troubleshooting is easier if you have a basic wiring diagram. The plan is attached to the technical passport of the housing. If not, a drawing is drawn up - if the rules are followed, the routes run in a straight line (vertical, horizontal).
Regular testing with a multimeter will help identify problems. It is not difficult to determine in which area the breakdown occurs. For example, if the sockets and switches connected to the box do not work, the problem is here. If there is only one, there is a breakdown between the box and the socket.
Modern technologies and systematic checks will ensure safety during operation of electrical wiring in the apartment and increase service life. The main thing is to follow the principles and rules of work.
In what cases is wire testing carried out?
This question can be answered in a few words - if the current-carrying core breaks or the integrity of its insulation is compromised.
Let’s clarify this answer and consider typical situations:
- Let's say an outlet or switch stops working. After you have made sure that the problem is not in the connections (including the junction box) and not in the light bulb (lamp), it is advisable to ring the wires in this area. If the integrity of the wiring is compromised, the multimeter will signal this.
- Developing the first example, it can be noted that such situations are not uncommon during repair work (drilling holes) and short circuits due to dilapidated wiring and network overloads.
- An atypical, but quite effective use of multimeter testing is to determine the required conductors on large sections of wiring. This method is appropriate when the color marking of the wires does not allow you to accurately identify the desired conductor.
- Also, in everyday life, dialing allows you to determine the integrity of electrical appliances (lamp, iron, switch, fuse). And if you are well versed in electronics, then when soldering, repairing printed circuit boards and other devices, testing circuits is a mandatory step.
Multimeter for testing wires
What do you need to know about this device? Firstly, it is worth noting the price variety and availability. Even inexpensive multimeters can flawlessly cope with many tasks, including testing wires.
Let's take a closer look at a typical budget option. Let's get acquainted with the design, layout and determine its functionality.
As you can see, a typical device has a digital display, controls and sockets for connecting probes. Let's decipher the main modes of the multimeter:
- OFF – the device is turned off (some devices have a special button for this).
- ACV (may be designated V~) – measurement of alternating voltage.
- DCV (can be designated V...) – DC voltage measurement.
- ACA (may be designated A~) – measurement of alternating current.
- DCA (may be designated A...) – direct current measurement.
- Ω - resistance measurement.
- hFE – measurement of transistor parameters.
- ->Ι- – conductivity check (circuit continuity).
The sockets for connecting probes are marked as follows:
- COM(-) – common socket for connecting the black wire.
- VΩmA(+) – socket for connecting the red wire.
- 10A...MAX – socket for connecting the red wire when measuring direct current, the maximum value of which does not exceed 10 Amperes.
Within the framework of the issue under consideration, only two modes of the multimeter will be considered:
| Resistance measurement mode. |
| Conductivity test (continuity) mode. |
| Availability of sound when checking conductivity. |
The presence of sound, which is not mandatory, complements the dialing mode and simplifies the verification process. You do not need to constantly be distracted and look at the device display. The presence or absence of a buzzer signal will give a clear indication of the integrity of the conductor being measured.
The principle of testing and determining resistance
If you carefully examine the multimeter, you will notice that the continuity mode (diode testing) is in the resistance measurement zone. In simple words, continuity testing combines the determination of conductor resistance, analysis of the data obtained and output of the result with an additional sound signal.
To understand the principle of dialing, it is enough to first know Ohm's law. It states: “the strength of the current in a conductor is directly proportional to the voltage at its ends (potential difference) and inversely proportional to the resistance of this conductor.” Based on this rule, resistance R = U ⁄ I, where I is the current strength, U is the network voltage.
Knowing how resistance is determined, it remains to understand where the current and voltage come from during measurements (for safety reasons, the circuit being tested must first be de-energized). It's simple. The multimeter has a power source that creates voltage and supplies current. By comparing the initial data with the amount of loss caused by connecting to the measured resistor, wire or light bulb, the final result is calculated (unit of measurement - Ohm).
Safe and correct operation of the multimeter
Working with electrical devices and networks must be safe. This rule also applies to the procedure for ringing conductors with a multimeter. Let us highlight the main recommendations that must be followed before and during work:
- First of all, the circuit must be completely de-energized by turning off the machine in the switchboard and removing the batteries (if the object in question is an electronic device).
- The capacitors in the circuit must be discharged by short-circuiting. Otherwise, during measuring work, the multimeter may fail.
- For convenience when making measurements, it is recommended to use special tips (“crocodiles”) at the ends of the measuring wires. These devices create reliable contact with the conductor being tested and, at the same time, free your hands.
- When trying to fix the probe, it is not recommended to touch the bare wires and the tip of the probe with your fingers. Otherwise, the results obtained may be incorrect.
How to ring wires using a specific example
As an example, consider a standard wiring network in an apartment or private house. Ideally, all electrical communications should be made in accordance with the standards, all consumers are separated (grouped) and each circuit is powered in the distribution board through a specific machine.
What to check
Multimeter design
Using a multimeter, they check devices - lamps, switches, sockets - and electrical wiring. Measurements are taken both locally and throughout the room.
How does a multimeter work?
The outer panel contains a display and a switch. The numbers show serviceability and voltage. The following symbols are located on the outside:
- OFF – on/off;
- ACV – voltage (variable);
- DCV – voltage (constant);
- DCA – current (direct);
- Ω – resistance indicator.
There are connectors for probes and for testing transistors.
Before starting work, it is important to correctly position the probes: black - COM, red - up to 200mA in VΩmA, above 200mA in 10ADC.
Checking the circuit for open circuit
Testing is a way to find out whether current is passing through wires. The multimeter is connected and a discharge is released. The device shows resistance. If there is no break, the device will beep and the screen will show zeros.
The resistance level depends on the cable length. There should be no contact between the wires of a multi-core cable product - this is checked by a multimeter.
Conductor integrity check
You can monitor the integrity of the cable using a multimeter. In this case, the amount of current passed does not matter - the voltage either passes or does not. The measurement error is not important.
The stranded wire is first separated, then each is checked with probes. If everything is in order, the device will emit a sound signal, and there will be no short circuit between the individual wires.
If the machines don't work
Checking the light bulb
Sometimes problems appear due to a power surge and automatic shutdown of the machines on the meter. If everything on the panel is in the on mode, faults should be looked for in the socket, lighting device and switches.
- Check the voltage on the machine.
- The device is tested for serviceability - the ends of the wires are short-circuited.
- Remove the lamp from the socket.
- One probe touches the base, the other touches the center.
- If a signal appears and a value on the screen other than 0 or 1, the device is working properly.
- They check the cartridge - disassemble the device, check the integrity of the contacts and wires.
- They check the switches - remove the protective cover, unscrew the bolts, and pull them out of the wall; carry out an inspection; The ends of the multimeter are connected to the contacts - if there is a sound and a value, the device is working properly.
Such a check will allow you to identify faults in devices (lamps, sockets, etc.).
If the machines are triggered, it is necessary to test the electrical wiring in the apartment with a multimeter.
If the machine worked
Distribution box
First of all, the housing is de-energized by turning off the general apartment circuit breaker. Perform the following actions:
- Use a screwdriver to disconnect the conductor.
- Unscrew the incandescent lamp from the socket.
- Touch the conductor with one probe and the “zero” with the other.
- If a signal appears, the electrical is shorted;
- You need to find the junction box at the top, under the ceiling.
- Separate the wires, check with probes, then check the cables again on the apartment panel.
If the signal sounds when checking from the panel to the box, then the problem is in this area. If not, the check continues.
Checking the outlet
Any multimeter – analog or digital – is suitable for testing the socket. The device will allow you to determine the performance and voltage level. The meter is prepared - turned on, set the knob to alternating voltage. For domestic premises, a level of 750 Volts is suitable.
When three zeros appear on the screen, insert the probes into the holes (red on the left, black on the right). Standard voltage is 220 Volts. The value may differ within 10% (according to GOST).
Security measures
It is important to remember that dialing is working with electricity. Therefore, care must be taken during this procedure. The rules are as follows:
- Use crocodiles that increase the reliability of contact.
- Disconnect the circuit from the power supply before making the dialing; even the batteries must be removed.
- Avoid touching parts of the cable (wire) with your hands.
Do not touch the wires with your hands.
There are a number of most common mistakes:
- Incorrect setting of measurement modes on the device.
- Incorrect connection of probes.
- Voltage does not meet the required parameters.
- Confusion with instrument scales.
It is important to eliminate the malfunction in a timely manner.
Testing cables and wires is an integral stage of electrical installation work. This procedure has a dual purpose: either to check the wire (cable) for any problems, or to determine the location of the breakdown. There are quite a large number of ways to make a call. To do this, you can use professional instruments (tester and multimeter).
It is also possible to carry it out using improvised means. It is important to remember that dialing involves working with electricity. This imposes the need to comply with fairly strict safety regulations. If such rules are strictly followed, then the likelihood of injury is minimal. The dialing itself will minimize the risk of damage to equipment, which is often very expensive.
Old-fashioned ways
Previously, when there were no instruments at hand, we managed to find the damaged area using the devices discussed in the table:
| № | Way | Application |
| 1 | We look for the location of the cable by eye | If the breakdown occurred during repairs, when the old wallpaper was removed from the wall, you can see a groove for laying the cable running along the wall. There is a chance to find the wiring location under the plaster or putty if it runs in a stripe. But if the entire wall is plastered, it will not be possible to visually determine the location of the groove. |
| 2 | Receiver or radio | We tune the device to medium wave. We move it near the wall, listening to sound distortion and crackling. Above the damaged area, the nature of the interference will change or it will disappear altogether. |
| 3 | Microphone connected to the player | We move it along the wall in the same way as a receiver. Where the live cable passes, interference will occur. At the point of break they will stop or their character will change. |
Using the old-fashioned methods described above, you can determine the damaged area with an error of 150-200 mm.
Laying open electrical networks
Repair work associated with a break in a hidden wiring usually requires complex construction and repair work: dismantling the finish, gating the walls, followed by sealing and covering a section of the wall with decorative materials.
Eliminating a broken hidden wire often requires dismantling the finishing, so it is advisable to combine such work with a major renovation of the premises
Since immediate implementation of such manipulations is not always possible, in some cases it can be recommended to lay a new wire along the surface of the wall, covering it in a special box or tube.
You will become familiar with a detailed description of the rules and technology for laying an open electrical network by reading our recommended article.
Signs of a cable break
Damage to electrical networks can be suspected if the electrical current supply partially disappears.
A broken wire may be indicated by a lack of voltage in outlets located in a certain area, or by lighting not working in a separate room. Sometimes wiring problems can also be accompanied by smoke or sparking in the cable. The cause of sparking can be not only a break, but also melting of the insulation as a result of illiterate selection of wires and cables.
Wire defects include breaks and breaks in the cord cores, as well as damage to the cable insulating sheath. Damage occurs on various sections of the network: the power supply may be disrupted at the point where the cable connects to the socket or switch; in the area between these devices and the box or lighting fixture.
conclusions
Finding a broken wire is a rather difficult and serious matter that requires certain skills and knowledge.
To quickly find the location of a damaged electrical wire, you need to know the layout of electrical communications. You can use logic to determine the area where an accident could have occurred. Find the exact location of the break, possibly using homemade or professional devices. You should find out which wire has burned out: phase or neutral, using the recommendations given in the article.
Using the information obtained, you can easily not only find the damaged wire and restore it, but also prevent a similar breakdown in the future.