The roof is an important and technically quite complex structural element of a house, requiring a balanced approach to all stages of construction - from design to finishing. But builders do not always pay due attention to all aspects of this process, and then it turns out that, for example, it will not be possible to correctly integrate a window into the pediment without seriously altering the rafter system.
This is exactly what we will talk about today, since the topic of dormer windows is quite capacious.
Attic installation: how to make gables from aerated concrete blocks with your own hands?
How to make gables from aerated concrete blocks yourself?
Where to begin? What are the nuances and features? What should you pay attention to? Aerated concrete blocks are a good material from the point of view of heat and sound insulation properties, which are quite capable of constructing a pediment with your own hands. But there are certain nuances here:
- firstly, the specificity of aerated concrete is that it is afraid of exposure to moisture and therefore you will have to protect it from the outside (plaster it, or cover it with siding, clapboard, etc.);
- secondly, this is a fragile material and when constructing a pediment, it is necessary to make a reinforcing belt at the base of the pediment.
The technology for laying aerated concrete blocks is similar to brickwork.
The pediment can be erected first,
What should you pay attention to?
You need to pay attention to the design documentation according to which the structure is being erected.
Attic installation: how to make gables from aerated concrete blocks with your own hands?
If you build “by eye”, then decide for yourself what height of the pediment you need, how to make reinforcement, and so on, including whether an armored belt is needed, or you can do without.
The pediment made of aerated concrete blocks is a continuation of the building wall (end).
Externally, it is an isosceles triangle (as an option).
In order to stay within the framework of this triangle, we attach a rail to the end of the wall at the height of the future attic.
The rail is strictly in the middle of the end wall (we find the middle with a tape measure).
We stretch the cord from the top of the slats to the edges of the wall, that is, the pediment is visually already formed.
Next is the masonry itself within the boundaries of the markings.
Masonry is no different from masonry walls.
It is better to use glue for aerated concrete blocks.
The glue is applied to the surface with a trowel, then grooves are formed with a notched trowel (don’t forget about the ends of the blocks, we also form grooves on them).
Masonry with brick-type ligation (in a run-up).
Lay the block down and press it slightly against the one next to it, you can tap it a little with a mallet.
Near the cord (see above about the isosceles triangle), the blocks are cut at an angle, or the masonry is laid in steps; at the end, the voids are filled with cut blocks.
Every three or four rows, we reinforce the masonry; a groove is cut into the block into which the reinforcement is laid (this is when laying with glue, because the thickness of the seam is minimal).
We do not leave the gables unfinished for a long time.
Aerated concrete is a good material for building a house, including for building an attic, but in order to do it you need to be thoroughly familiar with the characteristics of aerated concrete itself, first of all you need to know that this material is quite fragile and absorbs moisture very well. And therefore it must be protected from the external environment.
To build gables from aerated concrete, it is necessary to build an armored belt; it will strengthen the entire structure of the rafter system and will hold the attic gable well. Here is an example of how an armored belt is made directly on aerated concrete blocks from wooden formwork, everything is extremely simple:
We make formwork around the entire perimeter, put in reinforcement and fill it with concrete. It is on this armored belt that the pediment is placed. In general, it is not recommended to build a structure made of aerated concrete more than two floors due to its fragility, but when an armored belt is made, it increases its power.
There are no special nuances for the construction of a pediment; it is laid like an ordinary brick; the main thing in the design of such pediments is that it does not need to be made very high in order to avoid overloads on the walls.
And lastly, the entire aerated concrete structure must always be protected with plaster.
Concrete elements in the structure
To begin with, it must be said that this material goes well with various concrete elements and even allows for reinforcement. However, there are certain features that distinguish a structure made from this type of concrete. Therefore, the design instructions advise paying special attention to this.
Typical production of a reinforcing belt using wooden formwork
Armopoyas
- Typically, such systems are made directly on the building, ensuring good connection with the walls . However, a monolithic belt for aerated concrete is made from special blocks that are laid in one row, and their cavity forms a kind of formwork.
Production of a reinforcing belt using special blocks of aerated concrete, where general connection and additional insulation are assumed
- Next, reinforcement is laid into it, followed by pouring concrete . This results in a strong connection around the entire perimeter, which has a good appearance from the outside.
- It is worth noting that it is absolutely not necessary to make such an armored belt for aerated concrete . Such blocks are perfectly combined with traditional installation methods and perfectly withstand the weight of floor slabs.
Advice! By using special segments for this stage of work, you can save on material and at the same time significantly reduce the time for manufacturing formwork for concrete structures.
Foundation
It is important to mention that it is also necessary to calculate aerated concrete in relation to the type of base used. The fact is that it is not recommended to use pile foundations for such structures. However, some designers use this type of base to save materials, but only with a monolithic grillage.
Foam block pediment: work order
This front part of the building is located between the roof slopes. Based on the configuration features of the latter, pediments are oval, triangular and trapezoidal. This design has a dual purpose. It is a supporting element of the rafter structure and creates protection from moisture entering the attic. The area formed by the gable walls is in most cases allocated for additional premises. Today we will figure out how to make a pediment from a foam block.
Classification of roof windows
There are two options here: opening and fixed windows. Deaf ones are cheaper, but they are of little use for the attic, since the living space requires mandatory ventilation, and not only in the summer.
The swing opening method, traditional for ordinary windows, is not used so often for attic analogues. A design with opening around a horizontal axis is considered more successful. But here the question arises, where exactly this axis will pass. The option when it is located in the middle of the window cannot be called the most successful - after all, then half of the window sash will go inside the attic, taking up a lot of scarce space.
Therefore, it is advisable to ensure that the window opens outward when the axis is located at the top or at a distance of ¾ from the height of the window opening.
If there is a bathroom in the attic, then the first option is better here - then you can open the window without getting up from the bath. But the structure itself must be protected from moisture getting inside, that is, have a moisture-resistant impregnation, and a valve must be installed to ensure fresh ventilation.
It should also be taken into account that a roof window is one of the most accessible ways to get onto the roof slope for its maintenance, so the size of the opening sash should be sufficient to get outside. Although we do not recommend this method for a roof with steep slopes due to the increased risk of falling down.
As for the shape of the window, a standard rectangular frame is preferable. Triangular windows in the attic for gables are used less frequently - they are mainly equipped with dormer windows located on the slopes. However, to give this element of the pediment an aesthetic component, the shape can be any - in the form of a semicircle, with a frame of complex configuration, and a very exotic option - in the form of a balcony window (when the upper sash opens up and serves as a canopy, and the lower one opens down, and it has no glazing and is securely fixed).
Advantages of a foam block pediment
Foam block material has long been used for the construction of structures or gable sections of buildings. The main advantages include:
- reasonable cost of materials;
- good strength indicators;
- convenient processing of blocks due to their porous structure;
- the relatively light weight of the pediment masonry made of foam blocks, which does not create a large load on the foundation;
- The principle of masonry is the same as that of brick material, only an adhesive composition is used instead of cement mortar.
It is possible to carry out all the work yourself.
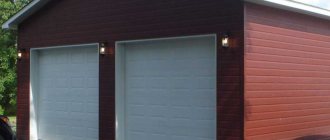
Types of garage blocks
The first thing you will have to decide before starting to build a garage is what material you will use. There are quite a lot of durable materials for construction: brick, concrete, iron, wood, foam blocks. Recently, blocks for garage construction have been used most often. This is due to reasonable cost and practicality. But foam blocks are also different, let's look at their features.
Foam concrete garage
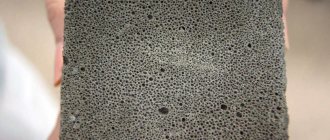
Foam concrete is a mixture of cement and foam, which is made using special equipment. Air bubbles are evenly distributed throughout the entire volume of the block and form small cells. The density of foam concrete is different, it varies from 200 to 1200 kg/m³, which indicates the strength and reliability of the material.
There are three main types of foam concrete blocks, based on density:
- D200-500 - such blocks are often used for thermal insulation; they are not very durable, but have low thermal conductivity;
- D500-900 - blocks are used in the construction of residential high-rise buildings, they are highly durable and do not allow heat to escape;
- D900-1200 – high-strength blocks, used in the construction of high-rise buildings.
Cinder block garage
Cinder block is one of the most inexpensive materials for construction. It is made by vibration pressing from ash, sand, crushed stone, gravel or shell rock. The binder in the production of cinder blocks is cement. In addition, a cinder block may have additives that increase its thermal conductivity (for example, expanded clay). The density of such blocks, as a rule, varies from 500 to 2000 kg/m³. Use the hint when calculating the brick consumption for a cinder block garage.
Cinder blocks are divided into two types:
- hollow (12-14 kg);
- full-bodied (15-28 kg).
Garage made of expanded clay concrete blocks
The technology for manufacturing expanded clay concrete blocks is similar to the production of foam concrete, but the composition necessarily contains expanded clay. Thanks to him, expanded clay concrete blocks are light and very porous. Such blocks have good thermal insulation and are almost eternal.
Expanded clay concrete blocks come in three types:
- thermal insulation;
- structural and thermal insulation;
- constructive.
Garage made of aerated concrete blocks
Aerated concrete blocks are made from gypsum, sand and a special gas generator. Their structure is similar to foam concrete, but with much smaller pores. This provides aerated concrete with the correct even shape, dense structure and low weight. In addition, aerated concrete blocks are easy to cut and can be easily given the desired shape. In addition, they have fire-resistant properties.
Aerated concrete buildings are durable and economical. However, they require mandatory reinforcement in order to prevent cracking during shrinkage.
Garage made of gas silicate blocks
Gas silicate blocks are similar to aerated concrete blocks. However, they also have differences. Firstly, the main binding element in gas silicate blocks is lime. Thanks to lime, such blocks, unlike other foam blocks, are white. Secondly, autoclaving technology is necessarily used in production. The density of gas silicate is from 300 to 900 kg/m³. It retains heat well, has a smooth, even surface and is highly fire resistant.
Preparatory work and calculations
Experienced craftsmen recommend erecting the pediment first, and then moving on to installing the roof. This will greatly facilitate the process, since the roofing creates certain obstacles during masonry work.
Making a pediment from a foam block with your own hands involves certain calculations. Having decided on the height, finding the total area will not be difficult.
Before starting work, markings are carried out. For this purpose, a rail is strengthened on the wall, the length of which corresponds to the height of the future pediment element. Its upper edge is connected to the corners of the walls with nylon cord. The end result is a triangle, the slatted top of which is considered the pediment apex, and the sides are highlighted with cords. After this, construction work begins.
Note that the construction of a pediment is possible before installing the roof or after carrying out such work.
Gable sections for sloping roof types are determined similarly. You just need to divide the façade plane into sector sections and determine the necessary parameters for each of them separately.
During the preparation of the project and carrying out all the necessary calculations, an important nuance arises. For one-story buildings, the height of the pediment is set in relation to 1 to 1 to the wall. As a rule, the wall with the basement section does not exceed three and a half meters. This value is quite enough to equip the attic space.
An excessively high roof will dominate the walls, visually putting pressure on them. An attic whose height does not exceed a two-meter mark will create the impression that the house has grown into the ground and will not add to the attractiveness of the property.
To find out the area of a triangular pediment, if its base and height are known, just use the formula from the school course. But in other cases, you will have to apply Heron’s formula, into which you simply substitute the values of the three sides. Calculations are complicated by determining the square root, but this task is simplified if you use special calculators that will perform all the calculations in a few seconds.
Having specified all the parameters, you can draw up a diagram of the pediment, buy material and begin construction.
Walls
There is nothing unusual in the process of building walls. However, if you plan to create a barbecue from aerated concrete with your own hands or another structure of a similar type, then standard procedures will not work in these cases. Here it is necessary to create specific layouts and projects that would take into account the scope of application.
Jumpers can be made from the same material that was used to create the reinforcing belt
Additional items
The most common question is how to lay the first row of aerated concrete, since some craftsmen experience a certain fear of this material, since they have never worked with it.
In fact, everything is quite simple, since recently blocks of a certain shape with special locks and the ability to make connections have been used to build walls. Therefore, no additions are required here.
There are separate segments of aerated concrete construction that can be created on a frame made of reinforcement to increase strength
- When organizing window or these techniques, it is best to use lintels, which were also created from aerated concrete. Their price exceeds the cost of standard products of this type, but then there will be no temperature changes or cold spots on the wall.
Advice! There are a lot of additional elements based on aerated concrete that can be used in construction. They greatly facilitate the installation process, saving effort and time.
An option for creating the simplest insulation for such structures
Insulation
The question of whether it is necessary to insulate aerated concrete has long been a topic of debate among builders. Some of them claim that such products retain heat well and do not require additional protection. Other craftsmen say that the porous structure of the blocks cannot provide sufficient comfort in severe frosts.
If you use sheathing material based on sheathing, you can preserve the properties of the walls to allow air to pass through and at the same time create additional protection from the cold
In fact, both of these statements are true and deserve attention. Therefore, professional craftsmen recommend that in cold regions of the country, before laying aerated concrete, compare its performance with other materials and select protection appropriate to the climatic conditions.
Advice! It is important to remember that aerated concrete absorbs moisture very well, which means that when creating a building project based on it, you should immediately take care of waterproofing.
Creating a pediment based on aerated concrete blocks
Finishing work
Exterior finishing of a block pediment can be done in three ways:
- The simplest and most affordable option is puttying over insulating material. Sheets of foam plastic are glued over the surface and, as an additional measure, fixed with dowels, on top of which a mesh of fiberglass material is fixed. Now you can take the decorative putty mixture and apply it in a thin layer.
- Siding panels cause certain difficulties in work. First, the sheathing is installed under the insulating material, then the slats are attached under the siding. Everything looks beautiful, but the cost of materials and services immediately increases at least twice.
- A long process - brick cladding. In addition, this type of work is more expensive than others, and difficulties may arise in its implementation, requiring certain experience.
How to calculate and arrange a pediment with your own hands for a block house
The pediment is usually called the end part of the roof located between the slopes. I will not say that making a pediment with your own hands is easy, but believe me, such a task is quite within the capabilities of an ordinary home craftsman. Without going into architectural subtleties, we will step by step analyze the technology for constructing the gable roof gable for a house made of aerated concrete, plus I will give a simple calculation of this sector of the roof structure.
The upper part of the facade, “sandwiched” between the planes of the roof slopes, is called the pediment.
In addition to the gable structure with two gables, there is also a multi-gable or three-gable roof, the rafter systems are different, but the technique for arranging the fronts does not change depending on their number.
A three-gable roof at the ends is arranged in the same way as a gable roof.
Making a triangular window
Take the choice of curtains seriously to get a warm, comfortable and comfortable room, and the unusual nature of these windows can be emphasized by the following:
- window-shaped cornice, plus lambrequins;
- fabric with a pattern of triangles;
- make the outline of the curtains triangular;
- choose curtain fabric in a contrasting color (relative to the walls and ceiling).
Briefly about gables
Often this part of the facade of a building in private houses has the shape of an isosceles triangle, but sometimes the vertex of the triangle can be shifted towards one of the walls, and in some attic structures the pediment can be polygonal.
What are gables made of?
The pediment can have different shapes.
- Basically, such structures differ in the material from which the walls are made. Thus, a house built from blocks is most often equipped with the same pediment. This solution is much simpler, both in terms of construction technology and design;
In block houses, it is easier to lay out the upper part from the same blocks.
- The so-called chopped gables are installed in houses made of rounded logs or timber. Arranging a gable wall from rounded logs is considered the highest level of skill among professionals. It’s a little easier with timber, but in any case, you shouldn’t tackle it without preparation;
Arrangement of a log facade is considered the most difficult.
- The most affordable option for installation is the arrangement of a frame structure. Here it doesn’t matter at all what the house is built from, just a frame is assembled at the ends of the rafter system, after which it is sewn up and finished with any material you like, usually a board or siding.
The frame structure can be mounted on any building.
A block and wooden pediment made of timber or logs is installed before the rafter system is erected, and the frame structure is constructed after the rafters are installed.
Simple design calculation
The pediment parts are mostly made in the form of triangles; accordingly, all formulas relating to this figure are applicable to them. It all starts with determining the height of the roof at the ridge. Once you decide how high your roof will be, calculating the area is not difficult.
The height of the roof at the ridge is considered one of the reference parameters.
Gables with sloping roofs are calculated in a similar way, only here you will have to divide the facade plane into sectors and calculate the necessary parameters for each sector separately.
Finish cladding: for every taste
Let's move on to finishing work. Let's start with the simplest cladding option, which you can always use for your country house:
By the way, the look of smooth boards can be easily diversified like this:
But modern siding, of course, looks more neat:
If you have a fairly old house, then we advise you to “pack” the entire house into one type of finishing:
What’s good is that the forms of modern siding make it possible to finish gables of any geometry, without loss of aesthetic perception:
How to fold a block gable yourself
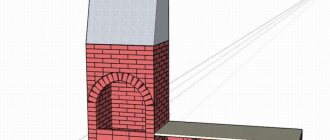
For a brick pediment, as well as for any other block structures, the same technology is used, only the dimensions of the blocks change. In fact, we continue the construction of the end walls, only we narrow them into a triangle shape.
To display the triangle correctly, we need to indicate its height:
- As a central post we use a metal corner or a wooden beam with a section of 50x50 mm;
- In the ridge area, usually the center of the building, we drill several holes in the wall for fastening;
- We screw the stand plumb, strictly vertically.
Now we need to mark the sides of the triangle. To do this, we stretch 2 cords from the top of the central pillar to the corners of the facade.
If it is planned to install windows on the facade, then it is advisable to immediately make marks on the central pillar that will indicate the bottom and top of the window openings.
Next, rows of blocks and window openings are laid out in the traditional way.
Our cords indicate the side cut of the wall. At first it will be stepwise and here you need to decide:
- For brick walls, it is better to have the cord run along the tops of the steps. Then the steps are leveled with mortar;
- Aerated blocks are easier to cut, so you can either cut them right away and make them flat, or focus on the bottom point of the step and cut them after laying.
In our example, windows with bevels parallel to the roof plane are planned.
To arrange them, you need to lay wooden boards in the masonry. The thickness of the boards is about 30–40 mm, and the width is equal to the width of the wall.
The upper bevels above the windows are laid out in 2 rows. Between the rows, reinforcing mesh must be placed in the solution. The thickness of the reinforcement should be from 12 mm.
By the way, when laying blocks, every third row also needs to be laid with reinforcement.
Theoretically, after construction is completed, the support boards can be pulled out and the area can be plastered with mortar, but in the vast majority of cases they are left immured in the wall.
A block wall is a strong thing, but until the mortar has completely set, at a height a strong gust of wind can simply topple it.
Therefore, during the construction process, you must immediately install rigid removable supports.
On top of the bevels we will place another row of blocks, in this case they are sawn from standard blocks.
Theoretically, you can do without this, but it is more convenient to make grooves for the intermediate horizontal crossbars of the rafter system.
It is very important to make a good groove for the ridge run. The width and depth of the groove should be slightly larger than the purlin itself, because according to the rules, the ridge beam must be wrapped in roofing felt or some other waterproofing material.
The parallel plane is laid out in exactly the same way. Only there, in addition to the oblique guy wires, you also need to pull a horizontal cord, indicating the ridge run. Otherwise, you may make a mistake and the skate will come out with a slope.
Some craftsmen immediately prefer to equip the skeleton of the rafter system, consisting of 2 outer trusses and a ridge girder between them, and then lay out the pediment on it.
This method works well if the end part is thin and is laid out only from facing bricks. True, then it still needs to be insulated.
Lucarne: an option for experienced builders
Dormer windows, or lucarnes, diversify the appearance of a building. In addition, this design expands the attic space, although it slightly reduces the level of illumination. It is convenient to use such a window in any season. Thanks to the vertical installation, the sash cannot be blocked by snow. The risk of the window starting to leak in heavy rain is also reduced.
There are also certain disadvantages. The main one is the high complexity of the hatchway construction. It will be necessary to create a rafter system for this element, securely connect it to the main rafter system, and ensure waterproofing of all joints. It is almost impossible to cope with such work if you take it on without the appropriate knowledge and skills.
Another design option is an antidormer, in which the window does not protrude beyond the roof, but rather is recessed inside. It has the same advantages as a regular hatch, but significantly reduces the volume of the attic.
Facing and insulation of the pediment
Exterior finishing in block houses can be done in 3 options:
- In my opinion, the simplest and least expensive is putty on the insulation. The idea is that sheets of foam plastic or EPS are glued to the wall surface and additionally fixed with umbrella dowels. Next, a fiberglass mesh is attached to these sheets and a thin layer of decorative putty is applied;
Foam insulation with finishing is the simplest option.
- Siding will be a little more complicated. In short, the structure of the system looks like this: first, the sheathing is installed under the insulation, after fixing the insulation, the sheathing is placed under the siding and the siding itself is attached. It looks decent, but it also costs 2 times more than the previous version;
Siding finishing technology.
- But the longest, most complex and expensive will be the installation of the façade with facing bricks. It is advisable to lay a layer of foam plastic under the brick. While a home craftsman can still handle laying aerated bricks, I don’t advise you to take on facing bricks without experience; it will cost more.
Finishing with facing bricks requires high professionalism.
It took me a week to lay the block pediment without experience, I spent 4 days on the parallel plane, and everything together with finishing the ends took about a month. So rest assured, the technology described above works. The video in this article contains visual instructions. If you have any questions, write in the comments, I will try to help.
An original pediment can become a true decoration of the house.
Light touches for an eye-catching design
All that remains is to give the pediment a small touch of individuality so that the soul of the master can be felt. For example, here is a simple decorative element for the pediment, which is especially loved overseas:
You will get a nice dormer window if you follow this master class:
You can also make an elegant and very beautiful decoration in the style of Russian architecture that will transform any home.
Got some ideas for yourself? Share your impressions and ideas in the comments!
Reinforcement of aerated concrete - necessary materials, technology
Reinforcement of aerated concrete is a technological method that involves measures to strengthen constructed structures made of porous material. At the moment the masonry dries, and under the influence of alternating loads during operation, processes can occur that cause deformation - shift or shrinkage of the building.
Technically correct reinforcement of aerated concrete masonry allows you to protect the structure from the occurrence of such defects.
General information
Autoclaved aerated concrete is a representative of the group of lightweight cellular concrete, obtained through a series of complex production processes:
- Mixing lime, quartz sand, gypsum, cement and water.
- Forming the finished mixture.
- Cutting blocks to size using a wire cutting machine.
- Autoclave processing of products, allowing to obtain a material with specified properties.
Aerated concrete products have the following advantages:
- low volumetric weight (400–600 kg/m3), which reduces the load on the building foundation;
- in terms of their environmental friendliness, products made from porous concrete are not inferior to wood, but unlike it they are not subject to rotting;
- the optimal size of the blocks allows you to increase the speed of masonry several times and significantly reduce the labor intensity of the process;
- small thickness of the seams (up to 3 mm) - the laying is carried out using a special adhesive composition;
- low thermal conductivity;
- frost resistance F25 and higher;
- good sound insulation (Rw = 43–58 dB);
- high heat resistance (up to 1000 °C);
- vapor permeability;
- ease of processing - cutting the material can be done with a regular hacksaw.
- High water absorption , which makes it difficult to carry out finishing work associated with wet processes (quick drying of the surface - the appearance of cracks).
- Low resistance to mechanical loads . Even a slight settlement of the foundation can cause cracks to form on the facade of the building.
One of the ways to protect structures made of porous materials from the above defects is to reinforce aerated concrete blocks.
Creating a Project
The rules for drawing up a garage project allow you to determine the size and nuances of the building, determine the volume and cost of materials. The project can be ordered from specialists or done independently.
Drawing up a drawing yourself requires certain skills. Professional versions of the project will look like this:
Features of the project will depend on:
- number of cars – 1 or 2;
- number of storeys;
- planned communications;
- gate;
- wall thickness;
- shape and size of the roof;
- inspection hole;
- mini workshop;
- bearing load on walls;
- foundation.
The project, in addition to dimensions and design features, must also take into account:
- climatic and landscape conditions;
- nature of the soil;
- location of groundwater;
- proximity to other buildings and communications;
- type of future finishing.
Depending on the soil, a strip or monolithic foundation is developed, which is installed after excavation and backfilling of the sinuses. Each project is individual.
Strengthening masonry - features
First, let's look at the areas of aerated concrete masonry that must necessarily be strengthened when constructing the walls of a building made of cellular concrete, these are:
- The first row of masonry for the outer walls of the structure (masonry roll mesh or reinforcing tape for aerated concrete).
- Every fourth tier (reinforcing bars).
- Lintels for window and door openings (rebar frame).
- The upper belt of masonry reinforcement at the floor level (reinforcement frame).
- Reinforcement of aerated concrete partitions (masonry mesh or perforated tape).
- Strengthening the masonry of gables.
Reinforcement of aerated concrete masonry is carried out in several ways. The main method is to strengthen load-bearing walls using hot-rolled steel reinforcement of periodic profile AII, AIII. Available in skeins or measuring rods of 6–12 m.
It is a corrugated profile with two longitudinal ribs. The weight of one meter is 6.3–7.9 kg.
To knit the jumper frames and install the upper reinforced belt, low-carbon reinforcement VR-1 and soft knitting wire 0.8–1.2 mm are additionally used.
In some cases, in order to save material resources, the use of fiberglass (composite) reinforcement of the same diameter is allowed.
The price and low weight of the profile determine its widespread use when performing masonry work from aerated concrete blocks.
The main disadvantage of composite reinforcement is:
- low heat resistance;
- impossibility of connecting rods by welding;
- cannot be bent.
Therefore, in any case, reinforcement of masonry made of aerated concrete blocks in the corners of load-bearing walls must be carried out with steel reinforcement.
To reinforce the first row of blocks, galvanized masonry mesh Ø 3 mm, with a cell size of 50x50 mm, is usually used. The use of mesh is possible if the masonry is carried out using cement-sand mortar, since the thickness of the adhesive layer is 2–3 mm, and reinforcement with such material will increase the masonry seam by another 3 mm.
An alternative to mesh and fiberglass reinforcement can be perforated reinforcing tape. It is a strip of galvanized steel 4–8 mm thick and 25–100 mm wide. Available in rolls.
The reinforcement technology is the same as when using reinforcement, with the exception of masonry scraping. The strips are laid with glue or fastened with screws to aerated concrete masonry.
Reinforcing tape is mainly used when it is necessary to reinforce a pediment made of aerated concrete or to lay interior partitions.
Tools
To perform work on reinforcing aerated concrete walls, you will need the following tools and devices (see table):
Rules for installing gas blocks
What you need to know in advance:
- Before laying begins, beacons are installed on the foundation and the mooring line is tensioned.
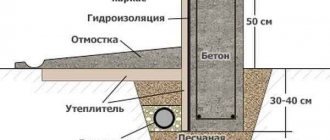
The first along the perimeter of the future walls and a few more along the diagonals to check that there is no difference in height.The maximum permissible height difference between the sides of the foundation is 4 cm. This distance can be adjusted using a cement-concrete mixture.
- Before laying the first row, the surface of the foundation is reliably waterproofed. A rolled material, for example, roofing felt or membrane, is placed on top of it. The joints are treated with bitumen mastic.
- Before starting work, the blocks are leveled in height using a special hacksaw. This is done so that there are no differences between the surfaces of the elements and the seam is formed evenly. After creating a row and hardening the solution, the blocks are sanded again with a plane. This reduces the likelihood of cracks occurring.
- Start laying from the highest corner, then the rest can be adjusted to the height as you go. Geometric parameters are constantly measured and angles are checked.
- The first row is placed exclusively on cement-sand mortar. It does not shrink, is strong and can be used as a pillow when leveling out heights.
- The mixture is kneaded in portions so that it does not have time to harden.
- To apply the solution, use a trowel, which is the same size as the thickness of the wall. A tool with teeth is suitable, which will form an even, thin layer. The height of the teeth is 4-5 mm.
- The second row is placed 4 hours after the first so that the solution has time to harden. Subsequent rows are also laid after at least 4 hours. Thus, we can answer the question of how many rows per day you can lay - about 3-4.
- The blocks must be clean, all external debris must be removed from them and swept. If there are irregularities on the elements, they are rejected and used for cutting.
- If there is a height difference between the blocks, a grater is used. It helps align the elements.
- Reinforcement of aerated blocks begins from the first row and continues along the course of the laying every 3 rows. The procedure is also carried out at window and door openings.
- The connection of load-bearing walls and partitions is carried out by installing flexible connections. The dressing of load-bearing and load-bearing walls is done through the block.
- The masonry is created with rows laid out: each subsequent row is shifted by ½ or ⅓ (but not less than ¼ block). This is done so that the pressure on the walls is distributed evenly.
- The last row is reinforced with an armored belt, which helps to support the weight of the floors.
- After completing the work, it is recommended to wait 10-12 months until the house is completely dry and partially shrinks, then begin finishing. If brick cladding is planned, it is done immediately, connecting the walls with flexible connections. A ventilation gap of about 4 cm is maintained between the masonry.
Reinforcement of aerated concrete - necessary materials, technology
Reinforcement of aerated concrete is a technological method that involves measures to strengthen constructed structures made of porous material. At the moment the masonry dries, and under the influence of alternating loads during operation, processes can occur that cause deformation - shift or shrinkage of the building.
Technically correct reinforcement of aerated concrete masonry allows you to protect the structure from the occurrence of such defects.
Roof
When construction is carried out using aerated concrete, the question of choosing the type of roof can be considered insignificant. Almost any roof is suitable for structures made of this material, even if it involves the creation of an attic.
Such a technological solution will allow the use of even heavy roofs
However, it must be said that most designers try to create a solid foundation to support the entire structure, especially if additional space is planned. That is why it is easiest to build a pediment from aerated concrete, which will bear the main loads. This technological solution is especially suitable for coatings made of heavy materials.
Advice! The roofing project must be developed individually for a specific type of structure. You should not use drawings from other buildings without preliminary modification, as this may lead to the destruction of the building.
The finished structure, even with high-quality masonry, should be additionally protected from moisture.
General information
Autoclaved aerated concrete is a representative of the group of lightweight cellular concrete, obtained through a series of complex production processes:
- Mixing lime, quartz sand, gypsum, cement and water.
- Forming the finished mixture.
- Cutting blocks to size using a wire cutting machine.
- Autoclave processing of products, allowing to obtain a material with specified properties.
Aerated concrete products have the following advantages:
- low volumetric weight (400–600 kg/m3), which reduces the load on the building foundation;
- in terms of their environmental friendliness, products made from porous concrete are not inferior to wood, but unlike it they are not subject to rotting;
- the optimal size of the blocks allows you to increase the speed of masonry several times and significantly reduce the labor intensity of the process;
- small thickness of the seams (up to 3 mm) - the laying is carried out using a special adhesive composition;
- low thermal conductivity;
- frost resistance F25 and higher;
- good sound insulation (Rw = 43–58 dB);
- high heat resistance (up to 1000 °C);
- vapor permeability;
- ease of processing - cutting the material can be done with a regular hacksaw.
- High water absorption , which makes it difficult to carry out finishing work associated with wet processes (quick drying of the surface - the appearance of cracks).
- Low resistance to mechanical loads . Even a slight settlement of the foundation can cause cracks to form on the facade of the building.
One of the ways to protect structures made of porous materials from the above defects is to reinforce aerated concrete blocks.
How effective this process is and what methods of reinforcement exist in modern construction will be discussed later in this publication. And in order to better visualize how to reinforce aerated concrete and understand what surprises may arise during the work, we recommend watching the video in this article.
Professional advice on choosing
We encourage you to watch some helpful videos. After getting acquainted with this material, you will see with your own eyes how the rafter system changes in each case, evaluate the labor intensity of bringing each project to life and will be able to use the experience of specialists in the design and construction of the roof of your house:
An ideal solution that would be optimally suited for each type of roof and each architectural project does not exist today. However, in the modern variety of solutions and ideas, you will certainly find an option that will be optimal for your home.
Strengthening masonry - features
First, let's look at the areas of aerated concrete masonry that must necessarily be strengthened when constructing the walls of a building made of cellular concrete, these are:
- The first row of masonry for the outer walls of the structure (masonry roll mesh or reinforcing tape for aerated concrete).
- Every fourth tier (reinforcing bars).
- Lintels for window and door openings (rebar frame).
- The upper belt of masonry reinforcement at the floor level (reinforcement frame).
- Reinforcement of aerated concrete partitions (masonry mesh or perforated tape).
- Strengthening the masonry of gables.
Reinforcement of aerated concrete masonry is carried out in several ways. The main method is to strengthen load-bearing walls using hot-rolled steel reinforcement of periodic profile AII, AIII. Available in skeins or measuring rods of 6–12 m.
It is a corrugated profile with two longitudinal ribs. The weight of one meter is 6.3–7.9 kg.
To knit the jumper frames and install the upper reinforced belt, low-carbon reinforcement VR-1 and soft knitting wire 0.8–1.2 mm are additionally used.
In some cases, in order to save material resources, the use of fiberglass (composite) reinforcement of the same diameter is allowed.
The price and low weight of the profile determine its widespread use when performing masonry work from aerated concrete blocks.
The main disadvantage of composite reinforcement is:
- low heat resistance;
- impossibility of connecting rods by welding;
- cannot be bent.
Therefore, in any case, reinforcement of masonry made of aerated concrete blocks in the corners of load-bearing walls must be carried out with steel reinforcement.
To reinforce the first row of blocks, galvanized masonry mesh Ø 3 mm, with a cell size of 50x50 mm, is usually used. The use of mesh is possible if the masonry is carried out using cement-sand mortar, since the thickness of the adhesive layer is 2–3 mm, and reinforcement with such material will increase the masonry seam by another 3 mm.
An alternative to mesh and fiberglass reinforcement can be perforated reinforcing tape. It is a strip of galvanized steel 4–8 mm thick and 25–100 mm wide. Available in rolls.
The reinforcement technology is the same as when using reinforcement, with the exception of masonry scraping. The strips are laid with glue or fastened with screws to aerated concrete masonry.
Reinforcing tape is mainly used when it is necessary to reinforce a pediment made of aerated concrete or to lay interior partitions.