The key to the pleasure you get in a bathhouse is always thoroughly warming it up to the desired temperature. Otherwise, the procedure itself loses all meaning, wouldn’t you agree? The entire load for this part falls on the oven, which must be properly prepared. You can, of course, save yourself the headache about this and turn to specialists. Or you can put in a minimum of effort, but as a reward you will receive a well-prepared oven and a significant amount of savings. How to make a sauna stove from a pipe with your own hands? In fact, using such material as a source allows you to reduce time costs to a minimum - and not at all to the detriment of the final result. The main thing is the availability of the necessary materials and a drawing, according to which you can successfully implement the plan and avoid mistakes that undermine safety.
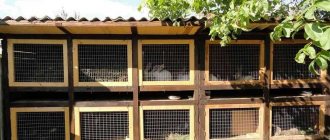
Advantages of a brick stove
Brick stove-heater
A stove made of brick has a large closed heater; designs of other materials cannot compete with it in terms of the quality of the steam produced. The advantages of this design are:
- Fire safety;
- long-term heat retention;
- the ability to heat a large area;
- ease of operation and no need to add fuel during the washing process;
- uniform heating of the room;
- lack of contact between stones and combustion products.
The disadvantages of a stone stove include its impressive weight, which requires laying a separate foundation, and the need to preheat the bath.
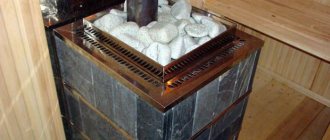
Metal heaters: pros and cons
Made of metal
If desired, you can weld a steel stove for a bath. A container for stones is installed above its firebox. This option is cheaper and can be manufactured faster and easier than a brick structure. Cast iron cannot be used for metal heaters; cracks will occur when water gets on it. Among the advantages of a steel heating device:
- compact size;
- light weight;
- fast warm-up.
When choosing how to make a heater for a bath, the disadvantages of the stove are also taken into account; rapid cooling after combustion stops, uneven heating of the bath, fire hazard.
The brick stove is installed so that it heats all the rooms. Its front part with the combustion door and ash pan goes to the dressing room. The location for the structure is chosen when designing the bathhouse, because you need to take into account the required distance from the wall to the stove and build a solid foundation.
Useful video
Not just diagrams, but also a description of the advantages and disadvantages of vertical and horizontal structures (not necessarily made of pipes). Plus interesting life hacks.
Even more diagrams, even more explanations about them. However, the main concern of the author of the video is that you get a stove for a real Russian bath. So sauna lovers don’t have to watch it).
+++
We hope that you have received some kind of holistic understanding of what a sauna stove is. Other things can only be learned from practice and experiment. Good luck to you!
Heater location
Depending on the area of the steam room, a stove of a suitable size is designed. If, as a result, the heater takes up space up to 2 m2, then it can be installed in a specially made niche in the wall. Due to this, heat loss can be prevented, since its combustion will be carried out directly from the steam room. Although in most cases the heater is designed in such a way that its firebox is carried out from the next room.
A sauna stove should be installed so that the heat from it spreads into the dressing room, washing room and steam room. Thanks to this, it will be possible to make a common chimney with three separate chimney channels for a gas boiler, fireplace and heater stove.
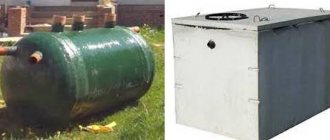
From the pipe
If there is space to install a stove, you can make a homemade electric stove from an iron pipe and U-shaped industrial electric heaters. The following is recommended:
- select the pipe diameter according to the size of the electric heaters;
- place the heaters in one of the pipe holes with the contacts facing outward, make grooves around the perimeter of the hole for inserting ceramic bushings for wires connected to the electric heaters;
- close the pipe hole with a durable metal sheet, which will become the base of the stove;
- connect the sheet to the pipe;
- the connection can be either welded or threaded;
- the free space of a vertically standing pipe must be filled with basalt-type stones measuring 6–11 cm.
Stones at the bottom of the pipe should not put pressure on the electric heaters.
To do this, you can place reinforcement rods along the pipe between the electric heaters, which will become a supporting device for the stones. The pipe and support sheet must be grounded. That’s it, the smallest stove-heater for a mini-sauna is ready. All that remains is to make the correct connection to the network and grounding device. Stoves with a power of up to seven kilowatts are connected to a 220-volt network, more powerful ones are connected to a 380-volt network. The same design can be used to construct a stove in a fairly large bathhouse. A large diameter and length of pipe and a larger number of electric heaters should be used. Date: September 25, 2021
Water container
Immediately before building the stove, it is important to determine the volume of the tank in which the water will be heated. The volume of the tank will depend on the intensity of visiting the steam room. So, the calculation is made based on one liter of hot water per person. It is best to use an open container. Although there will be evaporation, there are a number of positive aspects:
- Convenient when filling the container.
- The ability to carry out maintenance or repair of the internal part if necessary, for example, remove scale, clean and dry.
- In winter, completely remove water, protecting the tank from freezing the water in it.
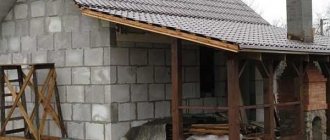
Foundation for a brick stove-heater
If you want the stove you made to last for many years, you should take care of making a reliable foundation for it. In this case, be sure to take into account the following nuances:
- The foundation of the bathhouse and heater must be different, especially if the total mass of the stove exceeds 700 kg. There must be a distance of at least 500 mm between them.
- The foundation for the heater must have a depth below the soil freezing level of an average of 700 mm. In different regions of Russia, the level of soil freezing is different.
- The size of the foundation should be half a brick larger than the stove itself on each side.
So, let's look at the step-by-step process of making a foundation for a stove:
- To begin, dig a pit with a depth below the soil freezing level, on average 700 mm. The size of the pit around the perimeter should be 100–150 mm wider. This will allow you to easily install the formwork, and fill the resulting gap with sand or gravel.
- At the bottom of the pit we make a sand cushion. At the exit it should have a thickness of 150 mm. After pouring a layer of sand, water it with water to compact it. As water is absorbed, the sand will settle, so you will need to add it to the desired thickness.
- When the water is completely absorbed, a layer of stones or broken bricks is poured on top of the sand. It needs to be compacted. The resulting gaps between the stones should be filled with sand and watered. It is very important that the sand fills the space between the battle and the stones as densely as possible. The thickness of this layer, in our example, will be 250 mm.
- If the sand has stopped settling, then the next layer of crushed stone can be backfilled. It also needs to be compacted well.
- Now you need to make formwork from boards 40 mm thick. The internal size of the formwork must correspond to the size of the foundation. The top of the formwork must be leveled. It should be securely fixed in the pit and a reinforcement cage should be placed inside it. There should be 50 mm between the formwork walls and the frame.
- At the next stage, perform concreting. In this case, it is necessary to tamp with a piece of steel reinforcement or a wooden beam. The upper level of liquid concrete must be brought to the edges of the formwork. The surface of the screed should be smooth. As a result, the formwork should be on the same level as the subfloor of the bathhouse. The poured concrete must be left for several days to set.
- When the concrete has acquired sufficient strength, the formwork must be removed. The surface of the concrete is covered with two layers of molten tar. After this, fill the space between the walls of the soil and the concrete with sand or gravel. After this, cover the concreted area with plastic film and wait 7 days. Then you can start laying bricks.
Rubble concrete foundation
There is also another option for making a foundation for a heater. The sequence of its manufacture is as follows:
- A pit is also dug to indicate the level of soil freezing. Its size should be wider around the perimeter and 100–150 mm deep.
- If groundwater does not seep into the pit and the walls do not crumble, then you can begin to lay a rubble concrete foundation.
- Fill the bottom with a thickness of 150 mm with crushed stone. It should be compacted well. In this case, the platform must be horizontal.
- After this, formwork is done. It looks like a box without a bottom. Its size must correspond to the foundation design plan.
- The inner walls of the formwork are covered with hot bitumen or roofing felt for waterproofing.
- Next, immerse the formwork into the pit.
- Place the first layer of large stones up to 15 cm in diameter at the bottom.
- The resulting voids between the stones must be filled with crushed stone.
- A layer of cement-sand mortar is poured on top. The consistency of the solution should resemble thick sour cream. It is prepared as follows: Portland cement M400 or 500, one part and 3 parts sand. Water is added until the consistency of the solution resembles thick sour cream.
Foundation for a stove with waterproofing completed
After these steps, you can follow one of the following paths:
- Spray the first row of stone with the solution. Leave it for a day. Then pour the second row of stone also at intervals of a day. And so on until you reach the desired level.
- If the volume of the foundation is small, then concrete can be poured in one go.
The foundation level should not reach the level of the finishing floor by 60–70 mm. Be sure to check the top layer of the screed for level. After this, the surface is smoothed and covered with plastic film. In a week, the foundation will be ready for masonry construction.
The drying speed of concrete will depend on weather conditions. Therefore, in some cases you will have to wait more than one week.
Foundation slab on piles
Foundation screed
Let's consider another option for making a foundation for a stove-heater. A reinforced concrete slab with a thickness of 150 mm is laid at its base. Its lower layer must be reinforced. The larger the area of the installed slab, the more reliable the entire structure will be. But what if the predominant soil is moist clayey and loamy? Such a slab will not be able to balance the force of frost heaving when the soil freezes. Among other things, even in sandy and dry soils, seasonal movement of the foundation can be observed. To get out of this situation and increase the stability of the foundation, several piles are laid under the slab, on which the slab will later rest.
You can make such piles as follows:
- Using a garden drill Ø20 cm, drill a cylindrical hole 1000 mm deep.
- The bottom of the pit is covered with a layer of crushed stone 150 mm thick and compacted.
- After this, take the roofing material and roll it into a tube that will serve as formwork in the pit. This tube is immersed in the hole.
- Next, pour concrete into the hole to the level of the slab installation.
- After an average of 10 days, it will be possible to install a reinforced concrete slab on the piles.
The foundation must be waterproofed along the top edge. This will prevent groundwater moisture from penetrating the brick structure of the furnace. For this purpose, lay 2 overlapping layers of roofing material on the installed slab, which is coated with hot bitumen. In this case, the roofing material should extend beyond the foundation by 50 mm. The second layer of roofing material is laid perpendicular to the first.
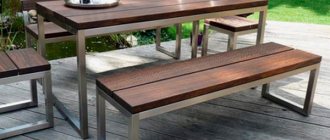
Manufacturing examples
Having decided to make a sauna stove on your own, you need to approach the matter thoroughly. Firstly, choose a project that is best suited for the bathhouse, and secondly, make drawings to make it easier to build. There are many options for sauna stoves, so anyone can create their own version, taking into account some basics.
Here are some examples of homemade projects.
Metal with a tightly closing heater
This option is possible for a steam room measuring 2 by 3 and 2.3 meters high. The material, namely metal, is taken as a sheet, three millimeters thick. The air supply goes to the top of the firebox. A metal plate is welded to the back wall of such a firebox, and air is supplied into the hole between the wall of the firebox and this plate using tubes. This helps cool the back wall and push hot air up where the flue gases are concentrated. When mixed, the substances ignite. Thanks to this, the stones are heated to high temperatures, although much less firewood is used.
For a compact steam room
It is not difficult to build such a stove. To build it you will need a metal sheet up to five millimeters thick. If you take a thinner sheet, the stove will quickly burn out. Its dimensions are 90 cm in length, 80 cm in height and 60 cm in width. To create a chimney, a piece of pipe with a diameter of 11.5 cm is suitable. At the bottom there should be an ash pit with a door; between this part of the stove and the firebox, cast iron grates and heaters are placed to remove waste remaining after combustion. To do this, one third of the back wall of the heater is welded with a strong sheet of metal, where a chimney pipe is welded in the center, lowered down 10-12 centimeters.
The top of the oven is covered with a metal lid up to one millimeter thick. It is this that prevents the stones from cooling down and also prevents waste and ash from entering the steam room. The lid opens only when needed, namely before going to the bathhouse.
Simple heater
This is the best homemade stove, which is suitable for both a sauna and a simple bathhouse. The high temperature is reached in about an hour and a half. During this time, the 50 liters of water needed for swimming can boil. Such a stove has not one chimney, but two. The first is suitable for heating the room. The second is for the release of carbon monoxide and acrid smoke. The structure consists of sheets of iron 3-4 millimeters thick, but the firebox itself is made later. It is made of metal up to 6 millimeters thick. The kit also includes a small and large valve and two metal grilles.
The heater is made of steel up to three millimeters, which is attached to the “neck” of the firebox itself. Two pipes are placed on top, to which flanges with the necessary holes are welded for fixing the outlet pipe and for attaching the elbow.
With brickwork
In this option, double technology is used, that is, brickwork plus a metal body. Steel up to two millimeters is suitable here, and the brick must be heat-resistant.
First, a base is made to which the legs necessary for the stability of the structure are welded. Then they lay out a row of bricks. The remaining rows are built near the half-brick firebox. Install a grate and a grate for stones. It is also necessary to install a window for the valve, where the heat will be retained after the end of the fire. The last two rows are made solid, leaving only a place with a window for the chimney.
Having finished laying the brick and waiting for it to harden, you can begin welding the metal body, which plays the role of a case. It is necessary to cut out the metal for the ash pan and windows for loading. A door is installed, always with a seal. The metal base is complemented by a cold handle.
The last thing to weld is the lid with the hole for the chimney. When the stove is installed in the place allocated for it, you can lay the stones. Their bookmark plays an important role. After all, work efficiency also depends on this. It is better to take stones that are round in shape and of different sizes, from approximately 50 to 100 kilograms.
Having examined the types and designs of homemade sauna stoves, we can say with confidence that making one yourself is a completely doable job if you take into account all safety requirements when installing it. This will save money for the family, and the stove itself will become the property and pride of the owner.
In the next video you will see how to make a sauna stove from a pipe with your own hands.
Masonry bricks
For laying a stove, it is important to purchase well-fired and high-quality bricks. It should not have chips or cracks. Its edges must be smooth. The quality of a brick can be checked very simply. If, when dropped, it falls apart into several large pieces, then the brick is suitable. If, when dropped, it crumbles into many small pieces, then such a batch of bricks is not suitable for a heater.
For masonry, the best option is a stove (ceramic refractory brick). Ideally, the size of such a brick should be 125x250x65 mm. However, it is extremely difficult to find a batch of bricks in which the dimensions do not differ from each other. Therefore, choose your brick carefully.
Before starting masonry, many stove makers lay the bricks dry, leaving the necessary gaps at the seams. This way you can avoid a large number of mistakes.
There is another type of brick in which only 3 sides are fired. One side is not burned. This side is placed out. But such bricks are rare, so red ceramic bricks are most often used.
Red and refractory bricks
As for the fuel zone, fireclay brick Ш5 is used here. It comes in light pink, white or yellowish color. This brick can withstand high temperatures. It differs in its dimensions, since in most stoves the fireclay firebox is not connected to the main masonry of the stove body. Moreover, there is no need to adjust their rows to one level. But if the situation requires it, then the brick can be cut to the desired size.
It is not recommended to use fireclay bricks for laying the furnace itself. This is explained by the fact that fireclay does not accumulate heat; it cools quickly. Its main advantage is that it can withstand high temperatures.
What metal is suitable
When selecting and inspecting metal pipes for a future furnace, it is important to pay attention to the following details:
- strength of the metal workpiece;
- pipe thickness;
- no defects or severe metal corrosion.
To eliminate defects, you need to weld patches of a suitable size in problem areas with a small margin.
As for the composition of the metal, it is not recommended to use alloy steel or steel with a high carbon content. The permissible carbon content in steel should not exceed 2%.
You can determine whether a metal is high-carbon or not by the appearance of sparks when grinding with sandpaper or an attachment on a grinder or drill. A high carbon content is indicated by white sparks like stars that pour in different directions. Low carbon content is indicated by yellow sparks that fall in a straight line. Alloy steel produces orange, bright red sparks.
The stove can be made either from a round pipe for a bath or from sheet metal. If in the first case the shape will be close to cylindrical, then in the second the furnace unit will be rectangular.
By choosing a round pipe as a blank, bathhouse owners receive a number of advantages:
- The pipe is easier to work with. Essentially, you have a ready-made firebox at your disposal that does not need to be cut.
- Economical material consumption allows you to reduce money expenses.
- In a round oven, the process of heat and air exchange is many times more efficient.
- The service life of a round stove is longer than a rectangular one made of sheet metal.
In addition to selecting the material, it is important to develop a drawing, a diagram of the future product, indicate the location and method of fastening all structural elements. This will simplify the assembly process of the unit.
Masonry mortar
For laying fireclay bricks, a mortar prepared from white fireclay clay is used. You can also purchase a ready-made composition for laying fireclay. You cannot place the entire oven on this solution. Why? This solution is sintered into a monolith at a temperature of 700–800°C. There are no such temperatures in external masonry. Therefore, after a short time it will crack and spill out, which will lead to the destruction of the masonry.
For external masonry, a solution of quartz sand and clay is used in a ratio of 1 (clay) : 5 (sand). The sand must be of river origin or quarry. River sand is somewhat worse, since its grains of sand are round and round, and the solution itself will have worse characteristics. Therefore, preference is given to quarry sand. The sand is sifted through a mesh with cells of 2–2.5 mm. This will prevent large particles from getting into the solution.
As for clay, it can also be obtained from a quarry from a depth of at least two meters. The quality of the clay should be checked. To do this, soak 200 g of clay in water for a day. Then roll the clay into a “bun” and leave it to dry under a canopy in the open air. After 2 days, drop it onto a stone slab from a height of 170 cm. If the “bun” has crumbled into several large parts, then clay is suitable.
The selected clay must be soaked in water to a paste-like state and ground through a sieve. First through large cells, and again through small ones.
Masonry
The masonry process is very painstaking and complex. There are a large number of subtleties and nuances here, understanding some of which comes only with experience. Therefore, to make this work easier for you, this section contains several videos that tell you step by step and show how to lay row by row.
As an example, consider the manufacture of an open small stove-heater. The size of such a stove is 102x62 cm. It is capable of heating a steam room with a tank, while the tank itself is located separately. It uses an interesting water heating system - an open siphon. So, a pipe is welded into the tank at a slight angle, which is sealed at the end. It should be under an open fire in the firebox. As soon as the water in the pipe boils, it rises into the tank, and cold water comes in its place.
The diagram below shows an example of a stove with an open heater:
Diagram of an open heater
And also a diagram of the arrangement of the firebox of an open heater:
Firebox order
Below in the diagram is the order of laying bricks for the stove:
Brick laying order
If you want to make a closed stove, keep in mind that this is much more difficult to implement. There are many nuances that must be taken into account when laying it. It is quite difficult to describe the entire technological process, so we suggest you watch an introductory video. The peculiarity of such a furnace is that the reservoir for stones is lined with fireclay bricks:
Video about making a closed stove:
It is worth noting that upon completion of the masonry, drying should be 10 days. At the same time, drafts are unacceptable. Only after this time can the first fire be fired.
Photo instructions for ordering the heater stove
Stage 1-4
Stage 5-8
Stage 9-12
Stage 13-16
Stage 17-21
Stage 22-25
Furnace classifications
| Kamenka | Flow-through | Deaf |
| Open | "Black" batch oven | Continuous oven |
| Closed | Batch oven | Continuous or combined oven |
Let us explain: if the heater is running, then the poured water will spill into the firebox. Therefore, you have to wait until the wood burns out, then just supply water. Since combustion stops, the operation of the stove is called “periodic” . Accordingly, the continuous stove is not filled with water and the wood can burn throughout the bathing procedures .
On a note! Most often, metal stoves are permanent, and brick stoves are periodic, but there are exceptions. If a solid heater is made in a brick stove, then such a stove is called a combined stove.
Inertness of the material
So, the fire burns, the stones heat up, and what happens to the steam room? If we need to heat the stones to 300-400 degrees, can you imagine how much the air in the steam room can heat up during this time? And now we come to the next important point: the role of material in the design of sauna stoves, in particular steam room units .
Stoves are either brick or metal . There is no other option. The former are considered very inertial - it takes hours to heat them up, as well as to cool them down . The latter are able to heat up in half an hour and during the same time manage to overheat the steam room. sauna stoves !
When choosing a design, you determine for yourself how inertial its body should be. At your disposal are not only “clean” options: a purely brick, purely metal stove, but also combined ones . For example, you can increase the inertia of a metal stove either by using the internal lining of the firebox and heater, or by using an external sarcophagus casing. Moreover, the option with a casing and lining at the same time is not excluded).
Important! Answer the question, what is the optimal time for lighting the stove for you - it is this that determines the degree of inertia of the body.
Smoke
What happens when fuel burns? Heat is released and combustion products are formed - steam, gases and solids. We call the latter soot, soot , and all together - smoke . At the moment of leaving the furnace, this mixture is also heated to several hundred degrees. And if some heat-intensive obstacle , all this heat will simply fly away into the chimney to increase the greenhouse effect on our planet.
However, once upon a time, not only were there no obstacles, but there were no pipes either. Because they weren’t made from wood! Therefore, the first type of stove according to the method of removing smoke is chimneyless, “black” .
In its simplest version, it is a pile of stones placed in a vault over a fire . In the modern version, it is a brick hearth that keeps the same pile of stones from spreading. But the principle is the same: light a fire under the stones, wait for the wood to burn out, release the smoke outside through a window or door - and you can steam by pouring water on the heated stones.
Then a smoke collector - akin to a kitchen hood - also separated from the stove. A similar option can still be found in the bathhouse today.
Then the chimney pipe . And if it is simply inserted into the stove (into the firebox or heater - it doesn’t matter), then such a stove will be called direct-flow . Heat here is not taken from the furnace gases, so it has the lowest efficiency.
But heat is a pity, so the inventors’ idea went this way: what if we increase the path that the smoke travels inside the stove? smoke circulation system appeared , where smoke is forced to run with obstacles inside channels that lead it up and down, or horizontally to the right and left. The system is excellent for heat extraction, but it has its drawbacks - the channels, especially horizontal ones, must be cleaned regularly , otherwise there will be no draft.
An alternative to the smoke circulation system was the bell-type stove . It has no channels and is practically independent of traction. Hot furnace gases, leaving the firebox, end up under the hood, where they actively share heat with the furnace mass. New portions of hot furnace gases rise, displacing cooled ones down and into the chimney.
However, everything that has been said about the chimney primarily applies to brick stoves . It's rare to see a metal stove with smoke circulation. Usually they are primitive - direct-flow, except that they have flame dividers. And their sizes are much smaller than brick ones, there are no passages, and there is no heat-intensive material - where to take the heat?
The stove ends at the chimney. What remains optional is a tank or heat exchanger , which can also be indicated on the diagram of the sauna stove. But it is better to talk about this when analyzing specific structures, to which, in fact, we are moving on.
Construction of a firebox and ash pit
It is very important to correctly calculate the dimensions of the firebox. In this case, it is worth taking into account various factors, starting from the presence of a collector for heating water and ending with the type of fuel for heating the bath. The average depth of the firebox is 800 mm. 250 mm is allocated for the hot water system, and 550 mm is the usual length of firewood. The height of the firebox can reach 350 mm and the width 400 mm. With such dimensions, 8 to 10 logs of firewood can be placed in the firebox.
An ash pan with a tray and a ash pit is intended to collect fuel combustion products. They also provide air flow into the firebox, which enters inside through the grate. To regulate the intensity of firewood combustion, a valve or ash tray is used. If you need to warm up the steam room quickly, the tray is moved almost completely away for a while. When the firewood has flared up, the pan can be pushed in.
In this video you can see the process of installing a blower door with a locking cover:
Peculiarities
Wood stoves provide cyclical heating of indoor air, which has a positive effect on health. The cyclical change in temperature has a hardening effect and, according to doctors, such heating is the most favorable for the home.
The main principle of operation of these heating devices is the ability to operate in two modes: rapid heating of the room and long-term burning. The efficiency of furnace operation is achieved through pyrolysis - smoldering of fuel due to the work of gas.
Chimney
The heater stove differs from its analogues in that natural stones are used to accumulate heat. The first segment of the pipe passes through just such a compartment with stones. The chimney can also pass inside a container of water to heat it. In all other respects, there are no special differences in the construction of the chimney. It can be assembled from sandwich pipes or ceramic blocks. The manufactured chimney must be insulated.
As for the lower part of the chimney, it is made of steel, right up to the ceiling. It is necessary to install a damper when passing through the ceiling pipe.
The gate is designed to improve combustion intensity, as well as to regulate draft.
If a sandwich pipe is used, then it has two walls, between which there is a heat-insulating material. They can be installed in the area from the ceiling to the fungus on the roof. Basalt mats are used to insulate a brick chimney. They wrap the pipe. Wire is used to secure the mats. An umbrella or fungus must be installed on the chimney. This will protect the chimney pipe from sediment entering it.
When arranging a chimney, you should decide what type it will be: external or internal.
You can learn about other subtleties of arranging a chimney pipe from the video:
Installation Rules
The requirements and recommendations for installing the furnace are the same as for other metal units.
- These relatively lightweight structures can be installed on a concrete screed without a foundation.
- If the floor is wooden along the joists, you need to pour or lay out a solid foundation from blocks.
- To reduce infrared radiation from hot metal and reduce the risk of burns, you can line a pipe sauna stove with bricks or simply separate it with a brick screen.
- The distance from the stove to the walls must be at least 20 cm.
- At the point where the chimney passes through the ceilings, a cut-out is arranged in the form of a metal box filled with non-flammable material, for example, stone wool.
The ceiling around the pipe is covered with a sheet of iron Source izhevsk.ru
- A metal sheet is also placed on the floor before the firebox to prevent accidental fire from sparks and embers.
Finishing
Most often, the stove-heater is left without finishing. Red brick is laid out for jointing, and all bulges and irregularities are sanded. At the same time, it is also practiced to enhance the color of bricks with a solution of sulfuric or hydrochloric acid. However, the stove-heater can be plastered or tiled.
If you decide to plaster, then the layer should be made up to approximately 15 mm. For this work, you can use the following compositions with proportions:
- clay (1) – asbestos (0.2) – sand (2);
- lime (2) – sand (0.2) – asbestos and gypsum (2);
- sand (3) – clay (1) – cement (1) – asbestos (0.2).
Immediately before plastering, the oven is heated. After this, the first continuous layer is wetted and applied. When the first layer has set, the next layer is applied. As a result, the surface of the wall should be rubbed so that the wall is smooth and looks neat. Finally, whitewashing can be done.
Commissioning
Before you are going to light the stove, you should let it dry thoroughly. To do this, open the doors, vent and vents open for 7 days, this way the oven will dry out faster. If the stove does not smoke when lighting, it means the draft is good.
You should not rush to light the stove. Otherwise, if there is insufficient drying, cracks may form in the masonry.
Selection of stones
river stone
Based on the name of the stove, it uses special stones that undergo sanitary and geological examination. As for the specific choice of stone, there are several options:
- Soapstone chlorite.
- Jade.
- Gabbro-diabase.
- Raspberry quartzite.
- Porphyrite.
For baths, sea stones are considered to be the best option. However, such an opinion is unfounded. As practice shows, river stone can withstand high temperatures much better. Sea stone is destroyed very quickly, as it does not have sufficient strength.
Types of stones
But in addition to the type of stone, you should choose the right size and shape. For example, these could be medium stones with a smooth structure. Remember that there must be enough stones, as this affects the quality of heating and steam release.
So, when deciding which stone is best to use for a stove, remember not only practicality, but also the beauty of the room. Beautifully shaped stones will be a real decoration of a Russian bathhouse.
In this article we familiarized ourselves with the most common type of stove that is used to equip a Russian bath. As you can see, the process of its construction is quite complex and responsible. Therefore, there is no need to rush to start work. Carefully study all the recommendations in this article, diagrams, photographs and video material.
Purpose
If the firebox door is made external, such a stove can be completely covered with a stone layer, protecting people from burns. But the main purpose of nets with stones is heat accumulation and gradual and constant heating of the steam room and the entire sauna room.
The second important purpose of a grid with selected and correctly placed stones is the ability to quickly raise the temperature in the steam room by splashing several ladles of aromatic infusions of herbs, pine needles or kvass onto the heater and create a unique atmosphere of a Russian bathhouse.