The jet in a gas stove performs a very important function. Another name for this part is a nozzle. What is a jet, what is it for and where is it located? A detailed consideration of these issues will be very useful for general development and avoiding stupid mistakes when connecting a gas stove to a certain type of gas (liquefied or natural).
Jets for a gas stove: bottled gas and natural gas - the difference, how to replace
Most gas stoves can operate on both natural and liquefied gas. To do this, the manufacturer supplies the devices with two types of jets. Typically, household appliances are initially configured to connect to the gas main. To convert it to bottled gas, you need to change the nozzles. If this is not done, the stove will not work correctly, which is dangerous for users.
How to convert a gas stove to bottled or natural gas
Natural gas, usually NG G20, is supplied to the kitchen from the central gas supply system, which is supplied to the device at a pressure of 20 mbar. Liquefied gas is used for cylinders, the most common is LPG G30. It enters the device at a pressure of 50 mbar. The combustion of gas-air mixtures is not the same due to differences in composition and pressure. To level the flame and prevent the appearance of soot, jets of certain sizes are installed in the burners.
The jet (nozzle or nozzle) is usually made of bronze or brass. It looks like a threaded bolt, but only has an internal hole through which fuel is supplied. The larger it is, the more gas flows through it. At the end of the nozzle there are numbers stamped out that indicate the diameter of the hole in hundredths of a millimeter. For example, the number 75 means the hole diameter is 0.75 mm, and the number 115 means the diameter is 1.15 mm.
How to choose a good device?
The main characteristics of such products are:
When choosing a device, you need to keep the following factors in mind:
- Simplicity of design. In this case, the cross-sections of the paths for the passage of gas must be the same and create minimal resistance to the gas.
- Room size. For small rooms, an atmospheric device will be sufficient, but for larger rooms the power of such devices may not be enough.
- Manufacturer of the product. Domestic and foreign (mostly products made in Germany are on the market) units have approximately the same cost, but some similar devices are designed for installation in specific types of stoves. For example, the domestic product AGG-15 is suitable for use only in stoves with a long channel for the fuel mixture.
Photo 2. Gas nozzle AGG-26, suitable for furnaces with a long channel.
- Type of heating device.
Important! You need to know where the fuel will come from to the heating device: from individual cylinders or from the main pipe. This is also taken into account when installing the stove.
Choosing household chemicals
No matter how trivial it may sound, a good assistant in the fight for the cleanliness of a gas stove is a gel-like dishwashing detergent. It washes off well, does not scratch glass ceramics, enamel, steel, and breaks down fats excellently.
However, dish gel only helps with simple stains. If the situation is severe, take a walk through the household chemicals department. Manufacturers offer a number of special compositions for cleaning gas stoves. These are thermonuclear chemicals, which are presented in several forms: pastes, sprays, aerosols. After applying them, the decomposition of proteins and fatty deposits begins, and the surface remains to be wiped with a clean napkin.
The standard restriction applies to steel wool, brushes, and abrasive powders. All these improvised means lead to the formation of scratches and chips, which aggravates the accumulation of dirt and subsequently causes corrosion.
I note that among all household chemicals there are those that contain silicone. This is a very useful supplement. It forms a thin layer on the surface that protects it from contamination.
Third stage. Examination
After everything has been assembled and tightened tightly, it is necessary to check the system, in case there is gas leaking somewhere. The seats of the jets, the connections of the hose with the gearbox and the plate are generously covered with soapy water. Dishwashing liquid or shampoo works well.
Then turn on the reducer on the cylinder. If there is a leak, the foam will bubble. This means we still need to tighten up the joints. Then wipe it dry and you can use the gas stove. Turn on the burners and light the gas. If the fire is bluish-green in color, burns evenly, without soot or pops, then everything is done correctly.
Source nahnews.org
And a few more important tips:
- The gas stove should be placed in a well-ventilated area;
- It is best to place the liquefied gas cylinder outdoors, in a special iron box;
- The regulations require that all connections, as well as the gearbox and hose, must be easily accessible for inspection.
- If you smell gas, you must immediately open all windows and doors and under no circumstances turn on electrical appliances.
To see how to convert a stove to gas from a cylinder, watch this video:
Safety precautions when replacing an injector
Therefore, do not neglect a number of rules:
- Before replacing the jets, disconnect the stove from gas and electricity.
- Make sure the burners are cool.
- Before starting work, open windows and turn off electrical devices that may cause a spark.
- You cannot independently modify the parts of the slab or replace them with non-original ones, inappropriate in size, or made yourself.
- After installing the parts, be sure to check all gas connections for possible leaks. To do this, wash the compounds on all sides (using a brush or sponge) and, turning on the gas supply, observe whether bubbles form. If a leak is detected, the connection is either tightened or disassembled and reassembled.
You cannot use nozzles designed for gas burners of stoves of a completely different design or other gas devices.
You should not replace the nozzles in a gas stove yourself if you are unsure of your capabilities.
What should you pay attention to?
To properly build a stove for your home or bathhouse yourself, you must follow certain subtleties. Whether you are building a small or large oven, pay attention to:
- For reliability, the brickwork of the stove is secured with the so-called bandaging of seams. Bandaging is alternating bricks with different sides. For example, the bottom brick is placed with the long (spoon) side forward, the middle one with the short side (called the butt side), then again with the spoon side. The dressing can be single-row or multi-row. Multi-row is more reliable and economical; it requires fewer incomplete bricks. Vertical dressing is required! Horizontal is desirable.
- All seams, both horizontal and vertical, are coated with the solution.
- It is recommended to lay the bottom row with the brick surface facing forward; this will reliably strengthen the entire structure.
- The thickness of the seams between the stones should be up to 3 millimeters, but not less than 2 mm.
- No need to tap the bricks! Put them in place immediately, with clear movements. Moving stones or moving them is not allowed.
- If the stove is located in the house, calculate its position so that it does not come into contact with flammable surfaces. When building a stove into a wall, cover the opening with brick and metal. Seal the gap between the stove and the opening with non-combustible insulation.
- When installing metal equipment, the edges of the bricks are cut off. The gap between the cast iron and the brick is about half a centimeter. Then it is filled with a mixture of concrete and sand. This is done because metal and brick have different deformations when heated.
- Around the holes and doors, brick can be laid edgewise. This will give the whole building a certain charm and also strengthen the structure.
- For a gas firebox, install special ready-made gas burners. They must meet all safety standards and have degrees of protection: when the flame is blown out or flooded, the gas supply must automatically stop.
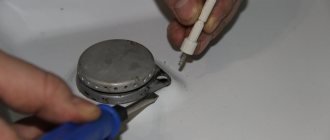
How to clean injectors?
It is recommended to periodically clean or change the nozzles - this is an integral part of maintenance procedures that must be carried out at least once a year. Delayed cleaning leads to a deterioration in flame combustion: the appearance of yellow tints, smoking, a decrease in the thermal coefficient and other undesirable consequences. To clean the injectors, you will need the following:
- cleaning products: vinegar, soda or detergent;
- old toothbrush;
- thin needle.
Cleaning is done as follows:
- the area where the jet is located is cleared of carbon deposits, grease, plaque and other foreign substances;
- the nozzle is removed - it can be unscrewed using a socket head of the appropriate diameter, equipped with an extension (the nozzle may be located deep in the body, which makes it difficult to unscrew it with a regular wrench);
- the object to be cleaned is soaked in a solution of soda, vinegar or cleaning agent for some time (depending on the degree of contamination);
- The outer surface is cleaned using a toothbrush and applying cleaning kitchen powder;
- the internal hole is cleaned with a thin needle; in some cases, blowing with a compressor or pump (a car pump is sufficient) is effective.
After cleaning is completed, the jet needs to dry thoroughly. Upon completion of drying, its hole should be visible through the light, and there should be no foreign debris in it. Reinstallation of the nozzle is carried out in the opposite sequence to disassembly. If there was a sealing gasket under the jet, you need to replace it with a new one.
Masonry
Each stove has its own design features. Its construction must exactly correspond to the drawings. Let's figure out how to build a brick oven and give the average stages of construction:
- It is always correct to make the bottom row continuous. It is the basis of the stove, so close attention is paid to it: the corners must be clearly straight, the verticality of the walls is checked with a weight.
- The second and subsequent rows are made in strict accordance with the drawings. Sometimes, the second row is also laid solid, sometimes a door for the blower is placed in it, and sometimes it is placed next to it higher.
- To make it easy to remove ash, trim the edges of the bricks immediately at the construction stage so that they form a cone.
- When placing the grate, make a small niche for it so that it is slightly in the recess - this will have a positive effect on the efficiency of the stove. Leave a small (few mm) gap between the grate and the bricks. It will be filled with sand and concrete.
- When building a firebox, it is important to combine materials correctly: the inner surface is made of fireclay bricks, the outer surface is made of ceramic bricks.
- A cooking surface is built into the upper rows, if necessary. For it, it is better to take fireproof fireclay bricks.
- Keep track so you don't accidentally block your channels! After several rows, a damper and a ventilation door are formed.
- In the upper rows, the chambers begin to overlap: first the cooking chambers, then the thermal chambers. The top row of bricks covers all channels except the smoke channel.
- The chimney is removed. To do this, in the places where it passes through the floors and roof, gaps are left, which are filled with special insulation. A steel sheet is strengthened around the hole and secured with self-tapping screws to avoid accidental fire.
- For reliability, the stove can be tied with metal ties.
- After all work is completed, allow the structure to dry and settle. It is recommended not to heat the stove for about two weeks after building it yourself.
This is a rough plan for how to build a brick oven yourself. Carry out all work in accordance with safety precautions. Remove any remaining solution immediately. Plastering of internal surfaces is not allowed.
Required Tools
Replacing jets should be entrusted to gas service specialists who have the necessary knowledge and qualifications and will be able to correctly adjust the gas supply when switching to another fuel. It is not recommended to remodel a gas stove yourself.
If the user decides to change the nozzles with his own hands, he will need the following tools:
- crosshead screwdriver;
- set of open-end and ring wrenches.
How to change nozzles on a gas stove
First, the stove is disconnected from the gas, if it was connected. After this, they proceed according to the following algorithm:
- Remove the top cover of the gas stove by unscrewing the screws to get to the burner.
- Then they find the latch, squeeze its ends and carefully remove it. After this, the tips with nozzles are removed from the traverse with burners.
- The tip is released from the socket and removed from the gas pipeline tube. The o-ring is removed from it and placed on the tube.
- Use a socket wrench to unscrew the jets counterclockwise. New ones are installed in their place.
- Carry out reverse installation. The accuracy of reassembly determines how smoothly the burner will burn.
It is easier to change modern models of gas stoves to use a different fuel. To gain access to the burner, only the grates with burners are removed. Then remove the tips and install new nozzles.
Replacing the jets in the oven is carried out as follows:
- open the oven door and the lower compartment of the device;
- pull out the floor of the oven compartment;
- unscrew the burner fastenings;
- carefully, so as not to break the thread, unscrew the nozzle (it is located on the left in a special housing);
- install a new nozzle and reassemble.
If the jet has become stuck during operation, unscrew the three fastening screws and remove the left side wall. Using a 17 wrench, unscrew the nut and move the pipeline to the side. Then unscrew the two screws that secure the nozzle body to the wall. The stuck thread is treated with WD-40 or kerosene and the nozzle is unscrewed. A new one is installed in its place and the oven is installed in the reverse order.
After replacing the nozzles, the stove is connected to a cylinder or central gas supply using a flexible connection. If the equipment is connected to a gas main, one end of the hose is connected to the gas pipe through a plumbing fitting or fitting. The thread of the drive is pre-winded clockwise. An O-ring is inserted into the hose nut. The parts are connected and tightened using a gas wrench. The other end of the flexible liner is connected to the thread of the plate outlet, using flax or fum tape for fastening.
If the device needs to be connected to a cylinder, one end of the flexible hose is connected to the stove nozzle through a fitting and secured with a worm clamp. The other end is attached to the gearbox and also tightened with a clamp. The reducer is connected to the cylinder using paronite gaskets; it must be positioned horizontally. The fasteners are tightened using an open-end wrench.
Then check the tightness of the connection. All connections are coated with a soapy solution and gas is released. If the soap does not foam, then there are no leaks. After this, the gas is lit in the burners one by one. A blue flame without yellow or red tints indicates that the job was done correctly.
Foundation
Ideally, when constructing a building, the foundation for the furnace will already be laid. Until recently, this is exactly what they did in the villages. What to do if there is no foundation? Let's build it with our own hands.
You need to dig a hole, the perimeter of which will be slightly (see 15) larger than the perimeter of the stove. The bottom of the pit is covered with sand, and the sides are reinforced. Then the concrete mixture is poured.
The concrete must harden well; up to 2 weeks are allotted for this. When working, check the surface with a level; it must be flat and strictly horizontal and 10-16 cm below the main floor. A roofing felt sheet folded in half is placed on top, then a steel sheet and an insulation bedding.
For stoves used in outdoor dachas, the foundation is not deep and just above the ground. The same applies to stoves that will be in the garden.
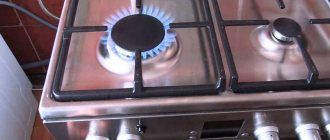
How to determine if a gas stove is working correctly
When igniting the burner there should be no extraneous sounds in the form of pops. The flame should burn evenly, its tongues should be bluish-white, it’s not for nothing that the gas is also called “blue fuel”.
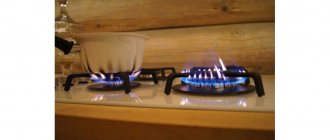
If, during the combustion of the air-gas mixture, yellowish impurities are observed, and the flames acquire a red tint, then this clearly indicates that the jets are not working properly.
Yellow and red flames are evidence of injector malfunction
When converting the stove from mains gas to bottled gas, all of the above disadvantages manifest themselves very characteristically. And plus, due to improper pressure, soot will be released. So it is difficult to notice it immediately with the naked eye, but it will manifest itself in the form of black spots on the dishes after 1-2 days of use.
Avoiding all these troubles is quite easy. It is necessary to choose the right nozzles for a gas stove when operating conditions change and conversion to bottled gas. It should be taken into account that due to the difference in the pressure of the incoming fuel, the diameter of the holes in the injectors (nozzles) will also be different.
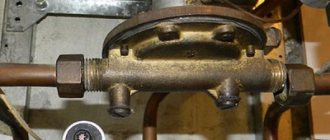
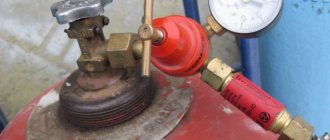
First stage. Connecting the reducer and gas hose
All modern gas stoves can be easily converted from network gas to bottled gas. You just need to change the jets on the burners and install the gearbox. The fact is that in the gas pipeline, which is connected to the houses in the city, the pressure is 0.05 MPa, and in the cylinders the gas is pumped up to 1.6 MPa. So the gearbox should level out this difference. In addition, the pressure in the cylinder gradually drops.
The reducer for a 50-liter cylinder costs RGDS-1, it is not adjustable, but this is not at all necessary at home.
Source dreammall.ru
I started by disconnecting the gas hose from the old stove and checking the connection. I cut off a few centimeters from the hose because the old clamp had already started to wear out the rubber. I connected it to the new stove, firmly inserting the hose into the fitting and tightening the clamp. Then I did the same thing at the connection with the gearbox. There, too, I had to cut off a piece of the hose, but since I have it about 3 meters, I still had some spare.
Must remember! According to the standards, the gas cylinder is installed no closer than 1 m from the stove. In addition, the hose should not be stretched.
I also had to change the rubber gasket between the gearbox and the cylinder. In general, it is recommended to do this more often.
Nozzle selection
Each gas equipment has its own characteristics, so it is important to select nozzles individually for each generation of gas equipment. Many motorists ask the question “Which injectors for LPG are better?” In the case of gas-cylinder equipment, this formulation is initially incorrect, because the proverb known to many applies to it: what is good for a Russian is death for a German
Naturally, the saying should be rephrased for gas equipment and understand that for one generation specific nozzles may be simply ideal, but not capable of working with another
In the case of gas-cylinder equipment, this formulation is initially incorrect, because the proverb known to many applies to it: what is good for a Russian is death for a German. Naturally, the saying should be rephrased for gas equipment and understand that for one generation specific nozzles may be simply ideal, but not able to work with another.
In order to make the right choice of injectors, it is enough to adhere to the following points:
- First, find out what generation your gas equipment is. This plays an important role in the selection process, because each type of gas equipment has its own injector standards. Thus, for the first generation the EURO safety standard is applied, for the second - EURO-2, for the third, fourth, fifth and sixth - EURO-3 and higher;
- Second, determine the number of injectors needed. It is worth noting that for HBO generations 1-3 it is permissible to purchase injectors separately. In the case of older versions of equipment, it is recommended to buy ready-made kits. This approach will help to avoid problems in further configuration of the equipment;
- Thirdly, check the connection method and other technical features of your LPG in relation to the injectors;
- And fourthly, when choosing new dispensers, give preference to trusted manufacturers. At the moment, they are deservedly considered Valtek, BRC, Digitronic, Rampa, Barracuda and Lomato. Moreover, the same BRC and Lomato produce their own gas equipment, so it is quite possible for their owners to avoid difficulties when selecting new injectors by telling the seller only the model of their equipment.
What is the reason for the ban on gas workers using a stove with a gas nozzle?
A ban by representatives of gas services regarding the use of stoves with gas nozzles may be due to the poor technical condition of the heating device. Or using a homemade nozzle.
This is due to the fact that there have been numerous accidents in furnaces with homemade gas sprayers. In this case, the actions of city gas representatives comply with directive materials on the safe operation of gas equipment.
If the owner uses a factory-made nozzle for reconstruction with all the necessary documentation. And the reconstruction itself to convert the furnace to gas fuel was agreed upon with Gorgaz, then in this case there should be no ban on the operation of such equipment.
Safety precautions when replacing an injector
Ensuring that replacement can be carried out safely is a critical requirement when performing gas-related activities.
Therefore, do not neglect a number of rules:
- Before replacing the jets, disconnect the stove from gas and electricity.
- Make sure the burners are cool.
- Before starting work, open windows and turn off electrical devices that may cause a spark.
- You cannot independently modify the parts of the slab or replace them with non-original ones, inappropriate in size, or made yourself.
- After installing the parts, be sure to check all gas connections for possible leaks. To do this, wash the compounds on all sides (using a brush or sponge) and, turning on the gas supply, observe whether bubbles form. If a leak is detected, the connection is either tightened or disassembled and reassembled.
You cannot use nozzles designed for gas burners of stoves of a completely different design or other gas devices.
You should not replace the nozzles in a gas stove yourself if you are unsure of your capabilities.
Purchased stoves
When planning to install a stove in a bathhouse or in a house, pay attention to the finished products. Modern stoves can be made to order, taking into account all your wishes.
It is better to entrust the installation of finished stoves to a professional. This is especially true for stoves with a gas nozzle: jokes with gas are bad and, if you do not have sufficient knowledge, you should not take the risk. A professional installer of gas furnaces will do everything quickly and efficiently, guaranteeing the reliability of the structure and its safety.
To install a stove in the country or in the garden, pay attention to ready-made structures. For example, barbecue ovens. There are a huge variety of them, starting with mini options and ending with large units. They are supplied disassembled and supplied with assembly instructions. Following these instructions, it will not be difficult to assemble and install them yourself.
Source pechinfo.ru
Product cost
Basically, all manufacturers equip new stoves with a set of jets for converting to another fuel. But if for some reason you need to purchase a separate set of nozzles, this can be done in specialized gas equipment stores. Injectors are also available for free sale on Internet resources. For your information, below is a list of average prices for jets for gas furnaces from some popular manufacturers:
| Gefest | 400 RUR |
| Moravia 1436 | 650 RUR |
| Indesit | 650 RUR |
| Hansa | 650 RUR |
| Flama | 550 RUR |
| Darina | 700 RUR |
| Ricci | 590 RUR |
From the above it follows that the operation of changing jets is not difficult and is quite within the capabilities of any person without special education. And installing the right nozzles will not only save gas fuel consumption, but will also rid the room of soot and unpleasant odors.
Construction of gas burners
There are two types of similar products:
- The first is called atmospheric.
Such devices operate by absorbing air and at the same time have a simple design.
The nozzles do not require automation or various additional devices; it is only sufficient to ensure good air circulation in the room where the stove is located.
The design of such a device may also include detectors to measure oxygen levels to prevent dangerous situations caused by low oxygen levels.
It is believed that atmospheric devices have a relatively low power , but it is quite sufficient for heating medium-sized rooms. You can also note the simplicity of the design of such units, their noiselessness and compactness.
- In turn, supercharged or blowing devices have a more complex design. The basis of the operation of such devices is the forced supply of air into the oven chamber to form a mixture on the basis of which the oven operates. Due to this mechanism, the correct ratios in the mixture are achieved.
Photo 1. A gas forced-air burner provides forced air supply into the furnace chamber, where a mixture for work is formed.
The devices are safe , since the processes take place in a confined space. They also have high efficiency rates and are more environmentally friendly devices than atmospheric burners.
Reference! If we are talking about atmospheric units, then the boilers will have open combustion chambers. In forced-air boilers, boilers have closed chambers.
Instructions for replacing stove and oven jets
Next, we will consider detailed instructions on replacing nozzles on the stove and oven.
Instruction #1 - replacing hob nozzles
Read more about what to do and how to replace nozzles on a gas stove. Since gas stove designs vary, let's look at a few of the most typical options. In the designs of new modifications, access to the nozzles is easier (just remove the burners). Other common models are of interest.
In terms of burner design, some models of Hephaestus and Darina stoves are similar. To replace the nozzles of the cooking part of the Hephaestus stove, a series of steps are performed sequentially.
Step 1. Remove the grate from the stove and dismantle all the burners.
Step 2. After unscrewing the fastening screws, remove (raise) the top panel. “Darina” has latches that are released with special stops from the stove set.
Step 3. To release the burner, use a Phillips screwdriver to unscrew the two screws securing its structure.
Step 4. Using a flat-head screwdriver, remove the retainer (bent plate) from the side of the faucet handle, freeing the tube supplying gas to the burner. Take the tube to the side.
Step 5. Detach the second end of the tube from the seat by removing the fixing plate with your fingers or using pliers (in Hephaestus) / screwdrivers (in Darin).
Step 6. In the Hephaestus stove, the end of the gas tube is connected to the nozzle through a transition cone (a sealing ring is installed on the tube under the cone). Throw a wrench (14) onto the hexagonal pad of the cone, in order to hold and not damage the tube when unscrewing, with a second wrench (14).
Step 7. Having unscrewed the old nozzle, replace it with a new one, lubricating the threads with graphite lubricant. The sealing ring is also replaced, which is convenient to do with a match. Use a 7 key to tighten.
Step 8. Reassemble the entire assembly in reverse order.
A similar operation is performed for the remaining burners of the cooking table.
Taking advantage of the fact that the upper part of the unit is opened, it is cleaned of debris and dirt. In addition to replacing nozzles, screws in the plates can also be replaced to regulate low gas flow (or low flame). They regulate the reduced gas supply, sufficient to ensure that the flame on the burner does not go out with a minimum gas supply.
Replacement procedure
For a successful replacement it is necessary to conduct a preparatory study. Within its framework, find out the following:
- what type of fuel is supported by the installed jets;
- what are the parameters of alternative nozzles for this stove model;
- what type of fuel is supplied to the gas system.
Important! Before installing new components, you need to turn off the gas supply and open all burners to release the residual volume of fuel from the system.
Burners
You should adhere to the following algorithm of actions:
- free them from all foreign objects: grates, flame “breakers”;
- remove the top panel that covers the gas supply system to the burners; it can be secured with special clamps or bolts;
- unscrew the jets currently installed in the stove;
- replace the O-ring, if provided by the manufacturer;
- lubricate the new nozzles with graphite grease, which is designed to lubricate parts exposed to high temperatures;
- screw the nozzles into their landing places, tighten with sufficient force;
- Reassemble the stove panel in reverse order.
In the oven
The principle of replacing the nozzle in the oven is identical to the process described above. The differences in the procedure come down to the difference in the design of the oven for each specific stove model and looks like this:
- provide access to the inside of the oven - open the door, remove the grill shelf, etc.;
- remove the bottom panel - the “floor” of the oven; in most cases it is not bolted, but inserted into grooves;
- find and unscrew all fastening points of the burner located under the “floor”; sometimes its fastenings are located at the bottom; access to them is through the bottom drawer of the stove, designed for storing kitchen utensils;
- After removing the burner, the nozzle will be in a position accessible for dismantling.
What is a jet?
The jet is one of the main components of a gas stove. It ensures the supply of blue fuel to the burner in sufficient volume and the required pressure. Without a nozzle, the operation of a gas stove would be impossible.
Deviations in the operation of the jets are immediately visible, they are noticeable by yellow and red flames and soot on the dishes
The shape of the nozzle resembles a bolt, in the head of which there is a passage hole. The diameter of the hole must correspond to the pressure of the supplied fuel and the power of the burner.
It must be taken into account that the pressure of the main gas and bottled gas is significantly different, therefore the diameter of the nozzle for these types of fuel will be different. The jet regulates the pressure and ensures that gas enters the burner in the required volume, equivalent to the volume of air required for the normal combustion process
The jet regulates the pressure and ensures that gas enters the burner in the required volume, equivalent to the volume of air required for the normal combustion process
To ensure the most efficient operation of the stove, eliminate the release of harmful products, the smoking factor, and normalize fuel consumption, you need to install nozzles whose dimensions and diameter of the outlet hole comply with the requirements of the gas stove manufacturer.
Types of jets and their main characteristics
Jets or nozzles with a hexagonal head, external thread and a longitudinal internal hole. The vast majority are made of bronze.
Nozzles for main and bottled gas differ in thread length and diameter of the gas supply channel, which is associated with different fuel supply pressure
There is a marking on the end part that displays information about the throughput of the nozzle. Units of measurement are the volume of gas in cubic centimeters that the nozzle can pass in 1 minute.
Jets can be of two types - for natural gas (differing in larger hole diameter and shortened body), for liquefied gas (differing in smaller hole diameter and elongated body, which is associated with higher pressure).
The pressure in the cylinder exceeds the pressure in the gas line, which explains the smaller diameter in the head of the corresponding nozzle. The power of the burner is determined by its size, therefore the diameters of the holes in the corresponding jets will be different.
The diameter of the hole in the nozzle must correspond to the gas pressure:
- Large burner - 1.15 mm (20 Bar); 0.6 mm (50 Bar); 1.15 mm (20 Bar); 0.75 mm (30 Bar).
- Medium burner - 0.92 mm (20 Bar); 0.55 mm (50 Bar); 0.92 mm (20 Bar); 0.65 mm (30 Bar).
- Small burner - 0.75 mm (20 Bar); 0.43 mm (50 Bar); 0.7 mm (20 Bar); 0.5 mm (30 Bar).
- Oven burner – 1.2 mm (20 Bar); 0.65 mm (50 Bar); 1.15 mm (20 Bar); 0.75 mm (30 Bar).
It must be taken into account that incorrect operation of the jets may not be caused by a change in the type of fuel, but by a simple clogging of the outlet. In this case, you can clean the injectors without having to replace them.
Injector cleaning technology
From time to time you have to change the nozzles or clean them. The recommended frequency of performing the procedure is once a year.
Clogged nozzles impair the quality of the flame and lead to a decrease in the amount of heat generated. In addition, fuel consumption increases, which is undesirable for owners of liquefied gas equipment. This fact will not suit homeowners with installed gas meters either.
To clean the jets you will need:
- Universal products - soda or vinegar, dishwashing detergent;
- Dish cleaner;
- Toothbrush;
- Thin wire or needle.
Work begins with removing carbon deposits, soot and grease from the area where the nozzle is located. The nozzle must be unscrewed and soaked in detergent, soda or vinegar solution.
To clean the injectors, no special tools are required; all you need is a thin wire, a toothbrush and detergent.
The outer surface can be cleaned with a toothbrush and regular household cleaning powder. The nozzle hole should be cleaned with a needle; sometimes blowing with a pump or compressor is justified.
The cleaned and dried jet must be replaced
Please note that if there is a sealing gasket under the nozzle, it must be replaced
Types and characteristics
Jets are bolt-type injectors. They have a hexagonal head slot and external threads, and are made primarily of bronze. They are equipped with a longitudinal hole. A marking is applied to the end part indicating the throughput of the nozzle in cubic centimeters per minute.
A stove that operates from a bottled fuel source should have nozzles with a smaller diameter. This is explained by the fact that the pressure in the cylinder is much higher than that used in a conventional gas network. If the diameter of the nozzle hole exceeds the permissible value, an amount of gas will pass through it that will not be able to completely burn out. This factor entails the formation of soot on the dishes and the release of harmful combustion products. A gas burner connected to the mains gas supply is equipped with jets with a smaller hole. A lower pressure coefficient in the network causes a corresponding amount of fuel to pass through such an opening.
Each gas stove comes with an additional set of jets. If there is no such thing, and the need to replace them is inevitable, you should not resort to remaking the injectors yourself by drilling out a hole.
These components are manufactured using high-precision instruments. The accuracy of the hole diameter is determined by microns, which negates the effectiveness of self-upgrade of the jets.
In order to replace the jets, you need to purchase the appropriate set of them. To find out the parameters of the nozzles required when using a particular fuel supply method and suitable for a specific gas stove model, you can refer to the technical documentation supplied with the equipment.
What is a gas jet
A jet (nozzle) is a part through which a gas-air mixture for the flame is supplied to the burner of a gas stove.
The nozzle for a gas stove has a hole of a certain diameter in the center. The diameter value (in hundredths of a millimeter) is necessarily stamped on the end (edge) of the nozzle. For example, the number 135 on the edge of the nozzle means that the hole for the passage of the gas-air mixture has a diameter of 1.35 mm.
Jet (nozzle) for gas stove
The diameter of the jets depends on the power of the particular burner and the type of gas for which the stove is set. So, we come to the questions of what nozzles are needed for, and what are the operating features of stoves depending on the type of gas supplied.
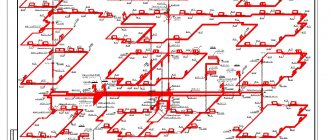
Main gas pipelines. Gas pipelines of high, medium and low pressure Glossary
The gas pipeline is an important element of the gas supply system, since 70.80% of all capital investments are spent on its construction. At the same time, of the total length of gas distribution networks, 80% are low-pressure gas pipelines and 20% are medium- and high-pressure gas pipelines.
Gas pipeline classification by pressure
In gas supply systems, depending on the pressure of the transported gas, the following are distinguished:
- high-pressure gas pipelines of category I (working gas pressure over 1.2 MPa);
- high-pressure gas pipelines of category I (working gas pressure from 0.6 to 1.2 MPa);
- high-pressure gas pipelines of category II (working gas pressure from 0.3 to 0.6 MPa);
- medium pressure gas pipelines (working gas pressure from 0.005 to 0.3 MPa);
- low pressure gas pipelines (working gas pressure up to 0.005 MPa).
Medium pressure gas pipelines through gas control points (GRP) supply gas to low pressure gas pipelines, as well as industrial and municipal enterprises. Through high-pressure gas pipelines, gas flows through hydraulic fracturing to industrial enterprises and medium-pressure gas pipelines. Communication between consumers and gas pipelines of various pressures is carried out through the gas distribution center, gas distribution center and main control unit.
Location of gas pipelines (classification)
Depending on their location, gas pipelines are divided into external (street, intra-block, yard, inter-shop) and internal (located inside buildings and premises), as well as underground (underwater) and above-ground (above-water). Depending on their purpose in the gas supply system, gas pipelines are divided into distribution, gas inlet, inlet, purge, discharge and inter-settlement pipelines.
Distribution pipelines are external gas pipelines that provide gas supply from main gas pipelines to gas inlet pipelines, as well as high and medium pressure gas pipelines designed to supply gas to one facility.
A gas inlet pipeline is considered to be the section from the point of connection to the gas distribution pipeline to the disconnecting device at the inlet.
The inlet gas pipeline is considered to be the section from the disconnecting device at the entrance to the building to the internal gas pipeline.
Inter-settlement gas distribution pipelines are located outside the territory of populated areas.
An internal gas pipeline is considered to be the section from the gas inlet pipeline (gas inlet pipeline) to the connection point of the gas appliance or heating unit.
Materials for gas pipelines
Depending on the material of the pipes, gas pipelines are divided into metal (steel, copper) and non-metal (polyethylene).
There are also pipelines with natural gas, liquefied petroleum gas (LPG), and liquefied natural gas (LNG) at cryogenic temperatures.
The principle of constructing gas pipeline distribution systems
Based on the principle of construction, gas pipeline distribution systems are divided into ring, dead-end and mixed. In dead-end gas networks, gas is supplied to the consumer in one direction, i.e. consumers have one-way power supply.
Unlike dead-end networks, ring networks consist of closed circuits, as a result of which gas can flow to consumers through two or more lines.
The reliability of ring networks is higher than dead-end networks. When carrying out repair work on ring networks, only part of the consumers connected to this section are disconnected.
Of course, if you need to order gas supply to a site or perform gasification of an apartment building, instead of memorizing the terms, it is more profitable and efficient to turn to reliable certified contractors. We will carry out gas supply work to your facility with high quality and within the agreed time frame.
Office in Minsk: Minsk, Pobediteley Ave. 23, bldg. 1, office 316AO Office in Dzerzhinsky: Dzerzhinsk, st. Furmanova 2, office 9
Conclusions and useful video on the topic
Replacing jets in a Hephaestus gas stove:
Jets are the main element of a gas stove; they are responsible for the pressure and volume of incoming fuel, ensuring optimal combustion conditions.
In Hephaestus plates, it is not as easy to replace jets as in modern models from more popular manufacturers. However, if the instructions are strictly followed, the work will not cause any particular difficulties. And any person can do the replacement; there is no need for special knowledge or special tools - just attentiveness, accuracy and observance of basic rules.
Tell us about how you changed the nozzles in the stove with the Hephaestus logo with your own hands. Share the nuances of the process that you know. Please leave comments in the block below, ask questions, post thematic photographs.
Oven options
The simplest version of a brick stove is a black stove. It got its name because when it was used in baths, it smoked very much and the washers became black with soot. The basis of the rough furnace: a stone pile, inside of which there is a niche for lighting a fire. A boiler is suspended above the stones to heat water. This design became the basis for all subsequent versions of the stoves.
In modern stoves, the boiler for water in the bathhouse is built inside. Its location can be anywhere, on top, on the side, or absent altogether, for example, if you are building a stove not for a bathhouse, but for heating a house. Fuel options have also become more diverse: since heating with wood is very expensive, in many villages a gas burner is installed in the stove. A stove with a gas nozzle is built slightly differently; in it, the burner is placed lower than with wood heating, and centered exactly in the middle.
The so-called “Dutch women” are widely used . They heat up quickly, heat the room well, you can cook with them, and, importantly, they take up little space. These mini stoves are suitable for heating small spaces.
Whatever stove you choose, the technology for constructing them is approximately the same.
How is the gas supply system organized?
Its hierarchy is determined by the classes of elements of the gas transmission network associated with the pressure of the pumped natural gas.
Principles of gas pipeline network design
The first level gas pipelines include gas communications in which the pressure of natural gas is high or medium. To eliminate dead-end sections, gas pipelines are backed up - duplicating individual segments or ringing. The creation of a dead-end network is allowed only in small settlements.
Natural gas under high pressure passes through several successive stages where its pressure is reduced. The process of reducing pressure at gas control points occurs intermittently, at the outlet of them the pressure is constant. In urban areas, gas communications with medium and high pressure levels form a hydraulically connected common network.
The use of hydraulic fracturing makes it possible to supply consumers with gas of different pressures, even if they are located on the same street - gas pipelines of unequal pressures are placed in parallel.
Second-level gas pipelines provide low-pressure gas fuel supply to the majority of consumers. Such networks are mixed, with a predominance of dead-end segments. Only the main pipelines are subject to ringing.
A low-pressure gas pipeline should not cross large man-made (highways, railway tracks) or natural (lakes, rivers, ravines) barriers. Installation of such communications in industrial areas is not allowed.
Gas networks supplying fuel at low pressure cannot form a hydraulically connected system for a large population center. They are designed exclusively as local complexes fed by several hydraulic fracturing units.
In turn, connected to medium pressure networks, which in turn, by analogy, are connected to high pressure mains. The third level of network gas pipelines is used at consuming facilities - on the territories of enterprises, in residential and public buildings.
The pressure requirement for such networks is determined by their purpose and the performance characteristics of gas-using devices (installations). Redundancy (partial duplication) on gas communications of the third level is usually not performed.