Old buildings rarely receive the attention of utility services and major repairs, especially since they are definitely not in danger of reconstruction for a long time. But you want warmth at any time, so overgrown radiators are often replaced or expanded on their own, having previously coordinated their actions with certain authorities. Replacing radiators on gas welding is not a long and dirty process and can be done in a matter of hours.
Changing radiators correctly
Radiators are legal
Before talking about obsolete cast iron batteries and the urgent need to replace them, I would like to touch on the legal side of this issue. If in his own domain the owner is free to modify heating devices every season, then residents of state-owned high-rise buildings are deprived of this pleasure. This is not surprising - the interweaving of communications contributes to a close relationship and the same dependence of apartments and their owners on each other.
To ensure that your intentions to replace the radiator of the last century with a technical innovation are not perceived as an attack on the personal safety of your neighbors, you should strengthen your actions with a regulatory framework.
So, in connection with the replacement of heating devices, the following questions arise:
- How not to upset the heat balance at home?
- Who owns the heating devices in a particular apartment?
- Where can I contact regarding dismantling, replacing radiators or changing their power?
- Who has the right to carry out such work?
Briefly on each issue, the concept of heat balance can be expressed by the formula heat input = heat loss, subject to which the optimal temperature is maintained in the building. An increase in the heat-transferring surface of the batteries and their configuration can “snatch” a large share of the heat from the central line, depriving the neighbors.
In a multi-storey building, all consumers are connected, so it is better not to engage in amateur activities
On the issue of ownership, heating appliances located in apartments are included in the common or collective property of the house. It is logical that any changes in this direction should be discussed at a general meeting of the owners of this house in accordance with Art. 44, 46 Housing Code of the Russian Federation.
According to Order No. 37 of the Ministry of Land Construction of the Russian Federation dated August 4, 1998, replacing a radiator in an apartment is considered a completely legal procedure and does not require permission. Control by the service organization is considered mandatory, which has the right to legally force the owner to dismantle the extra sections if they were added without permission.
If the people's council is not against it, the owner of the apartment can take up the renovation, but with the help of the appropriate organization. The issue of the identity of the new radiators with the old ones, their relocation, and also the change in the number of sections is subject to agreement. The progress of work is also controlled by the service organization.
The work can also be carried out by third parties, but they must have a certificate confirming that their heating devices comply with current requirements
Note! It is logical to carry out such work shortly before the onset of the heating season. This will give you the opportunity to test the tightness of the connections and have time to eliminate leaks before putting the system into operation.
Installation of equipment
After marking the surface, the fasteners are mounted, so that there is a gap of 40 mm between the battery and the wall. Then you can proceed directly to installing the battery, or you can do this after installing the pipeline.
For the system to work, water circulation must be ensured through the installation of pipes. It is important not to change the established power and volume indicators so that they correspond to operating conditions. As a rule, this point is discussed at the approval stage.
To give the pipe the desired size, it should be cut with special scissors. The pipes are then secured to the system using a welding machine. Exactly the same operation is performed with the battery. When everything is ready, you can proceed to testing.
Examination
The best option is to check the functionality together with housing department employees. The equipment must ensure uniform heat distribution without any malfunctions. The last step is crimping. This procedure is carried out by house management specialists. Once the system is pressurized, it is considered ready for use.
You are your own boss - complete battery replacement
Home owners can consider themselves lucky, because they can install radiators of any configuration and choose the optimal connection method without the mercy of higher authorities.
To install the device yourself, you will need the necessary tools, some of which are very specific:
- a set of keys;
- angle grinder or grinder;
- perforator;
- lerka – a device for cutting threads;
- vertical (plumb) and horizontal level;
The photo shows a set of tools for replacing the radiator
Note! If the old battery was connected to the pipeline with a squeegee, there will be no need for a connector - using the same squeegee you can easily connect a new one.
- gas welding (as an option), however, the cost of future repairs will be higher, because simply disassembling the connection will not work.
Threaded connection
To begin with, of course, you will need to dismantle the old heating battery (we assume that the drains are in good condition):
- On the upper and lower connections, screw the locknuts to the beginning of the thread.
- Use a plumb line or level to mark a vertical line on the pipe, leaving at least 1 cm of thread.
- Use a grinder to cut the pipes along the marked strips.
Pipes are cut with a grinder along the marking line
Note! If the cuts on the pipe are crooked, then connecting a new battery to them will become impossible.
- Remove the burrs by running the locknut over it and straighten the cut.
- Remove the radiator.
- Remove the brackets.
Having cleared the workspace, the second stage begins - directly replacing the radiator in the apartment:
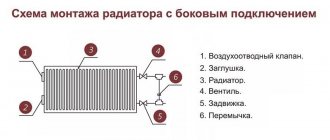
- Install taps with detachable connections on the pipeline connections, using tow as a sealant. The thread is painted with paint (not water-based), tow is wound clockwise from the edge, painted again and the tap is screwed on.
- Fittings for rubber/paronite seals are screwed into the internal threads on the battery body (2 pieces on each side).
Set of footwear
Note! It is better to buy a set with through nuts so as not to get confused about the types of threads.
- Install American connectors where the radiator is connected to the pipeline.
- Install the Mayevsky tap on top, and the plug on the bottom.
- Raise the device, aligning the future connection points of the tap with the American one. For stability, you can place a wooden block or brick down.
- Mark the locations for the brackets.
- Remove the battery and secure the hooks in the wall.
- Hang the heating device and check that it is horizontal with a level.
Installation is coming to an end
- Tighten the nuts of the detachable connection with an adjustable wrench.
Welding connection
Such a connection is considered more reliable than a threaded one for several reasons:
- Resists high pressure well;
- High degree of tightness;
- Does not require sealants;
- Aesthetic appeal.
Note! Work with a welding machine should only be carried out by a qualified specialist with permits. If the work is carried out in an apartment, then before replacing the radiator using welding, you must obtain special permission for this.
It is not worth reminding that before starting work, water is drained from the system, and the further scenario is in many ways similar to the previous one:
- Remove the old heating device.
- Pack it - seal the threads, tighten the nuts, install the American ones, put the Mayevsky tap in place.
- Secure the device and connect it with the American connection to the eyeliner.
- Bring the heating pipes to the riser and connect them by welding.
Welded joints are highly durable
Preparatory work
It is advisable to carry out any work as quickly as possible, and this is only possible with proper preparation.
In case of replacing the battery in advance:
- agree on the date of work with the craftsmen and the management company;
- buy radiators that are suitable in design;
- prepare tools and consumables: bends, fittings, taps, thermostats, working tools.
It is important to select the right components for the upcoming operating conditions.
Selection of radiators
A typical heating system for a private home is designed for a maximum pressure of 3 atm and rarely more.
Adjustable spring safety valve. Most often used in individual heating systems.
If it is exceeded, the safety valve will operate (the inscription 3 bar is visible on the lid). Based on this, almost any commercially available radiator is suitable for individual systems.
For apartment buildings up to 6-7 floors, you can choose steel, bimetallic or cast iron radiators. Aluminum products are not suitable even for 5-story buildings - the coolant in centralized networks is not suitable for such devices. In houses above 9 floors where the pressure in the system is much higher, you cannot use aluminum, cast iron and some types of steel convectors; it is better to choose bimetallic radiators.
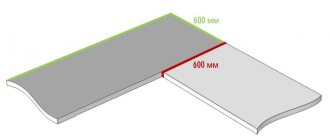
Center distance of heating radiators.
The center-to-center distance is taken into account when using a diagonal connection diagram; in this case, there is no need to adjust existing pipes.
The most effective is a diagonal connection.
An example of a diagonal connection of a heating radiator.
In the wiring of apartment buildings, the center distance is usually 300, 350 or 500 mm. Based on this, radiators are purchased.
In any other case, pay attention to the dimensions of the old and new radiators so that it is possible to bring the pipes to the right places.
How to actually choose the cheapest heating radiators on the market
How to choose steel heating radiators Design, selection criteria and best models
Necessary tools and consumables
The set of devices for carrying out the work depends on the connection method, the type of old and new convectors.
You may need:
| lever wrench, for unscrewing/tightening large nuts, as well as for holding a steel pipe if you need to cut a new thread | |
| an angle grinder (grinder) for cutting pipes from a battery that could not be removed by unscrewing the nuts | |
| ratcheting die with a die of the required diameter for cutting threads on steel pipes | |
| gas welding machine, if it is necessary to weld corners and bends of metal pipes | |
| hammer drill for mounting brackets | |
| laser or bubble level | |
| tape measure, pencil | |
| flat container for collecting coolant |
For installation purchase:
- plumbing flax (recommended) or sealing tape (FUM) and plumbing paste (optional);
- gaskets of the required size.
Required installation products depending on the type of radiator:
1. American – (quick-release threaded connection).
2. Shut-off and control valve (automatic thermostat)
3. Radiator valve (manual adjustment).
Important! Conventional ball valves cannot be used to regulate the flow of coolant. They are designed to operate only in the fully open or closed position.
Replacing sections
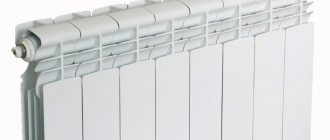
A remarkable property of aluminum sectional heating devices is their design - sections, the number of which can be changed, reducing/increasing the heat transfer area. The metal itself is lightweight, which significantly reduces the effort during installation work.
Adding or replacing an aluminum radiator section will require the following tools and materials:
- Radiator key.
- Radiator gaskets are pipes with double-sided threads.
- Paronite/silicone gaskets.
Note! Do not replace special gaskets with any others to avoid leakage.
In the photo - nipple and gasket
It is better to install the segments on a horizontal surface, placing the device “facing” you:
- Remove the plugs from the connecting holes at the ends.
- Place a gasket on the smooth part of the nipple.
- Screw the nipple 2-3 turns into the manifold.
- Using light pressure, align the section to be added with the nipple.
- Use a wrench to tighten the nipple - its right-to-left thread will tighten both parts of the battery. It is necessary to tighten both nipples in turn and by the same number of turns to avoid distortion.
The proposed instructions remain the same for all types of sectional radiators; you only need to take into account the characteristics of the metal from which it is made. So, when replacing a cast iron section, it is especially important to tighten the upper and lower nipples evenly. The fact is that cast iron practically does not work in tension, so microcracks can form through which water will leak during operation.
Note! To avoid possible leaks, do not sand/file the surfaces to which the seal will be pressed.
The radiator is being assembled
Prefabricated radiators are advantageous in that they allow you to simply replace a failed section. But in the case of solid heating devices, replacing the radiator core is impossible; you will have to buy a new heating device.
Tools
To properly disassemble a bimetallic battery, you will need a nipple wrench. It cannot be purchased in stores, but can be obtained in the following ways:
- A local market that sells used tools and other useful plumbing supplies at an affordable price.
- Go to the workshop and ask for a tool to rent.
A nipple wrench is an iron rod with a spade-shaped head on one side and a hole on the other.
Nipple key
It is important to prepare the tools, then remove the battery correctly. In accordance with its type and condition, the following is required:
- adjustable wrench, a set of wrenches of different sizes;
- grinder, autogen;
- hammer;
- construction hair dryer;
- chisel.
When the tools are ready, you can begin preparing the work site. Do this on the floor, on a sturdy table, taking into account that dirty water will flow from the radiator.
Economic efficiency
Replacing heating batteries yourself is not only simple, but also very profitable.
Specialists highly value their work, of course, prices greatly depend on the region, the complexity of the work and the specialist’s requests, but on average they are:
- connecting the battery will cost about 500-600 rubles (this is only for the supply), connecting the return will also round up the cost to 1000;
- It’s unlikely that anyone will undertake to dismantle an old cast-iron battery for less than the rate of 10 sections/200 rubles . Installing a new one will cost more - approximately 10 sections/400 rubles;
- installation of lightweight bimetallic radiators will cost approximately 250-350 rubles (this does not take into account its connection to the pipes of the heating system).
Replacing batteries is not the cheapest service
Note! Sometimes stores offer free removal of the old battery and installation of a new one. This is a good way to save money.
Connection errors
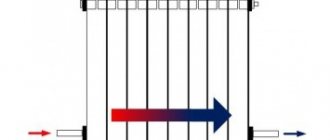
The biggest connection error is the feedback circuit. The correct scheme is to bring the coolant to the upper inlet and remove it from the lower part of the pipe. When the tape changes direction, the heating power is halved. A professional plumber will not make this mistake; this is a common problem with self-assembly.
Possible mistakes
Another important cause of errors is the removal of air pockets. The process involves tilting the pipe. The hot water supply line should be directed to an expansion vessel where air can escape. The slope of the return pipe must be directed into the boiler. At the end of the return, a drain pipe is installed to remove the refrigerant from the heating system.
Summarizing
Replacing radiators is a completely feasible task for anyone, even a non-specialist. To do this, you just need to follow the proposed recommendations (and do not forget about the legal side of the issue - for residents of multi-storey buildings). The result will be no different from the work of a specialist, and an additional bonus will be the savings of several thousand rubles.
The video in this article shows the process of replacing a cast iron radiator.
Did you like the article? Subscribe to our Yandex.Zen channel
Sample documents
As mentioned earlier, the citizen will have to write an application to the Housing Office. The form of the document is not established in current legislation. Therefore, it is permissible to write an application arbitrarily. However, it is important to follow generally accepted business practices. Experts advise reflecting the following information in the document:
- information about the organization to which the appeal is sent;
- personal data of the applicant and residential address;
- document's name;
- a statement of the specifics of the situation;
- a request made to the institution;
- date of document preparation and signature.
Handwritten paperwork is acceptable. The signature is affixed by hand. Having received an appeal, representatives of the authorized body are obliged to respond. If the decision is positive, it is permissible to turn off the heating.
Why is this necessary?
But really, why change heating appliances?
This is practiced in the following cases:
- If the heat transfer of the old device is not sufficient to maintain normal temperature in the room during the peak of cold weather. The temperature in different rooms of the apartment is regulated by the current SNiP and must be at least:
| Room | Temperature, C |
| Living rooms | 18 |
| Living rooms in regions with the coldest five-day temperature -31C and below | 20 |
| Kitchen | 18 |
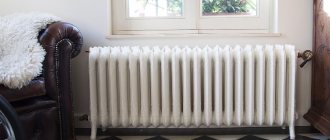
- If corrosion or erosion by suspended matter contained in the coolant makes further operation of the device impossible. The most typical in this regard are Soviet-style plate radiators: after 7-10 years of operation in the heating circuit, they begin to leak en masse.
- If the appearance of old batteries does not fit into the design of the room.
The old convector in the photo clearly will not decorate the room.
Let us clarify: the problem of appearance is solved by installing various boxes and screens. However, they significantly reduce the heat transfer of batteries, limiting the movement of convection currents.