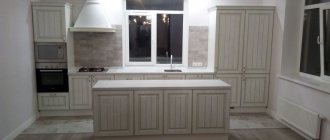
The shape of the kitchen set may be different. Straight models are placed along the walls; this is the easiest option to install. L-shaped and U-shaped options are more difficult to install. It’s not difficult to secure cabinets and shelves, but the table covering has to be joined together to create a single piece. Let's figure out how to connect the tabletops to each other so that it is invisible and lasts a long time.
Corner joining of tabletops
The corner tabletop can be made in two different versions, which fundamentally affect the joining of the tabletops.
First option . This is a corner tabletop without a segment. That is, two sheets of countertops are taken and placed on the kitchen cabinets at right angles.
Easy docking
The second option for rotating the tabletop is rotating through a segment. It is more bulky and is done if the kitchen furniture includes a corner kitchen cabinet.
Tabletop segment
pros
- Aesthetic appearance . The main advantage of the euro saw is what the kitchen looks like after it. It takes on more expensive features, and quality work will immediately catch your eye. Of course, even small gaps will not go unnoticed, so you will need the help of a professional.
- Easy to care for . It will be a pleasure to care for a kitchen surface that is connected to the correct technique. Due to the fact that there will be no gaps at the joints, dirt and grease cannot accumulate between them, which greatly simplifies kitchen maintenance.
- No dampness . When installing the countertop, a sealant is used, which provides protective properties to the joints, preventing moisture and microbes from entering there. This way there is no dampness at all.
- Smooth surface . Achieving this is not at all easy, especially if you perform Euro sawing on your own and without experience. But a high-quality connection at a professional level will make the kitchen surface smooth.
- No edges . With a high-quality euro-sawing, the edges will not be visible, especially if the work was done on a dark-colored kitchen surface.
Joining countertops at an angle without a segment
The joint of the tabletops should be tight, with a minimum gap between the ends of the tabletops. This is difficult to achieve if the end of the tabletop has an oval and rounded front edge.
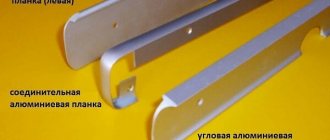
A simple option is to use a special corner connecting element. It costs about 170-190 rubles and quickly solves such a connection.
A more aesthetic option, with the claim to create a single surface of the tabletop, is an option called “euro saw”. It is suitable for chipboard countertops with any front edge.
Preparation of tools and materials
To simplify the work process and achieve the desired result, you need to prepare the following tools and materials:
- Drill;
- Hinges and Euroscrews;
- Sealant;
- Template for washing down;
- Router with cutters;
- Jigsaw;
- Furniture jig for drilling;
- Screeds;
- Ring.
You may also need other tools, such as screwdrivers and a variety of wrenches.
Docking with a segment
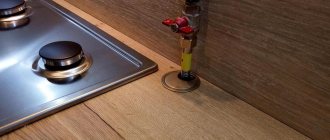
A tabletop segment is essentially the top table for a segmented base cabinet. The standard dimensions of the segment are 900 by 900 mm, with a width of 600 m. Along the front, the edge of the segment can be straight or semicircular.
Related article: How to visually enlarge a small kitchen
Since the ends of the joining of the table tops are sawn off smoothly, wood glue is used for joining. If such fastening seems insufficient, use special metal connectors for countertops (see photo).
By the way, similar parts are used for household trimming of countertops.
Let's sum it up
So, we found out how to join a wooden tabletop. As you can see, you can perform this operation yourself. However, no matter what kind of countertop connection is used (with or without strip), it is important to take measures for waterproofing. No moisture should be allowed to penetrate between the ends. Otherwise, the service life of such a structure will be short. By connecting the table top with ties according to the rules, you can get a durable and wear-resistant structure. The service life can be more than ten years. When connecting the tabletop with a strip one and a half millimeters thick, the aesthetic characteristics of the structure deteriorate slightly. But thanks to this bar, the gap is closed, and the structure itself does not bend.
Joining tabletops through a connecting element
You can join chipboard countertops through a connecting element. To connect the tabletops through a special connecting element you need:
- Treat the open cut of the tabletop with acrylic sealant to prevent water penetration. The sealant is applied with a rubber spatula in one or two layers.
- The connecting element is attached to one of the ends of the tabletop. To protect against water ingress, sealant can be applied to the element shelf before fastening.
- The second tabletop can also be sealed (video 2).
- If necessary, the tabletops are pulled together (video 1).
Sequence of work
Before you start assembling it yourself, it’s worth watching a video and photo of the euro-cut tabletop, which will help you understand the details of joining the slabs.
When buying a tabletop, you need to choose the length of the slab with a margin, since after a successful connection it needs to be cut. The first thing to note in the work is the uniform arrangement of the main elements.
Throughout the entire assembly process, care should be taken to ensure that both tabletop slabs are strictly horizontal and remain at the same height. When connecting elements with special ties, it is worth pre-fixing all parts involved in the work.
The docking procedure itself can be divided into several stages:
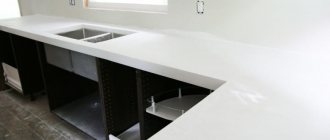
- Appropriate cuts are made on both parts of the tabletop using a special template. After this, the slabs are joined together and the quality of the future joint is checked. If the result is satisfactory, you can proceed to the next step. If necessary, the slabs are adjusted to the desired size by cutting off the edges.
- Next, using a router, grooves for the screed are cut out on both halves. It is important to follow some rules; the depth of the finished grooves should be more than three-quarters of the thickness of the tabletop. After cutting, you need to check the practicality of the grooves by inserting ties into them. If everything is fine, you can proceed to sealing.
- Before the joint is finally formed, the edges of the slabs are coated with a special sealant (most often it is silicone with adhesive properties). This will protect the connection from moisture. After applying the composition, both halves are joined and pulled together.
After all the procedures performed, it is necessary to wait until the sealant has dried and carry out final processing and cleaning of the surface.
Using sealant
Countertop sealant is useful in situations where you need to join two different materials. This can be porcelain stoneware or ceramic tiles as a backsplash, as well as solid wood, MDF or laminated chipboard as a countertop.
Only if silicone sealant is used, then the order of work will be different.
The first step is to install the kitchen unit. I told you about the features of self-assembly, and also gave the main points for carrying out such work. Next, the countertop is installed. In fact, the set and the tabletop are assembled at the same time.
When the assembly of these elements is completed, you can begin to lay the tiles on the apron. Yes, some may find this option not entirely convenient. But otherwise you will have to install a regular baseboard. If you don’t want to see it in your kitchen, you will need to follow different rules.
It is also interesting that on thematic forums there are often recommendations for the use of automotive sealants. Those that are used when installing glass. These are transparent and high-strength compounds.
These words have their own logic, as well as a pattern. This is a durable sealant. It is capable of supporting the weight of a heavy windshield. Over time, it does not allow it to come off. The connecting properties of the composition are excellent. Plus it's transparent. No traces will be visible.
And the most important thing. This is the level of protection against moisture. Automotive sealants used when installing glass do not react with water and are not destroyed by moisture. So it turns out that auto sealant can perfectly help you in resolving the issue of abandoning the usual baseboard on the kitchen countertop.
What is Eurobutt
Euro-sawing is one of the methods of hidden joining with the preliminary creation of a pattern. The work uses a milling machine. The manufacturer, in an effort to save money, performs the work on a cutting table.
The price is getting lower, but the quality still needs to improve. The difference in the height and radius of the ends reaches a millimeter or more.
It is almost impossible to disguise such a seam. If a manufacturer or seller unjustifiably reduces the price of a countertop, you should take a closer look at it.
It is possible that for the next 5-10 years you will have to admire not the smooth surface, but the jagged and uneven joints visible from afar.
If the ends are processed properly, a drawing is drawn up in advance, a pattern is developed, the surface will be almost uniform and smooth. The width of the gap will not exceed tenths of a millimeter. It will be difficult to find it on a dark or bright stove no matter how hard you try. The main condition is the use of a milling machine, not a cutting machine, and new patterns.
Disadvantages of Euro saw
Everything is clear about the advantages of the Euro junction. The owner receives a perfectly smooth surface without nicks, cracks, or discrepancies. But do not forget about the disadvantages:
- The tabletop is given a certain shape. You won't be able to change its configuration depending on your mood. It will not be possible to rearrange the set along another partition. Even laying a new apron won't help. The exception is absolutely identical walls;
- partitions and apron should be smooth, corners should be correct. Otherwise, the slab will not adhere closely to them. It will not be possible to eliminate the gap by moving the furniture. A small discrepancy is masked by the cornice, a large discrepancy will be visible.
Attention is paid to the alignment of the walls if the set has the shape of the letter “P”. A lot of time and money are spent on eliminating gaps.
If the walls have significant unevenness and it is not possible to obtain smooth surfaces, choose other types of joining parts that are not so demanding on the environment, for example, using an aluminum profile and silicone sealant.
The advantage of this joining method is water resistance. This is important when installing a sink.
And after 10 years the surfaces will not swell and will retain their original appearance. Eurozapil is not the best option for rooms with high humidity.
Expert opinion
Mikhailova Maria Vasilievna
Furniture store manager. Knows everything about comfort and interior design
Plastic or acrylic are not afraid of water, but chipboard or MDF will swell very soon. This can be avoided by treating the ends and cuts with plumbing sealant before assembly.
Trapezoid - the best way to design a corner
Important : making a trapezoid yourself without sufficient experience is almost impossible, and factory modifications are expensive. But this is practically the only acceptable way to design and develop a working angle.
Doing Euro-sawing at home with your own hands, as experts say, is possible, but only if you have the necessary tools and the appropriate skills. Installing an aluminum profile is a simpler option.
No professional skills are required for installation. The main thing is not to rush, look at different methods of joining.
Before cutting an expensive slab, make a model from cheap material.
If you don’t want to have protruding elements on the work surface, you’ll have to work on a Euro joint or cut. On one of the parts to be joined, the end is processed, on the other, the longitudinal edge is processed. The main problem is that the seam is not even, there is a corner with a smooth rounding. For a strong connection, the sections are covered with a layer of sealant, preferably colorless.
Important : if you are planning a tabletop with curves, it is better to initially purchase parts with a ready-made cut. Refinement is always more difficult; you will have to spend time looking for a good specialist who can work according to patterns and templates.
Dimensions
The thickness of the plank is directly related to its other dimensions. Here is an approximate correspondence for several models:
- with a thickness of 38 mm – width 6 mm, height 40 mm and length 625 mm;
- with a thickness of 28 mm – width 30 mm, height 60 mm and depth 110 mm;
- with a thickness of 26 mm - 600x26x2 mm (products with a thickness of 40 mm are practically not mass-produced, and they must be purchased to order).
Disadvantages of Eurosaw connection
The positive side of the euro saw is its smooth surface, on which the joint is not visible.
There are also disadvantages, they are few, but they are quite noticeable. Eurozapil is a lock that requires a clearly defined arrangement of parts of the tabletop; they cannot be moved.
Placing a headset with a top panel requires an absolutely flat wall and correct angles. If the walls are uneven, then the countertop will not adhere to it, and there will be a gap between it and the wall.
Expert opinion
Mikhailova Maria Vasilievna
Furniture store manager. Knows everything about comfort and interior design
It cannot be closed by changing its position. You will have to cover it with a table plinth.
If the curvature is significant, then the gap will still remain. You'll have to level the wall.
If you plan to install a set with the letter “P”, then the curvature of the walls will disrupt the arrangement - there will be gaps along all the walls.
In this case, small irregularities will have to be covered in this way: the installation is carried out as close to the wall as possible, and the surface should be worked on separately. The gaps in it will have to be sealed with special planks, and the sides adjacent to the wall will have to be filed down.
Therefore, in addition to the question of how to connect a tabletop without a joint, you can immediately figure out how to quickly make the walls straight and even.
For a kitchen with uneven walls and corners that are far from correct, it is better to make a connection using a different type of connection.
How to screw legs to a table?
There are many ways to attach furniture supports to a table:
- Using surface plates.
- Using driven bushings (T-nuts).
- For screws.
- Through wooden clamps.
- Using Z-shape holders.
- Using 8-shaped clamps.
- On spacers with grooves.
- With zip ties.
You can attach the legs to the table yourself in various ways. Below are some of the most common mounting methods.
Attaching the legs to the tabletop using plates
Surface plates are mounted on each of the four sides on the inside of the tabletop. To attach the leg to the plate, the kit includes a threaded pin and a mating part – a bushing nut. It needs to be screwed into the upper part of the leg.
The legs can be attached using plates. To be safe, it makes sense to apply glue inside the hole before screwing the bushing into the wood. Installation is carried out by sequentially screwing the pin into the nut, and then screwing the support to the plate.
Before screwing the bushing into the wood, glue can be applied inside the hole.
Using T-nuts
Another option for a pin connection, only using driven bushings. This method is suitable for countertops, the surface of which will subsequently have an additional coating, since the sleeve is driven in from the front side, so that the counter part is accessible from the back.
These T-nuts are also used to secure the legs to the table. Otherwise, attaching the legs to the tabletop follows the same principle as with the mounting option using plates.
The fastening process is the same as in the case of plates.