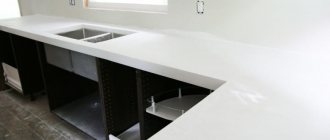
How to install a countertop in the kitchen with your own hands: step-by-step instructions
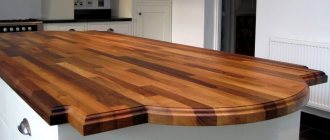
You can independently install a canvas made of artificial stone, MDF or chipboard. It is better not to use other materials due to the rather complex installation, which requires certain skills. The installation is approximately the same and includes several steps.
1 step. Preparatory work
They begin with fitting and adjusting the slab or slabs, if they are intended to be joined. Alignment is carried out along the facade of the cabinet. The tabletop should protrude in front of it by 30-50 mm. This is done in order to protect the facade from splashes and drops flying from above. Taking this into account, measurements and markings for trimming are carried out. It is optimal to carry out the latter in two stages:
- We make an oblique cut. This is necessary so that the edge of the slab pressed to the apron is parallel to the facade. Cut off the excess using a hand saw or electric jigsaw. In the second case, some experience will be required, since the board is thick and it is difficult to cut it at a right angle. If your hand slips, the material may be hopelessly damaged. It is optimal to leave a small allowance and process it with a belt sander. To ensure that the cutting line is smooth, we use a guide rail.
- We trim the edge to accommodate the unevenness of the wall. We make recesses for pipes, protrusions, etc. If there are bumps on the vertical surface or the tile has a pronounced relief, additional trimming or sanding will be required if the unevenness is small. Using a thin marker, mark a line on the board along which the cut will go and very carefully perform the trimming.
We prepare fasteners for the base. They fix it to the box, which will prevent possible displacement. These are steel corners, which are attached with one side to the bottom side of the stove, and the other to the side wall of the cabinet. Their fastening depends on the material. Self-tapping screws are used for wood boards and boards. They secure the brackets. They are glued to the composite or stone.
To do this, we clean the areas where the parts will be installed and then degrease them. We take a suitable two-component glue, apply it to the surface of the corner and press it firmly to the surface. We wait for the composition to dry, which will take an average of 24 hours. After this, you can begin installation.
Step 2. Joining fragments
Necessary only for prefabricated countertops, more often for corner ones. It is assumed that there are two or more fragments that need to be connected into a common canvas. Regardless of the material, ties are installed at the joint area. It is advisable to prepare areas for their installation in a workshop; it will be easier to carry out drilling and milling there. The fragments are trimmed so that they can be joined.
If you are working with a fabric coated with polyester or acrylic, the connection can be made without an additional profile:
- We process the ends of the parts with glue.
- We connect the elements, lay and tighten the ties.
- Remove excess glue.
- After the composition has dried, polish the joint. It becomes almost invisible.
- We reinforce the seam with an overlay strip on the reverse side.
For chipboard, MDF, etc. An aluminum docking strip is used. Several varieties are supplied to stores. The one that is intended for the connection being made is selected.
- We treat the end areas with silicone.
- Apply the strip and align it flush. We secure it on one side with small self-tapping screws.
- We connect the fragments and place the clamps in the prepared seats. We tighten them.
There is another way to join parts. This is the so-called euro saw. It involves the design of the joint area without any additional details. A pattern cut is carried out on a milling machine, which results in an interlocking joint. Its quality largely depends on the correctness of the work. You need to know that the use of a Euro saw requires precise fitting of parts and the absence of even slight curvature of the corners of the room. Otherwise, installation will not be possible.
Step 3. Installation of the canvas
Before putting the prepared panel in place, you need to cut holes for the sink, sockets, and hob. For correct marking, the easiest way is to use the template that the manufacturer includes in the packaging with the equipment. Holes are made along the marked lines. You should cut carefully so as not to damage the coating. The sections must be treated with silicone to prevent possible contact with moisture.
The stove is now completely ready for installation. It is placed on pedestals and aligned with the facades. After that, all that remains is to secure the panel. To do this, the remaining loose parts of the corner brackets are screwed with furniture screws to the side walls of the cabinets. It is advisable to do this together with an assistant who will press the plate with force during the fastening process.
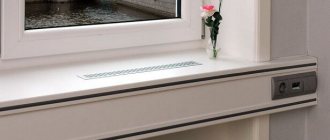
All that remains is to install the baseboard on the countertop in the kitchen. It will cover the unsightly area of the joint and protect it from moisture. You can attach the part in two ways: with adhesive and with self-tapping screws. The first one is good for stone, ceramics, etc. surfaces. When choosing it, you need to know that when dismantling the part it will be difficult to remove without damaging the base. Installation on self-tapping screws is carried out as follows:
- We take measurements and cut a fragment of the plinth to the required length. We process the edge with abrasive.
- We treat the installation area with silicone to prevent subsequent possible ingress of moisture.
- We put the profile in place and fasten it with self-tapping screws. We twist them at a distance of no more than 0.3 m from one another.
- We install the decorative trim. We insert it into the special groove until it clicks.
- We cover the joints, ends and corners with special overlays, not forgetting to additionally treat them with silicone.
The instructions on how to attach a baseboard to a kitchen countertop using glue are almost the same. The only difference will be that the profile is glued to a previously degreased base.
Installing a countertop yourself is not very difficult. If you have any questions, you can view all its stages in detail in the video.
How much should the tabletop protrude from the side?
Homo Antecessor
Group: Members Messages: 701 Registration: 10/9/2011 From: Veliky Novgorod User No.: 94021 Thanks said: 51
Reputation: 16
Installing the countertop is the final step in assembling the “bottom” portion of the kitchen. Before installing the tabletop, all lower drawers must be in place, connected to each other with ties or self-tapping screws. Approximately level. The final leveling is done with the tabletop secured.
Sometimes it is convenient to make cuts for the sink in a loose countertop. Hidden cuts must be coated with silicone sealant, otherwise it will swell. The corner connection of the table tops is made using a special corner connecting strip (its profile must be matched to the front end of the table top) or a Euro saw. In both cases, the connection should be carefully treated with sealant. As a rule, there is usually a sink in the corner, and the result is increased humidity, which leads to damage to the countertop.
Cabinet for hood in kitchen interior
The cabinet for the kitchen hood performs a number of functions.
- Reliably camouflages the massive structure.
- Fits harmoniously into the interior thanks to the identical facade design.
- Reduces noise levels.
- Free areas of the internal volume of the product are used for storage.
The location of furniture with a built-in exhaust device is always located above the hob or stove.
Mistress's height
The question of how far the kitchen countertop should protrude is extremely important, but we should also not forget about the height of the stone structure. For a long time it was believed that in this case it is best to stop at around 85 cm. This standard was popular in the 50s of the last century.
Practice has shown that in our time such norms are no longer relevant. And all because the height of the average woman has increased. A height of 85 cm will be comfortable only for housewives with a height of 165 cm. If you are taller, then fatigue cannot be avoided during long-term work (the spine receives a strong load).
Try a simple experiment. Bend your arm at a 90° angle. Measure down 15 centimeters. It is at this height that the ideal working surface for you should be.
Tabletop width
The standard width of the tabletop is 60 cm, the standard width of the cabinets is 52 cm. Even if the tabletop hangs 2 cm in front, it turns out that 6 cm will hang aimlessly behind the cabinets and, thus, reduce the kitchen area (the actual space where people walk). Does it make sense to cut off this extra 6 cm (or 5)? The walls are perfectly flat at 90 degrees, tiled, there is no baseboard. Can tabletop trimming be done at home? Is a jigsaw suitable for these purposes?
52cm cabinet, about 2cm front, 0.5cm chipboard, the rest will stand out. But, it didn't flow as much as it seems. There is no need to saw anything. You can't cut it off smoothly with a jigsaw.
Int wrote: standard cabinet width is 52 cm
depth! base, standard -560mm, in some models 555mm, placed close to the wall
Int wrote: Does it make sense to trim off these extra 6 cm (or 5)
there is no need to cut anything, you need to put the bases 560mm from the wall, there is a distance left for communications at the back if you cut it, the oven and cooking will not fit.
My cabinets are 52 cm deep + 1.5 cm fronts. There is no cooking or oven and there never will be. The communications are all in the wall and DO NOT INTERFERE with the installation of cabinets at a distance of 0 mm from the wall (i.e. close) - that’s how it was INTENDED. And now I don’t understand why I need an extra 6 cm of countertops if I don’t really need them. I want the cabinets to be TIGHT against the wall.
What about the sink? Won't it happen too?
Int wrote: Even if the tabletop hangs 2 cm in front, it turns out
Usually they make 30 mm at the front without a facade, make 40 mm and saw off the rest if you can manage it straight.
aksa wrote: What about the sink? Won't it happen too?
There are different types of sinks, the smallest we cut into a 500 mm countertop.
aksa wrote: What about the sink? Won't it happen too?
The sink fits perfectly into the cabinet (i.e. 52 cm.) Overall size: 465 x 485 mm Bowl size: 400 x 365 x 146 mm If you mean communications under the sink, then they come out of the wall perfectly and go straight into cabinet, with the condition that the cabinet is close to the wall. I don’t really need the communications to be somewhere behind the closet so that I can’t get to them normally.
Chepik wrote: saw off the steel if you can straightly.
Is a jigsaw suitable for these purposes? Table top 3 cm thick.
The problem is that the walls are uneven. and if you cut off the tabletop, there may not be enough space for bedside tables. For example, if I move the tabletop to the wall, the bedside tables stick out 1 cm beyond the edge of the tabletop! and therefore I had to put a wooden block under the baseboard. so whether to trim or not will be visible after installing the kitchen. I wouldn't, it's not that big of a savings.
Is a jigsaw suitable for these purposes? Table top 3 cm thick.
It will do, don’t be afraid to saw it. Here on the forum there was information on how to cut chipboard, take a look, it might be useful.
If there is no baseboard, then I would not recommend it. Although, what would it be like without a baseboard? Crumbs, won’t water get into the joint?
CHIZHA wrote: If there is no baseboard, then I would not recommend it
What baseboard? I meant the baseboard between the wall and the floor. There will naturally be a plinth between the wall and the countertop. It is attached to the countertop with self-tapping screws on top, am I right? Those. there is no need to allocate space for it.
electrovovik wrote: the bullshit is that the walls are uneven.
Some are uneven, and some are perfectly even, as I did it myself.
electrovovik wrote: if you cut off the tabletop, there may not be enough space for the bedside tables.
Tabletop 60 cm deep, bedside tables 52 cm + 1.5 cm fronts. This is how you need to cut it off. We do not consider the case of complete imbecility
If there is a plinth on the tabletop, then feel free to cut the tabletop, it will hide the uneven cut. A regular jigsaw can cut to a depth of 4 cm.
The jigsaw cuts normally, I sawed a hole for washing... but I will never be able to cut it straight with a jigsaw... Even a hand-held circular saw is not an ideal tool. It is best to do this on a cutting machine, it will be like a factory one. These are available in furniture factories and large construction stores (ours is OBI (they sawed my countertop there)). Before sawing the tabletop, experiment on a long board; if the sawing suits you, then you can try it, but only as a miner once. If you have a milling machine (even a manual one), then you can try to fix it.
(All of the above is my personal opinion and is not the ultimate truth)
fler-ter wrote: If there is a plinth on the tabletop, then feel free to cut the tabletop, it will hide the uneven cut.
Yes, feel free to cut. In this case, I don’t see any problems at all.
Int wrote: bedside tables 52 cm
520 mm + 30 mm = 550 mm, the size of your tabletop is 550 mm, or you still have to chew. The tabletop must hang over the façade by at least 10 mm. It's more beautiful this way!
Chepik wrote: 520 mm + 30 mm = 550 mm, the size of your tabletop is 550 mm, or you still have to chew. The tabletop must hang over the façade by at least 10 mm. It's more beautiful this way!
I also wanted to remind you of this
- handles protrude 30mm, total tabletop width 580mm
- It’s still more comfortable on a wide table. Pos
Pitfalls of self-installation
Those who want to try their hand at assembling furniture need to understand that only professionals can get a guaranteed good result. If this is your first experience, the result may not be the best. Those who already have the skill of working with MDF, chipboard or veneered wood have a greater chance of success. These are rather capricious materials.
Mistakes during operation can ruin them. It will be impossible to return the coating to its original appearance, which will lead to unnecessary expenses. If you intend to install a difficult-to-install panel, such as glass or stone, it is better to immediately contact professionals. Let us list the main difficulties in working with various materials:
- Natural wood. If handled carelessly, dents or chips may occur. True, in most cases they can be sanded and restored to an attractive appearance, but this is a job for a master.
- Wood boards. Inaccurate cutting will result in chips that cannot be disguised. There is also a high probability of mechanical damage.
- Stone, artificial or natural. The heavy weight of the coating makes installation much more difficult, this is especially true for the latter. In addition, without special skills it is impossible to make cutouts for the sink and hob, as well as cut the blade.
- Metal. It is quite simple to install and dock, but dents and scratches may appear during processing. However, they can be removed.
Rules for the arrangement of elements
Also, in addition to the approved generally accepted standards, there are rules and advice on the location of individual kitchen modules depending on their purpose.
For example, it would be better to install a dishwasher next to the sink; this will allow less water to spill on the floor, and it will be easier to place dishes in the dishwasher.
- There should be a minimum of 1.2m of free space at the front of the dishwasher to allow for easy loading of dishes.
- To conveniently open the oven doors down to easily pull out the baking sheet, the distance from the oven to the nearest object should be 1.2 m. If the oven doors open to the side, the free space should be 1 m, as well as the distance from the door hinges to the adjacent wall at least 30 cm - this will make it possible to open the side door by 150-1700.
- The oven should be built into a pencil case at the height of an adult’s eyes - this is the optimal height for comfortable use, as well as absolute safety for children.
- It is not recommended to place drawers next to the stove - they are not very convenient to use, and children can also use them as a ladder and climb onto the hot stove.
- A worktop space of at least 60 cm must be maintained between the hob and the sink. The oven should be combined with a pencil case or with a stove.
- Electrical sockets should be installed in a place convenient for you (away from the stove and sink) at a distance of 100-110 cm from the floor.
- When designing a kitchen, you should also leave a 3-5cm margin between the outermost wall of the kitchen and the wall.
- Typically, the lighting of the main lamp in the kitchen cannot provide normal illumination of the work area of the countertop. Therefore, it will not be superfluous to design and place additional lighting under the upper cabinets.
- A working area of 120cm long is enough for two cooks to work at this table.
- The free space in front of the drawers must be at least 75 cm for comfortable drawers.
- The hob should not be installed near a window or refrigerator; to prevent the fire from being blown out, place it at a distance of at least 30cm from the window.
If you design and arrange all the modules of our kitchen correctly, in the future they will help you save up to 30% of your time on cooking and about half the distance you walk and circle around the kitchen.
Standard sizes
When designing kitchen furniture, it is necessary to follow certain rules and maintain certain distances and dimensions:
- The working surface (tabletop) should be at a distance of 850 mm from the floor. The height was not invented casually, but in accordance with the average height of a European woman and based on working conditions while standing.
- Standard tabletop depth is 600mm.
- The distance from the tabletop to the bottom edge of the upper wall cabinets is ideally 600mm
- The depth of wall cabinets should be 300mm.
- The height of the base of the lower cabinets is 100mm. – This makes it possible to adjust the height of the legs within 10cm.
- The tabletop canopy over the facades is 30mm.
How to install a kitchen if a gas pipe is in the way (heating pipes are in the way)?
Gas pipes are not as scary as they seem. 1) Most pipes can be left as is by making cuts in the furniture.
2) In the gap between the upper and lower cabinets, you can close the pipe with a “box” made of chipboard or wall panel.
3) If the gas pipe extends to the stove along the wall and in the future will be located behind the refrigerator or oven, it is worth spending 4-7 thousand rubles. (for 2013-2014, the cost is determined by Lengaz gas workers) and shorten it. It is also possible for it to be digested higher or lower. It is highly advisable to consult with a kitchen surveyor to determine the most convenient location for a new pipe and valve:
4) If the lower bend of the gas pipe interferes with the installation of the refrigerator, order a “podium” with a height of 20-30 cm for it along with the kitchen. This way the refrigerator will stand close to the pipe, and you can store something on the podium.
5) In rare cases, the drain pipe riser runs through the kitchen. Although this may not directly concern the furniture, you may have in mind this way of decorating it. Just use your imagination:
How to install a kitchen if the walls are very thin?
After all, you want to hang full-fledged cabinets and load them with dishes. 1) you can make a mortgage, for example a beam or board during renovation, at the level of the “top” of the future kitchen.
2) if the kitchen is planned with a wall panel (apron), then it can be made from a 27mm countertop. This way the upper modules will “stand” on it, and the load will be removed from the wall.
3) You can destroy everything and build these thin walls anew - from brick or foam concrete.
How to install a kitchen on drywall?
This finishing material is very fragile, and hanging cabinets loaded with dishes are heavy.
1) When installing, use only special nylon dowels for gypsum board. It’s good if the end of the self-tapping screw also hits the solid base of the wall (concrete, brick).
Technically, it will be easier to hang a kitchen on such dowels if it is on adjustable “carbines” (“Euro hangers”), which in turn cling to the mounting rail.
How to increase the distance between fronts
In some design ideas, the opposite situation is present - it is necessary to install a set with large and pronounced gaps between the facades, which emphasize the style of the room. This solution really looks very unusual and creates a bright accent in the interior. In this case, you will have to not only calculate the distances, but also adapt the furniture frame so that gaps do not appear in the spaces.
When reducing the size of doors relative to the body, there are some things to consider. For hinged facades, they do not purchase standard hinges, but special semi-overlay hinges, which allow you to open the cabinet at half the end. The doors should also be reduced by this amount, which is usually between 8 and 10 mm.
As for the drawers, the increased gaps here do not make any difference from a practical point of view.
Dimensions of kitchen facades Source diz-kitchen.ru
Increased depth
As mentioned above, the standard installation depth (from the edge to the apron) is 60 cm. You can deviate from the rules if your kitchen is very spacious, and you know from your own experience that 60 cm is not enough for you.
As a rule, the width of the tabletop in such cases is increased by 14-16 cm. This opens up the following advantages for the housewife:
- At the standard depth, the wall cabinets are too close. Yes, they don’t interfere much, but in any case it causes discomfort. You will definitely notice this when you have to open their doors too often. Each time you will automatically move back;
- 76 cm countertops provide an expanded workspace. In the free zones you can conveniently place kettles, plates, mixers and other utensils necessary for cooking.
Our services
If you are interested in kitchen countertops in Yekaterinburg, give us a call. Keep in mind that you can install such products yourself only if you thoroughly know the technology and have the appropriate tools. Otherwise, you may make many mistakes that will subsequently be impossible to correct. That is why we strongly recommend that our clients cooperate only with professionals!
Most often they do it flush, but for some it makes sense to make the countertop protruding above the cabinets: in the kitchen you have to work a lot while standing and if the cabinets are the same as the table. at one level there is nowhere for the feet to go (just like in the bathroom, when the side is made strictly vertical), which will entail the need to tilt the body (additional load).
Besides. . If the drawers are slightly pulled out when working (for example, with spoons.. knives), then crumbs or debris may accidentally get there when cutting food, which will not happen if the cabinet recedes a little deeper into the countertop.
Hello dear friends.
Today we will talk about the depth of kitchen unit modules.
What can it be in the case of top and bottom?
So, first, let's decide where this size comes from?
And it “dances” (in the case of lower modules) depending on the size of the tabletop.
As you probably know, the width of a standard countertop is 600 millimeters. So, relative to this size, the dimensions of the upper and lower boxes are calculated.
Kitchen furniture standards and design rules
In order not to reinvent the wheel every time when designing kitchen furniture, all furniture today is created in accordance with established standards.
These standards were previously invented by trial and error and depended on the comfortable use of furniture by the consumer, as well as on the dimensions of CNC processing machines.
No matter how stylish your kitchen is, when designing it, certain standard dimensions must always be maintained, on which the comfortable operation of all work areas in the kitchen will depend.