A modern, stylish tile shower is a worthy alternative to bulky bathtubs and showers, especially for owners of small bathrooms. There is an opportunity to realize all your desires, give the opportunity to let your designer’s imagination run wild and, with a little effort, bring non-standard ideas to life. A small corner or niche in the bathroom can be turned into a comfortable and beautiful mini-zone, and the usual showering procedure can be turned into pleasant relaxation.
A tiled shower is a traditional solution that provides comfortable conditions for taking water procedures.
Which tile is best for a shower stall?
Ceramic tiles are simply the ideal facing material for a shower. Depending on the surface, it can be:
- glossy;
- matte;
- embossed;
- rough.
Options with a glossy finish will look great on the walls. They shine very effectively and shimmer in the light. Tile with various relief designs (depicting animals, flowers, butterflies, fish, birds, etc.) can be an excellent decoration for walls. The drawings can be either small or in the form of large bright panels consisting of several elements.
The tiles create a fairly aesthetic and elegant design, both in a city apartment and in a country house.
You can opt for a mosaic. It is very often used in combination with regular tiles. Using mosaics, they lay out unusual colorful panels or bright floral patterns that will help turn an ordinary shower into a unique masterpiece.
To cover the pallet, it is better to use tiles with a matte and rough surface. It will help prevent slipping on wet floors.
The choice of colors, prints and textures is purely a matter of personal taste.
When purchasing tiles, special attention should be paid to moisture absorption and wear resistance. It’s better not to save money and choose high wear resistance. Another very important addition: it is better to cover the shower tray with tiles with the least moisture absorption. All information about the product is indicated on the packaging.
The finishing must not only be beautiful, but also meet certain requirements.
Installation of formwork and reinforcement
The formwork is assembled from wooden boards, cutting out parts according to a previously prepared drawing. This can be a shape in the form of the letter L or the letter P, depending on the model and location of the shower tray. The boards on the screed are temporarily fixed in one position. The next task of the master is to reinforce the future pallet.
The main material is reinforcement with a cross-section of approximately 0.8 cm. A mesh is woven from rods equal in length. The resulting mesh is laid out on the prepared sand-cement screed. This stage of work is completed by installing internal formwork.
Advantages of a tile shower
The modern market offers a huge selection of all kinds of shower cabins. However, not all are suitable for a small room; they are often equipped with functions that are not used. Prices also do not always correspond to quality.
Compared to all ready-made shower cabins, a tile shower has many advantages:
- Tiles are considered an ideal material for tiling rooms with high humidity levels.
- It does not conduct electricity.
- It is characterized by high strength, safety and is an environmentally friendly material.
- Has a long service life.
- Allows you to disguise unaesthetic pipes that spoil the appearance of the room, as well as level the surface of the walls.
- With its help, you can realize any design solutions and all kinds of drawings and patterns thanks to the huge color palette and variety of shapes and structures.
- The ability to create a shower room suitable for a specific room.
- All of the above advantages will cost much less than a standard shower cabin.
Thanks to shower tile finishing, it is possible to create truly elegant accents in the interior.
The disadvantages of this design include insufficient sound insulation, which can be corrected with the help of an additional layer of sound insulation laid under the screed layer.
Step-by-step instruction
The most simplified option for construction work is to have a ready-made concrete base on which the tiles are laid. However, this situation does not always occur, and the owner has to start work from scratch.
Types of tiled showers
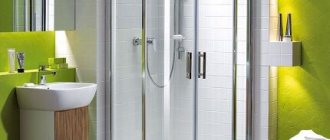
A built-in shower cabin made of tiles will organically fit into the interior of any bathroom, regardless of the size and stylistic design of the room. For example, the back of the structure can be decorated with tiles in dark colors, and the side walls can be decorated with contrasting light shades. Or decorate the back wall with a spectacular large panel, and complement the side walls with small mosaics made in the same style. The pallet can be tiled under stone or large pebbles. This built-in shower will be perfectly complemented by sliding glass doors, which can be frosted or patterned.
The photo shows a toilet combined with a bathtub and a shower without a tray with a glass door, tiled.
A very attractive built-in shower can be installed in a niche. Stylish high mirrored doors will be a great addition to it. Such a shower would be appropriate for a bright bathroom. A large mirror will help visually increase the space of the entire room.
Dimensions of shower stalls with tile drain
You can assemble a shower structure with your own hands of any size and various shapes: rectangular, square, triangular, round and non-standard. Everything will depend on the size and shape of the bathroom. In a small bathroom, the shower stall should not exceed dimensions of 80x80cm.
For small spaces, showers with transparent glass walls are suitable, especially if they are located in the corner of the bathroom, they will be almost invisible.
This way you can visually enlarge the space and give it an interesting look.
In a large room, a spacious shower stall with original lighting and a bright, interesting panel located on the back wall, complemented by spectacular fittings, will look very presentable.
Shower colors with tile tray
It is better to decorate a small shower room with tiles in light shades; a mosaic in beige, soft blue or olive colors will look great. A mirror wall made of small mosaics will look great in a small bathroom.
The choice of color scheme directly depends on the dimensions of the room and its functional planning features.
The dark range of colors harmoniously combines with bright ceiling or side lighting.
When decorating a shower with mosaics, bright colors are used as eye-catching accents (borders, frames, wall panels).
Adviсe
- When performing work on the manufacture of the cabin, keep in mind that the entrance to the sewer pipe must be below the level of the pan: from the drain hole to the entrance to the tee drain, there is a slope of 2 centimeters per meter;
- It is advisable to decorate the pallet with whole lamellas or mosaic blocks;
- use pebbles of different colors and shells as cladding: place them on the base and fill with transparent sealant;
- a homemade cabin can be equipped with a hydromassage, decorated with shelves for placing hygiene products or a chair lined with tiles.
Having decided to make a cabin yourself, start by developing a plan and a sketch, taking into account the size of the room, the location of utilities and the features of supplying pipes with hot and cold water. Installing a shower area without using a tray is a practical and original option for a bath.
Design options for tiled showers
Today there are absolutely no restrictions in bathroom design, regardless of the conditions. Guided by your own preferences, you can find interesting solutions in the form of mosaics and patterns, or choose very non-standard tile options that look like stone, pebbles, and even wood.
Tiles and mosaics
A shower stall tiled with mosaic tiles is practical, reliable and beautiful. It allows you to create a pattern of any complexity, and mirror elements can increase the space.
By adding such a characteristic touch as mosaic, the decor takes on a more thoughtful and complete look.
A textured pebble mosaic will help create a unique and inimitable relief, especially if you lay out a pallet - it will remind you of the warm sea coast.
Under the tree
Wood-effect tiles look very similar to wood in texture and texture, but at the same time have all the qualities inherent in ceramic tiles. It can imitate parquet masonry, wood mosaic, boards, lining or wood panels. It is used for cladding walls and floors. Wood-effect tiles in the bathroom look very stylish and original, adding warmth, tranquility and comfort to the interior.
Externally, it completely conveys the surface of natural wood, while possessing all the advantageous qualities of ceramic tiles.
The wood pattern consists of lines and stripes. It should be taken into account that longitudinal stripes narrow the room, and transverse stripes expand it. It is better to use tiles of darker colors as flooring. For walls, choose light shades.
Under the stone
The most popular are decorative collections that imitate the texture and color of wild stone, granite, slate and pebbles. Benefits on the face – absolutely natural appearance. Allows you to inexpensively implement interesting design solutions. You can decorate the room in a medieval style. The option of aged stone will be appreciated by fans of retro style. Stone-effect tiles go well with any materials, regardless of color and texture.
Thanks to special technologies, ceramics are distinguished by even the smallest irregularities, graceful breaks, cracks and overflows characteristic of stone.
The texture of stone in combination with wood tiles will create a relaxing and comfortable interior in the bathroom.
Under concrete
Until recently, concrete was considered an unfinished surface. Modern concrete is treated with precious marble. It is well polished and does not absorb moisture. Perfect for showers.
Visually and aesthetically, a room with this cladding takes on a more powerful and reliable appearance.
But a shower stall made entirely of concrete will look a little cold. In this case, the combination with wood-effect tiles will add a touch of warmth.
Fish scales
A new trend in design is tiles in the shape of fish scales. A great find for both large and small bathrooms. Most often presented in marine shades. In the bathroom, you can lay it out on the entire wall, alternating shades, or on half the wall, forming an uneven edge. It is good because it is used in almost all styles, in some - in doses, as an accent.
Due to the beauty of fish scales, which have soft tints, it is possible to visually give the space additional volume.
Large pebbles
A shower room is an ideal option for realizing your fantasies of pebbles. Continuous floor laying or a completely decorated wall - both options look original. By making a tray in the shower from pebbles, it becomes possible to get not only a spectacular coating, but also to experience the beauty of a foot massage. By massaging various areas of the feet, you can influence the condition of certain organs and the entire body.
It is not afraid of moisture and therefore is equally suitable for decorating a shower room in an apartment or for decorating a summer shower in a country house.
Magnificent glass ceramics with stone imitation, laid on the wall and illuminated with special lighting, shimmer with all the colors of the rainbow - this is an indescribable feeling of delight.
With an image
Patterned tiles are used in both large and small rooms. Drawing on the wall makes the interior more interesting and colorful.
A wall with a horizontal pattern will look longer - this option is suitable for a small bath. Dark tiles with a light pattern are suitable for large and spacious rooms. Light tiles with a dark pattern will visually expand the space.
A large image that occupies the entire plane is an excellent solution to diversify and enliven a monochromatic design.
Tiles with a large pattern will look depressing in a small bathroom. Tiles in a small floral print are a great option for a small shower.
Ceramic tile panels are used as a bright accent.
Installation of a drain ladder
Whatever the design of the drain and pan, the best option would be to “rigidly” install the drain before pouring the pan/screed. Rigid installation is when the drain, tray or channel is securely fixed with a solution. Trays and channels usually have special fasteners included, but they do not fix the structure rigidly enough and the design position can easily be disturbed when pouring the screed.
Therefore, it is best to first install the drain on the kit (if available) or homemade fasteners, and then fill the entire space under the drain with cement mortar or tile adhesive. This will not only allow us to securely fasten the structure, but we will also have a clear idea of the lowest point of the pallet.
As a last resort, rigid fasteners can be made before forming the finishing layer of the screed, if the pouring is carried out in two layers.
In this photo, the shower tray, in addition to the complete fasteners in the form of legs, is additionally secured with cement mortar. This was done while pouring the first rough layer of screed.
I want to say right away that drain designs without a flange are not even considered. If you need high-quality waterproofing of the shower, and in most cases it is necessary, then the presence of a flange in the design of the drain is a must!
A flange is a border of several centimeters around the drain, specially designed for reliable connection with waterproofing.
To set the ladder to the desired level, four studs are used, screwed into suitable dowels. The studs support the structure by the flange, and the height of each stud is adjusted by tightening and unscrewing it using two locknuts.
The drain design in the photo above is made in such a way that the level of the flange will inevitably be lower than the finishing screed. Therefore, in the future it is necessary to form the screed only up to the flange, leaving a recess around the drain. An example in the photo below.
The recess around the drain is sealed with tile adhesive after applying the coating waterproofing (of course, after the latter has dried).
The drain itself is connected to the sewer with a 40 or 50 mm pipe. I prefer to use the 50th pipe, although I think that this is not essential and the 40th will also do its job perfectly. If the drain outlet is 40 mm, which is often the case, then when installing the 50th pipe, an adapter is used immediately behind the drain.
As with any sewer installation, it is best to avoid 90-degree angles and use two 45-degree angles. I do not recommend using corrugated sewer pipes - as practice has shown, they are quite unreliable.
Good to know: if the sewer riser is poorly ventilated, then there is a high probability that the drain water seal will often break. In general, “grunting” sounds will often be heard from the pan. Therefore, for such cases, it is better to choose a ladder with a high-quality combined shutter. For example, a “dry” shutter mechanism should not contain springs - this is an a priori unreliable technical solution.
Also, in the absence of ventilation of the riser (this occurs in old houses), an aerator (a valve that allows air into the sewer, but restrains odors) will help solve the problem. However, you should not rely entirely on the valve, because it will serve the entire riser (all apartments) with its work. If only we could agree with most of our neighbors to install the same ones for ourselves...
How to make a shower room from tiles and mosaics with your own hands
Before you start creating a shower room from tiles and mosaics with your own hands, you need to calculate the facing material. To do this, it is advisable to draw a plan of the bathroom. Then you need to calculate the area of the walls and floor and summarize the results. The result obtained must be divided by the area of one tile, and you will get the required number of pieces. When purchasing, it is better to take 10% more tiles, taking into account defects or damage.
With proper decoration of the shower, you can create a truly beautiful design for any interior design.
Necessary tools and building materials
To work you will need the following tools:
- sewer pipe;
- drain ladder;
- trowel;
- chisel, spatula, trowel;
- profile PN 27x28, plaster beacons, wooden slats;
- building level;
- drill with attachments;
- roller, brush;
- tile cutting tool;
- water pipes;
- faucet and shower.
Required building materials:
- brick;
- cement;
- sand;
- waterproofing material;
- bitumen mastic;
- waterproof tile adhesive (white);
- tiles (for floors and walls).
Tools and materials to make your own tiled shower stall.
Preparing the base
Before starting installation of the base, it is necessary to lay communications and electricity. The wall needs to be grooved, and water pipes must be installed and fixed to the mixer connection point.
Then check and prepare the floor surface: clean it of debris and cover it with bitumen mastic with a small allowance for the walls. After this, the floor is screeded with special mixtures or cement, sand and water are used. After drying, the screed is covered with a waterproofing mixture, which can prevent the presence of unpleasant odors, the growth of bacteria, fungus and the accumulation of moisture. The pipes need to be wrapped with a special polymer membrane for better sound insulation.
Shower cabin arrangement diagram.
When installing the base of a shower stall, proper installation of the drainage ladder (drain) structure plays a huge role. Using special metal clamps, a wide metal sewer pipe is fixed to the floor, and a plastic pipe is inserted into the middle for greater strength and reliability.
To prevent stagnation of water, as well as trouble-free drainage, the pipes are installed at an angle to the sewer with an angle of at least 3 degrees. All elements must have sealed joints; for greater safety, it is better to treat them with sealant. After this, you can proceed to pouring the base.
Waterproofing the installation area
The first stage of installing a shower tray is to waterproof the working surface. The floor and lower part of the walls are treated with a waterproofing solution. For these purposes, special mixtures are used: glass solutions, liquid polymer-sand or rubber compounds. Regular bitumen mastic will also work.
Foundation with ladder
The next stage consists of laying a brick foundation, preferably moisture-resistant.
The fixing solution can be purchased ready-made, or you can make a batch of sand, water, cement and plasticizer.
Bypassing the sewer drain, the brick is laid on the floor surface along the entire perimeter of the shower stall.
Also, at the location of the door, a side is laid out the width of one brick, which will hold excess water in the shower and prevent it from getting onto the bathroom floor. All cracks on the surface of the pallet are carefully rubbed with a solution and after that the reinforcing mesh is laid. After this layer has dried, liquid waterproofing is applied.
Waterproofing the pallet structure
Next comes the stage of leveling the surface of the pallet. A screed of fine crushed stone, sand and cement is poured on top of the waterproofing on the surface of the foundation and leveled by installing construction beacons. You can use special mixtures to level floors. To ensure that the screed is perfectly smooth, it is rubbed with construction floats or sponges. After drying, cover with a waterproofing layer.
Laying ceramic tiles
Finally you can start laying the tiles. The preparation of waterproof glue should be done immediately before use.
Lay the tiles starting from the farthest corner of the shower. For better adhesion of the glue to the surface, it is applied using a special notched trowel. Using crosses, you can control the evenness of the installation and the thickness of the seams.
To better secure the tile, it must be lightly pressed with a rubber roller or tapped with a rubberized spatula handle.
In addition to standard ceramic tiles, mosaics are often used for facing work. Preference for this type of tile is given due to the huge selection of mosaic canvases. It is also very comfortable and quite easy to install.
For installing mosaics, white glue is recommended, and grouting should begin without waiting for the adhesive solution to dry.
Grouting and cleaning
The final stage of laying any type of tile is grouting and cleaning the joints. It is produced with special mixtures that are applied using a sponge or spatula. Then the surface of the tile is thoroughly rubbed, and excess grout is wiped off until clean.
It is better to select a mixture of the same tone as the facing tile, since over time it can become darker or lighter.
When the work is completed, special profiles are attached to the floor, walls and ceiling on which the door is installed. Glass sliding panels or just a standard glass door in a metal profile look original. Although it is very often replaced with a regular moisture-resistant curtain.
Finally, plumbing and necessary accessories are installed.
Video description
In this video you will see how to make a drainage channel for a pallet:
The adhesive can be applied to the inner surface of the tile or to the pallet. The first method allows you to reduce the number of possible errors, the second increases productivity. There should be enough glue so that there is no empty space left under the tile.
Many designers choose mosaic for finishing cheap pallets, which improves the decorative properties of the booth and is quite simple to install due to its increased flexibility. The standard size of elements is 5x5 cm, sheets are 30x30 cm. Installation is almost no different from finishing with ordinary tiles, however, glue is applied only to the surface of the material, and not to the pallet. After installing the mosaic, smooth it out, leveling it in one plane, and after 24-48 hours, grout the joints.
Shower tray finished with mosaic tiles Source remontspravka.com
Final stage
The shower enclosure is installed after all work is completed and the finish has completely hardened. This process can be accelerated by ensuring the room temperature is 25-30 degrees, effective ventilation and acceptable humidity (about 60%). Bathroom doors must remain open throughout the drying period.
If these conditions are met, the fence can be installed just 2 days after installing the pallet. The cabin frame can be assembled from metal profiles and moisture-resistant plywood, and finished with tiles or mosaics. The last step is the installation of swing doors, instead of which it is possible to install a plastic screen or curtain.
Shower, completely decorated with tiles Source stroyka-ug.ru
Recommendations for shower construction and design
Before you start making a shower cabin from tiles, you need to resolve all issues regarding the electrical network, as well as the need to replace and install new sewer and water pipes. In a small room, you should additionally take care of the hood.
It is necessary to make every effort to ensure that the shower stall is comfortable, evokes positive emotions and does not get boring.
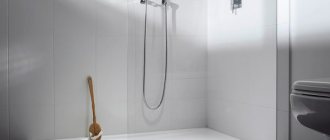
Which is better in the shower, tray or tiles?
Many consumers are interested in the question of how best, more economically and quickly to install a ready-made shower tray or make it themselves. The following types of ready-made pallets are available in construction stores:
- enameled;
- iron;
- cast iron;
- acrylic;
- ceramic.
Undoubtedly, a ready-made pallet will save money and speed up the installation of the shower stall a little. But there are also disadvantages.
The enamel tray is very slippery and quite cold, so it is necessary to lay a rubber mat on top of it. If there are small children in the house, this is not the best option.
For cladding, products are used that have a relief or rough surface and a high slip resistance, which is less dangerous.
The iron pan is quite thin and prone to deformation. It also has poor sound insulation and is susceptible to corrosion.
The most durable is a cast iron pan. It is covered with enamel, has good sound insulation and can last a very long time. The only drawback is the appearance of chips on the enamel surface.
Acrylic - similar to acrylic bathtubs, it is very unreliable and requires careful handling.
Ceramic is the most expensive and quite reliable when used correctly. Disadvantage: Impacts may cause chips and cracks.
Which of the above options to choose is up to the buyer to decide, but still, a tile pallet has more advantages and disadvantages. All the same, the walls will be tiled, and it is quite difficult to find a ready-made pallet of the desired color. And the shape of the product is also not always suitable, especially if the shower is of non-standard shape.
The most common design is a dense, durable, durable and moisture-resistant porcelain stoneware or quartz vinyl finish.
Using tiles, you can decorate the floor, walls and ceiling in the shower in the same style and in matching colors. This option allows you to use even a small corner space in the bathroom. The tiles also allow you to build a deeper tray, which can, if necessary, replace the bathtub.
The use of tiles gives unlimited scope for imagination. For example, for convenience and greater comfort, a tile tray can be equipped with a floor heating system. For these purposes, special IP class systems are selected that can be installed in rooms with high humidity.
Waterproofing issue
When constructing any shower tray, care must be taken to ensure reliable waterproofing, so that water cannot enter the lower or adjacent room. Moisture seeping through the pan causes the appearance of fungus, an unpleasant odor and destroys the structure.
Insulating materials for shower tray:
Methods for waterproofing a shower tray.
- roll film coverings;
- roofing felt;
- viscous compounds.
- liquid water emulsions (they are almost odorless);
- liquid glass - fills the pores and cracks of concrete and increases its strength;
- waterproofing additives - more suitable when pouring a concrete pallet, they grow in the solution and turn the entire layer into a hydrophobic one;
- one-component mixtures, for example Ceresit CR 65.
It is recommended to make 2 layers of insulation, for example:
- Rolled bitumen-polymer. Glued to a concrete base.
- Cement-polymer. On top of concrete that has settled for 3 weeks.
Before carrying out work, the ladder grating is sealed with masking tape. Rolled materials are laid on a flat surface, excluding differences of more than 2 mm and sharp chips. Insulation with canvas is carried out on bitumen mastic with an overlap of 15-20 cm. When bubbles form, the material is cut and pressed forcefully to the surface. Viscous insulating compounds are applied with a brush, single-component products are applied with a spatula.
Sealant Stern. Antia sealant. Somafix sealant.
The selected product is treated in 2 layers on the pallet and the walls near which it is located, at a height of at least 30 cm. Particular attention is paid to:
- the area near the drain hole;
- joints;
- corners;
- sides.
The best shower sealants contain at least 45% hydrophobic filler, silicone-based rubber, catalysts and fungicides. Somafix, Stern, Antia sealants are effective. Aquarium silicone can be used at joints and for sealing. It is recommended to combine some products, for example, Expanding Plombizol and Penetrating Plombizol, Elastopaz mastic and floor primer.
Elastopaz mastic is recommended to be combined with a floor primer.
When the second layer of waterproofing is completely dry, finishing work begins.
Interesting ideas for decorating a shower room in different styles
- If you want to achieve an elegant, stylish and at the same time discreet design, you need to use tiles with marble effect, which will perform all the functions of tiles. At the same time, it will emphasize the presentability of the shower room and add a touch of discreet luxury. As decoration, you can use gold-plated accessories for towels, as well as gold-plated sanitary ware and other decorative elements. All these accents will emphasize the sophistication of the style.
- Natural motifs are most suitable for wood-effect tiles. Stylization inspired by nature in combination with elements of ethnic motifs is very relevant today. Also, wood-look ceramic tiles are perfect for a vintage shower or eco-style. In a rustic or country style, imitation wood will allow you to feel the atmosphere of a country bathhouse.
To create your own unique design, experts recommend using and combining various materials: stone, mirror, ceramics, glass and chromed metal.
Nuances when installing a small tile shower
When installing a small shower made of tiles, you should exclude the model of doors that open inward. Especially if there are elderly or overweight people in the house. For them, this option will make it difficult to leave the booth.
It is convenient to use doors with a sliding mechanism. The ideal option for a small shower in a small bathroom is a corner one.
Light and transparent sliding doors will give the effect of free space.