- 1
In Moscow and Moscow region
PROMOTION
Turnkey swing gates with locking devices without a fence
From RUB 29,980
Limited offer!
Until the end of the promotion
4092935
Attention Promotion!
UPPER SCREAD OVER THE GATE AND WICKET AS A GIFT
Metal swing gates made of corrugated sheets are considered a simple modification of the enclosing structure; this model is widely used in industries, including suburban areas and dachas. You can order the installation of fencing from our company via the Internet; this option allows you to save time getting out of the car when entering and leaving the territory. The structures are in great demand; it is impossible to open them with improvised means. The catalog presents a wide range of options; you can buy swing gates from us inexpensively; the requirements and standards are met during production, and customer requirements are taken into account.
What types of swing gates do we install?
A popular option is a design consisting of two equal-sized sheets of corrugated sheets with a built-in gate. This option has an affordable price; the fencing is ideal for use in enterprises or private areas. Standard turnkey swing gates operate using radio control; in enterprises, control is carried out from a stationary remote control. In the manufacture of fencing, durable materials are used and computer technology is used. Their installation ensures a high level of security; control is carried out using a remote control. The design consists of a gate and a drive; the choice of automation depends on the type of fence; there are several types of design.
Popular types of swing gates:
- Industrial - for enterprises.
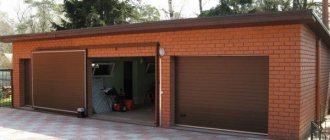
- For garages.
- Fireproof.
- Electrical.
- With a gate.
Types of paintings:
- Metal - lightweight and corrosion resistant.
- Lattice fabric - installed at industrial facilities; due to its transparency, better control over the movement of vehicles is ensured.
- With forged elements - installed in private homes, organizations, residences.
- Combined fabric is a combination of profiles and sandwich panels.
All types of enclosing structures are equipped with special fastening elements that are treated with an anti-corrosion coating, which ensures durability.
Tools for work
Tools for making gates with your own hands
To mark and coordinate the plane, verticality during welding and installation, you will need a tape measure, level, construction angle, pencil or core.
Other tools:
- electric or arc welding with a set of consumables;
- screwdriver, Phillips screwdriver
- angle grinder (grinder) with a steel wheel and a cleaning disk;
- hammer, pliers;
- drill.
Land work will require a bayonet shovel, a crowbar, and an ax. To mix concrete you need a concrete mixer or a trough or a shovel. Painting is done with a spray gun or using a roller and brush with a cuvette.
The price of swing gates, with installation taking into account the installation of the fence.
- Swing gate frame cost
- Pillars 80*80, frame 40*20, paint – gray or brown primer.
- Locking devices: Top removable tie, stopper in the ground, goose for the lock.
| Height | Width | ||||
| 3.00 m. | 3.50 m. | 4.00 m. | 5.00 m. | 6.00 m. | |
| h-1.8 m. | 11 990 | 11 990 | 11 990 | 12 990 | 14 000 |
| h-2.0 m. | 11 990 | 11 990 | 11 990 | 12 990 | 14 000 |
| h-2.2 m. | 13 000 | 13 000 | 13 000 | 14 000 | 16 000 |
| h-2.5 m. | 14 500 | 15 500 | 16 500 | 19 500 | 21 500 |
Wicket cost
- Cost of the gate frame.
- Post 80*80, frame 40*20, paint – gray or brown primer.
- Locking devices: Top welded tie, handles, latch, eyes.
| Height | Width |
| 1.00 m. | |
| h-1.8 m. | 6 980 |
| h-2.0 m. | 6 980 |
| h-2.2 m. | 8 000 |
| h-2.5 m. | 9 000 |
Prices for additional services:
Additional post 80*80 for a gate - RUB 1,990
Additional Titan lock for the gate – RUB 3,500
Jib beams 40*20*0.70 cm – 4 50 RUR
Compacting with crushed stone – 100 rubles per meter
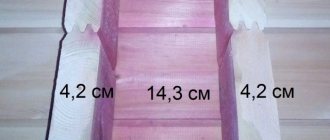
Decorative strip for a fence – 20 0 rub. per m.
*Low prices and regular discounts are due to our own production and the absence of intermediaries.
The cost depends on the type of structure and its size; the price of swing gates is calculated based on the filling and size of the door leaf. The equipment is installed based on the load, required intensity and speed of plowing. Preliminary calculations are carried out at the stage of agreement with the customer. The price is also affected by the installation of swing gates; it is recommended to discuss all details in advance.
Necessary materials
To make reliable gate posts in a suburban area, you will need to prepare a number of materials. The parameters of various structural parts are calculated taking into account the expected load. To create a gate you will need:
- a pipe having a diameter of 100 mm;
- corner 100x100 mm;
- Bulgarian;
- cement powder;
- carpentry tools;
- welding machine;
- sand;
- timber and edged board - formwork will be constructed from them.
Having prepared such tools, you can begin work on creating and installing gate posts.
Turnkey installation of swing gates
1
Metering
Free visit of a surveyor to your site to take measurements
2
Preparation of material
Cutting and welding according to measurements taken
3
Installing the gate frame
We fix the swing gate frame to the posts with hinges
4
Fastening the material to the frame
We attach the necessary material to the finished gate structure
5
Finishing work
Upon completion of installation, we inspect and clean the area.
The installation process is simple, the only requirement is that the surface under the canvas must be flat. During installation, standard designs are used, changes are made if necessary.
First, metal structures are manufactured; the technology consists of several stages:
- Preparation and cutting, only new materials without defects or damage are used.
- Welding according to a template, modern equipment is used during the work, the risk of deformation is minimal.
- Cleaning of welds, treatment with anti-corrosion compounds, painting.
- Reinforcement with special stiffeners (if necessary).
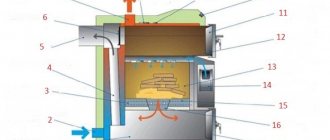
At the next stage, the electric drive is installed (the features of the object are taken into account in advance), and the reliability of the entire complex is checked. Automatic drives simplify and speed up the opening of sashes; when choosing automation, you should take into account functionality, manufacturer and warranty. Insulation ensures protection of live parts from damage; employees have access to the equipment for maintenance and replacement of components. At the final stage, the remote control is installed in a pre-prepared panel. During the installation, safety standards are observed, an integrated approach is the key to quality, and a guarantee is provided for the work.
How to choose pillars
The types of pillars are presented in the table.
| View | Description |
| Wooden | Designed for mesh and wooden gates. They are not suitable for more powerful and heavier structures. Before carrying out work, the area must be cleaned. Then it is marked. When installing a temporary structure, the supports are treated with roofing felt. If you want to install a permanent structure, the insulation must be more reliable. Wooden supports will last much longer if the anchor is concreted in a timely manner. Before this, you need to treat with insect attack and temperature changes. You should also protect the selected structure as much as possible from moisture and rotting. |
| Metal | Gate posts made of metal pipes are designed for all types and methods of fastening. To make a steel support, a pipe made of high-quality metal is used. The cross section is different. The structure will acquire the necessary strength only after welding the upper and lower crossbars together. Also, the product must be carefully concreted. Anti-corrosion treatment is required. A primer is used for this. The pillars are fixed using concrete. In order to further secure the structure, vertical supports are used. Welding is used for connection. The structure must be provided with additional reinforcement. A crossbar located on top is used. It is attached to the top of the supports. |
| Brick | The design performs not only its main, but also a decorative function. If there is a pipe inside made of first-class metal, then the support will be provided with additional strength. Installation of the foundation for the support depends on its massiveness. Concreting is required. A special “cap” must be installed on the top of the pillars, which protects the support from the adverse effects of external factors. |
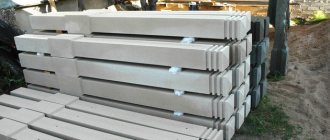
| Concrete | Used for tall, imposing structures. The installation method is similar to the installation of structures made of metal. The only difference is the need for deeper concreting. It can be replaced by installing a strip foundation. Having installed such a support, you can hang any gate - both swing gates, which are made of wood, and heavy forged ones. |
Price list
Swing gates with installation
Gate width:
From 3 to 6 meters
Gate height:
Up to 3 meters.
Post 80*80, GF-21 primer, paint. Frame 40*20, GF-21 primer, paint. Gate filling:
Corrugated sheeting, euro pickets, 3 d mesh, chain-link mesh. Locking devices. Goose, stoppers in the ground, handles, eyes, latch
Price from 9,990 rubles (SPECIAL: Top tie over the gate as a gift)
Receive an offer in just 7 minutes
Calculate the cost
Manufacturing of foundations and metal racks
First, the blanks from which the gate will be made are cut. For the racks, pipes with a diameter of 100 mm are prepared in advance. The length of the elements depends on the sum of the height of the valves and the depth to which each support will be buried. The last figure is 0.8-1 m. If the height of the gate is 2 m, the blanks for the pillars are made 3 m long.
The jumper used to connect the racks is made from a 100x100 mm corner. The length of this element must be equal to the width of the gate. For standard structures, it is 3 m long. When choosing a metal pipe for supports, one flange of the corner will have to be cut off and then bent slightly so that the edges of the corner fit better to the posts during welding.
Then the following actions are performed:
- The gate frame is assembled. This work should be done on a level piece of land. The frame should resemble the letter "H". It consists of two racks and a jumper. The last part should be placed at a distance of 2 m from the top of the structure. During operation, several conditions must be met - the racks must be parallel to each other, and the jumper must be perpendicular to them.
- The jumper is welded to the posts. Any metal pieces should be welded to the jumper in three places. They should be pointing down.
- These elements will play the role of reinforcement that will connect the lintel to the foundation.
- Then you should dig a trench for the foundation. The width of the pit should be 350-400 mm. The length of the pit is 3.5 m - if it is necessary to manufacture a 3-meter gate. The required depth of the hole should be determined taking into account the level of soil water and soil freezing.
- It is necessary to make wooden panels - for this you will need to prepare an edged board. Then the formwork is assembled. It should have dimensions of 0.3x3 m. The formwork walls are made with a downward expansion. This will prevent the foundation from being pushed out by the soil.
- Then the gate is installed in the formwork. This must be done so that the jumper is level with the ground, and the racks are installed strictly vertically.
When performing work, the racks should be strengthened. To do this, stone supports are placed under them. Then the pillars must be strengthened with stops. In order for the foundation to be strong, it should be reinforced with profile scraps. They are fastened with knitting wire.
Then the concrete mixture is prepared. It should contain four parts sand and one part cement powder. Then the formwork is filled with mortar. Broken bricks and stones are used to save the mixture. The solution must harden before the gates are hung on the posts. You need to wait about a week.
Advantages of installing swing gates with us
70% come to us on the recommendation of their friends
Free delivery to site
Careful and timely delivery of materials to the installation site
Low prices for swing gates
Affordable prices for metal swing gates from manufacturers
Compliance with installation deadlines
We meet project deadlines and are ready to financially compensate for every day of delay
Gate installation guarantee
We provide a two-year quality guarantee for swing gates
Departure and measurement free of charge
We provide a free visit of a specialist for measurements and calculations
More than 15 years of experience
Specialists with more than 15 years of experience will work with you
The design of swing gates with a wicket is easy to install and operate.
- The simplicity of the design ensures no installation problems.
- Single leaf gates are suitable for areas with a small amount of free space.
- Different widths of the sashes expand the scope of application and allow you to adapt to the individual characteristics of the customer.
The advantages of contacting our company include affordable prices; everyone can find a suitable option. When carrying out work, modern equipment and high-quality materials are used. We employ qualified employees, a professional approach guarantees a long service life without repairs.
- Before placing an order for swing gates with a wicket in Moscow and the region, it is recommended to measure the distance on both sides in the opening area of the leaves. To fill out an application, it is recommended to call; the details are agreed upon in advance; transportation is provided to all areas. Our employees will deliver and install swing gates in Moscow on time, all products are of excellent quality.
- You can not only buy inexpensive fencing structures from us, the company offers a range of services from consultations and selection for individual needs to complete installation with a guarantee.
cooperates with trusted suppliers in Moscow, which guarantees the quality of products (profiled sheets, metal logs, electric drives, mechanisms, and so on). All questions must be clarified in advance by phone or in the office.
Advantages and disadvantages
Like every design, such gates have their own advantages and disadvantages; we will consider them in more detail below:
- Advantages:
- relatively low cost, which will be a pleasant bonus to the installed gates;
- ease of installation;
- long service life of the installed structure;
- installation can be done on your own;
- installation can be done with your own design modifications;
- if there are no restrictions in volume, then accordingly there will be no restrictions on passing transport;
- you have the opportunity to choose on your own what material you will make the structure from, respectively, from suitable options.
- Flaws:
- for durable installation, it will be necessary to bury the pillars quite deeply, and this is not always easy to do with your own hands;
- concreting these pillars takes a lot of time, and if concreted incorrectly, the pillars may warp over time;
- a very large space will be required to install such a barrier;
- it is unsafe to use such structures in strong winds, because it will be almost impossible to control the doors;
- When installing an electric drive, you must purchase several wires to close/open the gate, which will increase the cost of your purchase.
As you can see, the advantages of such structures outweigh the disadvantages, and if you live in a region where strong gusty winds are not the norm, feel free to proceed with the installation of swing gates on your site.
We install the following types of fences
Corrugated fences
European picket fences
Chainlink fences
Sliding gates
3D fences
Brick pillars and fence
Foundation
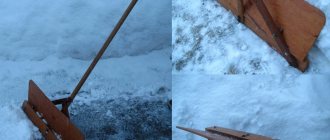
How to mark correctly
The easiest way to mark is to use a cord. This method is suitable for short fences. Otherwise, the cord begins to sag a lot, and when the wind rises, it moves to the side.
Features of correct marking
Note! It is best to use the visual method.
The first and last pillar are mounted at the required height, in accordance with the level. This method is best suited if the site is located on a slope.
After alignment, the next post is mounted using a level. If its severity is great, you must first “arm yourself” with a lath. It must be aligned with sides 1 and the last support. The work is done in pairs. One holds the rail, the second estimates the distance between the posts, and suggests the correct angle of displacement.
We install fences and gates in the following cities of the Moscow region
- Balashikha
- Lyubertsy
- Volokolamsk
- Voskresensk
- Dmitrov
- Zaraysk
- Istra
- Wedge
- Krasnogorsk
- Podolsk
- Noginsk
- Khimki
- Vidnoe
- Lukhovitsy
- Mozhaisk
- Naro-Fominsk
- Odintsovo
- Sergiev Posad
- Ramenskoye
- Ruza
- Pavlovsky Posad
- Pushkino
- Orekhovo-Zuevo
- Serpukhov
- Solnechnogorsk
- Stupino
- Taldom
- Chekhov
- Shatura
- Shchelkovo
- Bronnitsy
- Dzerzhinsky
- Dolgoprudny
- Domodedovo
- Dubna
- Yegoryevsk
- Zhukovsky
- Zvenigorod
- Ivanteevka
- Kashira
- Kolomna
- Korolev
- Kotelniki
- Krasnoarmeysk
- Losino-Petrovsky
- Fryazino
- Silver Ponds
- Roshal
- Reutov
- Pushchino
- Protvino
- Lakes
- Mytishchi
- Lytkarino
- Chernogolovka
- Shakhovskaya
- Elektrogorsk
- Elektrostal
Concreting fence posts
By concreting the pillars, the fence becomes much stronger. At the same time, the service life of the structure increases. Metal supports are perfectly protected from rust. There are several types of concreting. They have certain differences that are worth considering.
Full concreting
The first thing that needs to be done is to prepare the site for installing the fence. In places where the supports will be concreted, all plant roots should be removed and the fertile layer should be cut off. Using a garden auger, you need to make a hole with a depth below the soil freezing level. If the drill is equipped with a special expander, you need to make a slight widening in the lower part of the pit. This will prevent the foundation from being pushed out by the soil during frost heaving.
The site is marked around the perimeter. The plan must indicate the installation locations of the pillars. If the soil is highly susceptible to frost heaving, soil should be removed within a radius of half a meter around the installation of supports and sand should be poured into the holes.
Metal poles are prepared in advance. They must be thoroughly cleaned of rust stains. Then the metal elements are treated with an anti-corrosion compound. If possible, use a welding machine, weld two transverse rods at the bottom. This will make the pillars more stable.
The supports are installed in the hole and fixed with braces. You need to check with a level how vertical the pillars are and level them if necessary. Pouring cement mortar is carried out using an old bucket without a bottom. It is better if a mixture of cement and crushed stone is poured. When choosing this option, you should first mix all the components, and then simply pour the mixture into the pit. When pouring the solution, the vertical position of the supports is simultaneously checked.
Partial concreting
If a lightweight fence is being installed, it makes sense to carry out partial concreting. When choosing this option, the area is first marked out, and then the supports are driven into the ground using a sledgehammer. In case of heavy soil, it is drilled in advance with a drill. The diameter of the funnels should be slightly smaller than the diameter of the pillars. Then the supports are aligned plumb. The space around the pillars is filled with cement mixture.
Partial concreting is suitable for areas with low groundwater levels. Otherwise, in the spring the gate may become askew. When the soil absorbs water well and the fence is not too heavy, this method is optimal.
Features of installing supports for swing/slide structures
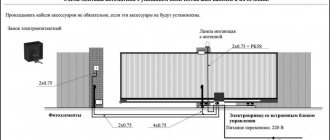
Sliding gates are an entrance structure with leaves that move on rollers along a rail fixed to the surface of the ground. They are convenient because they allow you to completely open the opening for the passage of large vehicles and provide the possibility of automatic control. Posts for sliding gates can be made of any material, the main thing is that they are concreted to the depth of soil freezing (from 1 m).
Important: brick and concrete supports should not have voids inside. Their strength is increased due to metal mortgages, which are fixed inside each rack. Also, a supporting bracket and a curtain catcher are installed in the sliding gate posts.
The most common gate design is swing gates. They are easy to install and operate, but are subject to wind loads. If they are secured incorrectly, over time they will become deformed, will close poorly and will look unattractive. Therefore, it is important to install the posts for swing gates correctly.
For their construction, profile pipes, wooden beams, and concrete are used. The supports are cemented into the ground at least 1 m deep. Brick/stone racks are additionally reinforced to increase their strength. Channels or corrugated pipes with a cross-section of at least 10x10 cm are laid inside them. Metal corners are welded to the rod, which are brought out to attach the hinges.
Preparatory activities for manufacturing
After becoming familiar with the features of these designs, you can think about making them yourself. And, first of all, you need to prepare the tools and consumables for making swing gates.
Tool for the job
To make a frame and arrange racks, you will need the following tools:
- Bulgarian. It is needed for cutting and grinding metal workpieces;
- Sliced discs;
- Sanding discs;
- Welding machine;
- Electrodes;
- Roulette;
- Building level;
- Corner;
- Hammer;
- Shovel;
- Master OK.
Among the auxiliary devices you should have:
- Riveter and set of rivets;
- Drill. May be required for fastening sheathing;
- Compressor, spray gun or brushes for painting the frame.
Necessary materials
Without material, it is impossible to do any work with your own hands. And the manufacture of swing gates is no exception. To assemble them yourself you will need:
- Pipe for racks. When choosing it, be sure to take into account the weight of the finished structure.
- Pipe for frame. A profile pipe measuring 60×40×1.5 is best suited for this. You can also use products of other sizes, for example, 40×20×1.5 . When choosing a pipe, be sure to consider the finishing material used and the wind load.
To avoid mistakes when preparing for assembly, you can adhere to the following recommendations:
- If the structure weighs more than 300 kg, choose a pipe with dimensions of 140x104x5 mm;
- If the product weight is from 150 to 300 kg, then it is best to use a pipe measuring 10x100x5 mm;
- For structures weighing up to 150 kg, an 80x80x4 mm pipe would be an ideal option. Racks can also be made from available materials such as brick, concrete or wood. But be sure to consider the properties of the material and the load to which it will be subjected.
- Gates can be equipped with two types of hinges: adjustable and non-adjustable. It is best that they are made of high-quality material and can easily withstand significant weight.
- Locks. There are mechanical and electromechanical. When choosing, you can completely rely on your own taste.
- Dye. It will be needed to design racks or trim.
- Sheathing. There are no special recommendations for its selection. Choose material taking into account personal preferences and your financial capabilities.
- Automation. If you are not initially interested in this option, then you can not install it or equip the gate later. In this case, we advise you to make the frame more durable in advance.
If all preparatory steps have been met, then you can proceed with the installation of the structure.
Sliding options
Making sliding iron gates with your own hands is a little more difficult than swinging ones, but the task is also doable if you approach the work responsibly. This type of gate has several subtypes, each of which is suitable for certain terrain conditions. But they all imply the presence of free space along the fence, since after opening they become almost flush with the fence, parallel to it.
Sliding simple gates come in several subtypes:
- recoil;
- console;
- hanging.
They all run on a rail (guide), another metal profile or channel. The hanging option is not very popular among owners of country cottages, as it involves opening the gate along a guide structure installed on top. Thus, the entry of large equipment is limited, and this is not very convenient in rural areas.
Sliding gates run on a rail installed along the wall. The option is also not very popular, especially in snowy regions. The gate will operate flawlessly only if there are no foreign objects in the guide and it is completely free of dirt and ice. In snowy regions, with a large minus, such gates will be useless. It is better to install them in the southern regions.
To ensure free opening of the structure, rollers and support brackets are installed . Rollers are also attached at the bottom. With their help, the sashes move along the guide.
Console structures are the most convenient, as they have several subtypes from which you can choose the optimal one. A beam is rigidly attached to the gate, which moves in a cantilever mechanism. The device is very reliable, since it is rigidly fixed, and it is practically not afraid of sub-zero temperatures.
Such gates are more difficult to manufacture and install, but their beam does not touch the ground, and, accordingly, ice practically does not freeze on it. In addition, there is a need to install only one powerful support post. A homemade gate will move in one direction, so support is needed on this side. The console can be mounted on top of the gate, below and in the middle.
Do not forget about the nuances of the location of the beams
The most popular beam location option is in the middle. This helps strengthen the structure. The mechanism is located at a sufficient height so that it is in working order all year round, even in snowy winters.
The location of the console at the bottom of the sashes is also a rather convenient option, which does not require the installation of a guide rail. Although the lower location of the beam contributes to contamination of the structure to a greater extent than the middle and upper location.
The upper position will completely protect the structure from contamination, but the support column and sashes will need to be strengthened, since the load will be greater, which can lead to deformation in the future.
Console options can be made independently if you have some experience. It is necessary to understand drawings and have general knowledge of physics and mechanics. If you approach production responsibly, you can make sashes that are indistinguishable from factory models. Any gate can be made automatic. To do this, it is enough to equip them with an appropriate drive and you can open them without leaving the car.
Installation of sliding structures
Compared with swing options, sliding ones are much more difficult to install. Between the gates there should be brick pillars on which rollers, support brackets and other parts of the mechanism are mounted.
In addition, the installation of sliding structures often occurs together with an automated opening and closing system. Installing the drive also requires appropriate experience. Although you can get by with a simplified version.
If the console is located at the bottom, then the channel along which the gate will ride on rollers is also mounted at the bottom. And if in the middle or on top, then the guide will be located together with the console and mounted on support posts.
Step-by-step work of erecting a gate
The support pillar assembly can be made from a variety of materials. Assembly can be carried out in two ways: driving and concreting with reinforcement.
For concreting it is necessary to make a 1 meter pit. Before pouring, it is necessary to backfill 15-20 cm of sand or crushed stone. Next you need to install the supports and fill the entire structure with concrete. Allow the fill to dry for at least one week.
Learning to make gate leaves
- Prepare a drawing.
- The calculation of materials is based on the width of the structure.
- When forming the components for the frame, you need to cut off part of the pipe and grind it.
Welding work
The main rule when welding is to prevent water from getting into the joints. Otherwise, the structure will be deformed over time.
Welding of the hinges must be done to the posts and base if it is made of metal. If the pillars are brick, you need to use a channel and then electric weld the hinges.
Priming and painting gates
A primer will be needed in any case. It increases the useful life of paint. Welding seams need to be primed in the most detail. Any paint is suitable for painting gates. For a more uniform application, it is better to use a spray gun.