article updated May 04, 2021 Previously, I thought that only a cadastral engineer could draw up a plan for a land plot .
Such a misconception has long been an obstacle to finding and obtaining a plot of land.
A land plot plan, or as it is also called a land plot diagram, can be drawn up yourself.
In this article I will describe a step-by-step scheme for drawing up a land plot plan.
The purpose of this article: to show the value and practical applicability of video instructions. How to find vacant land in 40 minutes and make a diagram of the land plot? (without involving a cadastral engineer).
Why do you need a plot plan and how to draw it?
A site plan or diagram is required to submit an application for preliminary approval for the provision of a land plot.
In other words, a site plan is needed to first “stake out” a plot of land. In other words, the land plan initiates the process of providing land without bidding.
To draw up a plot plan, 40 minutes of personal time and the following tools will be enough.
- Internet portal of Rosreestr,
- Agro program in a free version.
The cost of drawing up a site plan is 150 rubles. Plus a small payment system commission.
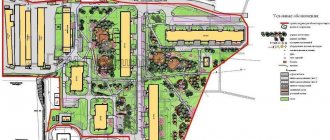
Landings
20 – Blue honeysuckle. Since this culture loves the sun, the southeast side is just right for it. My imagination is already painting a picture of how I will pick large, tasty berries right from this “edible” hedge! 21 – Blackberry. In my opinion, the place is simply ideal for planting this light-loving crop! 22 – Raspberry. Perhaps, as a gardening experiment, I’ll plant, for example, raspberries here. 23 – Thuja. Along the rest of the perimeter the hedge will be represented by thuja. 24 – Alpine slide. Since the area of the site allows you to “swing”, I would like to make the rock garden large enough. 25 – Jasmine. Garden jasmine, also known as mock orange, grows well in shaded areas, so I will leave a place for it on the north side, in the shade of the barn. 26, 27 – Hydrangeas. I want to try to “plant” both tree-like and large-leaved hydrangeas on the site. Shrubs of these two species do not require a lot of sunlight to produce lush blooms every season. 28 – Pear. Why not make the most of a free corner? 29, 30 – Hosts. These plants are also quite shade tolerant, so the northern side of the site is ideal for them. 31, 32 – Climbing roses. The space under the window and near the terrace will be decorated with beautiful rose bushes. 33 – Blueberry. The southwestern side allows you to plant a light-loving highbush blueberry bush. 34 – Currants and gooseberries. What would a garden be without these berry bushes! 35 – Cherries. Initially, I had the idea to plant a self-fertile cherry seedling near the greenhouse in order to save space for something else, but after thinking about it, I abandoned the idea - what if there were very few berries. Still, let there be two cherries. 36 – Plum. 37 – Apple trees. 38 – Pear. 39 – Flowerbed.
40 – Track. It was decided to cover it with decorative slabs.
I can't wait to try out the capabilities of the first design program and show you what I did. Stay in touch!
Step-by-step diagram for drawing up a land plot plan.
First : you need to obtain a cadastral plan of the territory.
Second : download the trial version of the Argo program.
Third : upload the cadastral plan of the territory into the program.
Fourth : in a few clicks, create a plan (scheme) of the land plot.
Fifth : insert a picture of the land plot plan into the diagram template. We will attach the diagram to the application for preliminary approval of the provision of a land plot.
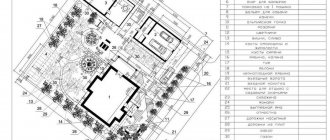
Components of a master plan
When drawing up drawings and plans, it is important to take into account as many details as possible. This will help eliminate serious mistakes in the development of the territory, the construction of capital structures and their operation. The likelihood of land disputes will also be reduced. For this purpose, other documents are additionally developed in addition to the general plan:
- situational plan — location of the allotment within the settlement, region;
- reference plan - a diagram showing the existing buildings on the site, water and gas pipeline networks, electricity, as well as places where tall trees grow;
- utility network diagram - shows how it is planned to connect communications to the plot, if they do not exist, as well as the points of their entry into the buildings;
- vertical site layout diagram — elevation marks at different points of the territory, volumes of earthworks to prepare the site for construction.
The formation of a general plan helps to determine the relationship of the house with respect to the cardinal directions, red zones, site boundaries, and to choose the best place for the entrance, outbuildings, and garden layout. It is important that all the features of the plot are taken into account - shape, size, species potential, soil, relief and others.
How to obtain a cadastral plan of the territory?
The cadastral plan of the territory will serve as the basis for drawing up a plan (scheme) of the land plot.
There are 2 ways to obtain a cadastral plan of the territory.
1. Via online service within 20 minutes.
2. On the Rosreestr website in the section obtaining information from the Unified State Register of Real Estate.
To submit an online request, you needed the number of the cadastral quarter in which a vacant plot was located.
I wrote about how to find vacant land plots in the article: Step-by-step scheme for obtaining a plot of land for construction. Personal experience.
The cadastral plan of the territory was sent by e-mail.
General plan objectives
Although you can do whatever you want on your own land, there are mandatory requirements, the implementation of which is monitored by architectural supervision and self-government bodies. They are taken into account in the general plan, which is drawn up before the site is designed.
Document development solves the following problems:
- coordination of the development project with government agencies and obtaining permission to develop the plot;
- rational distribution of objects on the territory (residential building, outbuildings, swimming pool, garden, playground, garage, etc.) taking into account the relief, climatic and other features of the area.
The drawings show a technically competent and safe communications layout, as well as the correct and convenient location of buildings in accordance with fire safety and sanitary standards.
A step-by-step algorithm for drawing up a land plot plan in the Argo program.
1st step : open the program and click create a new drawing,
Step 2 : load the cadastral plan of the territory into the Argo program and click add to drawing.
3rd step : we find on the cadastral plan of the territory the cadastral quarter on which the land plot we need is located .
In my case, the land plot has borders with other plots on three sides. The cadastral quarter in the program is highlighted with a colored line, so it is easy to navigate.
4th step : Load the topographic base so that infrastructure facilities, relief, buildings, etc. are displayed on the plan of the land plot.
To do this, directly from the program we select a raster background for our cadastral quarter. The background will automatically appear in the drawing.
5th step : The topographical basis helps to see what is on the land. Next, using just one program tool, we trace the contours of the area point by point.
Once the contours are outlined, the program will automatically calculate the area of the land plot. The program will also display the coordinates of all points. We indicate these coordinates in the application template for preliminary approval of the provision of a land plot. We submit this application to the administration.
Step 6 : We draw up the final plan of the land plot and fill out an application for preliminary approval of the provision of the land plot.
To do this, highlight the selected land plot with color. Copy the picture and paste it into the diagram template.
Fill in the table with the coordinate values of the points. We indicate the number of the cadastral quarter on the diagram.
The buildings
1 – House. As I already said, the house on the site is two-story. Initially it was square 10 x 10 m, but I expanded it with a terrace (5 x 2.5 m). 2 – Barn. I inherited a fairly spacious outbuilding 5 x 3.5 m from the previous owners. 3 – Toilet (1.2 x 1.5 m). 4 – Bathhouse (5 x 3 m). 5 – Outdoor shower (1.2 x 1.5 m). It’s not very convenient to heat water and carry it to the bathhouse, so I decided to build a summer shower with a solar panel on the roof on the property. During the season there will always be hot water in the cabin! 6 – Greenhouse (4 x 3.5 m).
As a result, the plan (scheme) of the land plot is ready.
Cadastral engineers will probably say that the preparation of a land plot plan should be entrusted to professionals. And they are absolutely right.
But it is necessary to note the following. It is not a fact that the administration will provide you with the land you have chosen.
In case of legal refusal to provide a plot, you will have to look for another plot of land. Again draw up a plan (scheme) of the site. Accordingly, pay the cadastral engineer again. And you need it.
It is advisable to invite a cadastral engineer when the issue of preliminary approval of the provision of a land plot is resolved positively.
That is, when all that remains is to survey the area.
Until this point, it is more profitable to follow the path of least cost.
In conclusion.
In order for the process of resolving the issue of providing a land plot to be launched, the prepared plan (scheme) of the land plot must be attached to the completed application for preliminary approval of the provision of the land plot.
We submit all documents to the administration. The administration has 60 days to give you a written response.
The step-by-step scheme for preparing a land plot plan, outlined in this article, is based on video instructions: How to find vacant land and draw up a plot of land in 40 minutes?
Fragments of video instructions
Zones
12 – Parking. There was no point in building a separate garage: I did not intend to live on the site permanently. It is much easier to park a car on the site. In my case, it will be lined with crushed stone. 13 – Reservoir. I would like to make it large enough, about 3-4 m in length. Such a personal whim! 14 – Barbecue area, also known as a summer kitchen. It would be nice to lay out this area with slabs. 15 – Compost heap. A fenced area measuring 1.5 x 1.5 m will be quite enough for her. 16 – Relaxation area with umbrella and sun loungers. 17 – Raised beds. I didn’t intend to set up a classic vegetable garden. And in order to have less trouble with the soil, the space between the beds was mulched with pine bark. 18 – Children's playground with swings and sandbox. I designed it right behind the house, away from the road. It will be located between the vegetable garden and the gazebo, right under the windows of the house, so the children will always be in sight. 19 – Garden. Here I will plant fruit trees and berry bushes.
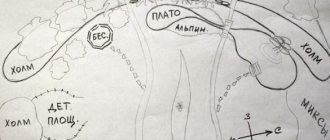
Field work
In geodesy, “field work” is the direct measurement of a site. They are carried out in the state coordinate system → tacheometers (the link describes how to work with a tacheometer) or using GPS observations.
When measuring your own plot, the longest side of a fence or residential building should be taken as the starting point. Preliminarily sketch a sketch of the area on which you will then take measurements. For convenience, choose a larger piece of paper and draw lines under the ruler (Fig. 1 a). To avoid confusion, sign the symbols on the outline. You may also find this article useful → about marking and laying out terrain.
Let's start with home. Measure it around the perimeter, recording the resulting line lengths.
To complete the picture, it is advisable for us to go to the starting point. As can be seen from the illustration, the blue arrow shows measurements inside the room. To obtain the external dimensions, the thickness of the walls must be added to the obtained value (Fig. 1b). Now we have a rigid outline of the house, which will become the basis for a DIY plan.
We take measurements of the remaining structures on the site. If the base and measured lines are parallel, one measurement will be sufficient.
In other cases, two or more measurements will be required. In geodesy, this method is called the method of alignments and perpendiculars.
If there was a separate building on the site, the measurement scheme would look as shown in Figure 1c.
I recommend: Foundation reinforcement, how to reinforce a foundation
On the ground, it is not always possible to plot a right angle, so measuring the diagonals can serve as a measurement control (Fig. 1d).
This method in geodesy is called the linear serif method. In the same way, we will obtain the extreme turning points of the site boundary, taking into account that most of the values at that time will already be known to us (Fig. 1e).
In practice, it is not always possible to obtain exact dimensions due to the congestion of the site, so we will use the parallel transfer method
.
We move the tape measure parallel to the measured value to avoid the obstacle. In this case, the length of the desired side will be equal to the sum of the measurements of the blue and red lines in the drawing (Fig. 2).
The result of our work will be an outline with dimensions, which we will turn into a site plan, drawn with our own hands (Figure 3 a).
If all the dimensions do not fit on the drawing, put them on a separate piece of paper.
Office work
In geodesy, this term refers to the processing of obtained values.
For convenience, we carry out the work, observing the proportions between the real image and its dimensions on paper, i.e. to scale. In our case, for clarity, we will use a scale of 1:200 (there are 2 meters of nature in 1 cm of the plan). We start with the base line, drawing it parallel to the graph paper lines. Our size of 19.13 m on the plan will correspond to the line 9.6 cm 19.13/2 = 9.565). We make linear serifs with a compass, the method of perpendiculars is transferred to the drawing using a ruler (Fig. 3b). This do-it-yourself site plan can be used to determine the area.
Since we carried out the work to scale, we can calculate the area of the resulting figure as the sum of the areas of complete graph paper squares and incomplete ones, which consist of triangles, rectangles or squares (Figure 3c).