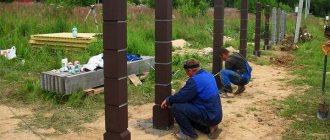
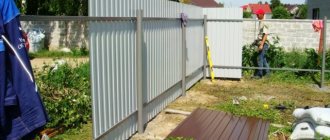
To give the fence a monumental look, you can resort to a very effective technique: build brick pillars instead of ordinary posts.
This solution will be relatively cheap, since the fabric remains the same - it is made from corrugated sheets, boards, forged parts, etc.
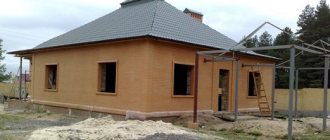
In general, the fence will look much more solid. Next, we’ll talk about what materials are used and how brick fence posts are made with your own hands.
Preparation and calculations
When planning to build brick fence posts with your own hands, you must keep in mind that seemingly simple posts have a complex internal frame that ensures the stability and strength of the entire fence structure. The first step is to determine the features of the future structure and its overall dimensions.
By choosing the standard size of the interval between pillars, equal to 2 meters, and one and a half masonry, you can imagine how many bricks are needed for a pillar. The initial stage of preparation is marking the territory. The location of the future fence is cleared of plants to lay a ditch under the foundation. Considering the distance between the supports, calculating the volume of material is easy. You can save a lot if you put solid brick in the first three rows and make the subsequent ones hollow.
Choosing a brick: which one is better
Every builder strives to make the brickwork of fence posts look beautiful, but special attention should also be paid to the practical side. How the fence will perform its functions is determined by the material. For example, if fence posts are made of facing brick, then after a while it will crumble and lose its layers. We list the most common types of bricks.
- Ceramic ordinary brick. It is produced in two types: solid and hollow. The first option is durable, but too heavy. The second is characterized by light weight but low strength. The material has an affordable price; it will look better externally under the cladding.
- Clinker. It has high strength characteristics and does not crumble. Clinker is beautiful and has many textures. Looks harmonious next to any style of building. The price is much more expensive than facing bricks.
- Silicate. Has noise absorption properties. It is not affected by temperatures and does not lose its performance in frosts and high humidity. Eco-friendly and expensive.
Nowadays, “torn stone” called “Rock” is popular, which is used, among other things, for cladding facades and fences. “Skala” has exceptional characteristics and is successfully used in the construction of fences.
Calculation of the dimensions of brick pillars
Before you build brick fence posts with your own hands, you need to accurately determine their dimensions. Having included in the project a pillar height of 2 meters, its size is calculated based on the standard brick thickness (0.065 meters). The number of rows to be laid in one support is counted: its height (2 m) is divided by the thickness of the brick. The result is the number of rows (30.7), not counting the thickness of the solution. The amount of brick depends on the technique that the mason will follow. A row of support, laid out in one and a half bricks, consists of four parts, and in two - from six. Assuming the thickness of the seams to be 1 cm, subtract this figure from the result obtained:
- 30 seams × 1 cm = 0.3 m;
- 2 m – 0.3 m = 1.7 m.
The figure is divided by the thickness of the brick (1.7 m: 0.065 m) to obtain the entire material - this is the actual size of the pillar of 26 rows. By multiplying this figure by the number of bricks in the row, the number of all bricks is determined. Bricklaying methods are important here too. A masonry of 1.5 bricks will require 26 × 4 = 104 pcs., and a masonry of two - 26 × 6 = 156 pcs. In addition, you should always make a reserve for defects and broken materials (5% - 5 bricks).
Estimated cost
After weighing all the possible costs of building brick supports for a fence, the cost of the project is determined. This includes materials, aids, tools and wages for the hired crew. If you decide to build a fence yourself, the savings can be 35-40%. The total price of a fence with brick pillars depends on the following items:
- quantity of materials;
- dimensions of the fence (length, height of supports);
- shape of support pillars;
- masonry method.
Brick prices vary widely. The cost of simple facing bricks starts from 18 rubles per piece. Hand-molded material can cost from 73 to 97 rubles per piece. A standard fence with brick pillars will cost the owner 8,500 rubles and more. The price includes the price of laying the support (brick + mortar + fittings or pipe). If we count in linear meters, installation of a fence will exceed 7,000 rubles. It is more profitable to build the fence yourself.
List of materials
First, we list what materials and tools you will need:
- decorative or red brick, it is better to take a new whole one;
- cement mortar of a grade not lower than M400;
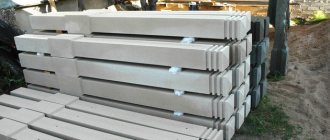
- a metal pillar around which the brick one will be built;
- gas drill or hand drill, shovel;
- crushed stone and sand for butting;
- metal rods 8 × 8 mm;
- plumb and level so that everything is smooth and beautiful;
- grinder, welding machine and rubber hammer;
- trowel - a spatula for applying the solution;
- mortgages, on which the fence itself will then be attached.
A natural question arises: what about the number of bricks per fence post? Below we will tell you how to make the calculations, but on average you will need 128–132 pieces per support. It is better to take a little more so as not to interrupt construction if there is not enough.
Where to start working
To ensure straightness, the marking cord is pulled. The foundation is selected. A fence made of corrugated sheets or wood will stand well on a pile foundation.
A mason needs to stock up on the necessary equipment. These include:
- trowel - a tool for applying mortar to brick;
- shovel for loading the solution;
- level, plumb line, string for tracking horizontal and vertical;
- pickaxe - a hammer with a pointed end for breaking off part of a brick;
- grinder - allows you to cut material or make grooves.
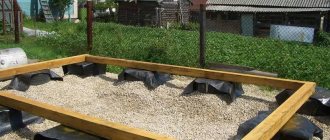
Foundation for a fence with brick pillars
Installation of any type of fence with brick pillars requires a foundation. For a light fence made of wood or mesh, one foundation is selected, but for a fence that has significant weight, a different type is required, for a larger load. Soil composition, groundwater depth and freezing are important. If the soils are mainly clayey, heaving, and groundwater is located high, the holes for the piles should be deepened 20-25 cm below the freezing level.
Tape
If the fence is made of brickwork between pillars or other massive materials, then a strip foundation must be used to install and ensure its stability. A trench is dug under it, and holes with a diameter of 15-20 cm are drilled in the places where the pillars are installed. First, concrete is poured into the wells with pillar posts installed in them. After this, layer-by-layer concreting of the trench begins. A trench 20-30 cm deep is dug along the entire proposed perimeter of the fence. The foundation parameters (overall dimensions of the trench, reinforcement, backfill depth) are determined based on the strength characteristics:
- the trench has a depth of 20-30 cm;
- the depth of the hole for the pillars is 90-100 cm from the surface;
- foundation height above the surface – 40-60 cm;
- width – 20-35 cm;
- distance between supports – 2.5-3.5 m;
- height of supports – up to 180 cm (masonry cross-section 38×38 cm).
If there are unstable soils on the site, before pouring the foundation, lay reinforcement bars (4-6 pieces, diameter 14-18 cm). We install the support no earlier than 2-3 weeks after laying the foundation, laying waterproofing under the bottom of the pillars.
Columnar
Columnar foundations are made on highly heaving, freezing soils. Such foundations are well resistant to squeezing out of the structure in winter. To build the described foundation, the following procedure is followed:
- mark the location of the pillars;
- arrange nests for supports with a sand and gravel cushion;
- tamp the pillow strictly vertically, using a level;
- Fill the supports with mortar.
The foundation does not require a large amount of materials, is easy to build and has a relatively low cost.
Stone
A stone foundation is made from natural or “ragged” stone. It has high strength indicators and is very reliable. However, this type of foundation is rarely used, since it does not harmonize with all types of fences. It looks good with wrought iron and brick fences. The construction of a stone foundation is complicated by its large weight, which may require additional equipment. If such a foundation is being built, you need to prepare the following materials:
- stone selected according to shape and size;
- mortar with cement for fastening elements;
- twine and pegs for marking the trench;
- crushed stone;
- tools (shovels - shovels and bayonets).
Making the foundation
Let's start laying out the foundation.
First step. We dig a trench. We maintain the width 60-70 mm wider than the future masonry. We make the depth at least 80-100 cm - the masonry will weigh quite a lot, so it’s better to play it safe. We level the walls and bottom of the pit.
Trench
Second step. We fill the bottom of the trench with a 10-centimeter layer of sand. Carefully compact the pillow. The sand will act as drainage and shock absorber during seasonal soil movements.
Third step. We install the formwork. We align the boards so that after pouring the concrete, the top edge of the base is perfectly level.
Fourth step. We reinforce the foundation. To do this, we tie the steel rods using wire into a mesh according to the dimensions of the foundation. We lay the finished mesh on a compacted sand cushion.
Formwork and reinforcement
Shrinkage cracks in the brickwork of a fence. There is no reinforcement of the brickwork, no settlement of the foundation. Further destruction of the masonry will accelerate
Fifth step. Fill the trench with concrete. We buy the solution or prepare it from a portion of cement, 4-5 portions of crushed stone, 2-3 portions of sand and water. We carefully level the filling surface and pierce it with reinforcement in several places to remove excess air. We give the pouring 3-4 weeks to gain strength. The formwork can be dismantled at least 10 days after pouring. In hot weather, we spill concrete with water to prevent it from cracking.
Concreting
Foundation
Foundation
Preparatory work and marking
Having cleared the space from vegetation, they begin marking. To do this you will need pegs and rope. Start with the corners of the future structure. Taking into account the characteristics of the soil, holes of the required depth are prepared for the intended location of future pillars. The laying of any brick pillar will begin only after the technological readiness of the foundation. In the meantime, you should carefully check the material. The brick for construction has already been selected and must meet the following qualities:
- strength. The main requirement for a support is its resistance to external factors: wind, rain, temperature changes;
- long service life. A fence with brick pillars, built in accordance with technology, will really last a long time;
- some types of decorative pillars made of hollow bricks are light in weight, which is an advantage during installation and when choosing a foundation;
- attractive appearance of the brick structure.
Solution: what proportions should be
The composition of the mixture plays an important role in ensuring the strength of the future structure. Its density and density are of great importance for work. To prepare the solution, you should use high-grade cement (at least M-400), and fine sand.
To prepare the mixture you will need a container (bucket, vat). The proportions of the components are 1:5 (cement: sand). To ensure plasticity, many craftsmen add liquid soap or dishwashing detergent (20-30 grams per bucket). According to the technology, in order to give the specified quality to the substance, lime is added (1 part). There is a “folk” method to check the quality of the solution. The prepared mass is applied to a plane, and a cross is drawn on it. Then the formation is taken to the trowel. If the cross does not move, this indicates the desired consistency of the solution. The decorative quality of the pillar increases significantly if soot is added to the mixture, which gives it a black color, which looks original.
Laying fence posts: basic technologies
Typically, the pillars are 1.5-2 m high and 38×38 cm or 51×51 cm wide (for three-meter supports). Strength is achieved by the method of laying bricks. The seam between the bricks (8-10 cm) of the bottom row should overlap the surface of the top brick. This masonry scheme ensures that the rows are connected to each other.
Operating procedure
To correctly assemble a brick pillar yourself, you need to follow the following procedure.
- Laying waterproofing under the support so that it does not become saturated with moisture. The wet brick begins to deteriorate. For insulation, roofing felt or special insulation with bitumen (“Gidroizol”) and mastic are used.
- Each layer is checked with a level. Use the handle of a trowel, tapping it on the masonry. You must also have other devices for laying brick pillars - a hammer with a rubber tip and others.
- It happens that poorly wiped mortar drips onto the brick. It is recommended to lightly moisten the material with water. This makes it easier to clean the brick.
- After laying out several layers, measurements are taken. By tapping with a hammer, displacements (even 1-2 mm) are corrected. Fill vertical gaps with mortar.
- The voids between the pipe and the masonry are filled with mortar; if it is large, crushed stone is mixed with sand, poured into the voids and secured with mortar.
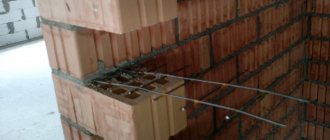
Laying brick pillars under rods
Masonry with rods allows the mason to make beautiful seams, since usually excess mixture crawls out onto the plane of the brick, and the seams are made uneven. The rod (side - from 8 to 10 mm) is cut into pieces that are 10-15 cm larger than the pillar. Lay the first row, then the rod is laid along the edge. A layer of mortar and bricks of the second row are applied. The metal prevents them from sagging. A trowel is moved along the rod, removing excess. Bricks are checked by level. The same method applies when laying the rod on its side. The solution is applied with a trowel, the excess is also removed, a level is applied, and the workpiece is removed. The rod is removed and the seam is held in place with a trowel.
Installation of mortgages for fastening fence sections
The master often misses a detail - what to attach the fence to. For fastening to the pipes in the middle of the column, embedded parts (angles, studs, etc.) are welded at the same height so that the crossbars stand level. For a solid brick wall, use 8 cm thick wire loops for every fourth row. In the case of corrugated sheets and wood, a cut is made in the brick and metal plates are attached to support the weight of the blade. Logs are welded onto the mortgages to secure the fence.
How to make swing gates and wickets: answers to the most frequently asked questions
The portal's users liked the UncleVovan gate. They asked the master questions.
MishaninaForumHouse Member
Can you please tell me what size the profile pipe is?
UncleVovan
I bought this pipe:
- Section 60x40x2 mm - 24 m;
- Section 40x20x2 mm - 18 m;
- Section 40x20x1.5 mm - 24 m.
Mishanina
What is the height of the posts and fence?
UncleVovan
Gate posts are approximately 2 meters. Then I will make the fence from welded mesh. The height of the fence will be 1.8 m.
Mishanina
How did you reinforce the foundation and how much cement did you use?
UncleVovan
Foundation reinforcement – 2 rows of 5 rods + 5 pcs. transverse frames. Together with the laying of the pillars, 15 bags of cement, 25 kg each, were needed. “Ten” fittings. It took 72 m for the foundation and 24 m for the pillars.
DIY brick fence post. Underwater rocks
Beginner masons face a number of problems:
- the evenness of the first row of bricks, on which the appearance of the entire structure depends. A stretched horizontal thread should be used 2-3 cm above the masonry;
- horizontal and vertical masonry. Each brick must be checked with a level, they all must be at right angles to each other;
- beautiful seam. The pillar looks untidy due to unwashed mortar. When laying with a rod, it should be wiped off;
- bricks stained with mortar are cleaned immediately;
- mortgages are not provided. There is nothing to fasten the fence cloth to.
Idea
Before starting such a large and ambitious project, you should familiarize yourself in more detail with all the proposals that companies for the construction of these structures can offer.
In order to find them, you don’t have to go to every store and check all the details. Using the World Wide Web, you can find information, photos of a brick fence, and any other information related to this product.
The main thing is to correctly analyze the market and choose exactly the product that is most suitable.
Common methods of processing and protecting seams
The masonry of a finished brick pillar will look more beautiful if the seams are treated as follows.
- Rectangular undercut. It consists of removing excess mortar with a trowel and treating with a stiff brush or lint.
- Rectangular recessed. It consists of removing part of the mortar from the seam (5-6 mm) and compacting and smoothing it with a round dowel. The use of such treatment protects the masonry from natural manifestations.
- Beveled jointing. Used in harsh climates. Using a sharpened trowel at an acute angle, cut the mortar to a depth of 3-4 mm.
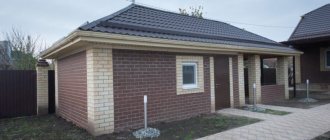
Fence caps
The final element of the pillars are caps, which provide the building with protection from precipitation. Manufacturers offer caps from various materials and different designs.
Concrete
They consist of an umbrella-shaped upper part protruding beyond the boundaries of the support. Moisture does not fall on the support, flowing down. The lower part of the cap is attached to the support. Products are produced in concrete colors and with the addition of colored pigment. They don't burn out.
Metal
The caps are made of galvanized steel. They can be a simple lid, or they can look like a pyramid. Similar products can be made from tin on your own site. Manufacturers are now offering innovative caps made from composite materials and alloys. They are distinguished by their slim design, elegance and reliability.
Determining the type of structure
They begin work by carefully drawing up a drawing. The diagram should show:
- soil type;
- type, height of the foundation;
- height of pillars;
- location, area of the fence on the site;
- dimensions of gates, wickets;
- step between supports;
- material for filling openings;
- communications that can pass under the fence.
Scheme of a fence with red brick pillars
It is important to correctly calculate the load on the base so that the fence can withstand the weight of the materials and does not begin to collapse.
In addition, it is worth remembering the SNiP requirements for fences. You will find detailed recommendations of the current legislation in the article: “What distance should be from the house to the neighbors’ fence.”