29308 1 1
Villara September 22, 2016 “Face and hair care, nutrition, smartphones, interior design, apartment renovation, SEO/copywriting”
Flower boxes are a decoration for any exterior, be it a kitchen or living room window in a multi-story building, or a loggia or window in a country house in a private house. In order for the flowers to bloom wildly and delight their owners, and to ensure that caring for them is not difficult, it is important to choose the optimal containers for the plants.
But that’s not all: it’s important to firmly and securely secure these boxes outside the window using brackets, stands or other fasteners.
Containers are selected not only based on appearance, they should be as comfortable as possible in size and depth for flowers
Preparation of materials and tools
In order to make a flower box with your own hands, you will need an electric jigsaw, a plane, a grinding machine, a hammer, a square, a screwdriver, a tape measure, and also tongs.
In the absence of a jigsaw, you can use a saw. However, the work in this case will be somewhat more difficult to carry out, and the process itself will be longer.
The design is selected depending on the availability of appropriate equipment; if you have to work manually, it will be easiest to make a simple rectangular or square box. Whereas if you have an electric tool, this allows you to make any designs.
A DIY flower box can be made from pieces of OSB, plywood sheets, as well as various slats and boards. The thickness of the latter should be 10 millimeters or more. In order to treat the surface and protect the material from the negative influence of insects and microorganisms, an antiseptic composition should be prepared.
Wood will look more attractive if it is treated with stain, but any other coloring composition will do.
Parts can be fastened using self-tapping screws, nails or glue. Quite often, craftsmen use two fastening methods at once.
Kokedama
Kokedama is a ball of earth wrapped in moss. This design is held in place by threads. Due to the absence of pots, kokedama looks original and natural. I talked about the materials and how to make it here: “How I visited botanical gatherings, or Kokedama “Sperm Whale” with my own hands.”
It is easy to hang a kokedama using the same threads that were used to wrap it. Alternatively, you can stitch the ball through with threads or braid it with macrame.
Flower box manufacturing technology
If you decide to make a flower box with your own hands, then at the first stage you need to use boards whose width is 20 cm. You will need to cut blanks from them, these will be three long elements that will go on the sides and bottom. While the other two will be used for the ends. The latter should be made slightly wider than the bottom. The difference will be in the thickness of the sidewalls.
The parts must be processed with a plane and then with coarse sandpaper. Holes should be drilled along the edges, 4 should be placed in the end blanks, while the other three should be in the side blanks.
conclusions
Boxes for growing flowers outside the window and stands for them will become a real decoration for your home, window or loggia, and an independent decorative element. Tell us what boxes and brackets you use when growing flowers outside your windows? You will find more useful tips on the topic in the video in this article.
Did you like the article? Subscribe to our Yandex.Zen channel
September 22, 2021
Accessories, Design, Windows
If you want to express gratitude, add a clarification or objection, or ask the author something, add a comment or say thank you!
Design assembly features
When making balcony flower boxes with your own hands, when assembling the sides and bottom you need to use screws whose length is 50 millimeters. Only then can you begin installing the end parts.
After the flower container is assembled, its surface can be sanded using fine sandpaper for these manipulations.
The wooden box must be impregnated at the last stage with an antiseptic composition; one should not forget about either side, while the outside of the product can be coated with stain; enamel or varnish is also perfect for these purposes.
How to make a fashionable bouquet of flowers in a box of peonies with your own hands: photo, master class
During the peony flowering season, it is simply impossible not to take advantage of this advantage, because these flowers have a very elegant, spectacular appearance and an amazing, strong aroma!
INTERESTING: Peonies are not expensive at all, have good durability and are now in trend! This means that a bouquet in a box of peonies will be very fashionable and relevant!
What you will need:
- Any box (preferably not very tall)
- Satin ribbon
- Lace (a strip exactly as long as the diameter of the box).
- Floral sponge
- Wide tape
- Decorative foliage
- Gypsophila
- Bouquet of peonies
- Wooden inscription or decoration for a bouquet
How to do:
- For this bouquet, you should choose a box that is not very high, since the peonies for the bouquet will be cut short, because the trunk of the flower is not strong enough).
- Decorate the box inside with tape and outside with decorative paper, and also attach a satin ribbon bow or lace in a circle).
- Place a floral sponge inside with inserted peonies, decorative greenery, gypsophila, and deepen the wooden decor in the center.
Bouquet in a box with peonies:
A box with peonies: white and pink A box with a lush bouquet of peonies and other flowers, greenery, berries A small bouquet of bright peonies A stylish bouquet of bright peonies A small bouquet of peonies in a box
Making a flower box from pallets
DIY balcony flower boxes can be made from pallets. To do this, the old stand needs to be disassembled into separate parts, the slats should be carefully pryed off using a nail puller.
As for the fasteners, they must be removed with pliers. If there are damaged and rotten slats, they need to be removed.
As a rule, about ten suitable boards remain from such products. The wood will need to be cut to the required sizes, then cleaned with abrasive sandpaper.
At the next stage, you can assemble the upper frame and lower base. The two parts must be fastened with side panels, using nails. Decorative strips will allow you to disguise the joints. Now the master can begin finishing work using paints and varnishes.
Floating shelf
Source
What you will need:
- wooden plate;
- scissors;
- yarn.
How to do:
Cut 50 strips of yarn approximately 3 meters long (a little more is better than less). Gather them together and tie a knot exactly in the middle - this will be the center of the pendant. Divide the ends of the threads into 4 equal parts. Then divide each of the parts into two more and twist these parts together; can be divided into three and braided.
All you have to do is throw the 4 resulting strands (or braids) over the object on which you are hanging the composition and tie a knot. Place the plate in the middle: it will hold firmly, and you can put small flowers on it. For decoration, you can tie a yarn tassel to the bottom knot.
Designer's recommendations
If you decide to make such a wooden flower box with your own hands, then the outer surface can be decorated using wood cuts. These can be thick branches or planks that look like a picket fence. In the lower part you need to strengthen the legs, which should be made of bars. This will ensure ventilation and keep the wood in good condition.
The flowers inside should be placed in plastic pots, but an alternative solution can be to plant plants directly in the box itself. First you need to lay a film on the bottom, making drainage holes in it.
Unusual street planters made from unnecessary things
Stylish flowerpots that will amaze with their appearance can be made from old or out-of-fashion items. Giving objects a second life is now fashionable. Here are a few garden planters that are definitely worth your attention.
It’s as easy as pie to make a planter for a summer house from an old chandelier; just place pots of flowers on it. But it is important to take into account their size so that the composition does not lose balance.
A flowerpot-bicycle will look original on the site. Painting it a single color will make it decorative. And you can place pots with plants not only on the trunk or frame, but also near the wheels.
A hanging planter made from an old T-shirt is very practical and elegant. It is unlikely that anyone will guess what it is made of. Just don’t take clothes that are too old to prevent the fabric from tearing. There are different ways to cut a T-shirt into ribbons. Some can be found on the Internet, and your imagination will probably tell you some!
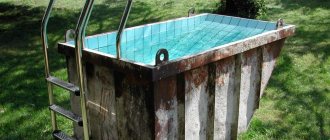
Do you feel bad about throwing away an old leaky bucket? Turn it into a Provence style flower pot! To do this, you can apply a thematic design to the bucket, tie it with ribbons, burlap, or place lavender inside.
Do not throw away mugs with chipped or chipped handles. It’s better to make a pot-cup, decorating it with any available materials.
A flower pot woven from newspaper tubes will look impressive. Just don’t place it in the open air, otherwise the structure will quickly lose its attractive appearance.
Balcony flowers
More and more often, when walking down the street, you can see balconies and windows decorated with flowers. For outdoor decoration, it is better to use long, but not deep flower boxes. Their height should not exceed 20cm. The earth, especially wet, weighs a lot, so such restrictions are necessary.
The flower box can be attached using hinges, brackets, or simply placed in a forged base. If indoor plants are used for planting, it is necessary to provide for the possibility of removing the structure for the winter so that the flowers do not die.
There are several tips to help minimize the maintenance of your balcony front garden:
- It is better to paint a box with flowers on the south side in light colors; bright colors fade quickly. Preference is given to natural shades. Brown or green work well. The main rule is that the box should not be brighter than the flowers themselves;
- Pay attention to the stability of the structure; poorly installed fasteners will not be able to support the required weight;
- Drainage holes should not be located too close to the wall, otherwise dirty smudges will remain. It is better to place the holes on the far wall or provide a slight slope;
- Flowers are often planted in 2 rows: the first is climbing plants covering the box itself, the second is the flowers of the main composition. This arrangement allows you not to pay much attention to the design of the box and put it together from simple boards.
Alternative option for making a box
Before making a flower box with your own hands, the master must carefully approach the issue of choosing the material. A floorboard with a width of 10 cm can be used as it.
To carry out the work you will need the same set of materials. When choosing the height of the container, you may prefer a parameter equal to 40 centimeters.
After the boards are connected to each other, bars can be installed in the corners. If you plan to plant climbing plants in such boxes, then you need to provide supports for them. To do this, you should cut narrow bars and then knock down a lattice, which should be fixed to the finished box from the inside.
Multi-level shelves with holes
Source
What you will need:
- wooden plank;
- several flowerpots in the shape of a cylinder or with an extension at the top;
- rope;
- metal ring;
- drill and drill bit 10mm;
- saw;
- sandpaper and paint and/or stain (optional).
How to do:
Turn the pots over and place them on the board, trace them, then measure 2.5-3 cm along the sides and draw squares around the circles. It is on them that you need to cut the board with a saw, so it is more convenient to start closer to the edge/corner. Already on the sawn-off planks, draw a smaller circle inside the circles already existing there. It would be optimal to step back 6-7mm from the edge or play it safe and measure the diameter of the flowerpot in the part that should be above the shelf.
Using a drill, make holes inside the small circle until the hole is large enough for the saw to fit through. Use a saw to cut out the entire circle. Then drill a hole in each corner for the ropes. Thread the ropes, tying a knot under each shelf, and tie everything to the metal ring on top. The pendant is ready! You can further decorate it before threading the ropes: sand the boards and saturate them with stain, paint the flowerpots.
Important: if your flowerpots have a hole at the bottom, it is better to make the bottom shelf without a hole, placing the flowerpot there on a saucer (glue the saucer for reliability): the fact is that water from the upper flowerpots will flow down.
Wall pockets
They make bare brick walls look a lot more fun. This is an original idea that will appeal to fans of mini-gardens. Laconic flowerpot pockets of different sizes are placed on the wall in any order you like. Such floral accessories can be purchased online or made yourself from felt or ceramics so that the plant roots can breathe freely.
Hanging shelf
This is the way you may be used to placing spice jars in your kitchen. But small pots with indoor plants on a hanging narrow shelf look quite aesthetically pleasing. This designer accessory will highlight a painting on the wall. When creating a shelf with plants, it is important to maintain symmetry and place the containers at an equal distance from each other.
Plant selection
Garden annuals and indoor plants are most convenient for placing on the balcony.
To obtain ready-made annual seedlings by May, the seeds are sown in late February - early March. These are plants such as calendula, gatsania, diascia and everyone’s favorites, petunia (for more details, see the article “petunias on the balcony”) and surfinia.
The variety of climatic zones in Russia requires an individual approach to the timing of moving indoor plants closer to fresh air. Adaptation must occur gradually. To “harden” the plants, when the daytime temperature rises to 15-17 °C, the flowers are taken out to the balcony for 1.5 - 2 hours. When warming reaches 20 °C, plants are left for a full day.
Spring is characterized by significant fluctuations between day and night temperatures. Plants are removed indoors if the nighttime thermometer drops below 8 degrees. At this temperature, in abundantly watered heat-loving plants, the root system rots and dies.
On glazed balconies, the air temperature should not exceed 28-30 °C.
Balcony dimensions
Loggias and large balconies
They allow you to use not only perimeter fencing, but also area horizontal containers. Stepped frames are placed near load-bearing walls. The ceiling surface is used for hanging flowerpots.
Standard designs
Fencing is activated. Light plastic pots and containers are used for hanging on balcony railings and building a horizontal green perimeter.
Small size
The emphasis is on structures mounted on a vertical load-bearing wall. Light containers for growing ampelous plants are attached to it (from the German die Ampel - hanging flower vase).
Colander flowerpot
Have a few old colanders accumulated? Find a worthy use for them in decoration. Paint them in rich colors and plant plants in them. Thanks to the side holes, the soil will allow air to pass through well, but also water. Therefore, it is better to hang such flowerpots on a balcony, veranda or patio at the dacha.
Hanging cut
The rough texture of a natural wood cut will be a wonderful accessory for eco-style interiors. You can hang such a tabletop using the method described in the first example, or you can drill four holes on the sides of the circle and thread a strong rope or leather braid through them. A copper hook goes well with natural wood and leather.
Window decor
In addition to curtains, the window can also be decorated with multi-level mini-pots with plants. The number, height and sequence of hanging containers largely depends on the style and purpose of the room and is selected individually. For example, the arch line is very popular for kitchen windows in country style.
Pipe cuttings
It is quite possible to arrange compact multi-tiered flower beds or beds using scraps of polypropylene pipes, of course, of a suitable diameter. By decorating simple plastic with good paint, you will be pleasantly surprised by the result - it will be almost impossible to recognize pipe scraps in stylish containers.
Hide the plastic surface under a good paint, and the flowerpots will look stylish and expensive