Who doesn't want to have a swimming pool on their property? There are probably not many of them, because everyone likes to swim on a hot day. Children especially love to do this! However, not everyone can afford such a pleasure, and sometimes there is simply nowhere to place large structures, so you have to come up with alternative options. Today we’ll tell you how to make a budget pool at your dacha with your own hands from scrap materials. Let's consider several options of varying degrees of complexity.
All you have to do is build in a jacuzzi, and life is good
Options for constructing country pools
All pool designs can be divided into two large groups: stationary and temporary. Stationary structures include all structures partially or completely dug into the ground, which cannot be moved without destruction. The bowls of such pools are made of monolithic concrete, brick, and sometimes concrete blocks are used in construction. They can use a polymer liner (plastic bowl) or provide waterproofing using film or coating waterproofing materials.
The initial stage of construction of a permanent pool
Temporary pools are mainly inflatable and frame. They differ in that they are installed in the spring, and in the fall they are rolled up and hidden.
Which swimming pool is better for a summer residence? If you are not yet sure whether you need such an “attraction” on your site or not, buy the cheapest and fastest to install: inflatable. It holds water due to the inflated ring. The disadvantage of such a pool is that it is not very deep: 1.2 meters including the sides is its limit.
But, if you want it for children, then you can’t think of anything better, and adults can “hang” on the wall and relax after “relaxing” at the dacha. Depending on the quality and intensity of use, it can last from a couple of years to four to five.
Even an adult can relax more or less comfortably in an inflatable
A frame pool is a little more expensive and a little more difficult to install. It already has a frame in the form of pipes, on which a special film in the form of a bowl is hung. The depth of such a pool is up to 1.8 m.
Stationary swimming pools are for those who have decided that they simply need a swimming pool at their dacha. Construction and maintenance are not cheap. First, a pit is dug, then a monolithic slab is poured, and in the second stage, the walls are erected. It is necessary to take measures to waterproof the walls outside - so that underground and melt water do not penetrate into the bowl. Next comes insulation of the walls. If this is not done, heating the water will be problematic. After this, a set of measures begins to waterproof the walls inside the bowl, and then finishing work begins.
A large pool requires constant maintenance
But the finished bowl is not the entire permanent pool. It is necessary to clean the water: leaves, dust and debris fall into it, bacteria and algae multiply. To bring the water into order, you need a pump, a filter system, chemical reagents, and also means for “scooping out” leaves and sediment from the bottom. Some equipment is also needed to maintain a temporary pool, but since the volumes are smaller, you can often get by with manual cleaning or water replacement, or you can use improvised means. And if there is at least 5-6 tons of water in a stationary pool (this is a small 2*3 bowl with a depth of 1.4 meters), then even such a volume is problematic to manually clean.
Main stages of reservoir construction
The sequential process of organizing an artificial pond in your home includes the following points:
First, determine those responsible for the construction of the future pool. Whether this will be done by a professional team of builders, perhaps you will share part of the work with them or even take on the matter yourself. Do not forget about the real complexity of constructing such a structure; a thorough understanding of all the subtleties during the construction process is necessary; omission of important points is extremely unacceptable, since this jeopardizes the safety of the building and the health of the people living in it.
Preparatory work must be carried out correctly. If specialists complete the work of constructing a reservoir from scratch, you can take care of other important aspects - ventilation, installation of a waterproofing layer and thermal insulation.
Installation of a frame pool at the dacha
Regardless of whether you are going to install an inflatable or frame pool, you need to prepare a site for it. These pools can be buried a little in the ground, or they can be placed on a prepared site. It doesn't matter. It is important that the surface is level and a lawn is not the best option, even if it is level. The grass under the bottom begins to decompose, and the appearance of the area after the pool is removed is very pathetic.
At the dacha they installed an Esprit Big swimming pool with a diameter of 450 cm and a wall height of 130 cm. It was decided to bury it almost halfway. So what did they do? We started by preparing the pit:
- We remove the subsurface layer of soil in an area that is 40-50 cm larger than the pool in all directions. This indentation is minimal. The instructions indicate a value of 1 meter. If possible, do more.
- The depth of the pit for a “surface” pool is about 20 cm; for a buried pool, add the desired depth to which you plan to dig. In this case, the pit was dug to a depth of 80 cm. The bottom was leveled, stones and roots were removed.
- A layer of sand was poured into the pit and compacted. The compacted layer should be 10-15 cm. If the soil drains water well, the sand is leveled with a rake and then watered. The pit can be filled completely. When the water goes away the sand will be leveled. If the water drains poorly (as in our case), we take a tamper and trample the sand with it. In any case, the surface must be leveled and compacted so that no footprint remains. This is a prepared pit with a layer of geotextile
- To prevent the bottom from going into “waves” later, you can lay a layer of geotextile. This is a non-woven material (black in the photo). It will prevent roots from germinating, and also serves as a barrier to bugs/worms that can make holes in the film.
A frame or inflatable pool can be placed on such a base. This pool design has a metal frame wall and support posts that are attached from the outside. It is advisable to insulate the part of the walls buried in the ground. You also need insulation on the bottom: so that the water heats up faster and does not cool down.
First, we lay out a U-shaped profile at the bottom into a ring. Then we take out the metal side, lower it into the pit (one person can’t handle it - it’s hard), unwind it, put the bottom edge into the unfolded profile, and connect it. The operation is simple, everything is clear: in the right place the sheet is connected into a ring.
The internal frame of the pool has been assembled
Next, we take the EPS and lay it out on the bottom of the pool, cutting off the edges, trying to keep the gaps minimal. After laying out the polystyrene, the joints and edges were sprinkled with sand (according to the instructions). Why was polystyrene foam chosen rather than the much cheaper foam? The foam will be flattened under the weight of water, and the effect of such insulation will be zero. EPS can withstand heavy loads, although it is expensive.
The interior is lined with polystyrene foam
Next, we bring the film liner inside, more or less straighten it, and temporarily attach it to the sides with tape. Next we start swimming. Pour a little water to the bottom - 10-15 centimeters, straighten the folds on the bottom, trying to keep everything even. Then gradually adding water. We level the film on the walls.
Film leveling process
Note - it is better to carry out the work on a sunny, warm day, and not only because the “swimmer” is cold. In the sun, the film softens, making it easier to straighten. We worked without the sun - wrinkles remained, although this did not affect the pleasure of swimming.
After the water procedures, stiffening ribs were installed on the outside, installing fixing strips along the upper edge of the pool. Next we started insulating the walls. In the photo above, laying of one layer began, but in general they laid two - 3 cm each. Thicker slabs are difficult to bend, but thin slabs are easy to bend. Therefore, the installation of polystyrene did not take much time.
Having installed the insulation, they began to fill the pit. Since ours is clay, we used native soil to prevent water from leaking under the walls. They poured a small layer, tamped it down, and so on until the top. One point: the bowl must be filled with water.
This is after backfilling the pit
The instructions include a recommendation to make external supporting walls. In this case they were not made. The staircase was half buried, as it was designed to reach its full height, but here 65 cm was buried. They buried it to this depth from the outside. All that remains is the installation of equipment.
As recommended, the included filter and pump were installed. After connecting, it turned out that there was a small leak at the connection point. After partially draining the water and drying, the area is coated with sealant (neutral silicone moisture-resistant). The problem has disappeared.
Where was it dripping...
That's it. The swimming pool at the dacha is ready for use.
This is already with all devices
The model was chosen to be frost-resistant, so as not to put everything away for the winter. The bowl is covered with wooden shields.
The recommended method for installing a frame pool is demonstrated in the video.
Prefabricated frame pool
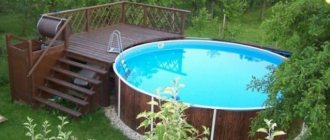
If leaving something on the site is dangerous, you can buy another design. It's just a system of stands and a film liner hung on it. A pool looks like the one in the photo below; it is never buried, but installed on top.
Prefabricated frame pool
Although in the photo he is simply standing on the lawn, this “feat” is not worth repeating. In addition to turning the lawn into a dirty mess, the soil sucks out all the heat. The swimming season with this setup is extremely short. Moreover, even in the heat in the morning the water is cold; children can swim only from lunch. In general, it is better to make an insulated deck under the pool. Its installation does not take much time and money, but using the pool is much more convenient.
The beginning is the same as described: a pit is being dug. Its depth is about 20-25 cm. First, pour crushed stone into the pit in a layer of 10 cm, compact it well. Lay out geotestile. It will prevent sand and gravel from mixing. On top of it is sand, which is also compacted. You can already install a pool on sand, but this is also not the best option. sand drags around the whole dacha, and cats also love to walk in it. Therefore, it is better to lay at least homemade concrete slabs, paving slabs on top, and sprinkle with pebbles, as in the photo.
Sprinkle the perimeter of the pool with pebbles to make it more comfortable to walk and prevent sand from running around the area
You can also knock down a shield from wooden boards, but the boards must be sanded and treated with antibacterial impregnation. You can use WPC - wood-polymer composite. They definitely do not rot and are not afraid of water or frost. A swimming pool can be placed on such a base. But even in this case (except for a wooden platform), it will be difficult to warm up the water.
Pool on a wooden base
Insulation required. This is at least 10 cm of EPS, laid under the bottom and covered with geotextile - as a temporary option. For a permanent insulated platform, a deeper pit is required: increase the depth by 15 cm. The sequence of layers is as follows: crushed stone, geotextiles, sand - 10 cm, EPS - 10 cm, geotextiles, sand - 5 cm, paving slabs or slabs.
Inflatable pool at the dacha
Inflatable pools are placed on the same base. Only they are installed quite simply: take the pump and start pumping up the ring. When it is filled with air, water begins to be poured inside. The ring gradually floats up, raising the edges of the pool. When the entire wall is level, the pool can be considered installed.
Laying waterproofing
The pool construction technology includes waterproofing, which can be carried out using two methods. Some experts believe that the protective layer should cover the entire surface of the bowl, while others recommend waterproofing only the seams.
The work uses roofing felt sheets, bitumen, and liquid rubber. A PVC membrane and hydrophobic dry (or two-component) building mixtures are suitable. Liquid materials are applied in two layers, preferably with a reinforcing mesh.
When choosing a material, it is necessary to calculate the costs, since the surface of the pool has a fairly large area. The quality of waterproofing can be improved by pre-leveling the walls by sanding.
Plastic pool: DIY installation
The easiest way to make a stationary outdoor pool at your dacha is from a plastic or composite (fiberglass) liner: a ready-made cast bowl. This is one of the easiest ways to make a stationary pool in your country house or near your house. A pit is dug under it, into which it is installed. One of the installation options is in the photo report.
Purchased plastic pool bowl
The size of the selected plastic bowl is 183*415*140 cm. The simplest shape was chosen for easier installation. It all started with marking out the area for the foundation pit. The bowl was turned upside down, the contours were outlined, and 5 cm was added to the boards (the plan was to install it in a wooden frame). So they nailed down the pegs, pulled the twine, and started digging.
Start of earthworks
It was decided to leave part of the side outside, so the depth of the pit is 1 meter. A layer of sand about 15 cm is poured onto the bottom, everything is filled with water to compact the substrate.
Sand is poured, water is poured
While the water is draining, the sand dries up, and boards 2.5 cm thick are assembled to fit the dimensions of the pit. A 50*50 mm beam was used as a frame, and it was also placed on top of the boards. The upper edge of the plastic bowl was attached to this beam.
Shield assembly
All boards are treated with an antiseptic for direct contact with the ground. The manufacturer promises 10 years without rot...
The panels are installed in the pit
When all the walls were assembled and secured, the bowl was inserted inside. The bottom lay tightly, the height was calculated correctly.
Placed a plastic bowl inside
There should be a reinforced concrete edge around the perimeter of the pool. To tie the bowl more tightly to the concrete, corners are installed around the perimeter. They are attached to the beam and the edge of the bowl through and through, with stainless bolts and nuts.
We fasten the corners around the perimeter of the pool
To prevent the plastic from “walking” during operation, we grab the edges with a clamp.
The clamp fixes the position of the bowl when attaching the corners
The fittings are attached to the installed corners. We used 15 mm, placed 4 rods: two on top and two on bottom. Knitted with special wire.
Strengthening the reinforcing belt for the side
Formwork is installed around the perimeter. First, sand was poured under the reinforcement, so external shields were installed. The inside of the boards is covered with a thick film to make it easier to remove the formwork. Mortgages were also installed: overflow pipes. They will be placed outside the pool and will protect the bowl from overflowing.
Formwork and drain pipe
Before pouring the concrete, they began to fill the bowl with water. This is necessary so that the concrete does not crush it. At the same time, the gaps remaining between the walls of the bowl and the plank frame were filled with sand. This means that the bowl is fixed in a better position. When it was almost filled, concrete was poured into the formwork and treated with a vibrator to increase strength and uniformity.
Concrete poured
Four days later the formwork was removed. The side turned out to be 40 cm wide and the same height. Next, we begin to prepare the foundation for finishing the adjacent area.
We had to pour sand on one side and remove some soil on the other.
Since the site is slightly sloping, soil had to be removed from one side. Sand is poured and compacted around the perimeter. Roofing material is rolled out over the leveled surface.
Roofing felt is laid on leveled ground around the pool
Another layer of sand was poured onto it, into which the paving slabs were laid. The cracks between the tiles are also filled with sand.
There is still sand on top of the roofing felt
Paving slabs laid
To prevent leaves from falling into the pool, debris and other contaminants from getting into the pool, a polycarbonate greenhouse was purchased, assembled and installed as a cover for the pool. It turned out that it was very convenient: warm and light.
Greenhouse installed outside
You just need to fasten it firmly; a strong wind moved it from its place. I had to make adjustments. The swimming pool at the dacha is also used in winter, but only after the bath - the ice hole is cut down. For winter, empty bottles with screwed caps are thrown into the water. When water freezes, they serve as a damper, taking most of the load from the ice onto themselves.
This is a DIY pool at the dacha
And until late autumn we swim just like that, we just installed a water heating system to make it more or less comfortable.
Briefly about the main thing
A concrete pool is a rather complex structure for a private plot, so a technical design is developed for it, which is then approved and registered with the BTI. Construction includes several stages, from digging a pit to cladding and arrangement of the surrounding area.
Correct execution of each stage will ensure the durability and integrity of the structure. Particular attention is paid to laying the bottom and pouring the walls of the bowl; it is important to use high-quality, frost-resistant and impenetrable concrete. High-quality waterproofing and finishing will make the operation of the structure trouble-free.
Ratings 0
Economy option: swimming pool from a banner
If you need an express option for a pool at minimal cost, you can get by with a thick film. For example, an old banner. The fabric used for them is thick, and you can buy an old one at an agency for mere pennies. If you need a pool in your garden, this is exactly the material: the costs are minimal.
So, armed with a banner, we dig a pit, which is significantly smaller in size than the canvas.
We lay out the banner in the pit
We lay the film in the dug pit and straighten it. For testing, a small pit was dug in case it wasn’t to his liking. Since the banners were old, after all, they laid two. They also tried to straighten the second one.
The second banner was laid on top
To prevent the edges of the film from being blown away by the wind, they were pressed down with bricks and a hose was thrown in to collect water.
They threw a hose
While the water was being collected, a little earth was poured around the “bowl” under the film, forming sides. They were lined with bricks.
While water was being collected, the edges were pressed with bricks
We left the “pool” to bask in the sun. Three hours later the tests were carried out. I liked the result. It was decided to expand the “swimming” part.
Testing a pool at the dacha
This, of course, is not a great option, but you can freshen up. It took 2 hours for “construction”. The main thing is to dig a pit. And what happens next is a matter of several tens of minutes. The photo below shows the same idea implemented on a larger scale. We bought the film for swimming pools and soldered two pieces together to create a more voluminous “sea”.
Larger film pool
Here, by the way, are several country pools made from scrap materials: an excavator bucket and a huge tire.
A long-lasting pool in the country is easy
Gorgeous!
Marking and excavation work
Before you start digging a pit, it is recommended to draw up a work plan containing a drawing and drawing of the structure. After creating the diagram, you can begin excavation work. First you will need to mark the territory. Wooden stakes and rope are used for this.
The next stage is the excavation work itself. It will take quite a lot of time to dig a pit of the required size. To dig a large hole, you can hire specialized equipment, however, this will be accompanied by additional costs.
Important! When digging a pit, it is necessary to take into account that it should be approximately 50 cm wider, longer and deeper. Additional area is needed in order to arrange the formwork.
After the pit has been dug, you can begin to form the bowl of the artificial reservoir. This is a very important stage of construction, so it is recommended to watch the training video before starting it.
Interesting: Garden plot design: options
Photos of country pools
To protect the water from debris, you need a canopy over the pool.
You can make a deck around the pool
An inflatable pool is a great option for children
Another option for a polycarbonate pool cover. Built using the same method as gazebos
The plastic liner can be round
An inflatable pool can also be buried, leaving only a ring on top
The folding canopy is also convenient
The bowl can be placed outside by making a frame for it
Super!
Recommendations
Construction of a concrete pool is a rather lengthy and labor-intensive process, so the start of work, as a rule, is planned for the month of March, as soon as the snow melts and it is possible to start digging a pit. In this case, it will be possible to build a bowl, line it and equip the reservoir with the necessary control devices around the beginning of summer. It will be necessary to lay water supply and electrical communications in advance, and lay pipes for draining water from the pool.
It is imperative to consider a water purification system for the time the owners are away from the dacha. Traditionally, the mirror is covered with a specialized plastic film; sometimes a protective grille with reflective marks is installed on top of the bowl. This will help the guests of the dacha not to fall into the pool at night.
Finishing
The type of external decoration of the pool itself and the surrounding area depends on the landscape of the site, your financial capabilities and taste.
- The bowl can simply be painted with a roller using Temaflor epoxy paint or Strengthened-Universal polyurethane compound. And within a week it can be used for its intended purpose.
- If a colored membrane was used for waterproofing, additional finishing can be abandoned altogether.
- Finally, the most common, but also the most expensive type of finishing is tiling or mosaic. In this case, the quality of work is very important. Especially the quality of the grouting.