Home » Articles » Bathroom renovation » Is it necessary to lay tiles behind the bathtub and under the bathtub
Whether it is necessary to lay tiles behind the bathtub and under the bathtub is a question not only of interior aesthetics, but also of cost-effectiveness due to increased safety in emergency situations. A bathroom requires a special approach to organizing renovations. High humidity, the presence of utilities, sanitary equipment and household appliances are the reasons why the choice of facing materials and the reliability of decorative coatings should be taken seriously.
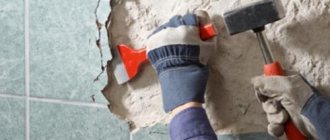
When deciding whether to tile behind a bathtub, you should carefully weigh the pros and cons. Laying tiles in places hidden from view is not considered mandatory, and for many apartment owners in modern high-rise buildings, the decision not to lay tiles under the bathtub seems economically beneficial due to the reduction in finishing costs. In practice, everything does not look so clear. By saving on the purchase of facing materials, you can incur much more significant losses in the future.
Proper preparation will ensure a positive result
At first glance, tiling the walls and floor of a bathroom with tiles may seem like a rather complicated process. However, knowledge of the theoretical part of tile laying work, combined with simple construction skills, guarantees a successful result. Before you begin laying ceramic trim, you will need to meet the following conditions:
- take the dimensions of the room and calculate the area of the walls and floor; calculate how many tiles you will need;
- purchase finishing materials, in this case you need to add 5–7% to the quantity of tiles you need for cutting and stock;
- level and treat the surface of the floor and partition with antifungal impregnations.
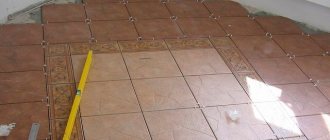
Before you start tiling, you need to level the floor
It must be said that ceramic cladding has long been the best option for finishing bathrooms. They are hygienic, easy to care for, and also have an attractive appearance.
It should be remembered that only tiles specially designed for this purpose are laid on the floor. It has a large thickness, which significantly increases its wear resistance, and a special coating that prevents slipping.
Likewise, only wall cladding is chosen for walls, otherwise floor tiles, which have more weight, will not be able to stay on a vertical plane.
Calculation of the required number of decor units
Finding the right number of ceramic border pieces is not difficult. For this:
- Using a tape measure, measure all sides of the bathroom that are in contact with the wall and summarize the obtained results.
- Divide the resulting amount by the length of one unit of the product and round up to the nearest whole number.
- 5–10% is added to the purchased amount of border in case of damage or breakage of the product (usually 2–4 units of ceramic module).
Tile under and behind the bathtub - aesthetics and hygiene
Even at the initial stage of calculations, many owners wonder whether tiles are needed under the bathroom. After all, finishing materials today are not cheap, and you really want to save money. It must be said that there is no consensus on this matter. However, by covering the entire floor, you will make cleaning the room much easier in the future. If you leave the area under the bathtub untiled, in the event of a water or sewer system break, it will be very difficult to dry it. And constant stagnation of moisture contributes to the appearance of mold and mildew.
The absence of tiles under the bathroom looks extremely unaesthetic
In addition to the practical point, there is also an aesthetic issue. Some models of plumbing fixtures, for example, in vintage style, do not provide screens. Then a very unsightly concrete base can spoil the overall impression of the work done. Not to mention that this place will become a constant source of sand and concrete dust, which you will not be able to get rid of.
It is advisable to abandon savings in favor of hygiene and aesthetics
When asked whether it is necessary to lay tiles behind the bathtub, the answer is that this is desirable from a hygiene point of view, but is not necessary for steel or cast iron bathtubs. It is enough to isolate the area well from moisture. It must be said that behind an acrylic bathtub, the optimal solution would be to completely tile the invisible area.
Construction of a removable screen
You can make a removable bathtub panel from moisture-resistant oriented strand board.
Required materials and tools:
- hand or circular saw, jigsaw;
- wooden beam;
- furniture legs (with height adjustment);
- metal corners, screws;
- primer;
- moisture-resistant glue;
- notched and rubber spatula;
- grout mixture;
- facing lamellas;
- OSB.
Screen manufacturing includes the following work:
- take measurements of the bathtub;
- transfer the markings to the slab (make the height of the screen 4-5 cm less than the obtained value, so that there is a gap and your feet can enter);
- cut the sheet to size;
- cut the timber, attach a frame from it around the perimeter of the OSB;
- fix the legs at the bottom of the screen;
- treat the product with a primer, wait until it dries;
- glue the tile to the screen;
- fill the seams with moisture-resistant grout;
- Place the product under the side of the bath and adjust the height of the legs so that the screen is level and motionless.
After completing the work, check the structure for strength; if instability of the structure is detected, make additional stiffeners.
Cladding under the bathtub: pros and cons
To tile the floor under the bathroom, you should be aware of the impossibility of this event without dismantling the plumbing. You will not be able to reach the corners adjacent to the wall, and the quality of installation will be poor.
If you are carrying out a major renovation of the bathroom, it makes no sense to skimp on floor and wall coverings under the bathtub. After all, you will have to dismantle the old plumbing, knock down the tiles that have become unusable and level the partitions and floor.
It’s another matter if only cosmetic repairs are being carried out, and you plan to replace exclusively wall and floor coverings. But even in such a situation, it is advisable to remove the bathtub so that falling tiles and plaster do not damage the enamel.
For normal repair work, it is recommended to completely vacate the premises.
If for some reason you do not want to dismantle the plumbing, you can get by with a compromise. When preparing the base of the floor for cladding, carefully level the entire horizontal plane of the room. Be sure to waterproof the coating to avoid future mold growth. Lay the ceramic lining in such a way that it extends about 30–40 cm under the bathtub. It is advisable to paint the rest of the floor in a shade that matches the color of the tiles. This will partially solve the problem of aesthetics and hygiene. But you still won’t be able to thoroughly clean this area.
A special screen will hide the unpresentable appearance of the floor under the bathroom
Another solution would be to shield the bathtub with a decorative panel. This way it is possible to hide the unsightly appearance of the space under the bathroom. But it is worth remembering that this is not the best option.
Preparatory work
However, the process of laying tiles itself is not so simple, especially if you have an acrylic bathtub of 180 cm or other large sizes, since in this case the finishing will take even more time and effort, and doing it incorrectly will doom you to a whole series of problems.
Therefore, if you have already decided to do the finishing on your own, then initially you should carry out all the necessary preparatory work. To do this, a small brick wall should be laid under the side of the product, which will serve as the basis for applying the tiles. It is advisable that the outer edge of the brick does not protrude beyond the edge, and the larger the gap, the better, since in this case you can apply plaster or other adhesive base.
At the same time, it is much easier and faster to make a base from plasterboard. This solution will cost you much less and will take less time. As for durability, plasterboard, despite all existing prejudices, can last no less than a brick structure. In any case, the base does not affect the aesthetic parameters, since plaster is applied to it, and in the case of drywall, it can simply be a primer, on top of which ceramic tiles are used directly, on which the appearance of the room will depend.
What is the best way to tile a bath?
Regardless of whether you liked an acrylic bathtub of 170 cm, a small length of 130 cm, or a large solution with a length of more than two meters, the finishing technology will be the same, except that the consumption of materials will be different. As for the time spent, with the right approach everything can be done independently and quickly enough.
But if you are not confident in your abilities, do not have enough time, or simply do not want to deal with finishing, especially with tiles, which will require both painstakingness and certain skills, then we advise you to turn to specialists. In this case, on the one hand, you can save your time, on the other hand, guarantee yourself an excellent result in finishing the room. Perhaps in this case you will spend a little more money, but the result in this case will fully justify itself. The main thing is to choose the right specialists and give preference to proven companies!
Please tell me how to properly seal the connection between the bathtub and the silicone tiles, plastic corner, or is there a more rational solution? Thank you in advance!
Experts answered the question
Best answer
It's not that simple. For example, acrylic and curved bathtubs cannot be tiled.
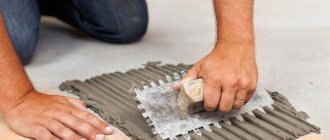
Preparing the floor
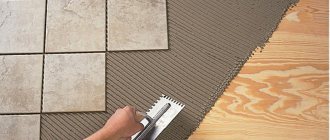
The quality of the final floor covering directly depends on the preparation of the subfloor. The optimal solution in terms of price and quality would be to level the floor with a cement mixture. It is strictly not recommended to leave a wooden base, as in some old houses. Wood is a material subject to a high degree of deformation when exposed to moisture. On such a surface, the ceramic coating will adhere very poorly. In addition, this will significantly reduce the service life of the tiles.
Experts do not recommend laying tiles on boards or plywood
Barrier design options
Types of decorative screens for bathtubs:
- sliding type, equipped with doors with rollers;
- with removable panels that are installed in a plastic frame;
- monolithic type with inspection hatches;
- monolithic type with hatches and additional recess for feet;
- designs with additional niches (open or equipped with doors).
When arranging the screen, it is recommended to consider hatches for inspection and cleaning of the drain hoses. A monolithic partition without a hatch has increased strength, but if leaks occur, the wall will need to be dismantled. Do not install steel pipelines under the bathtub, which are destroyed by tap water. The footwell may have a rectangular configuration, with sharp edges rounded to reduce the risk of injury.
Shielding with decorative panel
A screen mounted from the side of the bathtub to the floor will help hide the water supply and sewerage communications. Such a panel, lined with tiles of the same shade as on the walls, will look very stylish. In addition to the aesthetic side, screen installation also has a practical load. The space under the bathroom, fenced off from prying eyes, can be used as a storage system for household chemicals and various household items. The main thing is to remember to take care of access to sewer pipes.
Despite the presence of a screen, it would still be better to completely cover the floor
If the screen is suspended and does not rest against the floor, be sure to lay the tiles under the bathroom to a shallow depth. This will increase the presentability of the appearance of the interior.
How to install a bath correctly: before or after laying tiles
When planning a bathroom renovation, almost all people wonder what to do first: install a bathtub or tile the room? Both of these options have the right to be considered correct, because the choice of one or another sequence depends on several factors. The material from which the bathtub is made, the size of the bathroom, the skill and responsibility of the tiler and plumber are taken into account. Let's consider the features, advantages and disadvantages of both repair sequences.
First the tiles, then the bath
In this case, first the bathroom is completely tiled (walls and floors), and then the plumbing is brought into the room and installed.
The junction of the bathtub with the wall is sealed with sanitary silicone with antifungal additives or covered with a decorative plinth.
The advantages of this method include the convenience of performing the work, since nothing interferes with the master. There is also no risk of damage to plumbing equipment. Another plus is that it’s easy to replace the bathtub with a new one, if necessary.
The main disadvantage is that silicone sealant (even sanitary sealant) develops mold over time and has to be replaced.
Note! According to the manufacturers' instructions, this method is mandatory for use when installing an acrylic bathtub.
Install before laying tiles
This method consists of initially placing the bath on the floor and firmly fixing it. Next, level the bath using a level. Later they begin tiling. Having chosen this method, it is important to understand that the tiles in the bathroom are laid from the edge of the bathtub, and not from the floor. A small indentation is made from the edge (a few millimeters are enough), and the resulting gap after completing the main work will need to be sealed with sealant or other moisture-resistant material. The tiles will extend slightly over the edge of the bathtub, and from the outside it will look as if the plumbing is connected to the wall.
Option number three
This option is considered optimal for steel bathtubs, but is suitable for any type. After preparing the bathroom for finishing, a bathtub is brought into it and installed, but not connected to the communications.
Markings for laying tiles are made according to the actual location of the equipment (along the side).
After marking is completed, the bathtub is moved to the side or taken out, and they begin to line the walls, while the tiles are mounted not from the floor, but from the marked line, taking into account the gap.
Another option is to start laying the tiles from the floor, and make a gap the width of the side to move the bathtub close to the wall. When the installation is complete, the bathtub is installed and connected to the sewer system, and a mixer is connected to the water outlets.
The advantage of this method is that the bathtub is protected from the risk of damage during wall finishing.
Also, the sides are recessed into the tiles, which preserves the usable area of the bathroom.
Among the disadvantages, they note the need to maintain accurate markings: even with a slight mistake, the bathtub simply will not fit into the prepared “niche”.
Installation of cast iron models
Installation of such a bathtub is carried out after leveling the floor and laying floor tiles. Please note that the tiles on the floor must withstand significant loads, so be sure to check this point with the seller.
Installation of the product is carried out as follows:
- The bathtub is brought into the bathroom and placed on its side, the drain hole is located in the direction of the sewer. Before this procedure, experts advise covering the tiles with fabric to avoid scratches and mechanical damage.
- The siphon and supports are installed.
- The bathtub is turned over to its normal position and leveled in a horizontal plane.
- The font is installed in place, leaving approximately 1 millimeter between the side and the rough finish of the wall. Please note that tile is a rather slippery surface, so despite its weight, the bathtub may move during use. To avoid this, the supports are fixed to the tile surface with waterproof glue.
- The walls of the room are tiled. The contact points between the tiles and the side of the bathtub are protected from leaks by ceramic baseboards.
Please note that when installing cast iron and steel bathtubs, grounding must be done. To do this, it is better to invite a qualified electrician.
Nuances when performing work
When planning the layout of the tiles, it is taken into account that it is advisable to lay whole tiles near the side and above the ceiling: this way the finish looks more attractive. If whole tiles do not fit the height of the wall, they practice decorative decoration with a border - such inserts make the cladding elegant and original.
Before sealing the joint with the wall or starting to lay tiles from the side, the bathtub is filled with water so that it shrinks.
If you choose the option with a bathtub recessed into the cladding, you should understand that if it is necessary to replace the equipment, the tiles adjacent to the side will have to be dismantled.
The material of the bathtub is of primary importance when choosing the order of work in the bathroom. In an already finished sanitary room, it is recommended to install acrylic, corner, hydromassage and large (non-standard) size products.
A Jacuzzi should not be built into tiles, as repairs will require moving the equipment away.
Cast iron bathtubs are ideal for built-in installation.
With steel products, both options are acceptable, since they weigh little and are strong enough to stand on the side when finishing walls.
Recommendations on how to lay tiles in the bathroom from experts
Tools, materials
- Glue
- Tile
- Primer
- Plastic crosses
- Fugue
- Two containers: for fugue and glue
- Level
- Mixer attachment
- Brush
- Hammer or drill
- Notched spatula
- Rubber spatula
Preparatory work
Before learning how to lay tiles in the bathroom, let's clarify how to prepare the surface.
The most important rule of any high-quality finishing is the complete removal of the old one.
That is, we dismantle the panels, old tiles, wallpaper - everything that was there “before” the renovation. Some craftsmen claim that they can easily lay bathroom tiles on old tile floors. And such actions do take place, however, even here you will have to work a little so that your tiles do not “swell” in about six months.
Hatch inspection
Some owners cover the bathtub with a blank panel, leaving no access to the water supply and drain pipes. In the event of a leak, such a screen will have to be completely dismantled, which will entail the need for cosmetic repairs of the room. To avoid such consequences, you need to provide a special hole through which you can fix the problem.
You can purchase a ready-made inspection hatch, but it is not cheap. It's easier to make it yourself. The easiest option to implement is a tile equipped with magnets.
To make it you will need eight small magnets up to one centimeter in diameter. Four of them are fixed directly around the hole, and the rest are glued to the edges of the tile decorating access to communications. After fixing the magnets, the panel is inserted into place. It should be remembered that the size of the opening should be slightly smaller than the tile. This is necessary to place the holder magnets.
When the glue dries, you can use the improvised door. To pull it out of the opening, you need to pry the edge of the tile with a sharp object. For ease of use, experts recommend attaching a furniture handle to this tile.
To summarize the above, we can say that when renovating a bathroom, it is better to refrain from saving tiles and tile the entire floor and walls of the room. This will help avoid problems with the appearance of mold and musty smell in the room, improve the quality of room cleaning and give the interior design a complete and harmonious look.
Related discussions
Super-economy renovation of an apartment for rent
Can you tell me the best way to lay out the tiles?
Jamb with an opening to the bathroom
Towel racks for the bathroom!
background
In 99% of cases we install tiles under the bathtub. In terms of cost, this does not save the budget for the entire renovation.
- Like
- Save
Natalia Bey
Probably half of them comment without looking at the attached photo. I repeat - in such buildings without tiles
- Like | 2
- Save
Architectural and design bureau "Studio 3D"
we do not lay tiles under the bathtub - a waste of resources and time, waterproofing is done in any case
- Like
- Save
Architectural workshop "Ithaca"
Better put it down. Waterproofing is not always perfect and its service life is not eternal. It is better to lay tiles, but if you really want to save money, you can use ordinary, not expensive ones.
- Likes: 1
- Save
Anastasia Kuznetsova (Cloud9fitoutworks)
Anyone who wants to lay tiles under the bathroom needs to carefully look at the photo. There are blocks and mortar under this bathroom, there is no room for tiles, it is impossible to do wet cleaning there. We should have photographed such a structure at our site today.
- Like | 3
- Save
Archianddesign
I always put tiles under the bathtub and behind the bathtub I make a border from the floor on one tile. Because, as was said earlier, water will always find a hole))) And the bathroom wall can be made of foam blocks, drywall, and if something leaks, the whole problem will appear on the other side of the wall, for example in the bedroom in the form of fungus on the wallpaper.
- Like | 2
- Save