A good-quality wooden bathhouse has long become an integral part of many people’s leisure time. But, in addition to a feeling of satisfaction, it also brings headaches to its owners. Wood and water are not the best of friends. When exposed to moisture, floorboards become unusable over time. And wood wears out quite quickly from mechanical stress. There is a need to repair the floor: from replacing several floorboards to reconstructing the entire flooring as a whole.
Is it possible to avoid this? Certainly! Today there are a number of different solutions, but I would like to focus on one. This is laying tiles on a wooden floor in a bathhouse. And we’ll talk about how to properly lay tiles on the floor in a bathhouse in this article. How to combine seemingly incompatible things, which tiles and adhesive mixtures to choose for this, how to organize the work correctly? Discuss all the subtleties and nuances of the technology, hear the opinions and advice of experts.
The only thing is that we will decide right away in which rooms you need to lay tiles on the floor in the bathhouse, and in which there is no need for this. We will talk about those rooms in which water is intensively used. The floor in the steam room should be wooden, so we will not take it into account in the future.
How wood and tiles combine
The very first question that comes to mind is: is it possible to lay ceramic tiles on a wooden base? There are a number of factors that can become an obstacle to completing this task:
- One of the main requirements for tiles used in rooms with high humidity is moisture resistance. Consequently, the boards under the ceramics will be deprived of air access. And in the absence of ventilation, they will quickly rot.
- Depending on the state of the environment, the tree “plays” - it can change its shape and volume. Tiles are hard and cannot deform to the same extent as wood. A hard and static surface is another condition for installing tiles.
- Changing the size of the gaps between the floorboards can cause cracking or even destruction of the adhesive layer and the tile itself.
In contrast, we note that the floor in a bathhouse made of tiles will be much more durable and practical, and with the right choice of ceramics, it will be resistant to mechanical damage and shocks. The moisture-impermeability of the material will stop the access of moisture to wooden structures, thereby increasing their service life.
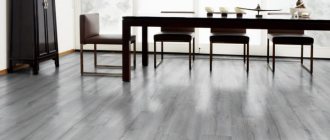
As for the aesthetic side of the issue, then, probably, in some cases, natural wood looks preferable. But the level of modern technology has made it possible to create simply a huge number of decorative coatings that will not leave you indifferent. The floor in a bathhouse made of tiles will look very stylish and beautiful. Having weighed all the pros and cons, we can summarize: if you wish, tiles can be laid on a wooden floor in a bathhouse without any problems.
Design
Concepts such as color, pattern, texture, and size play a big role in the choice of finishing materials.
Under natural materials. Tiles that imitate wooden planks or natural stone are very popular. The stone-like ceramic product has a matte textured surface, which makes it non-slip.
- Floral design. You should not decorate the entire room with tiles with a floral pattern. It is better to use this design partially, highlighting accents.
- Geometric ornament. This tile design is suitable for a room in a restrained, laconic style, which will make it not boring and add originality.
- Oriental patterns. A floor decorated in this style will become the stylistic center of the room. You can complement it with calm colors and discreet details.
At the peak of popularity are light natural shades and simple lines. The use of ceramic products of non-standard shapes, a variety of textures and their combination will help make this design less boring.
Required Tools
Before starting any work, you must prepare all the necessary tools in advance. You need to work concentratedly and measuredly, and not rush around headlong in search of missing equipment. What you will need for this job:
- Crowbar, nail puller, heavy hammer, hacksaw for dismantling the old floor or its fragments for subsequent replacement.
- Rule, level and tape measure for arranging a new coating and marking it.
- Glass cutter, tile cutter and grinder with discs for cutting ceramics.
- A drill with a mixer attachment and a container of sufficient volume for stirring assembly mixtures.
- Roller or brushes for priming.
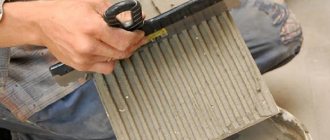
- Convenient spatulas, trowel and comb for applying adhesive.
- Rubber hammer for shrinking and leveling tiles during installation.
- A set of rubber spatulas and rags for working with grout.
When selecting a comb, remember that for tile sizes from 5x5 to 15x15 cm, the tooth width should be 3-6 mm. For squares with a side of 25 centimeters, the tooth will be 8, and for 30 - 10 millimeters. If you need anything else, think about it in advance and put the tool so that it is always at hand.
Choosing ceramic tiles
“Whatever you call the boat, that’s how it will float,” sound the words of one famous song. Which tile you choose - this is the result of all the work. Let's consider the main criteria that you need to pay attention to when making a choice. Remember, floor and wall tiles are two very different things!
- Moisture resistance. The porosity of the material should be minimal. Only in this case will the floor tiles in the bathhouse absorb a minimum of moisture.
- Rough surface. The surface structure should provide reliable grip on the foot, especially in conditions of abundant water.
- Strength and wear resistance. Ceramics must be resistant to load, mechanical stress and possible impacts. Let's not pretend - when both your hands and most furnishings are wet, something often falls on the floor.
- The consignment. It is very important! Make sure every single box of tiles is from the same batch. Products from different batches may differ in color and size.
- Geometric characteristics. The edges must be smooth and regular. If you take several different specimens at a glance, their sizes should perfectly match each other.
To be fair, it should be noted that cladding made from natural materials looks more natural, but glazed plates have increased strength. The markings and special symbols printed on the packaging will tell you about certain properties and qualities of the floor tiles. If you yourself find it difficult to understand the meaning of the designations, do not hesitate to contact your sales consultant.
Markings to pay attention to
When choosing tiles for a bath, you need to pay special attention to the markings on product packaging. What exactly do you need to know?
- The “T” marking indicates that the tiles are resistant to high temperatures.
- The designation “R” indicates whether the tile in front of you is glossy or matte. Next to the letter there will be a certain number, and the higher it is, the less slippery the tile is. For example, glazed tiles will be designated R9, R10, but matte tiles will be designated R11, R12, etc. Also, if the product is slip-resistant, you can see on the packaging an image of a foot stepping on the tile.
- Frost resistance and resistance to temperature changes are also important. The first criterion is indicated by a snowflake (sometimes two), and the second by a sun icon. It is also possible to indicate additional information, which is indicated by the letters “A” and “B”: the mark A I and B I indicates the possibility of using the tile even for the exterior cladding of a building, that is, it has high frost resistance. The A II and B II marks indicate average frost resistance, but tiles with the A III and B III marks can only be laid indoors.
- It is also worth paying attention to the abrasion resistance of the tiles - this criterion is indicated by the letters PEI and the image of a saw blade. If there is a number next to such a mark, it will be easier to determine whether the tile is suitable for you: 1 indicates the possibility of use in a bathroom, toilet (not suitable for a bathhouse), 2 – for use in corridors, a dressing room, 3 is suitable for any room in a bathhouse, and 4 and 5 can be found less frequently, since these are industrial options.
Markings that can be seen on tile packages
Preparing the base for tiling
Let's figure out how to make the floor in the bathhouse ready for tiling. The most important and important step at this stage of work will be to check the condition of the existing floor. We carefully check the condition of the flooring. Ceramic coating is durable, so it will be incredibly disappointing if the old base cannot withstand the load and collapses, thereby rendering the entire structure unusable.
How to make a floor in a bathhouse from tiles?
Leaky boards need to be replaced. It is advisable to dismantle the board cover and check the logs. Rotten fragments are replaced with new ones. The distance between the logs, taking into account the increase in load, should not exceed 50 cm. If this size is exceeded, we install additional logs. The ends of the joists should not rest against the wall; the gap should be around 1 centimeter. All wooden elements are carefully treated with an antiseptic composition. From this point on, there are several options for preparing the base to lay tiles on a wooden floor in a bathhouse:
- Filling the screed;
- Leveling the surface using chipboards or plywood sheets;
- Reinforcement of the base with sheets of moisture-resistant plasterboard.
Before starting any of the chosen methods, you should take care of organizing wastewater disposal. Most often, the drain hole is located in the center of the wash room or shower, but it can be shifted to any location you specify. The drain hole is located at the lowest point, so the floor in this room will not be level, but will have a slight slope towards the drain. Otherwise, water will not flow into the sewer system. The slope should be 1 cm of difference in floor level for every meter of distance from the drain hole to the wall.
Filling the screed
After checking the condition of the logs, we return the old boards (if their use is possible) to their places. Their thickness cannot be less than 40 mm. In order for the floor to breathe, the boards are not laid solid, but with gaps of about 10 millimeters. If you decide to make the flooring continuous, be sure to drill a sufficient number of ventilation holes in it.
Standard sheets of multi-ply plywood or any other particle board with a minimum thickness of 12 mm are divided into 4 parts and the resulting tiles are laid on top of the plank flooring perpendicular to the boards. We leave a gap of approximately 3 millimeters between the fragments. The slabs are installed according to the principle of laying bricks - there should be no cross-shaped joints. In these places the structure will “play” and will not provide the required strength. The plywood is glued to a special compound and fixed with self-tapping screws at least every 20 cm. Given the presence of an aggressive environment, the screws must be made of non-corrosion metal or galvanized.
The next layer is waterproofing. Whether it is specialized paper, bitumen tape or just plastic film depends on your capabilities and preferences. Strips of material are spread, overlapping by 7-10 cm. The joints are taped. The waterproofing is also applied to the walls by 10 cm and is also fixed with tape. Along the perimeter, a damper tape with a thickness of 10 and a width of approximately 100 millimeters is attached to the walls.
We lay the reinforcing mesh and fill the screed. What it will be like: a sand-cement mortar with the addition of liquid glass or a specialized mixture is again up to you to decide. We protect the edges of the drain hole with formwork. To get the desired slope without unnecessary problems, we recommend installing beacons and leveling the solution along them. To avoid excessive load on the base, the maximum thickness of the screed should not exceed 30 mm.
Leveling the surface using chipboards or plywood sheets
The floor is leveled with sheets of wood or pressed particle boards. To raise the floor level to the required level, logs are installed on the existing flooring on special stands that are adjustable in height. On the logs, as in the previous version, quarter sheets of plywood are mounted using the “masonry” method. A second layer is laid on top of it so that the seams do not overlap each other. We maintain a gap of about 3 mm between all tiles.
The positive aspect of this option is that insulation can be placed between the joists, thereby simultaneously solving the issue of thermal insulation.
Another very similar option comes down to the fact that instead of point supports on the existing floor, a dry leveling mixture, fine expanded clay or sand is poured over a layer of waterproofing and a damper strip. It is compacted and then covered with plywood sheets or OSB boards.
In both cases, the top layer of plywood is sanded and the seams are puttied. Glue can be used as putty on which the tiles will be laid. The finished surface is covered with a layer of primer, in other words, primed. The adhesive mixture for tiles is selected taking into account the properties of the base material. For example, for OSB, polyurethane compounds can be used.
Laying ceramic tiles on a wooden floor
Reinforcement of the base with sheets of moisture-resistant plasterboard
Absolutely nothing new. Sheets of moisture-resistant plasterboard are laid on the existing floor. The plane is controlled using a building level. To level the flooring, we put pads made of any material at hand that will not shrink: slats, fiberboard, strips of roofing felt. We leave a gap along the edge, which we subsequently seal with sealant. We prime the fixed sheets with a primer.
So, we have prepared the foundation and approached the final stage of work. We only note that for a shower room the best option would be a wet screed. But other methods also have a place with a careful, balanced approach to organizing work. How to properly lay tiles in a bathhouse on a prepared floor? We'll talk about this in the next chapter.
More about waterproofing
The service life of a bathhouse, the safety and comfort of staying in it largely depends on high-quality waterproofing.
Traditional methods of floor waterproofing include coating and laying. We are talking about bitumen mastic, which is applied in several layers to the cleaned floor. A waterproofing coating and finishing are laid on top. This simple method provides excellent protection from moisture, but has its drawbacks. The height of the room decreases, as the floor level rises by an average of 5 cm. It is likely that the wooden cladding of the ceiling and floor will become saturated with a specific pungent bitumen odor.
Another traditional method of waterproofing is the use of glass roofing material, various polymer films, hydroglass insulation and other materials that are not afraid of moisture.
Waterproofing with polyethylene film
Often in baths they use penetrating waterproofing, which does not have the disadvantages of the above methods. We are talking about special waterproofing compounds that are applied over a cleaned and primed floor. As a result, a layer is formed that, after drying, reliably protects the surface from moisture.
Penetrating waterproofing is:
- concreting;
- polymer cement;
- cement inorganic;
- seamless.
Of all the varieties, the polymer-cement composition is suitable for use in a bath - environmentally friendly, durable, with excellent adhesion and seamless coating.
In a bathhouse with a wooden floor, the work of waterproofing the floor is firmly connected with the process of its thermal insulation. A floor without insulation will freeze, become covered with ice and release heat from the room. Therefore, heat-insulating material with fire-fighting properties is laid on the waterproofing layer (2-3 layers of roofing felt, for example or polyethylene film). Mineral wool is excellent for these purposes. A waterproofing layer is placed on top of the thermal insulation.
How to choose good mineral wool?
Floor tiling
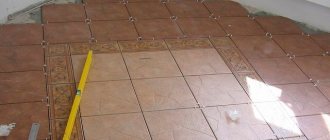
We mark the floor. If the drain is in the center, we will start dancing from there. You can lay out the tiles in an “envelope” by laying out a central square of triangles. The markings will be made from the center with rays to each corner of the room. The imagination now pictures a pile of tiles cut at different angles... Indeed, the best option would be simple, standard masonry.
The center of the first square will be the drain hole. We make a block from 4 tiles, measure it, and according to the resulting size, divide the entire area into blocks. Why is this necessary? Firstly, it is easier to lay out even rows and adjust seams. And secondly, the glue dries out quite quickly and loses its properties. Therefore, marking will help to apply the mixture to such an area that you can cover with tiles without compromising the properties of the adhesive solution.
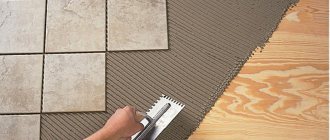
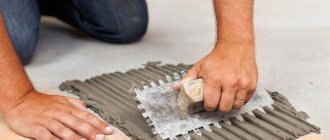
Spread the adhesive mixture evenly over the floor and tile surface with a comb. Let us remind you that the tiles are first soaked in water for 5-10 minutes so that the moisture from the adhesive is not absorbed by the porous structure of the material.
Having covered the first fragment of the surface, we repeat the procedure until the floor is completely covered with a decorative layer. To make it easier to align the ceramic plates, we install special mounting crosses in the corners of the seams. One of the nuances of this stage will be the choice of the adhesive mixture: it must be completely compatible with the base material. How to properly prepare the solution for use is written in the manual that is supplied with the glue by the manufacturer.
Kinds
There are many types of tiles suitable for use in baths, saunas, and hammams. Among them are fireproof, heat-resistant ceramic products, perfect for finishing the lower part of the walls and lining the stove. A stone-like slab for floor finishing looks interesting; however, beautiful natural minerals and rocks today are also sold in the form of piece products and are not too expensive. A striking example of such an affordable finish is soapstone and coil.
A relatively new option is non-slip tiles, indispensable in baths with high humidity and low steam temperatures. Here, any other materials quickly become unusable.
Ceramic
Most often, ceramic tiles are chosen - they are inexpensive, and the range is quite wide. There are several varieties of it, which differ in shape, thickness, clay used for production, firing method, molding method, etc.
It can be produced in two ways: either extrusion or pressing. The almost finished product can be fired single, double or even triple, and the more of them, the more porous the tile will be. You can determine this by the markings on the package - look for the flame icon and the number next to it (1, 2 or 3). We recommend using single-fired tiles for steam rooms and washrooms - they have sufficient strength, but double-fired products, although more beautiful, are “weak”, so they are only suitable for a relaxation room.
As for sizes, you can choose from square, trapezoidal, octagonal, and rectangular tiles. Product sizes are indicated on the packages.
Ceramic mosaic
Mosaics can often be found in swimming pools, baths and saunas. Usually it is used to decorate the sides of the font or completely finish the washing area. It is also great for decorating the interiors of bathhouses - panels are assembled from mosaics.
As with large ceramic tiles, mosaic tiles are easy to care for, they are not afraid of moisture and temperature changes, and if installed correctly they will last a very long time. True, it is quite difficult to install it, so you will have to be patient.
Clinker
Clinker tiles are made from several types of clay. The products are fired at high temperatures, so that they have sufficiently high strength, resistance to various influences and heat resistance. It is also not afraid of water - it can be placed on the floor in the washroom. The thickness of such products varies from 8 to 12 mm.
Terracotta
Terracotta tiles are notable for the fact that they are not glazed, so they look natural, like stone or brick. It is usually brown in color, quite porous, so it is not afraid of high temperatures and temperature changes, does not crack or deform in any way.
Ideal for cladding stoves and walls. It is rarely used as a floor covering.
Coil
Natural stone of a beautiful green color looks noble and elegant, giving the premises of the bath complex a special chic. The coil costs less than marble and has an original design. Tiles made from it have average heat resistance, but the material is quite soft, easily picks up moisture and cracks. This type of finish is not suitable for unheated rooms; in addition, it should be considered exclusively as wall decoration; for the floor, mechanical strength will be insufficient.
This list of materials is not exhaustive. Tiles made of marble and travertine and other expensive natural minerals are highly valued, but are not very appropriate in a simple home bath.
Clinker
Made from natural clay, clinker tiles differ from ceramics in the firing method, thickness, and composition. Here it is multicomponent; different types of mineral fillers are used. The tiles themselves are most often rectangular, quite thick 8-12 mm. During production, they are subjected to high-temperature firing, which gives the finished products heat resistance, strength, and low moisture permeability.
Grouting joints
The final stage will be grouting the joints. Choose a composition in a contrasting color or to match the general background of the surface - your taste and desire will tell you. Main quality. If, as an example, we consider the range of grouts from the Ceresit company, then there are silicone grouts, elastic water-repellent grouts, and two-component grouts. Antifungal impregnation is offered to protect the grout.
Therefore, your experience, information that you can find in sufficient quantities on our website or consultation with a specialist will help you make the right choice. After the tiles have completely dried, we begin grouting. Mix the solution with a mixer, and use a rubber spatula or small grater to fill the seams. We hold the tool at an angle of approximately 45 degrees - this is how the grout most effectively fills the seam. You need to prepare as much mixture as you can produce in 20-30 minutes. After this time, it will begin to dry out and lose elasticity.
After letting the grout dry a little, use a dry, clean rag to carefully remove excess gypsum from the surface of the tile. After this, wipe clean with a damp cloth and leave until completely dry. As you can see, there is nothing complicated or supernatural about laying tiles on a wooden floor in a bathroom. Please note an important point: the floor level in the washroom should be lower than the floor level of the remaining rooms of the bathhouse, so that in case of problems with the drainage, the water does not flood the neighboring rooms.
Overview of species
Currently, in construction stores you can find a huge variety of flooring for bathhouses.
Ceramics. This ceramic bath base has a special level of wear resistance and strength. It can easily withstand significant loads. In addition, the tile material is particularly heat resistant; models marked “T” are the most resistant to temperature changes. If the bathhouse will not be heated during the cold season, then it is better to find a sample marked in the form of a small snowflake. All individual ceramic elements must be the same thickness. It is recommended to select samples with a relief surface, which will make the flooring anti-slip and safer for humans. Ceramic tiles can be used for both steam rooms and showers. It is considered the most hygienic option, it is easy to clean from dirt, and you can use almost any cleaning chemicals, since it is resistant to such compounds. The material is safe for humans and their health; during operation it does not emit harmful substances. This base can be made in a variety of designs and colors.
Using porcelain stoneware, you can create various beautiful imitations of different types of wood and stone, but in such cases the cost of finishing will be much higher compared to standard options. Porcelain tiles with a slight relief make them even safer for humans; they will not be slippery.
Today, beautiful bath tiles made to look like wood are becoming increasingly popular. This option is often called “thermo-birch” or “thermo-aspen”. Wood, with special treatment, can become a durable material with excellent moisture-resistant and heat-resistant characteristics.
The treatment is done with wet steam in a special sealed chamber. After this, the wood does not absorb water, does not deteriorate under the influence of ultraviolet radiation, does not deform and does not lose its rich color. At the same time, during the processing process, all moisture leaves the material, which makes the tile lighter. In addition, it acquires a beautiful and rich brown hue. It is necessary to lay the wooden covering on a waterproofing layer.
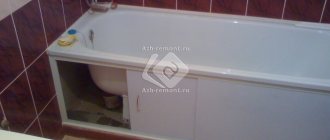
Horizontal drain
It is better to place a horizontal drain close to the wall, since the trim does not look aesthetically pleasing.
- This option for laying tiles is as easy as shelling pears to do with your own hands, even if the screed was initially poured without a slope. First, we calculate the distance from the drain to the opposite wall. The level of floor slope in centimeters towards the drain will be equal to the number of meters. For example, if there is 3 m from the ladder to the wall, then the slope level should be 3 cm.
- Now we measure 3 cm up from the floor on the wall opposite the gutter and attach the beacons. We pull the cords from them towards the drain and fix them in this way. As a result, we have a template according to which we will lay the tiles.
Important: mark the wall in the washing bath, from which we will begin laying the lining towards the drain, in half. The first tile should be placed to the right of the applied markings. Now you should put the required amount of material to the right and left of it. This will be the first row of masonry.
The process for laying each tile is as follows:
- Apply the required amount of glue to the back side of the tile using a notched trowel and lay the tile. We adjust the height of the masonry with a rubber mallet if the screed was poured without a slope.
- Between each tile we install plastic or wooden crosses that regulate the width and uniformity of the seams.
- First, lay all the whole tiles towards the drain and only then lay the outer cut ones. While working, use a damp cloth to remove excess adhesive on the tiles. Otherwise, once it dries, it will be difficult to remove.
- Leave the laid floor for 12-24 hours until the glue dries completely.
- Once the glue has completely dried, you can rub the seams. The grout is applied with a special rubber spatula. Remove excess with a cloth. We treat the joints of the facing material with the wall with silicone.
Video description
You can get acquainted with the process of laying tiles from a ladder onto a pre-prepared screed with a slope in this following video:
However, professionals carry out the work of tiling a sloping floor with ceramic tiles as follows:
- first, cover the far triangular surface opposite the entrance door to the room with tiled material;
- then the tiles are laid on the left and right sides of the ladder;
- then the ceramics are placed on the last sloping section of the floor near the entrance;
- at the end of the process, the surface directly next to the drain is coated.
Thanks to this sequence of work, the master moves less on the facing material, the glue under which has not yet reached its maximum strength. At the same time, during the masonry process, experts pay increased attention to the watershed lines of the floor with expansion joints, as well as cuts and joints between the ladder and the tiles. After all, such places are most susceptible to damage of various types.
To increase the strength of the seams, they are reinforced using metal profile elements. In this case, the gaps themselves are first filled with bitumen, which is preheated. Such a mass, when cooled, can reduce the negative impact of loads.
Metal profile for protecting tile joints Source profil-mo.ru
Lining of cuts
Craftsmen perform this work after laying all the solid ceramics and drying the glue underneath. In the process, specialists use exclusively individually cut tiles for a specific location. At the same time, the tile material is distinguished by its decent thickness and high strength. Therefore, only experienced craftsmen can cut floor ceramics efficiently. Moreover, they use a special tool.
Central drain
In this case, laying tiles indoors with your own hands will be a little more difficult, but it can still be done.
Here the floor with a slope will be laid using the envelope type. That is, stretch the cords towards the drain from the corners of the room. In all three corners, raise them by the required number of centimeters (see above for how to calculate the height of the clone). You will end up with three or four triangles of possibly different sizes (depending on the location of the drain in the washroom). In order for the laying to be correct, you can start from the base of a larger triangle. That is, from the wall of the washing bath that is wider.
- We take the first tile, apply glue to it and lay it in the center of the largest base. To the sides of this we place the required number of whole tiles. We adjust each one with a mallet in accordance with the established levels.
- We will lay the next row of whole tiles like brickwork, that is, tied together. Thus, you need to lay the entire triangle with whole tiles.
- Using the same principle, you can cover the floor in the area of the remaining triangles.
- The remaining untiled areas of the floor will need to be finished with cut tiles. And each piece will have to be adjusted in accordance with the necessary parameters.
- Now let the cladding dry for 24 hours.
- Finally, apply grout and treat the joints of the tiles and walls with silicone. We rub the seams.