Tiled flooring for the kitchen and bathroom is practical and durable, but is it possible to lay tiles on existing wooden floors without resorting to large-scale construction work? The answer will be yes. In this article we will study in detail all the nuances of the “cooperation” of such different materials.
Lay tiles on a wooden floor
Disadvantages of finishing wood with ceramics
Ceramic products adhere well only to a solid, durable and immovable base. Violation of any of these requirements leads to their peeling, cracking, chipping and mowing of tile joints. Tiles cannot be laid on a wooden floor for another reason: these materials have completely different characteristics - hygroscopicity, coefficient of thermal expansion, vapor permeability. Therefore, combining them without damaging one of the materials is quite difficult.
Let us list the problems that arise with such floor finishing.
- The structure of a wooden floor with joists cannot boast of absolute immobility - the boards “play” under load, and the tiles rigidly glued to it begin to break.
- All wooden floor elements, including joists, are deformed and change their cross-sectional size under the influence of variable humidity, and such movements also negatively affect the integrity of the tile covering.
Mechanical damage to tiles is a common problem when laying them on a wooden floor Source carehomesuk.net
- The tree must “breathe,” but under an impenetrable ceramic shell it is deprived of this opportunity, and the base can quickly rot.
- The service life of wood and tiles is different; if the base begins to deteriorate, the coating will also be damaged, which will have to be removed to repair the main floor.
Therefore, before laying tiles on a wooden floor in a wooden house, you need to try to eliminate all possible problems, carefully strengthen and level the base, and protect it from destruction.
In addition, these materials have different heat capacities. Warm wood is pleasant to the touch, it is comfortable to walk on it with bare feet, which cannot be said about tiles or porcelain stoneware. You can make it warm by installing a heating system under the ceramic coating, but it will create additional problems associated with temperature changes that greatly affect the stability of the wood.
Heated floor system under tiles Source bitrix24.ua
Based on the above, the question of whether it is possible to lay tiles on a wooden floor cannot be answered unambiguously. If this is necessary, then it is possible, but first you will have to prepare the foundation very well, having first inspected its condition.
Arrangement of a waterproofing layer
You can install waterproofing immediately after using latex impregnation, without waiting for it to harden. The waterproofing layer has important functional significance, so you should not neglect the basic nuances and principles of its arrangement.
We recommend watching - How to waterproof a bathroom under tiles?
Damping layer
Any rolled materials can be used as a waterproofing layer:
- parchment;
- glassine;
- bitumen paper;
- paraffin paper;
- thick polyethylene.
The materials are laid overlapping and secured with tape. For better protection, it is necessary that the layer extends at least 10 cm onto the walls.
To prevent deformation and moisture penetration, a layer of damper tape is used. It withstands temperature changes typical for a bathroom, prevents heat loss and reduces noise.
But the shock-absorbing properties of the damper tape are of particular value - it compensates for possible movements of the floorboards and fixes the coating.
Important! To maximize the compensation effect, the tape is laid on the subfloor with the elastic surface and the hard surface facing the ceramic tile side.
Strengthening the load-bearing structure of the floor
The first thing to do is to completely open the floors, exposing the joists and floor beams. You can exclude this stage only if the house is new and you know for sure that the wooden “skeleton” of the floor is laid correctly - with all elements treated with an antiseptic, a damper gap is installed between the joists and the wall, and frequent steps are taken between adjacent joists.
If the house is more than 2-3 years old or you are not sure that the technological requirements were observed when installing the floor, it will be possible to lay tiles on a wooden floor only after it has been inspected and the structure has been strengthened.
Rotten beams may be found under the floor that will not withstand the weight of the ceramic coating Source imhonn.ru
Having opened the subfloor, the following activities are carried out:
- dismantle old rotted or cracked logs, laying new ones in their place;
- between the ends of the logs and the wall a compensation gap of about 10 mm is left;
- at a step of more than half a meter, intermediate logs are laid, which is necessary to increase the load-bearing capacity of the supporting structure and prevent sagging of the boards between the beams;
- align the upper edges of the lags in one plane, cutting off the protrusions and installing linings;
Leveling using a building level Source oteplicah.ru
See also: Catalog of companies that specialize in finishing materials and related work
- treat the frame on all sides with antiseptic impregnations in 2-3 layers, drying each one.
When deciding whether it is possible to lay tiles on a wooden floor from dismantled boards, they are inspected for rot and damage and discarded. Instead, lumber of the same thickness is prepared.
Advice! All wooden elements of the base must be dry. If the humidity is more than 18-20%, they will begin to deform when dried.
Before attaching the boardwalk, you can fill or lay insulation in the space between the joists that is not afraid of moisture - expanded clay, expanded polystyrene, polyurethane foam. To ventilate the boards, leave at least 1.5-2 cm of air space between the insulation and the flooring.
When laying antiseptic-treated boards on the joists, they also leave gaps:
- between the ends and the wall – 10 mm;
- between boards - 3-4 mm.
This is necessary so that when the wood expands, tension does not arise at the joints.
The decking is fastened with galvanized screws or nails, 2 pieces at each intersection with the joists.
If the floor is supposed to be leveled with a planer or sanded, the fastener heads are recessed into the wood Source chudopol.ru
Video description
How to dry level a wooden floor under porcelain tiles, see the video:
If the base is not stable enough, it is better to lay the dry screed in two layers with the joints offset. It is advisable to calculate so that the joints fall on supporting elements - joists or floor beams. For free expansion, small gaps 2-3 mm thick are left between the sheets, which are filled with elastic sealant after installation.
After cleaning from construction debris and wet cleaning, the finished screed is primed and dried. Ceramic tiles on a wooden floor are glued with polyurethane glue, which does not crack due to movement of the base.
In damp rooms, the wooden base needs additional protection from getting wet, so after priming it is covered with waterproofing in several layers, extending onto the walls. The seams between the sheets and the joints with the walls are additionally taped with reinforcing tape.
Choosing tiles
The floor should be tiled with anti-slip tiles. Matte textured varieties of floor tiles with a corrugated or rough surface are perfect.
You will have to discard thick tiles - a wooden floor is not resistant to high loads. The same applies to large-area ceramic elements - their installation will require more glue or mortar, which means the facing layer will be more massive.
It is better to opt for thick but light floor tiles, which will match the color and design of the main style of the room.
It should be taken into account that large tiles in small bathrooms will visually reduce and conceal the space.
Video description
How to properly waterproof wooden floors in bathrooms and other wet rooms is described in this video:
Wet screed
A wet screed is used when it is necessary to lay a heated floor carpet under the tiles, as well as to increase the service life of the finishing coating and waterproofing of the floor in wet rooms. Cement-sand screed creates a monolithic foundation without joints with high load-bearing capacity.
But it itself creates a large load on the wooden base, so the concrete layer should not exceed 3-3.5 cm. A smaller thickness is also undesirable, since a thin screed is fragile and can crack.
Scheme for laying tiles on a wooden floor using a wet screed Source derevostroika.ru
Good condition of the base
So, it was found that it is possible to lay tiles on a good, reliable base. So how is work done in this case?
Step 1. First of all, the base of the floor is prepared. All debris is swept away from it, the wooden base is treated with special protective preparations for wood, which will help it fight beetles, fungus, and mold. Next, a layer of waterproofing material is mounted on the floor surface so that its individual strips overlap and are secured with tape. Next, an additional leveling material is mounted on the surface, which will not “walk” like the wood itself, which means it will keep the tile intact. This can be plywood, moisture-resistant gypsum fiber sheet, etc. The material is attached to the base using self-tapping screws in increments of 15-20 cm. The joints of the material are coated with glue.
The tiles must be laid on a previously prepared base
Step 2. The required number of tiles is calculated. The number of elements will directly depend on the size of individual copies of the material, as well as on the area of the room being repaired. In order to find out the required amount of material, the area of the room is divided by the area of one tile. This gives the total amount of material required.
Calculate the required number of tiles
Important! It is necessary to buy ceramic tiles with a small margin in case some of the material is damaged during installation. Tiles are a rather fragile material until they are laid on the base and break easily.
Calculator for calculating the amount of adhesive for laying tiles
Go to calculations
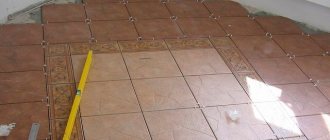
Step 3. You can lay tiles in several ways, for example, starting from the center of the room. To do this, a central point on the floor is identified: the midpoints of each wall are marked and the two opposite ones are connected point by point using a thread. Where the thread intersects is the center point of the floor. By the way, the lines formed from intersecting threads will also be useful when laying tiles - they should be applied to the base of the floor.
The center of the room is determined
Step 4. Pre-laying of tiles is carried out. It is laid out from the center of the room (at the central point the first four tiles meet at the corners) in accordance with the picture, as it should ultimately lie. During preliminary layout, all distances between elements are observed.
Pre-laying tiles
Step 5. If necessary, you can immediately estimate how many and to what length the tiles will have to be cut. Holes for pipes are also drilled in the tiles. To do this, use a special drill attachment or hole saw.
Drilling a hole for a pipe
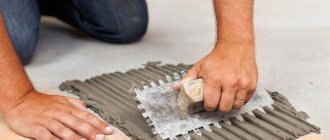
Step 6. Now it's time to start laying the tiles with glue. To do this, the finishing material is removed from the surface of the base and the tile adhesive is diluted. Next, using a notched trowel, it is applied to the base of the floor in the area of the central point on the floor so that the tiles can be laid on it immediately. The tile is placed on the surface of the glue carefully, under slight pressure from the master. You cannot twist or move the element along the glue! It is also recommended to apply a layer of adhesive to the back surface of the tile; the application lines should be perpendicular to those applied to the floor. Separators are installed along the edge of the tile.
Tile laying process
Attention! Tile adhesive hardens quite quickly, so it should be diluted in small portions.
Step 7. After the tile has been laid, the glue underneath should dry well. The drying time of the composition is about 24 hours.
The glue will dry for about a day
Step 8. Next, the joints are grouted using a special trowel and a special composition. The grout composition is pressed into the cracks between the floor elements using a spatula so as to completely fill the voids. Excess is immediately removed using a rubber float. After a few minutes, when the grout has set a little, stains from it can be removed with a soft, damp cloth.
Grouting joints
After laying the tiles, it is recommended to allow the floor to settle before using it fully. Let it sit untouched for about a week, but you can carefully move around it immediately.
Video description
An example of installing a wet screed on a wooden floor in a private house is shown in the video:
The main disadvantage of this method of preparing the base is that the screed must be completely dry and gain strength before laying the tiles. This process lasts at least three weeks, and with high air humidity and temperatures below +10-15 degrees it can last even longer.
Tiles can be laid on a cement screed using regular tile adhesive, but it is better to use polyurethane adhesive. After the glue has dried, the seams are filled with epoxy grout.
Selection of adhesive composition
For work on wooden bases, only special types of adhesives are suitable, which contain components with high elasticity. They must withstand the linear expansion of the boards, preventing the tiles from moving from the base and cracking.
These parameters correspond to the products of the following brands:
- Unis – super elastic adhesive and super polymer;
- Knauf Flex;
- Ceresit CM17, etc.
If a concrete screed was made on top of the floorboards, it is permissible to use a classic mortar based on sand and cement.
Among the non-standard methods offered by folk craftsmen, we can mention liquid nails and liquid glass (silicate glue)
In some cases, homemade mixtures of nitrocellulose varnish with polystyrene foam dissolved in gasoline or acetone are becoming popular.
Read more about tile adhesive for the bathroom in the article - How to choose adhesive for tiles in the bathroom
Important! When using homemade glue, there is no guarantee that the cladding will last long and be strong.
Briefly about the main thing
Ceramics are quite difficult to “make friends” with wood, especially when it comes to covering a floor that experiences constant vibration loads. Wood expands and contracts under the influence of varying temperatures and humidity, while ceramics have little or no effect. Therefore, before laying tiles in a wooden house, the floors should be strengthened, leveled, protected from moisture and ensure their stability. This is done using a dry or wet screed, onto which the finishing coating is subsequently mounted.
Ratings 0
Tile laying process
Before gluing the tiles, you need to do a fitting, lay a section of the floor with tiles to determine how it will look more beautiful. The tiles will definitely need to be trimmed; try to lay them out in such a way that the pieces are on the periphery of the room and in inconspicuous places. You need to make the layout starting from the center and from the brightest place in the room. Tiles that need to be cut must be prepared in advance. If the volume of trimming is small, you can use a tile cutter, but if the volume is large, then you cannot do without a grinder.