Tiling a floor is not as simple a process as it might seem from the outside. Somewhat more complicated than conventional, “straight” cladding is laying tiles diagonally. It has its own characteristics, which primarily relate to planning and marking. Therefore, further we will consider all the stages of such tile laying, starting from surface preparation and ending with the assessment of the tiled surface.
Laying tiles diagonally
Pro & Contra diagonal tiling
In modern interiors, designers very often use various techniques to create certain effects in a room. One of them is precisely the location of the cladding diagonally. Therefore, if you want to include something unusual in the design of your hallway, corridor, bath, kitchen or toilet, then diagonal tiling is one of the available options.
Diagonal masonry can also be combined with traditionally laid cladding
The advantages of this design technique include the following points:
- A visual expansion of the space is achieved, especially if the walls are at least slightly reflective.
- It becomes possible to visually divide the room into zones using different directions for laying tiles.
- The spectacular arrangement of the floor finishing immediately attracts the eye of those entering the room.
The disadvantages of this masonry option include:
- Increased complexity of work, including difficult markings.
- Forced cutting of more tiles diagonally.
- Increased consumption of facing material.
- There is a high probability for beginners of making mistakes when calculating, drawing up a diagram, and also when performing cladding.
How to choose ceramic tiles
Selecting a mixture for grouting
The cladding will acquire a finished aesthetic appearance if its seams are properly sealed. The final stage of finishing the floor will help hide the resulting defects and protect the cracks from the penetration of dust and moisture. When carrying out grouting work, it is necessary to strictly follow the technology. The choice of material will depend on the size of the gaps.
If the seams between the elements are wide, more than 5 mm, it is better to choose a resin-based mastic for grouting. A small space at the joints must be sealed with moisture-resistant cement-based compounds. Places in contact with the wall must be treated with silicone sealant.
Grouting joints performs not only practical, but also decorative functions. The material of the desired shade can be purchased ready-made or made with your own hands. Pure white grout is used if it is necessary to hide unevenness during installation and other defects. With ideal installation, the design of the seams in contrasting colors will look beautiful.
TOP 3 popular manufacturers of ceramic tiles
| Photo | Name | Rating | Price | |
| #1 | Kerama Marazzi | ⭐ 99 / 100 | More details | |
| #2 | Keramin | ⭐ 98 / 100 | More details | |
| #3 | Fap Ceramiche | ⭐ 95 / 100 | More details |
Kerama Marazzi
The largest share of the domestic market in the budget and mid-price segment is occupied by Kerama Marazzi. This manufacturer of ceramic tiles manages to gain popularity due to the combination of affordable prices and Italian quality.
Kerama Marazzi
pros
- Good assortment.
- Innovative technologies in the production of tiles and glazes for them.
- Durability of tiles.
- Developed trading network.
- Affordable price.
Minuses
Not all collections have the ideal combination of wall and floor tiles.
floor tiles Kerama Marazzi
Keramin
The products of the Belarusian company Keramin are well known to Russian consumers. The manufacturer's catalog is varied and you can find interesting design solutions in it.
pros
- high quality products;
- acceptable price;
- wide product range;
- long service life.
Minuses
- inaccurate geometry found in products.
ceramic floor tiles
Fap Ceramiche
The tiles produced by the Italian company stand out among competitors thanks to their unique design and bright, vibrant color.
Fap Ceramiche
pros
- original manufacturing technology;
- a wide range of.
Minuses
- high price.
Fap Ceramiche tiles
Tile leveling systems will help you carry out tiling work with the highest quality possible!
Our online store invites you to buy new innovative tools presented on the Russian market, which allow you to lay tiles with the highest quality possible. Our assortment includes three varieties of the most popular leveling systems - DLS, SVP and Litolevel. All of them have excellent factory quality, leave production with a complete absence of defects, and are made of impact-resistant plastic. It is impossible to say for sure from which category of people they have gained the greatest popularity. Beginners who have used leveling systems speak highly of them, as they helped them lay tiles with high quality without experience. Professional masons value working with leveling systems , as they significantly simplify facing work and, in addition, allow the work to be done several times faster. Thus, they manage to complete several norms during a working day and, accordingly, earn more. In addition to leveling systems , we also sell 3D crosses, which are also popular among layers. If we compare systems and crosses, the former are more universal and allow, in addition to obtaining even seams, to organize a perfectly flat surface, thereby solving two problems. The cost of leveling systems is slightly higher, but they are more functional.
Options for laying tiles diagonally
Each good craftsman may have his own proven technology for making diagonal laying of floor tiles. But in many ways, the marking for cladding also depends on the evenness of the corners, as well as on the shape of the room in which the cladding will be carried out.
Expert opinion
Afanasyev E.V.
Chief editor of the pol-exp.com project Engineer.
As a rule, the walls in apartments are not perfectly perpendicular, unless, of course, they have been previously leveled. This means that the corners of the rooms are not always exactly straight. And this circumstance, in turn, affects the option for starting masonry.
This can be done in the following ways:
- If the corners of the room are uneven, after marking the floors, the cladding begins from the corner into which two triangular elements of the same or different sizes are placed. They must fill this indirect angle and at the same time set an even diagonal, from which further “dancing” begins.
Starting masonry from the corner with one triangular fragment
- If the corners of the room are aligned, then the laying can be started with one tile cut diagonally, as shown in the illustration above.
Options for “starting” from the center, with the usual laying of tiles along the perimeter of the walls.
- Laying tiles diagonally from the center of the room can be done at any angle, if the tiles have previously been laid along the perimeter of the room in the traditional way.
- Laying begins from the center of the room when using tiles of different colors for tiling, from which a certain pattern must be laid out.
In any of the selected options, it will be necessary to draw up a project for the future cladding on paper, transferring the floor plan to scale onto it. At the same time, do not forget about the thickness of the seams - although it is small, it adds up a lot on the scale of the room.
By the way, a good help in drawing up a scaled plan for laying out tiles on the floor can be the Microsoft Publisher program, which is probably on every computer - it is included in the regular Microsoft Office package.
Then, the surface of the floor is outlined, the way it looks on the drawn up plan. Using this scheme, it will be easier to prepare the tiles for laying in shape and size. And it will be much easier to calculate the quantity, especially if several different tile models are used.
Tile laying diagram with its numbering
In order not to spoil the material, before proceeding to cutting, you should lay out the whole tile on the surface, along a pre-marked base. Some craftsmen at that stage immediately cut out the fragments, precisely fitting them, and then carry out a general numbering of the entire “mosaic”. And during the laying process they are no longer distracted by side operations. But this approach still requires some experience.
Any small mistake can result in a considerable number of incorrectly cut tiles. And it will be good if an opportunity is found to use these fragments usefully. And high-quality floor tiles can cost a lot.
ceramic floor tiles
Using a special corner
If you use a construction corner. It is also called trim.
Operating technique:
- the master initially checks the required length and cuts the profile at this level;
- sealant will help fix the tiles to the trim;
- the construction corner is installed vertically and checked with a level;
- an even part of the trim is applied to the already laid panels;
- on the second side new rows of tiles are placed.
A day after finishing the work, the master rubs all the joints with a special solution. Thus, the trim installed in the tiles will not be visible in the future.
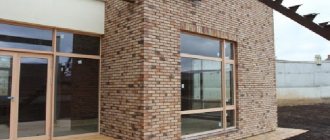
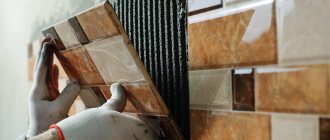
Cutting tiles at 45 degrees is the best option for the outer corners of the bathroom. It is the most accurate method suitable for such surfaces. The panels are cut using a special tile cutter with a rotating bed. A diamond-coated disc is used here.
The master carefully checks the outer corner. After cutting, the edges are sanded well. If this process is not approached with care and precision, the outer corner will become sloppy, which will spoil the overall impression of the bathroom and toilet.
Tools and materials for work
Before moving on to the description of the preparatory work, it is necessary to list the tools without which it will be impossible to prepare the floor and lay the cladding.
Tools needed for laying ceramic tiles
So, to mark and lay tiles you will need:
- Painting cord for marking the surface;
- Tape measure and long metal ruler;
- Marker and simple pencil;
- A laser level is desirable, but not required, but in this case, you cannot do without a building level and rules.
- Containers for mixing glue and grout solutions, as well as a painting tray with a ribbed surface for primer;
- Electric drill and mixer attachment.
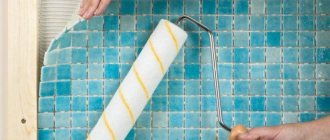
- Roller with fur attachment;
- Spatulas - traditional, serrated and rubber;
- Rubber hammer;
- A tile cutter, a grinding machine with a disc for ceramics, and, as a last resort, a high-quality glass cutter;
- Handy tools, for example, a block for tamping tiles.
From materials other than tiles you will need to prepare:
- primer for concrete surface;
- tile adhesive;
- grout composition.
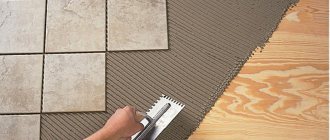
Mixing tile adhesive
In order not to purchase excess tile adhesive, it is best to calculate its consumption in advance. Moreover, taking into account that its quantity will depend not only on the area of the room, but also on the parameters of the selected tile. The larger its dimensions, the thicker the layer of glue applied using a notched trowel. It follows from this that the larger the tile, the more glue will be required to install it.
| Linear parameters of the tile (if it is rectangular in shape, it is calculated on the larger side), mm | Recommended height of teeth of a notched trowel, mm | Approximate glue consumption, kg/m² |
| 400 or more | 12 | 7.6 |
| from 300 to 400 | 10 | 6.3 |
| from 200 to 300 | 8 | 5 |
| from 100 to 200 | 6 | 3.8 |
| from 50 to 100 | 4 | 2.5 |
| up to 50 | 3 | 1.9 |
This table will help you navigate when purchasing dry mixture. But it’s even better to use a calculator that will calculate the amount of tiles, tile adhesive, and grout at once. True, it will fully help in all three positions if it is planned to cover the entire floor with tiles of the same format.
tile adhesive
Calculator for calculating the amount of materials for floor covering with ceramic tiles
Go to calculations
A few explanations about the calculator
No special explanation is needed, but still...
- We proceed from the area of the floor to be covered, in square meters. You will have to determine the area yourself - having in front of you a plan of an apartment or house, this is not difficult to do.
- The parameters of the selected tile are indicated in millimeters:
- length - along the larger side of the tile;
- width - on the smaller side.
Naturally, if the tile is square, then these indicators will be equal.
— tile thickness;
- the planned thickness of the joints between the tiles.
Please note that the seam thickness count starts from zero. The fact is that there are varieties of floor tiles that can be laid without any gap at all (for example, rectified porcelain tiles). Another thing is that seamless masonry is still not particularly welcome, and at least a millimeter should be left.
- It is necessary to indicate the chosen masonry pattern - straight rows or diagonally. This, as we remember, is reflected in the amount of waste, that is, it requires a larger supply of tiles.
- After clicking on the calculation button, the result is displayed:
— Tiles – piece by piece.
— Tile adhesive – in kilograms and approximate number of bags (standard packaging of 25 kg).
— Grout for joints – in kilograms.
All materials are calculated with a margin of 10%. When choosing diagonal laying, the supply of tiles increases to 20%.
grout for joints Ceresit
How to calculate the required quantity
Any construction or renovation work begins with the choice of design, selection of material and calculation of its quantity. A large assortment of tiles, their colors, textures makes it difficult to solve such a problem, especially if the floor has non-standard geometry. When making calculations, it is important to know the future size and pattern of the elements.
You can determine the required number of tiles for one room in the following ways:
- By room area. Suitable for single-color, one-dimensional elements. First, determine the area of the room and add 10% to the resulting value to create a supply of material. The final figure is divided by the area of one tile. This method of online calculation is available on many websites of ceramic manufacturers and in special programs.
- When laying diagonally. This installation technique increases the consumption of tiles, so 15% is added to the area of the room.
- By the number of rows. Determine the width, length of the room and the parameters of one tiled part. Then the length of the room is divided by the length of the tile, and the width is dealt with accordingly. The resulting figure is rounded up and a margin is added.
- Piece counting method. They are used when laying floors with expensive coatings and elements of complex panels, since the method gives a minimal error in calculations. Determine the parameters of the room, one tile instance. Then the number of rows and tiles in each is calculated.
Floor tiling diagonally
Preparatory activities
This part of the work can well be called one of the most important stages. And, therefore, how well they are carried out directly determines how much easier it will be to lay the tiles, and how durable and aesthetic the ceramic coating will be.
The foundation preparatory process includes the following steps:
- Dismantling the old covering, if it was laid on the floors.
- Cleaning the surface of old hardened mortar or glue.
- Conducting an inspection of the foundation to ensure compliance with the horizontal plane, detection of cracks, stakes, and unstable areas.
- If the mentioned defects are found in the concrete screed, they should be repaired.
- The repaired areas are leveled with the rest of the floor. Sometimes uneven floors require sanding.
- In case of significant unevenness of the floor, it is leveled with a thin layer of self-leveling compound.
- Thorough priming of the base.
- Surface marking in accordance with the developed plan.
These stages of work will be briefly discussed below. A detailed description of them can be easily found on our website in separate publications:
| Illustration | Brief description of the operations performed |
| Dismantling the old coating is perhaps the most unpleasant stage of the work. The easiest way is to remove the linoleum covering from the surface, especially if it is not glued. It is more difficult to dismantle ceramic tiles. It can be removed using a hammer drill with a special attachment or manually, as shown in the photo. This process is quite messy, noisy and time consuming. If the old tiles hold securely and have a flat surface, and the height of the ceiling and threshold of the front door allow the floors to be raised, then a new ceramic coating can be laid on top of it by choosing the correct composition of the primer and adhesive. | |
| If the old coating is removed and glue remains are found underneath, it will have to be removed. This process will have to be done manually so as not to damage the base. | |
| The cleaned concrete base should be carefully inspected for cracks, chips, depressions or protrusions. If protrusions are found, they will have to be chipped off, and the depressions, chips and cracks will have to be filled with repair mortar. | |
| If the cracks are small, they should be widened a little and cleaned of dust. Then, cracks, as well as depressions and chips, must be treated with primer and allowed to dry. Then the defects are filled with a repair solution. Tile adhesive works well for this purpose. | |
| After repairs, floors should be checked for evenness using a building level. If the surface does not have significant differences, then you can proceed to the next stage of work. | |
| The concrete base is cleaned of dust using a vacuum cleaner and then treated with a primer. It is better to apply this solution in two or three layers, each of which is applied after the previous one has completely dried. | |
| If the surface has differences that could interfere with the quality installation of the ceramic coating, then it is recommended to level it using a self-leveling compound. | |
| When the leveling layer has dried, it should be primed again. The primer will increase the adhesive properties of the surface, due to which the tile will be more firmly glued to the surface. | |
| The final stage of preparatory work is marking the surface. For diagonal or centrally patterned masonry, when marking, it is necessary to find the center of the floor. |
It should be noted that each individual case requires an individual approach, taking into account the quality of the base, the evenness of the walls and corners. Therefore, various options were taken into account in the base preparation table. However, in the most difficult cases, it is necessary to pour a full-fledged concrete screed in order to thoroughly level the floors.
The process of laying tiles diagonally
This subsection will discuss the stages of tile laying work, including marking the floor without using a laser level. We hope that the step-by-step description will help you cope with this difficult task yourself.
| Illustration | Brief description of the operations performed |
| We repeat - the prepared floor surface should be marked. This stage should be carried out very carefully, since the quality of the tile laying, the evenness of the rows and compliance with the width of the gaps depend on the accuracy of the markings. First of all, you should find the center of the room. To do this, you can use the simplest devices, for example, a marking cord. They connect the midpoints of opposite sides - two lines are broken off. The intersection will give the desired center. | |
| Ideally, the lines should be perpendicular at the intersection. But the curvature of the shape of the room can have an effect - sometimes a right angle does not work. This means that it will have to be set using, for example, the principle of the “Egyptian triangle”. That is, if you set aside two legs in a ratio of 3:4, then the hypotenuse will become equal to 5. For example, legs 900 (3x300) and 1200 (4x300) mm, hypotenuse - 1500 mm (5x300). It will be more accurate to mark the perpendicular with an ordinary construction square. | |
| Now, based on the location of the center and the perpendicular lines extending from it, you can make a preliminary layout of the tiles, as intended by the design. This will help ensure that the markings and the selected pattern are correct. This is especially true if tiles of different colors are used for cladding. Tiles should be laid taking into account the gaps between them, and special plastic crosses are used to maintain their width. | |
| Next, you can choose one of two options for carrying out the work - fix the tiles laid out in the center of the room with glue, or lay them along the entire length of the room along an extended cord. In this case, the master chose the second cladding method, since with the help of glued tiles the entire central line of the masonry will be immediately determined. | |
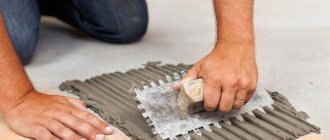
| The tile is first laid out along its entire length and then secured with glue, which in this case is best applied directly to the tile using a notched trowel. When the first row is fixed, the rest of the tiles will be laid with a reference to it. Any adhesive that appears along the edges of the tiles should be removed immediately, otherwise it will interfere with the installation of the following cladding parts. | |
| Tiles located next to each other (no matter how they are laid diagonally or in the traditional way) must be checked for evenness using a building level, since they must be clearly in the same plane. | |
| If a difference is detected, that is, some edges of one of the tiles are raised, then they should be knocked through the beam with a rubber hammer. After this, check again for evenness with a level. | |
| Next, you can proceed to installing tiles in the central part of the room. This approach is especially relevant if a geometric pattern is laid out on the floor from tiles of different colors. To maintain the same width of the seams, it is recommended to use plastic crosses. They can be installed vertically (seems preferable) or laid horizontally at the junction of four tiles. | |
| After this, the installation is carried out in one direction from the center of the room. In this case, the color order and pattern configuration are observed. Only whole elements are laid; cut tiles will be installed at the last stage of laying. Any adhesive that comes out when installing the tiles that are outermost from the wall must be thoroughly cleaned off, otherwise it will interfere with the cut elements that will complete the central part of the pattern. | |
| After the entire central part of the floor is filled with cladding, tiles cut diagonally are laid. If the outermost diagonal tiles are not the last in the masonry, as in this option, then the evenness of their edges can be controlled using a rule or a beam with perfectly straight lines. | |
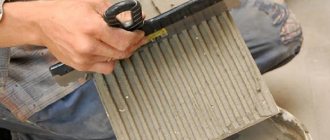
| To cut ceramic tiles (diagonally or with a straight cut, it doesn’t matter), it’s most convenient to use a tile cutter. | |
| Another option for cutting tiles is to first mark them with a pencil, and then draw them with pressure along the line with a good glass cutter. After which the tile is applied along the edge of the workbench along the marked line. You must press sharply on its hanging edge. If the groove made by the glass cutter is smooth and deep enough, the tile should break smoothly along it. It’s important that in the picture the master works with his bare hands, but you shouldn’t imitate him in this. The sharp edges of cut or cracked tiles (and anything can happen) can cause very serious wounds. | |
| After the central area of the room is tiled, the preparation of tiles for framing (if there is one in the plans) begins. To do this, the tiles are marked and cut. Next, it is laid, also using crosses, since the width of the gaps should not change. | |
| When laying the tiles is completely completed, the coating should be left until the adhesive has completely dried. This time is indicated by the manufacturer on the packaging. You cannot walk on the tiles during this period, otherwise the work may be completely ruined. | |
| When the glue has hardened and it is possible to move on the surface, the stage of filling the seams between the tiles begins with a special grout, selected according to color if necessary. The grout can be applied to each seam separately using a narrow rubber spatula. Or, as shown in the illustration, directly onto large areas of the cladding with a wide rubber spatula. To do this, a sufficiently large volume of grout is laid out and distributed over the gaps between the tiles. In this case, it is necessary to press the mass into the joints so that they are densely filled with it to the full depth. Grouting is carried out over the entire tiled area in one go. | |
| When grouting, it is very important to immediately remove the grout from the surface of the tile as much as possible. It is acceptable to leave stains, but not mass accumulations. Therefore, after rubbing individual areas of the coating, excess mortar should be immediately removed using a moistened but not very wet sponge, so as not to damage the evenness of the grout in the seams. | |
| After the grout has completely hardened, the coating must be immediately thoroughly cleaned of any remaining grout. The task is performed with a damp, hard sponge, and then with a soft, dry cloth. Only after completing this stage will it be possible to fully evaluate the quality and aesthetics of the laid floor covering. |
Can tiles be laid over old tiles? Read in the special article.
* * * * * * *
Let us repeat that this is by no means the only way to lay ceramic tiles diagonally on the floor. Experienced craftsmen have a lot of individual approaches to this problem. For example, watch a video in which a professional gives advice and demonstrates a master class on such styling. By the way, this is only the first video of a whole “series” in which such finishing is painted literally down to the smallest detail.
Installation technology
Aluminum, plastic and metal trims are attached to the wall surface using tile adhesive. The profiles have a perforated inner surface, which allows them to be slightly pressed into the adhesive layer for better fixation.
Layouts are divided into 3 groups: hard, semi-rigid, soft. To design corners and joints of complex geometry, the best option in choosing profiles would be plastic layouts, since they are easy to cut. Straight and clear joints cover metal products well.
Installation of corners for external joints:
- Make markings on the wall. To do this, cut off the required length of the profile and apply it to the finished joint. Rectangular tiles or products of a different configuration are inserted into the trim groove on both sides. Measurements are taken and the necessary marks are marked on the wall.
- The corner is covered with glue and the elements are laid. The correct installation is controlled by the marks made at the beginning.
- The edges of the tiles are inserted into the grooves and the trim is pressed against the surface of the cladding to remove voids.
- Remains of glue are removed with a rag, and the surface of the cladding is wiped dry.
To prevent the tile from “floating”, it is additionally fixed with masking tape, which is removed after the glue has dried.
The decorative corner for internal joints consists of several parts:
- groove for tiles;
- perforated protrusion;
- concave fragment.
Installation begins after the facing material has been completely laid on the wall. The profile is chosen 2-3 mm larger than the thickness of the tile. Apply glue to the cladding. The elements are applied to the edge of the wall covered with adhesive material, pressing tightly. Place the tile into the groove. The same procedure is done on the other side of the corner. Press firmly to remove voids between the tiles and the trim. After drying, grout the joints.
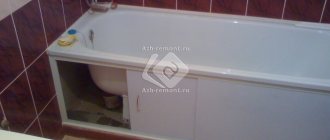
Particular attention should be paid to the processing of joints. When installing the layout between the edge of the bathtub and the adjacent wall, you need to treat all the cracks with sealant so that there are no large gaps left
This very important procedure is performed using an aquarium protective coating. Laying of trims begins after the glue has completely dried. The use of a PVC profile to seal the joint between the bathtub and the wall is most justified. It cuts well, does not allow moisture to pass through, and quickly sticks to “liquid nails” or tile adhesive. When gluing, the corner is pressed tightly against the wall and the edge of the bathtub.
Pruning
When cutting layouts, it is necessary to take into account the characteristics of the material. Cutting is done with a hacksaw or grinder. When using a hacksaw, you can use a miter box. This carpentry tool is essential for cutting corners correctly.
What are the differences between the main types of floor tiles?
Porcelain tiles as a finishing material were invented much later than ceramic tiles. Despite approximately the same composition (clay, quartz sand, flux, water), these two flooring options have differences not only in production technology and appearance, but also in performance characteristics.
We compared all three options (along with quartzvinyl) in one table to track important differences. For all parameters, we gave each material a rating on a five-point scale.
| Comparison parameter | Ceramic tiles (tiles) | Porcelain tiles | Quartz vinyl not lower than class 32 |
| Wear resistance | 4 | 5 | 5 |
| UV resistance (fading) | 4 | 5 | 5 |
| Resistance to mechanical stress, chips, cracks, cuts | 3 | 5 | 5 |
| Moisture resistance | 5 | 5 | 5 |
| Easy to care for | 4 | 4 | 5 |
| Environmental friendliness | 5 | 5 | 3 |
| Difficulty of installation | 3 | 3 | 4 |
| Tactile sensations | 4 | 4 | 5 |
| Price | 5 | 4 | 3 |
| Slip/safety | 3 | 4 | 5 |
| Total points: | 40 | 44 | 45 |
All other things being equal, it turns out that quartz vinyl is slightly superior to tiles and porcelain stoneware. But when choosing, as a rule, we are guided not only by durability and wear resistance, but often by cost and appearance. A detailed description of each option below will help you make your choice.
Tile (ceramics)
The peculiarity of tile production determines such a huge number of design options - with drawings and patterns of different shades and subjects. BUT (!) This is also the main drawback: since the pattern or color is applied superficially already at the glazing stage, its wear resistance will be low; after a few years, the pattern or design may wear out and fade, losing its attractive appearance.
Tile is inferior in strength to porcelain stoneware and quartz vinyl, but outperforms them in cost and decorative properties. It is lighter in weight, which means it is cheaper (if you order delivery) and it will be easier to transport.
Porcelain tiles
Porcelain tiles, unlike tiles, are painted over the entire thickness while mixing the base components, which allows for depth and color stability. Its different types have their own characteristics.
- Structured porcelain tiles have a relief surface and can beautifully imitate natural materials - marble and other types of stone, wood, concrete.
Porcelain tiles that imitate wood are often called “ceramic parquet”, but compared to its natural counterpart, it is many times more practical and durable.
- Polished porcelain tiles are a floor covering that sparkles to a mirror shine. Most often, this processing technique is used in products with a stone design to emphasize the spectacular pattern.
Despite its beauty, polished porcelain tiles have significant disadvantages, due to which their choice for the kitchen cannot be called practical: slippery surface; polish wears off over time; the cost of the polished version is higher; When polishing, the pores open, and the material becomes vulnerable to dyes, instantly absorbs them and loses its attractive appearance. The last drawback can be minimized by covering the surface with a special varnish (in cases where the manufacturer has not yet done so).
- Glazed porcelain tile is a material on which glaze has been applied and then fired. This allows you to create durable tiles with complex design options. But, as in the case of tiles, the design or pattern will quickly wear out and fade over time.
Glazed porcelain tiles are best combined with simple ones: in the kitchen work area - the most accessible and vulnerable place, it is better to lay regular porcelain tiles, and place glazed ones in the middle of the room.
There are other types of porcelain tiles - matte (unpolished), lappated (semi-polished, more resistant and less slippery), etc. Every year, the production technology of porcelain tiles is being improved, new processing methods are appearing that can minimize disadvantages. But at the same time, the price of the material, compared to ceramics, remains higher.
Quartz vinyl floor
More recently, another flooring option has appeared - quartz vinyl (PVC tiles). In terms of composition, installation technology and properties, this material is completely different from the analogues listed above.
Quartz vinyl is inferior to porcelain stoneware or tiles in terms of environmental friendliness.
Quartz vinyl flooring is often associated with cut-to-piece linoleum. Cheap vinyl tiles can actually resemble their counterparts in appearance. But expensive ones can surpass not only linoleum in properties and design, but also tiles, laminate, and many other flooring options for the kitchen.
- Thanks to the addition of sand, quartz vinyl is a super-strong and resistant to mechanical stress, even to the fall of piercing and cutting objects. A dropped heavy frying pan will likely break a tile floor, but a vinyl floor will remain scratch-free and dent-free.
- Moisture resistant. She is not even afraid of flooding.
- Unlike porcelain stoneware and tiles, it is tactilely pleasant: it is comfortable to walk on barefoot, since the surface is not cold.
- Installs easier and without dirt. Glued with super strong glue. No special or expensive tools are required, as is the case with tiles or porcelain stoneware, except perhaps a utility knife, which is needed for trimming. Careful preparation of the base is also necessary.
Laying quartz vinyl flooring
- It can have a wide variety of designs, including very realistic imitations of natural materials.
- Easier to care for. There is no need to clean dirt from the seams, since the coating is laid out joint to joint. The perfectly flat and continuous surface is quick and easy to clean.
For the kitchen, it is best to choose quartz vinyl tiles of at least class 32. It is more durable and will last longer in high traffic areas.