If you have ever used a portable burner with piezo ignition, then you have probably encountered the problem of such a device breaking down. Agree, it would be somewhat inappropriate to throw away an almost new burner due to a malfunction that you can fix yourself.
In order not to spend “extra” money on repairs, for which the technician will demand the cost of the device, you should figure out how to repair a gas burner with piezo ignition with your own hands, and not spend a penny from the family budget.
A gas burner can stop working for completely different reasons, ranging from water or dirt getting inside the mechanism, and ending with a breakdown of the piezo ignition itself. Further in the article, you will become familiar with the main causes of burner malfunction, and learn how to disassemble the mechanism yourself and repair it without the help of an experienced technician.
How to light it?
Special literature usually indicates a clear procedure for igniting the device. First of all, oxygen access is opened. Then the combustion gas is supplied. The resulting mixture must be ignited immediately. Extinguishing is carried out in the opposite order: first the gas valve is closed, then the tap responsible for the oxygen supply is closed.
The problem is that if you turn on the oxygen first and then the gas, the flame is likely to be blown out by the oxygen flow. Therefore, the feed should not be opened completely, but by ¼. Some solve the problem differently: they initially open the gas, ignite it and gradually open the access of oxygen. This method helps to adjust the torch, and the only drawback is a small amount of soot.
Manufacturing Features
The design features are that it is very easy to operate; there are no traces of soot or repulsive odors when using the gas burner. This device is compact and can be used virtually anywhere. The main component of the burner is the industrial valve. You can purchase a new part, however, and used ones that are in working order are quite suitable. The process of making a burner with your own hands begins with the handle, then the body and nozzle are made.
In order to obtain a burner that is safe to operate and does not waste fuel, you need to make it a rule to avoid scaling and adjusting the example circuits.
To be fair, it is worth noting that not all gas appliances are calculated according to the laws of gas dynamics. But if the manufacturer changes the dimensions of the design parts, then the Reynolds number of the fuel (or intake air) will go beyond the limits indicated in the original product. The burner with such “improvisation”, if we give an optimistic forecast, will begin to smoke and will be “gluttonous”, or even be completely dangerous in operation.
And one more important note regarding the manufacturing features of the burners: it is impossible to increase its power above 10 kW. And that's why. With a burner efficiency of 95% (which is an excellent indicator for an amateur invention), with a device power of 1 kW, it will take 50 W to self-heat
It is theoretically possible to get burned on the structure, but it is not fraught with explosion. But if you build a burner with a capacity of 20 kW, 1 kW will be superfluous. Threshold manifestation is expressed by the structure being hot or bursting into flames. Therefore, those burner drawings that are oriented at 7-8 kW should not be considered
With a burner efficiency of 95% (which is an excellent indicator for an amateur invention), with a device power of 1 kW, it will take 50 W to self-heat. It is theoretically possible to get burned on the structure, but it is not fraught with explosion. But if you build a burner with a capacity of 20 kW, 1 kW will be superfluous. Threshold manifestation is expressed by the structure being hot or bursting into flames. Therefore, those burner drawings that are oriented at 7-8 kW should not be considered.
Spray cans
These are convenient compact devices that provide fuel in nature, on hikes, etc.
How to clean a gas burner for a spray can? Here only a mechanical method is needed. An analogue of a cleaning rod is created from available devices. For the procedure to be effective, you need to understand the operating principle of such a device.
The burner is threaded onto a cylinder. Due to the pressure inside it, the fuel rapidly flies out of the hole, forming a mixture with oxygen along the way. Thanks to this, combustion occurs.
The cleansing procedure is performed in a place away from open flames and hot appliances. You need to disconnect the burner from the container.
The created cleaning rod systematically cleans the internal cavity of the gas supply tube.
At home, cleaning can be done with a long knitting needle or similar object.
Purpose
Let's first determine what methods of heating stoves there are:
- wood;
- charcoal:
- oil;
- gas;
- electric.
When using the oven in restaurants, cafes, etc. The question arises about the method of heating this oven. And if using firewood is convenient and environmentally friendly in open areas and presumably in the summer, then tandoors with gas burners will allow you to use them indoors and fit harmoniously into the conditions of a modern kitchen.
It is possible to use heat-electric heaters, but the cost of electricity cannot be compared with paying for gas. Therefore, if you plan to work indoors, then choosing a gas heating method is an ideal option.
A gas device is used for initial heating of the tandoor and accumulation of heat in the walls. It allows you to more smoothly regulate the heating, which will avoid cracks and burning of the walls. Subsequently, burners are used to maintain the required temperature in the tandoor, but not during cooking.
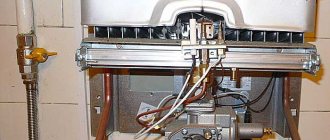
This is what the burners look like in the photo:
Photo 1
Photo 2
How to remove control knobs?
If you need to either adjust the flame in the burners of a Gorenje gas stove, or simply clean the buttons from accumulated grease, you can remove the handles from the control panel yourself, without using additional tools. Depending on the age of the model, the handles may have slight differences in structure.
The first thing you need to do is turn off the gas valve, and then make sure that all regulators are turned off. Next, you can slightly pry the handle with a knife to simplify the process of removing the handles.
So, if you have an inexpensive model, the handles can be removed by pulling, since each of them is based on a spring. To do this, just pull the handle towards you, slowly turning it along the axis.
On expensive models of Gorenje stoves, the handles may be equipped with special fasteners that must be unscrewed before pulling the handleTo prevent the handle from slipping in your hands, you can wrap it with a small piece of fabric, and only then pry it off with a knife.
Heavy contamination of the control panel can slow down the process of removing the handles, so in this case it makes sense to use a special soap solution. Having previously moistened each part with this solution, you can safely begin removing the handles.
If you are not sure that you can fix the breakdown on your own, it is better to contact the company with which you have an agreement for the maintenance of gas equipment.
If you liked the article, please share it
Previously on the topic:
Share
Ignition produces a spark, but the burner does not ignite
In cases where the electric ignition produces a spark, but the burner does not ignite, you should try replacing the thermocouple. Sometimes the problem is related to the solenoid valve, and after updating it, the equipment operates normally. You should check the ignition unit, because if everything is fine with it, but ignition does not occur, you need to look for a problem in the power wire or burner spark plug.
If a spark is supplied, the flame lights up, but immediately goes out, try holding the gas button longer. It is likely that the sensors responsible for the formation of the flame simply do not have time to warm up.
The oven burner burns with a red flame, with a gap
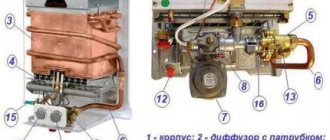
Sometimes the oven burner burns red. Or, conversely, flame separation occurs, that is, opposite some burner holes the flame does not burn or periodically goes out. If the gas pressure is normal and the nozzle is clean, then this is due to the installation of the gate (Fig. 2. B). The gate is a regular elastic plate, bent into a ring and inserted into a hole. By moving it, you can adjust the proportions of mixing gas and air. If you move the gate closer to the nozzle, there will be little air, the flame will burn with red tongues. If you move the gate away from the nozzle, there will be more air, the flame will burn intensely, with separation. We need a golden mean.
Reasons for the lack of spark and flame in boilers with semi-automatic ignition - methods for eliminating them
Most of these models are equipped with Eurosit 630 automatic transmission.
Photo of the Eurosit 630 automation.
One of the reasons why a gas boiler with automatic “Eurosit 630” does not light up or goes out may be:
The piezo element is faulty
The piezoelectric element is a reliable part of the gas boiler automation system and breaks down in rare cases. It is installed next to the coolant temperature control knob, but can be mounted separately. To check the functionality, it is enough to disconnect the wire along which the generated voltage moves from the electrode and bring it to the valve body at a distance of 4-8 mm.
Piezoelectric element wire disconnected from the electrode.
Press the piezoelectric element's trigger button several times
If a spark appears between the wire and the housing, it means that the generator is working and you should pay attention to the electrode itself, the ceramic housing of which must be dry and intact. The electrode mounting nut must only be tightened by hand.
The emergency electrical circuit is broken
The emergency protection system for a gas boiler consists of:
- connecting wires;
- bimetallic sensors installed in the chimney and heating supply line, triggered at a temperature of 75-85 degrees Celsius;
What to do in such a situation
Once the color of the flame turns orange, red or yellow, you should understand that this indicates danger. Therefore, it is necessary to find the problem and fix it. Once you notice a change in the color of the flame, you should contact a qualified specialist to diagnose and repair the gas device.
It may be necessary to clean the gas equipment, replace the burner nozzles and adjust the air seal in the boiler. You can adjust the air-fuel mixture yourself. This does not require the help of a specialist.
The main requirement before installing gas equipment is the installation of carbon monoxide detection sensors.
It will not be difficult for qualified specialists to eliminate flame smoke. This does not require special tools. If you have the slightest suspicion of a carbon monoxide leak, immediately contact a specialist.
Lights up and goes out immediately
The reasons for this problem are:
- Weak traction. The chimney needs cleaning. If there is poor ventilation in the kitchen, then you need to open the windows or install a ventilation valve on the window frame.
- The ignition button is pressed poorly. It needs to be held for 20 to 30 seconds.
- The sensor that removes combustion products does not work. This can be found out using a multimeter. If the sensor is working, there will be a sign on the screen indicating infinity.
- Mixing streams. You need to set the regulator to a constant normal temperature.
- High pressure in models with low power. Set water parameters as indicated in the instructions.
- Systematic switching off of the overheating sensor. Solution: replacing it.
- Adjust the igniter. Disconnect the electrode from the igniter so that the spark is in the central part of the burner. Inspect and test the tube connections for leaks.
If ignition is delayed, clean the burner. There is a high probability that soot and soot have accumulated in it. The problem may also lie in the microswitch.
Comparison of models
Based on the rating described earlier, we made a table containing the technical parameters of all participating models in the rating. With its help, you can compare burners with each other and identify the best purchase option for your purposes.
| Burner name | Power, kWt) | Weight (g) | Gas consumption (g/h) | Flame length(mm) | Cost (rubles) |
| REXANT 12-0019 GT-19 | 1.1 | 135 | 80 | 145 | 300 – 400 |
| DAYREX DR-45 | 1 | 145 | 60 | 145 | 400 – 550 |
| STURM! 5015-KL-01 | 1.1 | 151 | 80 | 130 | 300 – 490 |
| STAYER 55584 MASTER | 0.9 | 170 | 70 | 135 | 200 – 300 |
| Virax Mapp Pro | 1.4 | 1.8 | 70 | 140 | 9 000 – 10 00 |
| Foxweld MT-55 | 1.5 | 160 | 80 | 150 | 300 – 350 |
| Kemper Emper 1064 E | 2.86 | 145 | 44,205 | 145 | 4 500 – 6 000 |
How to avoid burner failure?
Since the most common reason for a gas burner with piezo ignition to stop working is the breakdown of its most important element - the piezo, it is important to take care of its safety. Do not damage the device or allow water to get inside the burner, especially if you are going camping.
At best, you will have to light the gas burner with matches, unless you remember to take them with you
Do not damage the device or allow water to get inside the burner, especially if you are going camping. At best, you will have to light the gas burner with matches, unless you remember to take them with you.
The duration of use of the gas burner should not exceed 10-15 minutes, after which it is necessary to give the device a little time to cool down
Even if the piezoelectric element is damaged in some way, you should not be upset, because today there are many autonomous piezoelectric ignition devices on sale. That is, it is the same piece, only portable.
So, you don’t have to unscrew the gas burner every time to put on a new piezo ignition, and such a portable piezo ignition will definitely come in handy not only outdoors, but also at home.
Do not forget that the cause of the malfunction may be simple contamination of the nozzle or a slipped ring, therefore, to identify the cause of the breakdown, it is important to conduct a thorough diagnosis of the device. If the piezo is working properly, you just need to try to light the burner to understand which part caused the burner to malfunction
Soldering tool
A gas heater with piezo ignition is a compact and mobile alternative to a hair dryer. To operate, it does not require a connection to wires; the fuel source is a gas cylinder; in this case, a burner with piezo ignition significantly bypasses a construction hair dryer, which is less convenient to use due to the need to connect wires, which are not always convenient to pull.
Application of gas burner:
- heating and melting metal or plastic elements;
- pipe melting;
- hardening of small metal parts;
- quick lighting of a fire or stove;
- soldering of small parts;
- other minor work that requires a mobile source of high temperature.
The gas temperature during combustion reaches 1300–1800°C. The tool is easy to use with one hand.
GENERAL OCCUPATIONAL SAFETY REQUIREMENTS
1.1. An employee who is at least 18 years old, who has undergone a medical examination and has no contraindications for health reasons, who has the necessary theoretical and practical training, who has completed introductory and initial workplace safety briefings and training according to a special program, and who is certified, is allowed to perform work using a gas burner. qualification commission and received permission to work independently. 1.2. An employee who performs work using a gas burner (hereinafter referred to as the employee) must periodically, at least once a year, undergo training and testing of knowledge of labor protection requirements and receive permission to perform high-risk work. 1.3. An employee, regardless of qualifications and work experience, must undergo repeated training on labor protection at least once every three months; If an employee violates labor safety requirements, as well as during a break in work for more than 30 calendar days, he must undergo an unscheduled briefing. 1.4. An employee who has not undergone timely instructions and testing of knowledge of labor protection requirements is not allowed to work independently. 1.5. An employee performing work using a gas burner, who is allowed to work independently, must know: safety measures when using gas cylinders and burners. Rules, regulations and instructions for labor protection and fire safety. Rules for the use of primary fire extinguishing agents. Methods of providing first aid in case of accidents. Internal labor regulations of the organization. 1.6. An employee sent to participate in work unusual for his profession must undergo targeted training on the safe performance of the upcoming work. 1.7. An employee is prohibited from using tools, devices and equipment that he has not been trained in the safe handling of. 1.8. When performing work using a gas burner, an employee may be exposed mainly to the following dangerous and harmful production factors: - the possibility of a fire when using a gas burner; — the possibility of a gas cylinder explosion; — gas burner surfaces heated to high temperatures; - uncomfortable working position. 1.9. An employee performing work using a gas burner must be aware that during work, the most likely cause of injury may be burns from the open flame of a gas burner. 1.10. To protect against the effects of dangerous and harmful production factors, the employee must use special clothing, safety shoes and other personal protective equipment. 1.11. To prevent the possibility of a fire, the employee must comply with fire safety requirements himself and prevent other employees from violating these requirements; Smoking is permitted only in designated areas. 1.12. The employee is obliged to comply with labor and production discipline, internal labor regulations; It should be remembered that drinking alcohol usually leads to accidents. 1.13. If an accident occurs with one of the employees, the victim must be given first aid, report the incident to the manager and maintain the situation of the incident, if this does not create a danger to others. 1.14. The employee, if necessary, must be able to provide first aid and use a first aid kit. 1.15. To prevent the possibility of illness, employees should observe personal hygiene rules, including thoroughly washing their hands with soap before eating. 1.16. It is not allowed to perform work while intoxicated or in a state caused by the consumption of narcotic drugs, psychotropic, toxic or other intoxicating substances, as well as drink alcoholic beverages, use narcotic drugs, psychotropic, toxic or other intoxicating substances at the workplace or during work. time. 1.17. An employee who violates or fails to comply with the requirements of labor safety instructions is considered a violator of industrial discipline and may be subject to disciplinary liability, and, depending on the consequences, to criminal liability; if the violation is associated with causing material damage, then the perpetrator may be held financially liable in the prescribed manner.
Safety precautions
Fairly safe work with a gas burner can only be performed by adults. They must undergo instruction in the field of labor protection and special training in order to work systematically and at large facilities.
Here are a few more rules:
- do not work in darkness or cramped conditions;
- check devices and hoses before work;
- keep equipment and workplace in order and clean;
- use safety barriers;
- Place gas cylinders firmly and straight;
- maintain optimal ventilation;
- work without a gearbox;
- do not place cylinders near open flames or in places of strong heat;
- Avoid heating the gearboxes with an open flame;
- Do not walk on stairs with a lit burner.
To learn how to use a gas burner correctly, watch the following video.
Electric ignition does not work on two burners
In some cases, a gas stove on two burners does not light. Sometimes lighting it with a match helps - everything works normally, without interruption. The cause of this malfunction is damage to the spark plug responsible for ignition. We repair electric ignition as follows: clean the spark plug and look at its condition; perhaps it’s enough just to clean the spark plug’s power wire.
If there is a crack on the element, we buy a new part and put it in place of the old one. The electric ignition may also break down due to a faulty ignition button. Moisture or small debris could have gotten into it, or it could have been damaged mechanically. To fix this, you need to clean the oxidized buttons or replace them if they are mechanically damaged.
Damn resistor
The mentioned resistor of the electrical ignition circuit is often rated at 3.9 kOhm. The dissipation power is 0.5, less often 1 W. The size of the capacitance has long been known (according to forum members) - a couple of fractions above 2 microfarads (the numbers go in jumps according to the series given by GOST, it will not be possible to find exactly 2 microfarads, except from the E24 series) with an operating voltage of 250 volts. A radio amateur will not notice any difficulties. There were times when fuel assemblies were rewound manually!
The average person wants to know the sequence of actions. First, you need to turn off the electric ignition of the gas stove from the voltage source. The second step is to remove the electronic, high-voltage units. The design consists of separate printed circuit boards, a single substrate. There are other options.
Begin your inspection by assessing the quality of the tracks and solder joints. The conductor layer, which looks like a silver stripe, is covered with a layer of varnish. Made to protect the electrical ignition circuit from external factors, primarily moisture. The varnish reliably covers the conductive layer. Do you have nail polish at home? It will fit one hundred percent.
The deposits are cleaned off with zero sandpaper, degreased with alcohol, and varnished on top. The peeled, torn tracks of the electrical ignition circuit are restored.
Example. The conductive layer is torn. Both edges are lightly sanded, tinned, and joined with solder. Varnish is applied over the cooled solder, alcohol is used as needed. For wiping the printed circuit board, of course.
The burnt resistor is black. The denomination is indicated above. It is not forbidden to install a more powerful element. Eyewitnesses unanimously say: the further process of operation is going excellently. Let's give the stove circuit a resistor with a nominal value of 9 kOhm. It is better to take the dissipation power equal to greater than the similar parameter of the original element. 1 W is fine.
A capacitor failure can be seen from afar. Some (electrolytic) swell; the swollen barrel cannot be missed by an attentive master. Regarding the denominations, it is recommended to ask members of the forum. Modern marking of resistors with multi-colored rings is more complex than the traditional alphanumeric inscription. Tolerance was expressed as a percentage.
Repairing an electric ignition gas stove can be a simple matter. If the windings of the transformer are burnt out, you will have to buy a new one. Do you want to check the location of the fault? At each output we find a pair that rings. The resistance (use a multimeter) is hundreds of ohms. There were “legs” hanging in the air: most likely a problem with the installation of the transformer. Rewinding the activity is not easy. The Internet will provide you with valuable information. A core shaped like the letter W is used. There are dozens of primary turns; the secondary winding will have to be taken seriously.
Ignition operating principle
Electric ignitions, which are equipped with most modern models of gas boilers, include the following elements: diode, resistor, capacitor, transformer, spark plug, switch. This convenient and practical invention facilitates the operation of the unit, speeding up its activation and configuration. With the help of a compact device, you can ignite a flame in a burner not only quickly, but also safely, without the use of matches and lighters, which tend to run out and deteriorate. The flame appears immediately after pressing a button or turning a lever. It is customary to distinguish between several types of electric ignitions for gas boilers - mechanical, automatic and semi-automatic. If the unit is equipped with mechanical ignition, to turn it on you need not only to activate the burner by turning the switch, but also to press a special button. The device will generate a spark and ignite the flame. If the electric ignition is automatic, then the equipment turns on when you turn the handle - there is no need to use additional devices. To be able to use automatic ignition, the heat-generating device must be connected to the network (a grounded socket must be nearby). If the electric ignition of a gas boiler fails, you should call a heating equipment repairman at home; this can be done on the website https://24master.com.ua/.
Some features of the operation of stoves of various brands
Before buying a gas stove with the Hephaestus logo, you should find out how its oven works, what functions and protective systems the equipment is equipped with. It is necessary to check whether its technical parameters and settings correspond to the type and pressure of gaseous fuel in the network.
Warranty service for gas stoves and household ovens of the Hephaestus brand is carried out by a service technician. Subsequent repairs or adjustments can be performed by specialists who have the appropriate permit to repair gas equipment
Using a gas stove in an apartment or country house requires the owner to strictly adhere to safety rules.
We invite you to read: Which is better: a stove or a hob and an oven?
The operation of a gas oven is allowed if:
- the stove is installed in a fire-safe place, grounding is carried out;
- the gas stove and, in particular, the oven are in good working order, all structural elements are without damage;
- the baking tray and wire rack are not overloaded - permissible weight up to 6 kg;
- The operating oven door is closed.
The device should be used only for its intended purpose - heating the room or drying flammable items is not permitted. If there is a smell of gas, first of all the common valve of the fuel supply pipe must be closed, and then all the burner valves. Emergency services are called to eliminate the leak.
There are three main plate control systems:
- mechanical;
- electronic;
- combined.
The principle of mechanical and combined control is described above.
How to turn on an oven in a stove with an electronic programmer using the Gorenje brand as an example:
- The time is set by simultaneously pressing buttons 2 and 3, then and -.
- The selection of functions on the clock on a programmer with an analog display is carried out by pressing the “A” button.
- Press twice to confirm your choice.
Press and hold the thermocouple button for several seconds and at the same time press the electric ignition button with the other hand (a spark or light is shown next to it). If piezo ignition is not provided, use matches.
To use the ARDO electric oven:
- Select the desired mode using the button or adjusting knob.
- Light it with a match or electric ignition.
- They don't close the door for a couple of minutes.
- Warm up the cabinet for 15 minutes.
The Bosch stove is equipped with a knob for timer, temperature, upper and lower heating. There are models with and without electric ignition. Set the temperature, select the heat, place the dish in the preheated oven and set the timer.
To turn on the Greta oven, turn and press the knob, hold it in this position for 15 seconds, then release. If necessary, no earlier than 1 minute later, repeat the procedure with the oven door open.
Be sure to read:
How to connect a gas stove with your own hands: step-by-step instructions, installation rules
In Indesit models with piezo ignition, just turn the knob towards the maximum temperature and press. In models with manual ignition, you must hold the knob down for 15 seconds, otherwise the oven will not light.
Be sure to read the instructions and study the safety rules.
The most important:
- Do not store cleaning agents, detergents or any other chemicals inside the equipment due to the risk of fire.
- Do not allow children to play with the device.
- Use special dishes for cooking.
- Use oven mitts: the equipment gets very hot.
- If you smell gas or smoke comes out, turn off the oven.
- Do not leave the oven running unattended.
- When the cooking process is complete, turn off the stove and remove the dish using oven mitts.
Setting the gas burner flame
In order to properly configure the burner of a gas boiler, you must first follow the operating instructions for the gas appliance. Next, we’ll talk about how to properly start and set up a gas burner, and in what cases flame adjustment is necessary. But first things first.
Features of boiler burner settings
It is recommended to adjust the burner flame using a gas analyzer. It shows information about the amount of air that is mixed with the gas, namely the level of oxygen involved in the process and the amount of CO.
Typically, CO should be no more than 50 ppm, oxygen concentration should be approximately 3 to 5%. If it is less, then most likely the gas will not have time to burn, as a result of which a lot of soot will accumulate, the CO2 level will be higher than normal, and the efficiency of the equipment will decrease.
If the air is more than normal, then the temperature of the household burner of the gas boiler will be too high, and this can lead to tragic consequences, including an explosion of the equipment.
To ensure maximum efficiency of the equipment, make sure that the gas burner flame is blue. If it is yellow or blue-orange, then an adjustment needs to be made, otherwise the gas will not burn completely and leave a lot of soot. This in turn will lead to damage to the device.
The flame in the gas burner should be blue. If you find that the color has an orange tint, then try reducing the amount of gas. Reduce until the color turns blue (blue). This color is a sign of optimal operation of the gas appliance. The main thing is not to reduce the fuel supply to the point where the flame becomes almost colorless. In this case, it will go out very quickly.
Setting the starting gas supply is only necessary during ignition and does not affect the performance of the device. But if necessary, it is possible to adjust it too. To begin with, you should reduce the starting fuel supply. Reduce until the burner stops turning on. After this, you can turn the regulator until ignition resumes. You can watch the video at the end of this article for more details on setting the flame of a household gas burner.
We also recommend that you familiarize yourself with the intricacies of adjusting a gas boiler.
When is flame adjustment necessary?
An atmospheric gas burner, which operates without a built-in fan, very often fails; a turbocharged one breaks down much less often. During prolonged use of the device, its components may break or stop working at full capacity.
A floor-standing gas boiler occupies the usable area of your premises, so such heating systems are suitable for private homes. Most often, a special room is allocated for such devices - a boiler room in which the boiler is installed. Wall-mounted boilers save space, so they are preferably installed in apartments or houses with a small area
For example, a gas boiler may experience reduced efficiency or a decrease in flame.
And this can happen for the following reasons:
- High burner power installed for equipment that is designed for less powerful burners. In this case, there is not enough space for proper combustion of fuel, the fuel burns unevenly, which leads to soot quickly accumulating on equipment parts.
- A lot of soot in the chimney can have a bad effect on the draft of a gas boiler. Because of this, the subsequent removal of combustion products is very weak, little air enters, and the flame becomes yellow.
- The presence of burner defects is one of the reasons for reduced boiler efficiency, but in this case, adjusting the flame will not help correct the problem.
- Pressure drops when supplying gas can also contribute to the formation of soot and carbon deposits, and this will significantly reduce the productivity of the equipment.
All these reasons can affect the flame temperature in the gas burner, in which case repairs will be required.
Wall-mounted heating boilers and gas water heaters are installed, most often, in apartment buildings. But they may also need to adjust the burner flame
Inclusion rules
Connecting an open or closed type gas boiler is not as simple as it might seem, since this is not only a high-tech device, but also a dangerous one. There are too many connection options and circuits. The installation method and the order of connecting the highways are all individual. For this reason, it is recommended that the connection process, start-up and commissioning of gas equipment be carried out by an authorized service center.
In addition, if you connect a double-circuit or single-circuit gas boiler of an open or closed type yourself, this will void the performance warranty. However, situations are different. You should proceed as indicated in the instructions.
The algorithm for how to light a gas boiler will depend on the method of installation of the boiler. So, you can connect a wall-hung gas boiler correctly by proceeding as follows:
- Connect the device to the electrical network;
- Unscrew the gas valve and press the start button (the type with the name of this button is indicated in the operating instructions);
- Select the operating temperature using the plus and minus buttons.
Burners running on electricity are connected automatically after they have been switched to the hot water heating mode. The piezo type of ignition occurs by short adjusting the flame and pressing a special key.
Note! Switching on is blocked when air accumulates. It is enough to press the restart button and the boiler will be able to start working.
As for how to turn on a floor-mounted double-circuit or single-circuit open or closed boiler, this can only be done after the boiler room has been completely ventilated. The rest of the connection process is simple. First, you need to set the temperature selector to off mode, open the gas supply valve, and set the selector to piezo ignition. Then hold down the key for 5 seconds, press the piezo button and adjust the temperature.
Important! To prevent rupture of pipes and freezing of the system, you need to set the minimum indicator values before starting the boiler.
How to make a gas burner for a tandoor with your own hands
A do-it-yourself tandoor burner is an interesting and uncomplicated undertaking if you have the necessary tools. Making it yourself will allow you to more accurately select the desired parameters and geometric characteristics. To make your own, you must be able to handle a welding machine and drill. Have knowledge of connecting coupling fittings and conducting hydraulic tests.
Manufacturing will not take you much time if you set yourself a clear task beforehand, decide on the dimensions and characteristics of the burner to be manufactured. You need to look at existing analogues of products to understand the result you want to get.
The manufacture of the simplest and most reliable gas burner design will be described below.
Required materials and tools
To manufacture the most unpretentious burner device, the materials you will need are:
- Half-inch gas supply pipe;
- A pipe bender, or other device with which you can bend a pipe of the required diameter. If this is not the case, then you can use ½-inch half-bends at 45 degrees;
- 90 degree bends;
Important! It is necessary that all these parts are the same size in terms of internal and external diameters. You will also need:
You will also need:
- Piezo ignition button;
- Ceramic electrode for igniting boilers;
- Couplings, ½ inch bends – 1 set;
- ½ inch gas valve – 1 piece;
- Welding machine;
- Cutting machine;
- Drill;
- Drill;
Manufacturing instructions
Evenly mark the locations of the holes (the number of holes and their size should be such that the sum of the areas of these holes is equal to the cross-sectional area of the pipe itself);
Drill holes; We bend the pipes;
We mark pipes and bends according to the required size of the tandoor. In this case, it is necessary to take into account that the distance between the welds is at least 50 mm. This way you will get an outer ring and, if the diameter is sufficient, then an inner ring with rays. Then weld all the parts included in this structure. Perform hydrotests of the structure to control welds. Just make sure there are no leaks
And pay special attention to the places where the structure exits the tandoor. Connect the piezo ignition so that the ceramic electrode is located at the nearest hole in the pipe (this is necessary in order to avoid the accumulation of natural gas in the furnace).
Install a coupling and mount a valve on the section of pipe entering the furnace. The structure is ready. Homemade tandoor burner Another option
Installation and connection
- The burner is installed after testing in fresh air to determine the uniformity of gas supply and combustion. It is mandatory to check the piezo ignition multiple times under different operating conditions. Also be sure to test the adjustment range
- Installation is carried out in the lower part of the furnace using spacer metal fittings. Installation on bricks with subsequent fixation of pipes is possible.
- After installation, it is necessary to reliably seal the places where the pipes pass through the furnace wall. To do this, use either cement or mineral filler used in the manufacture of the tandoor itself.
- Connection is made with a flexible hose to the connection pipe with the valve.
- Tests of the installed combustion device can be carried out.
Main stages
It is not difficult to make a burner or mini-burner according to the drawings, as already noted, without spontaneously changing the parameters.
Frame
The body is usually steel. A brass rod with a width of 2 cm is suitable for its manufacture. A divider can be made from the same rod. Then several holes are made that will help create oxygen circulation in the device. Fire, as you know, does not exist without oxygen. There should be 4 such holes: each about 1 mm in diameter. They are made in the burner divider rod. The next step is to press the divider into the device body. The internal flange is installed with a gap of 0.5 cm. This gap will subsequently slow down the powerful flow of gas that approaches the igniter.
Nozzle
This part of the device ensures the supply of fuel from the cylinder to the outside. It is made from a metal rod. At this point, the technician will need a two-millimeter drill to form a blind hole in the nozzle. And for the jumper you will need a four-millimeter drill.
Then a hose from the gearbox, made of fabric or rubber special material, is attached to the end of the tube. Fastening is carried out with a clamp using a regular screwdriver.
Assembly
When the mechanism is precisely secured correctly, you should set the required pressure in the cylinder and supply gas from it. The air is then completely displaced from the hose. The length of the fire, if all parts are positioned correctly, will be 40-50 mm. There is another way to manufacture and assemble a burner, in this case a miniature one. This device is convenient because it is easier to make it yourself, and you can hold it in your hands without fear of getting burned. That is, for those who doubt their abilities regarding more complex manufacturing, this option is suitable.
What you need to make and assemble a mini-burner:
- old, out of order gas burner;
- thin copper tube (10 mm);
- copper wire;
- needle from a syringe;
- bolt No. 8.
And everything works like this.
- First, the tube for the burner is prepared (a file is used).
- The nozzle is made from a medical syringe.
- The tube is connected to the wire.
- 2 pieces of copper tube are connected.
- The adjusting bolt is inserted.
- The device adjustment is being tested.
- A tripod for the burner is being made.
- All that remains is to check the functionality of the device.
Natural gas appliances are made from a metal pipe, a blowtorch handle and a can. The homemade device is suitable for soldering copper, for roofing repair work, and for singeing the necessary structural parts.