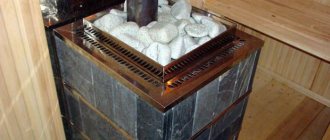
Brick stoves equipped with a hob are universal - they allow you to heat the house, as well as heat water and cook food. The designs of stoves vary, from the simplest and most compact, which you can assemble with your own hands, to complex multifunctional ones, the laying of which is best left to an experienced stove maker. For those who are interested in how to fold a stove with a stove for the home, how to properly fold a stove with your own hands, an article will help, which contains a diagram of the stove and drawings with orders.
Features of the order of brick stoves
Stoves often serve as interior decoration, so they are lined with clinker, tiles, and tiles. The diagonals in the first row are carefully measured, and a plumb line is hung in the center of the chimney, which is removed on the last rows of the pipe. Also, the diagonals are controlled every 4 rows, and on each row a cord is pulled during installation, which is checked by the rule. Instead of cement-sand mortar, it is recommended to use clay, regardless of the type of furnace being built. Ready-made dry solutions significantly save time spent on clay preparation. To prevent the composition from drying out quickly, the brick must be moistened with water before laying.
Operating costs will be lower if there are no rectangular ledges inside the structure. For this purpose, when creating an overlap (ledge), the stone is tried on without mortar, the overlap line is outlined, and the excess material is cut off with a grinder. Internal seams during laying are regularly checked, and excess mortar is removed from time to time. The pipe is cleaned after completion of the work.
Brick kilns are made of several materials:
- external cladding;
- masonry bricks (main structure);
- fireclay – fireproof material is used to lay out areas exposed to strong heat (furnace, under);
- bricks with high-density edges are located inside the oven.
Clay bricks should not be mixed with fireclay, and ovens, hobs, rods and grates, and water tanks should not be embedded in the masonry - this is due to different expansion coefficients when heated. If metal elements are rigidly embedded in the masonry, the structure will soon collapse.
What should it be
It would seem that there is nothing easier than replacing the suitable surface of a brick oven with a metal insert with your own hands, getting a stove for cooking. In reality, everything is much more complicated. A stove is a complex device, and the thermophysical processes occurring in it depend on the correct arrangement of its elements.
There are special requirements for furnaces of this type. On the one hand, it must effectively accumulate heat in the thickness of the brickwork, on the other hand, it must take a significant part of the heat to heat the hob . In the summer, when heating the house is not required, the hob should warm up quickly with economical fuel consumption.
Requirements
Theoretically, the hob can be made from any material that can heat up to high temperatures when the stove is fired. In practice, they use cast iron plates with holes covered with a removable lid.
This design allows you to create zones with different temperatures on the stove.
The thermal conductivity of cast iron, unlike steel, is not very high, so you can heat food on the plane of the stove, as well as cook or stew it over low heat.
And by removing the ring from the hob, you can achieve direct heating of the cookware with an open flame, which allows you to quickly boil water or fry food in a frying pan.
The most practical are the burners shown in the photo, consisting of concentric rings of different diameters - they can be adjusted to the size of the bottom of the cookware.
In addition, the gaps between the rings compensate for the thermal expansion of cast iron that occurs when overheated, and the plate can withstand multiple heating and cooling cycles without damage. Solid cast iron stoves are less reliable and require more careful firing.
Where can I buy a hob for a stove and at what prices?
Materials
Which brick is preferable for laying a stove equipped with a hob? In most cases, on the ordering diagrams of stoves for a home, cottage or bathhouse, you can see two types of bricks: regular solid ceramic and fire-resistant fireclay - it is most often indicated in yellow. From fireclay bricks, they lay out with their own hands those parts that experience the greatest thermal loads during combustion : the firebox and the roof of the furnace, part of the smoke channel directly after the combustion chamber.
The main difference between fireclay bricks is its increased heat capacity . It is able to accumulate and release the resulting heat for a long time more efficiently than ceramic. For laying a heating stove, and especially a sauna stove, this is an undeniable plus.
But if the stove is used primarily as a cooking stove, then the increased heat capacity of fireclay is rather a disadvantage: it will absorb a significant part of the heat, and cooking will take more time.
In the summer it will be impossible to cook on such a stove - the room will become hot and stuffy.
If the stove is used primarily for cooking, it is recommended to use a minimum amount of fireclay bricks!
Briefly about the main thing
A brick heating and cooking stove, installed by professionals, may additionally have a fireplace section, a heated bench, a chamber for drying vegetables and other useful compartments. Today, many projects of such structures for private houses have been created. Moreover, they have a T-shape, wide or narrow design.
The stove is selected depending on the area of the room and the entire residential building. Its location is also taken into account. After all, it can be located at the corner, in the middle or against the wall of the room.
One of the interesting options is the Swedish stove-fireplace, designed by Ryazankin. This is a small but functional design. During the laying of each row, from 5 to 36 bricks are used.
Ratings 0
Buslaevskaya stove projects
The design has a built-in hood. The oven is small in size. It is ideal for any private home, as it allows you not only to heat the premises, but also to cook food. Despite its compact size, the stove heats spacious rooms well, which is why there are ready-made designs for houses with a stove.
Special schemes for laying brick stoves will help you complete the work without carrying out complex calculations.
For installation you will need the following materials:
- doors - firebox (0.2x0.25 meters), VK (0.39x0.5 meters), blower (0.14x0.14 meters);
- refractory - 43 pieces;
- solid brick – 382 pieces;
- oven-cabinet 28x33x50 centimeters;
- cast iron stove 0.7x0.4 meters with burners (removable rings of different diameters);
- valves - steam exhaust (12x13 centimeters) and smoke (12x25 centimeters);
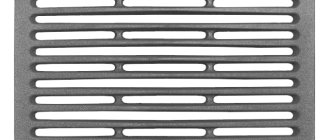
- grate - grate 30x20 centimeters;
- corner - three equal-flange blanks 1 meter long and 45x45 millimeters in size;
- steel - piece 0.3x0.28 meters;
- strip - 4 pieces of meter (4 graph paper), 0.25 meters (2 graph paper), 0.35 meters (3 graph paper);
- cast iron plate – 0.4 x 0.25 meters; 40x15 centimeters.
Projects for brick stoves of this type look like this:
- Full row.
- Blower door.
- Window opening for cleaning.
- The bottom of the oven is lined with refractory, three sides are lined with iron.
- Installation of the combustion door, grate, refractory under the firebox, cleaning cover, ash door.
- Installation of DS.
- Laying refractory on the edge around the door.
- Laying according to the scheme.
- The oven is top coated with clay (1 centimeter), the heater is covered, and a stove with burners is attached.
- Installation of smoke circulation with cleaning windows, the stove is not laid. Subsequently, the brick is placed on its edge.
- The cleaning is overlapped, channels are created, and 25-centimeter strips are laid.
- The cleaning is completed and the fastening wire is installed.
- The cap is installed.
- Installation of the VK ceiling, while the hoods remain.
- The stoves are laid out according to the diagram.
- The small stove ends in sheet iron, the masonry is done in the same order as a brick stove.
- The cleaning hole of a large stove is laid out, the edges of the side walls of the channels are cramped.
- Laying protrusions.
- The projections are duplicated and the corner is installed.
- The BP chimney is closed in the same way as row 19.
- A three-row neck is made, the size of the chimney is reduced to a section of 26x13 centimeters for the top valve.
- A chimney is created with grooves on this and subsequent rows.
The dimensions of the structure increase when using clinker facing bricks, so using them instead of solid material is not recommended. When finishing with tiles, durability is ensured (the material lasts for decades), in addition, it can be dismantled for cladding other heating structures.
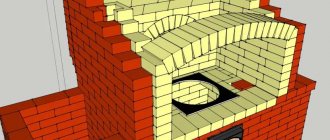
Laying a furnace designed by V. E. Grum-Grzhimailo
Diagram of the furnace designed by V. E. Grum-Grzhimailo
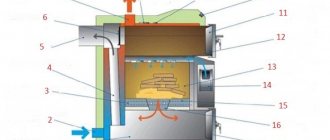
The following figure shows the furnace of the ductless system of Professor V. E. Grum-Grzhimailo. It has absolutely no smoke circulation. The design has a round shape and is enclosed in a sheet steel case. Gases will move in the furnace not so much under the influence of the draft of the chimney, but under the influence of gravity. As a result, the heavier cooled gases will sink down, and those that are hotter and, therefore, lighter will rise up.
This device consists of 2 parts. The lower part is occupied by the firebox. In the roof of the firebox there is a small chilo (mouth) to ensure the passage of smoke gases to the upper part. The top is a chamber without smoke circulation. It looks like an overturned cap, like a glass. That is why such furnaces are often called bell-type or ductless.
Heated smoke gases will not escape from the hill into the chimneys, because they first rise under the roof and, when cooled, descend along the walls to the very base. Here they will enter the chimney, after which, under the influence of draft, they will be carried away into the atmosphere.
A vertical A-A cut is made across the firebox, and a B-B cut is made along it. Horizontal cuts are made from 1st to 9th row of masonry. On section 9-9 you can see the so-called buttresses. In other words, these are vertical ribs (a quarter of a brick) that run along the walls of the stove from the ceiling of the stove to the ceiling of the vault. They will form a packing and arrangement to increase the internal heat absorption surface and better absorb heat from the flue gases by the furnace array. Fins that are heated by gases can allow the stove to retain heat longer.
The Grum-Grzhimailo design will use about 80% of the heat of the fuel that is burned. The iron case is capable of making the walls of the furnace as thick as a quarter of a brick, and therefore the device can heat up quite quickly.
The heating and cooking stove is a two-tier hood. The lower tier warms up more, which allows you to heat the cold air at the bottom of the room.
The laying of such a design is not at all complicated. The advantage is that if the smoke valve on the pipe is not tightly closed, the stove in its upper half will not be cooled by the cold air entering the firebox. The air that enters through the cracks in the ash and fuel doors into the firebox will rise through the firebox. However, due to the fact that it is heavier than the hot gases of the bell, it will immediately overflow into the side channels and go into the chimney. In this regard, the entire part under the heil (the entire cap) will not undergo cooling.
The disadvantage of this design will be the preferential heating of the upper part. In order to reduce it, you should make holes in the 5th row of masonry in the walls of the firebox. The stove will function well on anthracite and lean coals. If the structure is heated with wood (in particular, raw wood), the cracks between the buttresses will become overgrown with soot.
Cleaning soot is quite difficult, because the cleaning doors are located in the 8th row and do not allow you to completely get into all the spaces of the buttresses. The smoke will be discharged into the main pipe.
Channelless structures based on the principle of free gas movement are square or rectangular. They can be carried out in a metal case or without it. In the latter case, you will need to thicken the walls of the cap to 1/2 brick.
Preparatory work
First of all, you need to choose a place to build a furnace.
The easiest way to do this is before building a house - then both the stove and the building are designed together so that three or at least two rooms are heated. With a ready-made house, the situation is more complicated. In this case, they tend to build the stove into an interior partition, since installing it into a load-bearing wall requires complex calculations and dangerous, time-consuming work (part of the wall will have to be dismantled, keeping the load from being blocked by a system of lintels and columns). You can, of course, limit yourself to a simple wall-mounted arrangement, but then only one room will be heated.
A reinforced concrete foundation must be built at the selected location. Its dimensions must exceed the dimensions of the oven by at least 100 mm on each side. It is not allowed to combine the foundation of the furnace with the foundation of the building - both structures give different settlements and one of the foundations will pull the other along with it, causing it to skew.
A reinforced concrete foundation must be installed under the furnace.
The depth of the foundation depends on the bearing capacity of the soil, the depth of its freezing, and the method of operation of the building (periodically/continuously). Typically, in buildings with year-round habitation of people located on stable ground, the foundation is deepened by 400–600 mm. Crushed stone should be poured onto the bottom of the excavation as a reinforcing layer, and a sand cushion should be placed on top of it.
Then everything is done using traditional technology - they install the formwork, fix the reinforcement frame and fill it with concrete. You should proceed to the construction of the furnace only after the concrete has fully matured and gained sufficient strength - this usually takes about a month.
Laying stoves for home drawings and diagrams
Classic Russian wood stoves for the home have characteristic advantages.
Instead of outdated, imperfect devices, new, more modern models of heating stoves are being introduced today.
A competent master who introduces new types of similar structures into life must be well aware of all the shortcomings of the old models that have survived. He must be able to repair or alter them. To do this, he must be familiar with the most common examples of not only new, but also outdated devices, as well as know their drawings and be able to apply his knowledge in practice.
Materials
The heat transfer and durability of the stove will depend on the material used in construction. Therefore this stage is very important.
For cladding, ceramic bricks are used - grade M-500. It is insensitive to temperature changes. And the combustion chamber needs to be laid out only from refractory bricks.
In addition to bricks, the following is used:
- Sifted sand.
- Clay – normal fat content.
Laying a furnace with preferential bottom heating
Scheme of a furnace with preferential bottom heating: 1 and 3. Lower risers. 2. Lifting riser.4. Chimney.5. Cleaning.6. Smoke valves.
The following figure shows a stove that has predominantly bottom heating. Its dimensions are 115x56x231 cm. Heat transfer will be 2640 kcal per hour. Based on the smoke exhaust system, this design can be classified as a combined duct stove with bottom heating.
Flue gases will descend from the firebox, after which they will rise in a riser to the ceiling. From there, 2 parallel moves will descend to the 16th row of masonry. Then they will go into the last riser, which goes into the chimney.
This design is very rational and simple. It is capable of providing fairly good heating of the lower part and has self-regulating movement in 2 channels of the upper part, which can be considered as a cap with a nozzle.
The gas blizzard principle allows air to pass along the bottom of the hood (as shown by the dotted line) without cooling it down. This design is characterized by ease of masonry and can be located in a partition.
The fuel door and front wall open into the hallway. The device has a mounted pipe. Can be used both with wood and coal.
Kitchen stove with oven and hot water box
To lay a kitchen stove with an oven and a hot water box measuring 1290x640 mm, the same materials are required as for the previous stove. Additionally, you should purchase a water heating box measuring 510x280x120 mm.
The figure below shows a general view, a horizontal section along A-A and a vertical section along B-B of the slab.
Kitchen stove with oven and hot water box: a - general view; b - cuts. Definitions: 1 - firebox; 2 - cast iron plate; 3 - oven; 4 - water heating box; 5 - smoke valve; 6 - ash chamber; 7 - angle steel trim
A kitchen stove with an oven and a hot water box is placed in the same order as a kitchen stove with an oven. The only difference is that after laying the third row, instead of a brick partition, a water-heating box in a case is installed on the edge between the oven and the vertical channel. The height of the hot water box should correspond to the height of four rows of flat brickwork. The rest of the masonry is completely similar to the masonry of a kitchen stove with an oven.
Layout diagram of a two-tier stove for a home
Scheme of a two-tier oven1. Voids.2. Upper cap.3. Tuck.4. Mounted pipe.
The first picture shows a two-tier oven. It consists of two structures that stand on top of each other. The dimensions of each stove are 165x51x238 cm. The heat output of the lower stove is 3200 kcal per hour, and the top one is 2600 kcal per hour.
Home stoves are separated by a brick lining with voids in order to be able to lighten the weight and save some amount of brick. The lining that fills the space between the upper and lower oven will serve as the base for the first.
The lower and upper ovens have completely the same design. The smoke circulation system here is ductless. Gases flow from the firebox into the upper bell, which has a nozzle. The gases, cooling, descend and, at the level of the bottom of the firebox, go through the undercut into the mounted chimney.
The chimney of the lower furnace passes through the upper one, and therefore the heating surface is somewhat smaller in the latter. The upper structure has its own separate chimney. This device is easy to install, and the gas flow pattern is quite simple. Cleaning of the lower structure must take place through the door in the rear wall. In the side wall - the top one. The stove runs on anthracite or coal. Both pipes are equipped with a pair of smoke valves.
The upper part of the voids in two-tier furnaces is often covered with a solid slab of reinforced concrete. Covering with a slab will contribute to the stability and strength of the entire structure of the array. Masonry of such a volume must be done especially carefully, because in addition to the fact that the structure must be covered with a slab, its repair is very difficult, which can cause some difficulties.
The chimney of the lower structure must also be carefully laid out. If there are leaks in the masonry, the wall that separates both chimneys on the second floor will allow heat to pass through from the upper structure even if both smoke dampers are closed.
Furnaces of almost any design, which have a square or rectangular shape and operate on any type of fuel, can be combined into a common array. Such a system will be a good heater for a country house.
Basics
Most of the advantages of Kuznetsov furnaces come from the principle of free passage of gases. Let us explain again with an example.
Let's imagine a stove with a complex system of smoke ducts: an ethermark, a four-five-turn Dutch oven. In this cramped labyrinth, strong turbulence will inevitably arise. Have you heard the furnace humming? This is only a minor manifestation of the vortex energy raging within her. And there’s nowhere to get it from except from the fuel stash. If the channels are long and narrow enough, then at first glance there is nothing terrible here: the vortices, by the time they reach the pipe, will dissipate, cooling, and will still give their energy to the body of the furnace, and it to the room. But in reality, nuances appear, which will be discussed later in the text. Because of them, the efficiency of a channel furnace over 60% is an exceptional rarity.
In a channel stove, while it is being heated, a huge flow of energy rushes about, and only a small part of it can be used for heating or heating water without disturbing its operation. Such a furnace is somewhat similar to a nuclear reactor. Don’t be alarmed, just because of the synergy, i.e. along the paths of energy circulation in it. A nuclear reactor has to be loaded with tens of times more fuel than is necessary to ensure the design energy output. Otherwise, the neutrons will simply fly out without having time to meet the uranium atoms ready to receive them. In a channel furnace, hot vortices, without having time to cool, will fly out into the chimney or, conversely, will cool down immediately, producing smoke and soot.
But the Kuznetsovkas (details below) are closer in synergy to the thermonuclear reactors of the future. “Thermonylus” sounds scary, but this is only due to its association with the hydrogen bomb. In fact, fusion reactors are quite safe.
Why? Because they generate exactly as much energy as the consumer needs, and the technological power reserve required for rarefied plasma is scanty. If suddenly the chamber of a tokamak or stellarator suddenly completely collapses, the plasma will be completely emitted (there are no heavy atoms in it) and will cool down before it reaches the walls of the room. The repairmen will curse - maybe the duty department is sharpening their laces - but after 5 minutes. will be able to blunt to elimination without protective equipment.
So what do Kuznetsov furnaces have in common with thermonuclear reactors? The fact that the energy of the flue gases, thanks to the principle of free passage, does not rotate many times in the flow until it is pushed into the body of the furnace, but saturates it immediately. And now she has nowhere to go from there except into the room and/or the water heating register.
Classic stove and water heating
Standard wood-burning stoves for the home can be combined with a water heating circuit, significantly increasing the performance properties of such buildings.
This option helps to reduce the disadvantages of stove heating, which is possible thanks to the use of modern technologies, and is associated with additional benefits:
- significant increase in useful heating area;
- ensuring uniform heat distribution;
- all elements of the furnace are involved in heating;
- after the combustion process is stopped, the heat is retained.
The design of a water-heated furnace is complemented by a heat exchanger, which ensures heating of the coolant and its effective circulation.
Selection of working tools
Compliance with the technology and the quality of the work performed will also directly depend on the auxiliary measuring instruments and tools that must be used during the work on laying the furnace.
When laying a furnace, measuring, construction and many other auxiliary tools are used:
- Jointing - pours the mortar into the seams and gives the joints an aesthetic appearance. It will come in handy if the stove is left without lining or plaster.
- Trowel.
- Hammer-pick.
- Shovel for mortar.
- Plumb.
- Stove line.
Russian stove drawings of brick stoves
Previously, such designs were found in every home, but nowadays they are already a rarity. Despite this, a Russian stove can successfully fit into the interior of the room. Also, Russian brick stoves are not only a heating device - they also have a hob.
To lay the stove you will need the following materials:
To work you will need the following tools:
- trowel – for laying and leveling the mortar;
- pick - a multifunctional hammer with a blade located perpendicular to the axis of the handle. At its other end there is a square windshield;
- bubble level for masonry and hydraulic for the first row;
- rule - serves to align the bricks of each row;
- plumb lines - one of them must be permanently attached to the axis of the chimney (floor), and with the help of the second the verticality of the corners is checked;
- brush – needed for grouting joints;
- cord - it is pulled over each row of masonry.
Drawings of brick stoves for any type of home look like this:
- Cooking chamber. For masonry, 3/4 ground corner bricks with locks are used.
- Under. There is a slope from the back, for the purpose of which the space is filled with sand, on which the brick is laid.
- Covering the bottom. The structure is covered with bricks along rods, corners or sheet blanks.
- Vault with a castle. In some cases a central lock is used, in others the last two symmetrical bricks are used.
- Rows to the lower arch. The bricklaying of the stove is carried out in the usual way, then a vault template assembled from chipboard or springs cut from wood are installed on top of it.
- Wells. They are tied rows in which a hole is left leading to the underside.
- Sub-bake. Bricks are laid on a foundation mortar; hollow stones are not allowed.
- VK code. For convenience, the bricks are cut into a wedge-shaped shape.
- Covering the channel above the samovar. It is solid, only solid stones are used.
- The holes above the pole become smaller. The brick is cut in accordance with the drawing.
- Alignment of walls. At the same time, the over-pipe is reduced and the samovar channel is laid.
- Installation of a samovar. The structure is closed with a separate lid.
- Installing a view. To embed the structure, two rows are laid.
- Chimney. The height of the pipe from the bottom to the top must be at least 5 meters. The upper rows form a canopy that prevents precipitation from entering the chimney.
Thanks to this stove, high-quality heating of the house is ensured.
Preparation before construction of the stove
After choosing a model of the furnace structure, the master carries out preparatory processes before starting installation of the heating structure. At this stage, a place for the construction of the stove is selected, and individual elements are purchased.
Cast iron parts for the stove Source glavspec.ru
The efficiency of a heating brick structure largely depends on the location of the structure. When choosing it, they are guided by existing fire safety requirements. If the walls of the house are built of wood, then the following rules are observed:
- The minimum distance from the stove to the wooden walls should be 10 cm.
- A heat-resistant basalt or asbestos layer is created between the wall of the building and the stove structure when the heating structure is built into a previously prepared niche.
- The minimum distance from the chimney to the floor beams and rafters should be 15 cm.
Preparatory work also includes the construction of a foundation for the furnace structure. The durability of the entire heating structure depends on its strength.
Important! The reinforced concrete base of the stove should not be monolithically connected to the foundation of the house. After all, the shrinkage of these two structures may differ, because unequal loads will act on them. When they are combined, it is possible that cracks will appear on the walls of the stove and the house due to mutual influence.
The stove foundation is not connected to the base of the house Source ad-cd.net
A bell-type heating structure is a dome stove. Regardless of the name, a building for heating premises can be built in a house that has long been put into operation. However, in this case, the floor is dismantled to construct a pit in which the foundation will be poured.
Important! The perimeter of a monolithic concrete foundation should be 0.5-0.8 cm larger than the base of the furnace.
Sometimes houses are built on a slab foundation. Therefore, the furnace structure also has to be built on the same foundation. To minimize the likelihood of deformation of structures, experts recommend building a lightweight stove. This is exactly what “Kuznetsovka” is.
On a note! It is recommended to bury the reinforced concrete base of the stove structure at least 30-50 cm into the soil.