Rules for choosing a cooking stove
Creating a brick oven, additionally equipped with a hob, is a long and labor-intensive process that must be carried out evenly and carefully only by experienced specialists. Only professionals will be able to put together a functional structure. Such a device will effectively heat the premises and provide the opportunity to prepare delicious dishes.
There are different designs of brick stoves for houses with order. The designs differ in size, appearance, and internal structure. They are created small and large, focusing on the area of the house. The provisions of SNiP 41-01-2003 are also taken into account. The rules from it must be followed when selecting a place for furnaces and determining the necessary set of works for additional thermal insulation of the building. Otherwise, problems arise with government agencies that control the fire safety of residential buildings.
Modern stove designs are developed using computer programs Source pro2-bar-s3-cdn-cf5.myportfolio.com
Proven stove designs allow you to create efficient heating and cooking structures from bricks. Moreover, each of them will have its own operational characteristics. Therefore, when making a final decision, be sure to pay attention to a number of important points:
- The size of the stove, in which, regardless of design, the front and rear walls will necessarily give off more heat compared to the side surfaces.
- Features of installing a brick structure. For faster and more efficient heating of a specific room, the side wall of the stove should face towards this room. At the same time, its hob must be located in the kitchen space.
- Heat transfer, which is selected taking into account the area of the heated room. Additionally, the location of the room is also taken into account.
On a note! Lighting and heating a large stove requires a lot of solid fuel and time. Therefore, this design is never chosen for heating a small room.
The dimensions of the stove are always chosen according to the dimensions of the room Source build-experts.ru
The efficiency of any brick heating structure depends on the thermal insulation of the house.
If the insulation of the building is done efficiently, then a small stove will be enough to heat it. After all, reliably thermally insulated building structures will retain heat well in the building. At the same time, high-quality insulation is an insurmountable barrier to the cold outside.
Varieties
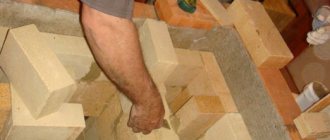
A do-it-yourself stove can be built with a shield built into the body (structure) of the stove, and then in appearance it is indistinguishable from the stove, pos. 1 in Fig. The rough-slab is compact, the least material-intensive, the lightest, and requires a minimum amount of additional construction work, but its thermal power is limited to 10-12 kW, and then with great effort. Therefore, rough slabs are installed mostly in seasonal dachas (spring-autumn) with occasional trips there in winter, hunting lodges, etc. An important advantage of a rough slab is that it can be built without a foundation directly on the floor, if its load-bearing capacity is at least 500 kgf/sq. m.
Types of rough ovens
A rough structure with an attached shield (item 2) is structurally more complex and heavier, although a simplified foundation (see below) is also suitable for it, but its thermal power is potentially greater. A wood-burning grub with an attached shield can develop up to 16-18 kW; on coal - up to 20-22 kW. The diagram of the flow of flue gases in the hood with a shield is given in pos. 3; This is how the popular Galanka stove was built. However, you need to know that there is no point in building a furnace with more than 3 revolutions: such a furnace with a single cycle will be simpler and cheaper. In addition, during construction it will be necessary to pay special attention to some of the features of rough stoves, the consideration of which is devoted to a significant part of the article.
Note: roughing on wood can also be done with a stove bench, see below. It is not advisable to heat such a stove with coal; the stove will overheat.
Why is it rude - rude
Visually, a rough stove can be distinguished from a stove with a later added shield due to the integrity of the structure (item 4), but in essence they are one and the same. The calculation of a heat-efficient furnace is very complex and requires fairly deep knowledge of heating engineering, and the development of a furnace design based on its results also requires solid practical experience. It is much easier to design and build a rough fire because its furnace (fire) part and the shield are calculated separately, and then “molded” together according to the rules for pairing building structures, taking into account the requirements of heating engineering. Naturally, the thermal efficiency of the resulting device will be lower, because the interaction of the thermal cycles of the fire part and the shield is not taken into account, and it is by taking it into account that it is possible to increase the efficiency of a single cycle furnace. Therefore, if you live in an area with a harsh climate, a rude stove may only make sense for you as a seasonal stove for temporary use.
Stove models
When existing brick stove designs are considered, attention is paid to the features of each design. After all, you can fold the device with a complex or simpler internal configuration of smoke exhaust channels. The final decision is always made on an individual basis. That is why it is recommended to contact specialists in order to avoid mistakes at the initial stage.
A brick heating and cooking stove can be manufactured in the following options:
- T-shaped and have a massive structure.
This stove is often placed in the middle of a large room. This arrangement allows you to divide the room into separate zones. In addition, a T-shaped stove can be placed between two or even three rooms. This location option will allow you to effectively heat 2 or 3 rooms at once.
T-shaped brick heating stove Source remontnik.ru
On a note! The T-shaped model is an ideal option for a medium-sized private residential building.
- A narrow design in which the hob protrudes from one side.
These types of stoves take up less space in the premises. At the same time, they have a simple design and are installed to heat a maximum of two rooms.
A brick stove in which the hob protrudes from the left side Source iz-kirpicha.su
On a note! Narrow stoves with a protruding part are often heated with dry branches, created in country houses and placed between the kitchen and living room.
- Heated protruding bed, aesthetic appearance and medium size.
Such brick stoves for a home with a hob are smaller than full-fledged Russian heating structures. At the same time, they provide owners with the opportunity to use a large number of functions. Usually in these stoves the hob is located in a built-in chamber. It is convenient to prepare a variety of dishes here.
Some models have an additional built-in camera. It will allow you to bake homemade bread. There are also options with an upper chamber, intended, for example, for heating dishes or drying vegetables.
Stoves with a stove bench and hob are equipped with doors that are entirely made of cast iron or have glass filling. The size of this element can be large, which will allow the structure to be used even as a fireplace. At the same time, any family member will always be able to relax in a warm bed, since the design of such stoves includes a bed, under which there are channels for flue gases.
Brick stove with heated stove bench Source pechiexpert.ru
- Open or closed fireplace fireplace.
This brick heating and cooking stove can be placed in the middle of a residential building. With this arrangement, the fireplace will be located, for example, in the bedroom or living room, and the hob will be in the kitchen. If the stove is placed in the middle of the house, then the entire floor will be filled with heat from the structure. Even the rooms located behind the rear stove wall will be heated.
Modern versions of stoves are most often designs that are simultaneously equipped with a “summer” operation and the ability to work exclusively in warm weather. This device will allow you to save fuel by using only the stove in the summer. At the same time, in warm weather the entire structure will not heat up completely. Therefore, the premises will have a comfortable atmosphere. After all, people in the rooms of the house will not have to endure the heat of the stove in the summer.
Original stove with fireplace insert and hob Source dompech.ru
Do-it-yourself rough stove: from a simple country stove to a two-story one for a house with a heated attic
The internal surfaces of the channels should be as smooth and even as possible, which reduces the resistance to the passage of flue gases. The purpose of all channels is to perceive heat from burned fuel. This heat is subsequently transferred to the furnace array. All smoke ducts must have a sufficient cross-section for the free passage of the entire volume of flue gases. Excessively large channel sizes reduce the speed of gas movement and therefore require an increase in the size of the furnace.
Reducing the rate of gas movement reduces the heating of the furnace as a whole. This can lead to condensation, which, penetrating through the masonry, gradually destroys it. The oven should heat up evenly. Overheating of the upper part is undesirable, since in this zone the heat is little felt by the human body. A significant role is played by the total length of the smoke circulation and especially the number of turns, “increasing the resistance of the flue gases during passage.
All this is taken into account in the recommended ovens.
Where should you start?
Smoke circulation systems in furnaces are different: ducted, ductless and mixed, low-speed and multi-turn. Low-speed systems have one lift channel and one or more lower channels connected in parallel, and the gases flow in them in one direction (Fig. Multi-turn systems are constructed in such a way that the smoke channel consists of vertical and horizontal sections connected in series, where gases, heading to the pipe from the firebox, overcome a large number of revolutions (Fig.
Furnaces with such a rotation system heat up very unevenly, require increased draft, and the abundance of revolutions increases soot deposition. It is very difficult to clean such ovens.
In a ductless system - bell-shaped rice.
Swedish order
Before you correctly assemble the stove and the brick stove itself, you need to thoroughly understand the order of the entire heating and cooking structure being created. At the same time, the Swedish fireplace stove is popular among homeowners and stove makers in Russia. Its design was developed by A. Ryazankin.
One of the variants of the “Swedish” stove heating design Source 2stiralki.ru
See also: Catalog of companies that specialize in the design and installation of fireplaces and stoves
The Swedish fireplace stove, designed by Ryazankin, has a simple layout. This compact heating and cooking design heats up quickly and features an oven. In addition, the design of the stove allows it to function like a fireplace. This option is great for heating 2 rooms. Although in fact there are a huge number of modifications of the Swedes.
Most professionals are familiar with the Ryazankin stove design. Therefore, they will always help and tell you how to lay a brick stove in a country house step by step for beginners. The order itself looks like this:
- The base of the furnace structure is the first row of bricks made of 34 elements.
It is created on a pre-prepared foundation, which is pre-coated with 2 layers of roofing felt or other similar waterproofing.
For any of the options in the Swedish stove, the 1st row consists of brick blocks tightly laid together Source 1-teplodom.ru
The use of a large amount of brick implies its dense installation. In other words, a specialist creates a kind of slab from it, in which there will be no smoke exhaust holes or any chambers. This so-called stove base will increase the reliability of the entire structure. However, it is laid out exactly along the horizon within the previously designated angles on the waterproofing.
On a note! A specialist first carries out dry, step-by-step laying of a brick stove for a home. Only after this does a professional use a mortar to fix the bricks.
- For the subsequent, second row, use 30.5 bricks.
They are also placed close to each other. In other words, they create a continuous plane. Where the fireplace will be, the craftsman attaches metal brackets. They are usually made from reinforcement. They are necessary so that in the future it will be possible to secure the fireplace grate by welding.
One of the options for a fireplace grate attached to pre-installed brackets Source kuznia-diadi-vani.narod.ru
On a note! If a specialist uses a grid with brackets in his work, then he fixes it on the masonry while creating the second row.
- To lay the third row you need 19 bricks.
They begin to create combustion walls and channels for the movement of combustion products. At the same time, do not forget to leave openings where doors will later be installed to ventilate and clean the interior of the stove.
On a note! The master always provides a minimum of 17 cm between the oven and the smoke channel, which will be formed in the vertical direction.
The cleaning and venting doors are also installed at this stage of work. They are attached using wire by twisting it. In this case, such fasteners are embedded between brick rows.
Cleaning and blowing chamber (position 2 and 3) in the furnace masonry, where the corresponding doors are subsequently installed Source ahbanya.ru
- Laying the fourth row when installing a stove is carried out using 18 bricks.
With their help, all cleaning and blower doors are thoroughly secured. In this case, the seams between the rows may turn out wider, because there is still wire here.
- For the next, fifth row, use 24 brick blocks.
When a specialist places them above the blower chamber, then he first makes grooves in them. They are needed to secure the grate. At the same time, the master prepares a place for the oven. It is usually a metal box. To mount it, the height of the front bricks must be 2.5 cm.
Important! The installation of a stove in a private house made of brick with a stove is carried out using heat-resistant fireclay blocks. They are used for laying out firebox walls.
Kiln fireclay bricks Source taldom.favoright.ru
On a note! The oven metal box is installed in its place only after it is lined with asbestos. The material creates a gap that will allow the material to expand when heated and maintain its integrity.
Brick pipe repair
To put the pipe in order, you can go in two ways: restore the masonry or perform lining - treat the channel inside with special means.
Reconstruction of masonry
In case of minor damage to the chimney masonry, they act quite predictably - instead of destroyed bricks, they install whole ones. To do this, the crumbled elements are carefully cleaned of the solution and removed. The empty cell is scraped out, after which a new element is placed in place of the taken brick, using a fresh mixture of clay and sand.
In case of minor damage to the masonry, it is restored by replacing individual bricks with new ones
Sometimes a situation arises when cracks appear in the pipe, through which moisture seeps in during heavy rains. In these cases, the outer surface of the pipe above the roof is primed and then plastered.
When the bricks in the masonry are damaged by more than 20%, partial repair of the chimney is out of the question. The smoke channel with severely damaged elements is completely dismantled to create a new masonry.
Video: one way to repair a brick chimney
Brickwork
Lining is an excellent way out of the situation if the problem is the loss of smoothness and strength by the chimney walls. To complete this task you need a mixture of Masan or Mordax. These compositions simplify the restoration of the chimney’s functionality and do not reduce its cross-section at all.
It will take only a few hours to complete the lining. The operation consists of the following steps:
- The area near the chimney is covered with film so that drops of a special composition do not stain the roofing material.
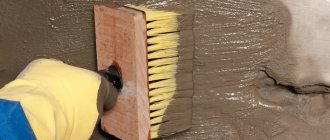
- Taking a brush with metal bristles, peel off fragments of bricks and soot from the inner walls of the channel.
Before lining, the brick channel is cleaned, achieving a smooth surface. - The channel, which has become completely clean, is wiped with a generously dampened rag.
- Using a special brush and winch, a special composition is applied to the inner walls. The mortar mixture should spread over the surface as the brush moves.
Masan lining mixture is used for repairing chimneys, as it is fire resistant - When the applied composition dries, the internal walls of the chimney are treated a second, and then a third time.
You may need several different brushes during the lining process. This is explained by the fact that the cross-section of the chimney in certain areas may not be the same. In general, the size of the brush should correspond to the parameters of the smoke channel.
If you comply with the requirements for the masonry process in a house or bathhouse, you can create a safe and durable chimney. A self-made structure can look no worse than the structures of real masters. If you have learned how to build chimneys with your own hands, then you can also make repairs of any complexity without outside help.
Video description
You can clearly see one of the options for arranging a Swedish stove without a fireplace compartment in the following video:
- The next, tenth row is created with bricks in the amount of 17.5 pieces.
They cover the front part of the place where the oven will be. The blocks are mounted directly on metal strips. Their installation allows you to combine the space above the firebox and oven. In this case, cutouts are first made at the top of the bricks used. They will allow you to subsequently lay the cast iron hob.
On a note! At the same stage, a place is designed where in the future a small door will be installed, allowing the upper part of the fireplace chamber to be cleaned.
- For the next, eleventh row, use 18.5 bricks.
From these they begin to build the walls of the brewing compartment, where there is already a cast iron panel. The brick blocks laid on the right should close the gap between the fixed cooking plate and the already created wall. At the same time, the blocks that are used to create the back wall of the fireplace chamber are pushed forward 4 cm and then pulled together. This allows you to continue creating the inclined surface.
Construction Technology Tips
The construction of a Russian heating stove is a serious matter. It will be very difficult for a homeowner without experience in the stove business, so we recommend stocking up on time and patience. We published detailed instructions for preparing the mortar and laying it in an article about building a fireplace; we advise beginners to familiarize themselves with the specified material.
Here we will give general recommendations regarding the Russian home stove:
- Even the mini version of the heater weighs over 2 tons. The foundation slab must be supported on a stable soil horizon; the depth can be determined by the occurrence of the existing foundation of the dwelling.
- In the finished building, the “sole” must be arranged separately from the foundation of the house, retreating at least 10 cm. At the stage of construction of the cottage, the foundations, on the contrary, are combined - a common formwork is set up and concrete is poured.
- You need quality bricks and mortar, not a gully clay mixture. The correct geometry of the stones will make your work much easier - uneven bricks will have to be filed down.
- Soak the red brick in the bucket for 2-3 minutes, as shown in the photo. Do not immerse the refractory in water, just rinse it to remove dust.
- It is allowed to lay the furnace and firebox from ceramic bricks, as our ancestors did. But remember: such cameras are afraid of accidental overheating; the material begins to crumble and crumble.
- A bed built on a loose base is also afraid of temperature fluctuations. This is why it is recommended to fill the void above the vault with clay mortar. If you fill the cavity with sand, small cracks may appear on the roof. No sooner had the stove been built than repairs needed to be done.
- The refractory masonry is not tied to the ceramic; cardboard is inserted to provide a gap between the two walls. Horizontal seams are laid with kaolin non-combustible wool.
- The pipe does not have to be made of brick all the way to the top. Lighten the structure - after cutting, install a sandwich - a chimney that goes out onto the roof, as shown in the photo.
Finally, a few words about how to properly heat a new stove.
After drying the stove for 2-3 days (in summer), first build a small fire on the top damper. When the pipe warms up, start heating the furnace little by little, then the lower chamber. Increase the amount of firewood slowly, do not rush. The task is to uniformly heat the furnace body for final drying. Date: September 25, 2021
Video description
Another option for creating a stove is shown in the video:
- Further, in the twelfth row, exactly 18 bricks are used.
With their help, the door of the cleaning compartment is closed and the formation of the rear wall of the fireplace chamber continues.
- At the next stage - for the thirteenth row, 19 bricks are used.
When using blocks in a fireplace compartment, they are pulled out and cut away. The same row allows you to raise the walls of the open hob.
- Also 19 bricks are used in the next, twentieth row.
They begin to form a shelf above the fireplace insert. To do this, each brick is pushed 3 cm not only forward, but also to the side. The result is an overhanging row over the firebox.
- Further, in the twenty-first row, 20.5 bricks are used.
With their help, the walls of the cooking compartment are completed and the construction of the fireplace mantel continues.
- Then, in the twenty-second row, 15.5 bricks are laid.
They are reinforced with a steel angle above the cooking chamber. Metal strips are also used above this compartment. They are installed in the middle and rear part, the so-called ceiling of the cooking chamber. The elements are needed to subsequently cover the entire tier.
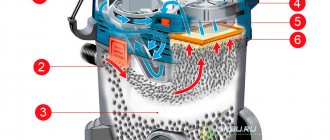
General structure of the furnace, drawing
The design of the furnace is not particularly complex.
Structural components of a brick kiln
In the brick mass there is a chamber with a door in which fuel burns - a firebox (in the figure - positions 8 and 9). In its lower part there is a grate (item 7), on which fuel is placed and through which air enters the firebox. Under the grate there is another chamber, called an ash pan or ash pit, which is also closed by a door (positions 4 and 6). Through this door, air from outside enters the oven and through it, the ash that has fallen into it is removed from the ash pan.
Through the hole at the rear wall, the flue gases enter the hailo (pos. 11) - an inclined channel directed towards the front wall. The hailo ends with a narrowing - a nozzle. Next comes a U-shaped channel, called a gas convector (item 16).
The walls of the gas convector heat the air moving through a special channel inside the furnace. This channel is called an air convector (pos. 14). At its exit there is a door (pos. 18), which is closed in the summer.
The chimney contains the following elements:
- cleaning door (item 12): the smoke exhaust duct is cleaned through it;
- valve for adjusting the combustion mode (item 15);
- view (pos. 17): also a valve, by means of which, after kindling, when all carbon monoxide has already evaporated, the chimney is closed in order to retain heat.
The thermal insulation surrounding the chimney at the intersection of the attic floor and the roof is called cutting (pos. 23). At the intersection of the ceiling, the chimney walls are made thicker. This widening is called fluffing (pos. 21), it is also considered cutting.
After crossing the roof, the chimney has another widening - an otter (pos. 24). It prevents rain moisture from penetrating into the gap between the roof and the chimney.
Other positions:
- 1 and 2 - foundation with thermal and waterproofing;
- 3 - legs or trenches: a stove with such elements requires less brick, and besides, it has an additional heating surface from below;
- 5 - the beginning of a special air channel (vent), through which uniform heating of the room along the height is achieved;
- 10 - combustion chamber;
- 13 - bend of the air convector, called overflow or pass;
- 20 — furnace roof;
- 22 - attic floor.
Briefly about the main thing
A brick heating and cooking stove, installed by professionals, may additionally have a fireplace section, a heated bench, a chamber for drying vegetables and other useful compartments. Today, many projects of such structures for private houses have been created. Moreover, they have a T-shape, wide or narrow design.
The stove is selected depending on the area of the room and the entire residential building. Its location is also taken into account. After all, it can be located at the corner, in the middle or against the wall of the room.
One of the interesting options is the Swedish stove-fireplace, designed by Ryazankin. This is a small but functional design. During the laying of each row, from 5 to 36 bricks are used.
Ratings 0
Required Tools
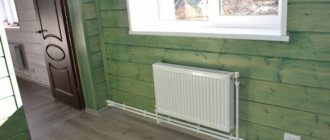
The masonry is made on a ready-made foundation.
Equipment and tools for construction are in the arsenal of any home craftsman.
You will need:
- bayonet shovel for digging a foundation pit;
- shovel for mixing the solution;
- level and plumb;
- square and string for setting right angles;
- ruler or tape measure;
- trowel or trowels for masonry and plaster;
- hammer-pick for laying and adjusting bricks;
- container for mixing the solution, buckets.
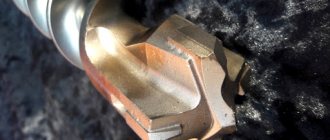
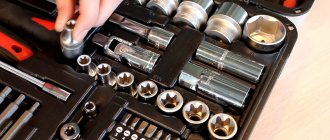
To accurately select and cut bricks for the vault, it is better to use a grinder with a cutting wheel for stone.
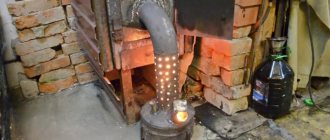
Heating the muffle with gas
A homemade muffle furnace can operate not only from electricity, but also under the influence of a gas burner. You can purchase such a heating element or make it yourself.
To create a gas burner, you need a metal pipe 10-15 centimeters long. The diameter of the pipe should not exceed a few centimeters. First, you should make a through hole near the edge for connecting the gas tube. It is also necessary to make several one-sided holes perpendicular to it. They are necessary to ignite the device.
For a gas burner you will need a metal pipe 10-15 centimeters long
The gas tube is made of copper, its diameter does not exceed 0.8 centimeters. Threads are required at both ends of the tube. In the middle of the device you need to make a small blind hole for the gas to escape. One hole must be closed with a plug, and a gas cylinder must be connected to the other. When combining elements of the device, be sure to install a valve between the hose and the burner, as it will protect the structure from fire.
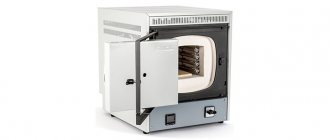
Operating rules
The electric oven may only be plugged into a reinforced socket. You can also run a large cross-section wire directly from the shield. In addition, it would be useful to install a circuit breaker.
Since this device model has exposed wires, you need to be extremely careful with it. Do not touch the coils while the oven is running. To avoid accidents, it is recommended to install a limit switch on the door, which will turn off the unit when the door is opened. If you are not very good at electrical work, seek the help of a specialist who can help make the device as safe as possible, including grounding it.
Making the lid
- Cut a circle out of steel, identical in diameter to the already fully assembled structure.
- Place fireclay bricks on top of the glue - it will provide sufficient sealing.
- Weld handles on the sides to make it convenient to lift and remove the lid, and a latch for closing.
- Cover the edges with fireproof silicone; before doing this, be sure to degrease the surface (even White Spirit will do).
Let us remind you that when the oven is operating, it must be closed. Excessive air ingress will lead to rapid wear of nichrome.
Automation with temperature-time tasks
There are three types of automation for hardening furnaces. The cost of organizing furnace control increases along with the comfort of use. The simplest option is a simple thermostat with a thermocouple as a temperature sensor. This device will simply maintain the set temperature with a hysteresis of about 30–50 °C. The holding time is controlled manually, as is the moment the temperature point is reached.
More advanced automation is being developed specifically for electric ovens. Thermal controllers of the Autonics TCN4 type have a proportional power control function, providing adjustable hysteresis up to 1 °C. The device is also equipped with additional functions, such as an alarm when the set temperature is reached. If desired, the alarm channel can be used to activate a time delay relay installed in series with the thermostat.
The most advanced in this regard are automation devices for Profile-M type furnaces. They differ not only in built-in power relays, but also in the possibility of more flexible configuration. Such controllers have a preset timer, and also have the ability to configure heat treatment with a complex temperature profile, sequentially setting the duration of time periods during which a certain temperature should be maintained.
Lining and arrangement of the firebox
The very concept of a muffle furnace implies the presence of a muffle - an internal heat-resistant capsule that covers the heating circuit spiral, protecting it from small debris and scale. The muffle, as a rule, is removable in furnaces, which allows for repair and replacement of heating elements.
The main difficulty is to manufacture the muffle and the heating assembly body at the same time. To do this, you will need two types of heat-resistant ceramics: one for making the body with grooves, the other for the thin-walled muffle. For a ceramic base, it is better to use a mixture of refractory clay with an aluminum oxide content of at least 30%. The clay should be diluted with excess water and left to swell for a day, after which the settled water should be removed from above and only the swollen sediment should be left.
The ceramic body of the heater is massive, so it cannot be made from a pure binder; a filler is needed. Glass fiber, dry quartz sand or crushed fireclay are good options for the latter. The total clay content in the solution should not be less than 50% by volume; as a result, the mixture acquires the consistency of a viscous plastic paste. If the composition turns out to be more liquid, excess moisture is removed by adding small portions of building gypsum immediately before use.
Fireclay powder
The heater body is made on a three-dimensional corrugated cardboard template, the dimensions of which should be 15–20 mm larger than the planned dimensions of the firebox on each side. First, you need to wind a cord or silicone hose of the appropriate diameter onto the template, forming the required number of grooves for the spiral. After this, the template with the cord must be covered with clay on all sides, avoiding the formation of voids and achieving a wall thickness of at least 40 mm. The addition of alabaster helps the piece maintain its shape before firing. Carefully remove the cardboard insert from the dried ceramic body and pull the cord out of the grooves.
For the lining of the firebox, ceramics made from higher quality kaolin are used. Enriched clay of the KFN-2 brand is optimal; as a filler it is better to use crushed fireclay of high purity with a content of about 20–25% by volume of dry components. The mixture is mixed as described above and used to form the internal lining.
To ensure that the muffle can then be easily separated, spirals are inserted into the ceramic body in advance. Then the inner surface is covered with scraps of newsprint according to the papier-mâché principle. You should get at least 8–10 layers, while the inner surface should contain as few irregularities as possible. After the paper has dried, a refractory lining compound is applied to the inside. It is better to do this in several passes, giving time for excess moisture to evaporate; as a result, the muffle wall should reach a thickness of 15–20 mm. In this state, the entire assembly dries for several days until the plasticity is completely lost and a ringing sound appears when tapped.
After drying, primary firing is carried out - voltage is applied to the spiral and the hot product is kept for 4-6 hours. During the firing process, fechral passes the crystallization threshold and, becoming more fragile, takes the form of channels. The clay in the ceramic liner and muffle is baked and vitrified, becoming resistant to cyclic temperature changes. Well, the paper and glue residues simply burn out, forming a minimum technological gap for easy removal and installation of the muffle.
With this manufacturing method, you can use some tricks. For example, forming a ceramic body on a cone-shaped template to make it easier to remove the muffle. It would also be a good idea to extend the front part of the assembly, where there are no heaters, or place a small coil at the bottom of the chamber. Several copies of the muffles themselves can be made at once for one furnace.
Purpose of the equipment
Why do you need a homemade heating chamber at home? It can be intended for various needs: firing of ceramic products, hardening of cutting steel elements and melting of metals. The thermal chamber can be heated either by electricity or run on gas.
The external shape and internal design of the furnace can take different configurations. The main task is to achieve a certain temperature regime in a limited container space.