Even in ancient times, wood was used not only as a material for construction, but also as a material for crafts, from which not only various interesting household items were made, but also decorative items in the interior. Since wood is easy to process, you can make crafts with your own hands, without requiring any special skills.
If you have a desire to learn how to make crafts from branches, but have never encountered such an activity before, do not be afraid to improvise. To choose the right tree for crafts, you should know that it must be smooth, without knots. You will find smooth wood, without flaws, at a sawmill or at any woodworking enterprise or in a store. It is necessary that the wood is of high quality, as this affects the quality of the crafts. Crafts can be made not only from branches, but from sections of wood or from any scraps.
If you make crafts from branches, then it is better to choose straight ones and without resin, although branches of non-standard shape are also ideal. Based on this, spruce or pine branches are not very suitable for making products for interior decoration, since they contain a large amount of resin, so it is very difficult to clean off the resin after working with pine or spruce branches with a knife and hands. Branches whose fibers are located in the same direction are ideal for crafts.
How to process branches before use
If you want to make crafts from hard tree branches (oak, maple) , then you need to know that they need to be processed immediately after they are cut . In order to make a small figurine, birch branches are perfect. Because they are very easy to cut and will not take you much time to make the craft. But, for example, black birch wood is harder. If you dry the birch wood a little, it will become even more docile.
How to treat branches before using them at home?
- The first step is to wash them thoroughly.
- And then, in order for the craft to be smooth and even, we take sandpaper (or a hard sponge) and rub its surface, leveling it.
- After this, you need to dry the cut branches. To do this, you need to put the branches in the oven for 1-2 hours. Make sure they don't dry out.
If the wood dries out, you just need to moisten them a little with water before you start working, since dry wood is more difficult to work with.
Benefits of Tree Bark Mulch
Tree bark is an almost ideal mulch for flower beds and beds with plants that prefer acidic soil because:
- tree bark is an environmentally friendly material; when decomposing, it does not release substances that can harm plants and human health;
- tree bark is durable and does not require complete replacement; usually just updating the top layer is enough;
- due to its structure, as a rule, it does not fly apart in gusts of wind;
- tree bark prevents moisture evaporation, which allows you to water the garden much less often;
- at the same time, it allows water to pass well to the roots of the plants, which means that there is no need to partially push back the mulch before watering;
- tree bark protects plant roots from exposure to low temperatures and also prevents them from overheating in the summer sun;
- tree bark mulch prevents the germination of weeds, which means it saves you time that would be spent on weeding;
- decomposing, tree bark fertilizes and acidifies the soil;
- among other advantages, it fits perfectly into the landscape, being a decoration of the garden and vegetable garden.
How and with what you can paint branches
In order for the branches to be snow-white, they can be painted with ordinary white emulsion paint, and we will get such a wonderful basis for decoration. You can also paint the branches with white gouache with a brush and without water (pure paint), rather than with watercolors, since the consistency of the gouache allows the paint to dry on the branches. It is also applied evenly, clearly and has a snow-white color (compared to watercolors).
After you've given the branches one coat of paint, let them dry for about 15 minutes , then flip them over and paint the other side. You can repeat the process until all parts of the branches are completely covered with paint.
You can also use acrylic paint or spray paint (aerosol) to paint branches .
Aerosol paint in a can has some advantages:
- Very easy to use. There is no need to spend money on solvents or quality brushes.
- If you use brushes, you will not achieve such an even paint job as with an aerosol.
- Aerosol paint in cans is a simplified method of painting with a compressor. If used skillfully, you can achieve professional painting of any surface.
- Reliability and color matching.
Advantages of acrylic paint:
- There is practically no toxicity - you can work indoors, there is no unpleasant odor.
- High quality coating of the material, which makes it possible to apply fewer layers of paint.
- Dries very quickly. The drying time of acrylic paint on wood depends on the structure of the surface, the thickness of the layer, and the microclimate in the room.
- Good durability.
- Easy application (both manually and using a spray).
- After drying it is very elastic. The film that forms after water evaporates can change its linear dimensions, so cracks appear on the painted surface much less often.
- Extensive color palette and variety of textures.
Disadvantages of acrylic paint:
- High price.
- It delaminates if stored for a long time.
- Cheap varieties quickly discolor, fading under the influence of ultraviolet radiation.
Painted tree branches are ideal as interior decoration.
Photo frame made from branches
You will need:
- For the base, wide wooden frame;
- Smooth thin branches;
- Glue;
- Beads, natural materials and any other options for decorating the frame.
How to do it: cut the branches into equal lengths, slightly longer than the sides of the base of the frame. Glue each branch onto a wooden base. Cover all 4 sides of the frame with branches. You can glue artificial flowers or other decorations in the corners, or even paint the entire branches with acrylic paints in any suitable color.
In skillful hands, any piece of driftwood will turn into an unusual shelf for books or small items. Many interesting homemade crafts for decorating your home can be made from branches and driftwood, including paintings, figurines, shelves, mirror frames, clothes hangers, screens, stools and even chandeliers. The main thing is to see the silhouette of a future piece of furniture in a simple branch and make an effort to ensure that the branch becomes it.
Author: Marina Abadzheva
How to age wood
There are several ways. The most interesting and most used of them is the texturing or brushing method.
The name of broaching comes from the English word brush, which means “brush”. This method involves removing soft fibers from the top layer of wood. As a result of processing, the surface becomes embossed. If this happened during natural aging, it would take a very long time. Brushing is considered the most realistic method of simulating antiquity, and it is not at all difficult to do it at home.
What types of wood are suitable for brushing?
In order to age a tree, you need to use the following tree species: pine, oak, larch, ash, walnut. And maple, beech, cherry, pear, teak and some exotic trees are completely resistant to mechanical aging.
The main tool for brushing is a hard metal brush . Since it is not possible to age wood quickly in this way, the process can be accelerated using a drill or grinder with a special wire brush.
If you do it yourself, you will need hard sandpaper. We clean the surface with it, and then apply a solution of ammonia (ammonia), which gives the effect of darkening the wood. As a result, the structure of the wood will be able to appear brightly, and the darkening will give the product an antique look.
Next, you can simply coat the product with varnish in 2-3 layers.
Then rub it with a soft cloth to give it extra shine. Thanks to varnishing, the product is given a finished look.
Preparing driftwood
First, high-quality raw materials are selected for crafts. It should not be badly damaged, rotten or rotten. Suitable wood is processed in several stages.
Cleaning from dirt
The easiest way is to wash the driftwood in the basin using a soapy sponge. If the dirt is difficult to clean off, you can use washing powder. Remove dirt from cracks and small depressions with water from a shower head or using a high-pressure washer. If necessary, use a soft brush for cleaning.
Cleaning the bark
Loose bark must be removed using a non-sharp chisel. Act carefully so as not to damage the wood. You can also use a grinder with a suitable attachment or a sandblaster to get rid of bark.
Drying
If the moisture content of the wood is not reduced, the process of rotting and destruction will continue. After cleaning, the driftwood must be dried naturally or forcibly.
In the first case, the workpieces are left in a ventilated area for 10-30 months. Forced drying in a dryer or oven is much faster and lasts only 10-50 hours.
Removing the loose part
The boundaries of rotten, rotten, loose wood are marked with a pencil. Afterwards, the middle of the rotten area is broken off by hand or cut out with a jigsaw or an ax, and the remains are ground off with a brush. The dust is removed with a large rasp or brushed off with a metal brush.
Changing shape
To give the workpiece the desired shape, it is cut with a hacksaw, electric saw, jigsaw or grinder. The cut surface is leveled with a plane and jointer, and slots and holes are made with any suitable tools.
Puttying
The cracks are covered with ready-made wood putties or you can independently mix a composition based on fine sawdust and PVA. If desired, add color to the putty.
Grinding
Small irregularities and excess putty are removed by sanding. For rough sanding, use coarse sandpaper or a sander. Soft wood is sanded manually with medium and fine sandpaper.
Burning
After heat treatment, the wood darkens and becomes more noble in appearance. You can burn either individual parts of the driftwood or the entire piece. For firing, use a blowtorch or gas torch.
Impregnation with reagents
If the product will be used where there is high humidity, be sure to impregnate it with the following substances:
- antiseptics;
- water repellents;
- flame retardants.
Important! It is better to purchase a ready-made composition with all the necessary components and apply it according to the instructions.
Painting and varnishing
If you plan to paint the driftwood with water-based paint, carry out “wet sanding” in advance - it will help remove excess lint. Polymer products are applied only after the wood has been thoroughly dried. Instead of paint, you can use varnish or stain - they will enhance and emphasize the color.
Polishing and finishing
The driftwood is polished with any mastic for parquet and wooden floors. If necessary, auxiliary parts, fasteners, and additional elements are attached to it. For this purpose, glue, locks, threads, nails, etc. are used.
How to process wood cuts
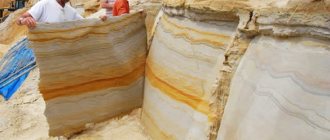
Products made from end cuts or saw cuts of wood simply enchant with their design and deserve special attention.
An even cross-section of a tree with a thickness of 8 to 20 cm and a diameter of 15 to 80 cm or more is called a cut.
This is simply unique, since the annual rings of the tree are visible on the “plate”; their contours are never repeated. Saw cuts with and without bark are used in interior decoration: on walls, ceilings, floors, in furniture cladding, in object design and decor.
- For example, let’s take a cut of a tree and cut out the shape we need with an electric jigsaw.
- Then we sand it with a grinding wheel or sandpaper.
- After this, we cover the product with stain or wood varnish.
In order to protect your crafts from harmful factors and give them an aesthetic appearance, they must be painted (by choosing the paint you like) or varnished. Before painting, you can prime it with wood primer. The paint is applied in an even layer to the primed surface.
I would like to fill my home with natural items, without toxins and dyes. Eco-design is one of the main trends, and wood is its leading element. Reminiscent of pleasant walks in the park and forest, gives warmth and freshness to the interior.
Together with interior designer Yulia Butova, woodworker Kathleen Smith and creator of cozy things Yaroslava Gaiduk, we figured out how to make wooden decor and decorate a house.
Text author: Elena Shirina
Wood in the interior: benefits for health, soul and nature
Health
Research says that if you surround yourself with trees, you will become more active and energetic. An experiment by Austrian scientists showed that children who studied at wooden desks had lower stress levels and better academic performance. In Finland, they collected the results of several scientific works and came to the conclusion: wood in the interior is no worse calming than walking in nature.
Practicality
The material is soft enough to drive nails into and engrave. But it is also durable enough to age beautifully and maintain an attractive appearance for years. On dry, hot days, wood humidifies the air, and if the room is damp, it absorbs excess moisture.
Durability
Pieces of furniture and decor can live several lives. Antique frames, boxes and chests of drawers can be restored. Use old boards and boxes as a basis for recycling. Motivational signs with drawings come out of the boards, bookshelves come out of the drawers, and original cabinets come out of the wine barrels.
Availability
The material is so accessible that it literally lies under your feet. If there are no unnecessary boards in the pantry, go for a walk. The easiest option is to collect beautiful branches, wash them and put them in a vase. The result is an unusual and durable alternative to a bouquet. Making decorations from bark or wood cuttings is also easy.
How to create wooden decor?
The material is under your feet
To create eco-style decor, there is no need to cut down trees. Everything you need is in the forest on the ground. Pay attention to dry trees, stumps, branches. Each branch has a unique shape, texture, and pattern. All you have to do is wash and dry the tree. It is convenient to cut garlands and decorative figures from the bark. From the branches you can make a hanger, assemble a frame for a mirror or photo, or decorate a candlestick. And if you want to capture yourself in the updated interior, there is a life hack - you can make convenient eco-selfie sticks from branches.
Oil or varnish will make the wood more durable
Varnish and linseed oil protect the wood from moisture and mold. To treat a hanger or a decorative bark figurine, choose a varnish. This way the bark will hold on better and will not dry out. Varnish is also suitable for painted wood. In other cases, oil is preferable.
Disadvantages of traditional tree whitening
The main problem due to which lime whitewash is inferior to modern protective coatings is its fragility. After each rain, the whitewash needs to be renewed so that it restores its beneficial properties for the tree. Also, the characteristics of whitewashing are negatively affected by dust contamination and mechanical stress on the bark. Consequently, all this leads to new worries about applying whitewash to the tree trunk and additional financial losses.
However, some resourceful gardeners resort to tricks so that the lime whitewash stays on the tree trunk longer and is not washed off by rain: they add construction paints to the coating composition. At the same time, summer residents do not think about the damage they cause to the tree by their actions. Under such a coating, the plant's pores become clogged and biochemical processes are disrupted.
In times of austerity, there was a need for a durable protective coating for barrels.
A solution to the issue of coating durability was found by German scientists.
The drug they created, Arbo-Flex, is devoid of all of the above disadvantages. A new type of product was developed on the basis of an organic binder material combined with quartz sand. Its composition includes calcium carbonate (8%), titanium dioxide (8%), quartz sand (36%), adhesive (38%), water (7%), additional substances (3%).
The coating lasts on trunks for at least 5 years. And at the same time, the tree bark is reliably protected at all times not only from precipitation, but also from de-icing reagents. This was confirmed by many years of testing Arbo-Flex on street trees.
Important
For better adhesion, before application, be sure to carefully clean the trunk of algae growth and treat it with LX 60 primer.
Arbo-Flex and primer LX 60
Arbo-Flex is not washed off from the trunk and does not interfere with air exchange. As the trunk grows in thickness, the coating stretches and slowly cracks, the tree bark gradually becomes more and more exposed to solar radiation from year to year, and the reflection decreases. During this period, the covering slowly becomes overgrown with lichens and turns gray. Thanks to this, the tree gradually gets used to and adapts to the changed growing conditions. In addition, as the age of a woody plant increases, the bark thickens.
Coating the barrel with Arbo-Flex, unlike cuffs made of burlap or reed mats, does not require maintenance or disposal. At the same time, it is much easier to control coated seedlings, in particular, when identifying damage to stem pests (for example, bark beetles). On a light-colored surface, the entrance and exit holes of insects are better visible.
In addition to the fact that Arbo-Flex protects tree trunks and branches from temperature damage (spring and autumn frosts, winter temperature fluctuations, summer overheating), it also protects against rodents, since animals consider tree bark coated with the product unattractive.
Method of applying Arbo-Flex:
Clean the barrel with an abrasive material
Apply Arbo-Flex thoroughly (bark should not be visible)
Apply primer LX 60
Arbo-Flex is well tolerated by plants, does not interfere with air exchange, and is not toxic to people and animals. When using it, no special protective equipment is required. Only gloves.
Examples of using Arbo-Flex:
The thin bark of a young tree is protected by Arbo-Flex
Old trees need protection in cases where their growing conditions change
Tver, April 26, 2014. Arbo-Flex treatment of young trees planted in the park
Due to construction work, the light regime of tree growth has changed
An adult tree needs protection after pruning its crown.
_____________________________________________________________________
Our advice
- Frost spots occur mainly on the southwestern side of the trunk because here the sun's heat activates the sap on sunny winter days. Subsequent cold night temperatures lead in some places to freezing of the tree bark. To avoid this, the trunks are coated with a protective agent and protective screens are installed on the southwest side of the trunk to prevent too much heat.
- It is important to avoid sudden clearing of forest edges (during mass felling). If this is not possible and the outer trees are damaged, they should not be removed to protect the trees behind them.
- Large seedlings transplanted from a nursery to an open place (and in Russia large seedlings are transplanted mainly from the forest) develop bark burns. To prevent this, it is recommended to thermally protect the bark.
www.arboflex.ru
_________________________________________________________________
To make the tree live long
Throughout their life, trees are exposed to many factors that weaken their vitality and shorten their lifespan.
Advantages of decorating the interior with wood cuts
Wood cuts surprise at the same time with their visual appeal and the complexity of their creation from a technical point of view.
Now let’s see what advantages wood finishing has:
- Durability. If the wood can be properly processed and is protected from moisture and various mechanical damage, then it will last quite a long time. If it is a whole wooden wall or floor, then you can save on annual repairs.
- Thermal insulation. Firewood is a source of heat not only in a fire. The raw material has the ability to maintain temperature, so for a cold concrete apartment this is the best type of insulation, albeit partial. In winter, such an insulated floor will warm any feet.
Decorative tree made from branches
- Uniqueness. You can, of course, hang wallpaper with images of wood cuts, or lay laminate flooring, but in such pictures a pattern is used - a simple repetition of one module. Natural finishing with saw cuts is a composition where each element is unique. The pattern on the saw cut and its shape are unique.
Types of wood used for cuts in decoration
Important! The interior combines wooden elements, decorative stones or plaster well. When using wood material for decoration, it should be taken into account that when cutting a log, cracks and cracks open. Consequently, layers of wood must undergo carpentry processing.
And provided that the wood material is planned to be used in a functional role, then I advise you to restore the cracked sections of the cut. To do this, fill the damaged area with a special resin solution. After the resin has dried, we mill and sand the layer.
The following types of wood are used for decoration:
- spruce;
- pine;
- fir;
- ash;
- birch;
- oak.
When completing the finishing work, the cut of any type of wood must be coated with a paint and varnish composition. We discussed above how to process tree cuts for the interior (stain, paint, varnish).
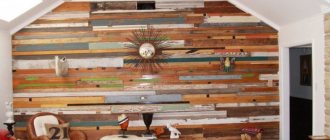
Creating a designer wall
For decoration, it is advisable to choose one side of the room. The design of all planes is a sign of bad taste, and the room will look overloaded. Any room needs to be given air, and it’s not about the windows. It should breathe space, and light empty planes give this effect. Only one “woody” edge of the room will become a kind of accent, which will become its mood. You can lay out the “wood puzzle” yourself, and now we’ll talk about how it’s done.
Everyone has a dead tree in their yard that needs to be removed. Now it's time to chop it down. We take a branch and cut it into bars of medium thickness. You can remove the bark from the resulting “pancakes” and then sand it. Thanks to this, you will not drive a thorn when touching the wall. The resulting wood layers should be treated with a special insect repellent, and then placed on glue. It is advisable to varnish the resulting relief - varnished wood can last a long time.
On a note! Create a composition from branches of different sizes, starting from a massive trunk and ending with the thinnest branches. The composition breathes due to the voids formed between the cuts of different sizes.
Why do needles fall off trees?
Lowland schutte spruce needles
The needles fall off, turn yellow, and the bark peels off? We analyze the symptoms of conifer disease and look for the cause.
One of the favorite remedies of gardeners is lime whitewash , which should prevent the formation of cracks on the trunk and damage to cells under the bark due to solar irradiation. It is believed that thanks to the applied whitewash, the trunk tissues heat up less, the difference between the temperature of the trunk and the air is noticeably smoothed out, and large temperature fluctuations do not occur in a short period of time. However, this coating has a number of significant disadvantages.
Wall panel - a piece of nature in the interior
You can find a panel made from any components, but you haven’t seen a canvas made of wood, have you? Contrasts are welcome here, so feel free to even use hemp. The picture should not look like a pattern, but a full-fledged composition with a dominant and secondary elements. Make tonal gradations and place accents using tone. For the proposed product specifically, it is better to leave the bark - it will make it more attractive. The careless terrain will create the atmosphere of an endless forest and transport you into it.
It is advisable to sketch out a rough sketch, but if you like to improvise directly during the work, then go ahead. For a bright contrast, assemble the canvas frame from simple planks, this will give the picture lightness. The cuts are sanded on the side that is adjacent to the wall for better gluing. Leave the other side untouched - this will add naturalness to the overall picture. The wood cuts limited to a frame in the interior will look like a window overlooking the forest. The frame collects the composition into one whole and groups it.
Harvesting tree bark
Most often, pine bark is used to mulch the soil in the garden. It is easy to prepare and has the greatest decorative effect. However, bark from other trees can also be used.
Tree bark mulch can be purchased at the store. Today, many manufacturers offer bark in small, medium and large sizes. The latter is the most decorative and is often used by professional landscape designers.
In addition to tree bark, many manufacturers also offer wood chips for soil mulching. Sometimes it is painted in various bright shades, which allows you to create original compositions and drawings on the site.
But if you decide to prepare the bark yourself, it is important to consider several points:
- tree bark is best harvested in spring or autumn;
- Harvesting bark from living plants is unacceptable, as it will lead to the death of the trees;
- Tree bark is not harvested from young trees;
- It is advisable to choose trees for harvesting tree bark that were cut down no more than six months ago;
- It is not recommended to use freshly harvested pine bark as mulch; it must first be dried;
- Be sure to pay attention to whether the tree is sick or whether there are signs of pest damage.
Some gardeners and gardeners collect bark lying on the ground in the forest. This method has a significant drawback. You cannot be sure what tree this bark is from, whether it is healthy, or whether you will introduce pest larvae into your area. Therefore, tree bark collected independently must be treated with special antibacterial agents and insecticides in order to protect the plants in your garden.
Some craftsmen heat the bark in a hot oven for 15 minutes for disinfection purposes.
If you don't have a garden shredder but want to shred the bark, you can put some of it in a rough linen bag and break it with a regular hammer.
Difficulties in laying out a modular floor
This type is quite complex, so it is better to be patient and get to work. Choose thick trunks to avoid the formation of large voids when laying out circles. Hardwood logs are selected to make the floor, because the floor is exposed to impact every day.
There are two reasons that will make you sweat:
- Solution. If you put all the parts on glue, then the floor will not last long, even if you cover it all with varnish. Modules will begin to fall off due to constant pressure. You will have to use a solution, possibly cement-based.
- Leveling the surface. If the thickness of each element does not play a big role in the design of the vertical plane, then for the floor this is the main condition. It is necessary to adjust all the modules to the overall thickness, and start grinding after installation. The procedure will take quite a long time, because achieving a smooth surface is not easy.
Thermal protection of the bark. Why is it needed?
The need to protect the bark has been proven both in theory and in practice. Spring frosts and bright sun are dangerous for young trees: the thin bark cannot withstand serious temperature influences. This leads to damage to sensitive tissues (cambium, phloem) and the appearance of frost cracks or solar necrosis.
Thermal damage to conductive wood tissues occurs at peak temperatures, usually in July, and frost damage occurs at the end of February - March.
The tree finds itself in stressful conditions, due to which the roots die and the plant dies. Only over the years, when the thickness of the bark increases, does the tree acquire heat resistance and the susceptibility to temperature damage decreases.
Thermal damage to the trunks of young trees:
Old trees need protection in cases where their growing conditions change. For example, it ends up in an open, unprotected area due to the cutting down of trees growing nearby. Heavy pruning can leave a tree's trunk and branches exposed and vulnerable to sun damage.
Serious trouble can be avoided if the tree bark is treated with a protective coating that will reduce or eliminate temperature damage.
See also: |
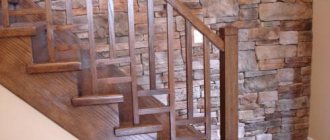
Creating home comfort with homemade furniture
Furniture looks completely different depending on the type of raw materials available. Tables and chairs are made, since the silhouette of the cut itself already resembles a small table or chair.
There are two basic principles for creating furniture:
- Modular - assembly of an element from small parts (modules). Actually, we are already familiar with this method. It allows you to create a product of absolutely any shape. Here it is also necessary to achieve a perfectly flat surface. Dishes will be placed on the table, and to prevent them from overturning, the surface of the table must be perfectly polished.
- Solid - a solid element is taken as a basis. This option is much simpler than the previous one in technical terms, but it is more difficult to find a large diameter bar. Things are better with chairs, but if you want a table where the whole family can dine, you will have to tinker with finding a large-diameter cut. The price of a dimensional cut is quite high.
It doesn’t matter what principle you apply to creating a product, the main thing is to immediately assess your capabilities so as not to spoil the material. Any method is good, because wooden furniture is famous for its strength and durability.
What kind of wood chips are used?
The process of producing high-quality wood chips goes through complex technological stages. First, the raw materials are cleaned, then crushed to sizes of 3–5 mm. After this, the wood chips are sifted through a special device and treated with antiseptic agents against fungi and harmful insects.
At the final stage, many manufacturers paint the raw materials in different shades, which gives a lot of scope for design imagination. Chips are made from different types of trees.
The following material is most often used in gardening:
- pine chips - ideal for decorating areas where coniferous plants grow. It will not only become an excellent decoration, but will also nourish the soil with the elements necessary for evergreen crops;
- oak chips - the material is highly dense, making it a good insulator for the winter;
- larch bark - in comparison with pine, it is more expensive, as, in fact, is the wood itself;
- spruce chip — has a pleasant pine aroma, and its natural color is darker than that of pine bark;
- cedar bark - the densest and warmest material.
Kitchen ideas based on semicircular cuts
This figure is an unusual piece of decor and a reliable assistant in the kitchen. The material can withstand high temperatures and does not heat up as much. From saw cuts you can create simple one-piece stands and modular ones, the material of which is easier to find. Everyone has seen such stands in a store and thought “No, you can’t do this yourself” - a wrong opinion. Why pay more if you do it yourself?
The kitchen will be complemented by fancy semi-circular shelves, which can be put together from solid cuts of wood, dividing them into two parts. The illusion is created that the “round block” is in the process of sinking into the wall. An interesting technique is if the shelf is round, this creates visual movement. The effect is achieved due to the dynamic relief on the bark. Cookbooks or personal collections of the housewife's recipes will harmoniously be placed on the shelves. And the product will withstand quite a lot of weight, even if its dimensions may not inspire confidence.
Remember! If this is a stand specifically for dishes, then it is better to make it one piece. Joining small parts involves gluing, and glue is not compatible with high temperatures. The stand will simply fall apart into several parts.
Decorative wood chips in landscape design
There are many technologies for landscaping a personal plot. When decorating a garden area, different materials can be used. But decorative wood chips will help you decorate your summer cottage without any worries. This material is popular in garden landscape design. With its help, you can give an aesthetic appearance to the site, add a special color to the design of the territory, and you can also use wood chips as a natural bedding for fruit trees and shrubs. Read about the properties of decorative chips, their types and methods of use in the article.
Wood detail as an accent in the interior
Small inclusions of “forest” in your usual surroundings will mentally bring you closer to nature. Saw cuts in the interior are used as decoration and perform certain functions.
We create fancy accents with our own hands:
- Watch. The unusual use of sawn wood in any interior looks nice. Especially if it is an uneven circle with bark on the surface. The bark is fixed, because it can deteriorate over time. The more careless the wooden “pancake” looks, the more interesting the watch will be.
- Flower vases. Give free rein to your imagination and use different types of branches. An ornament made with your own hands from small branches looks expensive, and no one will guess that the vase cost you pennies. It will harmonize with the design and will resonate with items with similar decor.
Remember! There should be few things made from identical material in the room. They should resonate with each other, but not look like too much.
- Frames for mirrors. When creating a product, it is important to adhere to rhythm or metricity, but chaos will be inappropriate. Alternate large cuts of wood with small ones, or make the entire frame from circles of approximate size. Any of the options will be correct.
Making a floor from saw cuts yourself is quite possible. Not to mention small interior items that can be made in a minute using wood, glue and your imagination. Surprise your friends with a tastefully decorated home and make your life more comfortable. This is an environmentally friendly product that will benefit your health. If the product is made of pine needles, then the light pine aroma can even help you treat a cold.
If you can handle the floor, then decorating an entire wall with wood will seem like a matter of five minutes. You will need to use your own taste and knowledge of composition, although most people trust their instincts.
Everything will work out, just “assemble” these products and secure them with glue, or simply cut out a solid object. Create an image in your head and try to bring it to life. You do not need special knowledge or skills; adhere to the basic rules for choosing materials and processing tools. After all, why spend a lot of money on a designer’s work if you can handle this task yourself without spending a penny.
Making crafts
You can combine materials from different species.
So, we collected and dried the bark. Now you can begin the process of creating decorations and decorations.
Most often, the material is used to decorate flower pots and vases: to do this, just wrap the vessel in a birch bark “clothing” or cover it with pieces of pine material, and it will begin to resemble a wooden log.
Pots decorated with bark.
The method of decorating photo and painting frames is also common. To do this, cut out a double frame from cardboard or thick paper, which is glued on three sides, leaving a gap on top for the photograph. Then the front side of the product is pasted over with pieces of bark, like a mosaic.
The gaps remaining between the pieces of material can be filled with forest moss. You can also grate the bark itself using a grater or using a large file, and fill the taped seams with the resulting powder.
Decorative photo frame.
A more complex, but also more effective way is to make flat figures. To do this, draw a silhouette of the future product, for example, a bear cub or other animal, on thick paper, then cut it out, place it on the prepared piece of bark on the back side (where there is no hard crust) and trace it.
Then, using a sharp knife, a wooden figurine is cut out in several passes along the contour. You should work very carefully, as the material is fragile and brittle. Next, you can think about how to make the texture of the tree bark more beautiful - whether to open it with varnish, tint it with stain, or leave it in its original form.
Animal figurines will decorate your interior.
Birch bark deserves special attention. If processed correctly, it will resemble paper, which means you can cut and glue almost any craft from it.
Thin bark is removed from the birch during the sap period, in small strips. Do not strip the tree too much, as even artificial tree bark may not save the plant from death.
The strips then dry naturally, after which they should be boiled for 20 to 30 minutes and dried again. The material is ready.
A great variety of products can be made from birch bark:
- magnets for refrigerators,
- roses,
- all kinds of flower butterflies,
- use as parts for making figurines,
- houses,
- boats or appliques.
You can paint on birch bark, use it as veneer to decorate country wooden furniture, and finally, make dishes, bags, bread bins, boxes, insoles, stands for dishes, etc. from it.
Crafts made from birch bark.
Important! In your work, you are limited only by your imagination and creativity. There are no rules or taboos here, so don’t be afraid to experiment and express yourself, especially since you got the material for free.
Logs and stumps
You need to decorate the interior using logs or stumps wisely and with a sense of proportion. The final compositions are distinguished by sufficient volume and should fit organically into the overall concept of the room.
Logs can make good benches for the dressing room, and stumps, with the right skill, can make good places to sit near the dining table.
Laying decorative mulch
The minimum thickness of the mulch layer should be 2 cm. However, experienced gardeners recommend making a layer of 5–7 cm, then it will last a long time. It is recommended to pour mulch onto the prepared base. It is recommended to first clear the area to be decorated of vegetation, stones and debris.
Wood chips will look beautiful if used as a filler for a prepared pan. Creative people first make mosaic recesses, and then fill them with wood filling, painted in different colors, creating entire pictures. In combination with flowering plants or fruit trees, such mosaics become unique masterpieces of landscape design.
Beginning amateur gardeners can make simple patterns of circles or stripes. They will still look cute.
What you need to build a gazebo from driftwood
First of all, curved tree trunks are needed; they do not have to be even and smooth. This idea requires only the irregular forms that nature has created. Interesting snags, roots and stumps, as in the photo, will do. In general, everything that can be easily found in the nearest forest. In addition, there are probably trees on your site that are dangerous and need to be removed. You can also use them for your construction.
You will also need boards (unedged ones are possible) and tools. To keep the tree in good condition, you can purchase some varnish and antiseptic. For processing you will need sandpaper and a spatula. It is a good idea to impregnate the wood with a fire-fighting substance in case a barbecue is installed in the gazebo.
Construction work
- To begin with, at least schematically, you need to think through the upcoming project. Draw how to correctly match ready-made structural elements. In the drawing you need to think about how the load will be distributed and what the foundation will be like. Consider even the little things. After this, you need to decide where to put this interesting structure.
- Decide on the foundation of the future building. So, you can install paving slabs on ordinary crushed stone.
- Since crooked tree trunks appear instead of load-bearing pillars, they need to be installed differently. It is advisable to mount tree trunks upside down for beauty. The gazebo can be made with four or five supports.
Anyone who knows how to carve wood can show their talent by creating fairy-tale characters and beautiful patterns. The bark must be removed from all wood. After a long period of drying, the trunks can be opened with stain and high-quality varnish.
How can you decorate the inside of a gazebo?
We suggest using our recommendations for arranging a gazebo from tree trunks inside:
- A large tree stump can be used as a table. Smaller stumps will replace your chairs. As an alternative, you can simply visit a specialized store and buy comfortable wooden furniture.
- We lay even boards on the floor.
- Which lamp to choose for the gazebo? It makes sense to show a little imagination here too. For example, hang a small piece of driftwood at the top and install an electrical appliance inside.
- A fireplace or barbecue will also not be superfluous.
- How to decorate the entrance in a stylish and unusual way? Use railings made of decorative forging.
- Flowerpots are hung on crooked trunks. Crafts made from wood and other natural materials will help to emphasize the curvature and original design. The ceiling is filled with paintings and other interesting designs. Animal figures are placed along the perimeter of the roof.
- We also suggest considering the option of carved shelves. In the future, you can put a variety of trinkets, fruits and bouquets of flowers on them.
- Additionally, the walls can be decorated with bushes that are well trimmed. Barberry, spirea and boxwood are best suited for these purposes. If desired, shrubs can be replaced with vines: clematis, virgin grapes.
Thus, even from such improvised materials as unnecessary tree trunks, snags and thick branches, you can build a real work of art. All you need is a little work and imagination - and you can invite friends to barbecue.
I would like to share an interesting video where the characters make a gazebo frame from tree trunks at their summer cottage:
A gazebo is a place to relax and meet friends. Here you can dream while looking at distant constellations, or enjoy the coolness of the evening. A gazebo will become a real decoration for a site if it is done tastefully. You can even build it with a minimum of investments. For lovers of original and unique things, an unusual and creative gazebo made of driftwood and tree trunks is perfect. All you need to create this beauty are blanks and a little artistic taste. Such a construction will take very little time and money.
Decorating with branches
The most ordinary branches that can be collected in a city park or in a country forest will turn into interesting compositions in creative hands. A fairly simple eco-style technique makes possible a great variety of types of accessories for wood decor.
Single branches or their compositional interweavings will appear as frames for family photographs, various panels and beautiful decorations.
Components given by nature, such as leaves, shells or pebbles, will easily complement the overall composition. A rich imagination will tell you how to combine them.